Looking around my 90yo aunt's home, I came across a neglected PD277 DD automatic player. No lid...yet.
I found the service manual (pdf).
I am considering "at least" getting it working.
I will post progress pics.


I found the service manual (pdf).
I am considering "at least" getting it working.
I will post progress pics.

I recapped a PD272 some years ago and have enjoyed it very much. I expect that your find is clean inside, so, if the auto start and return stuff is in good shape, a recap (easy) and test seems well worth the effort to me.
Skip
Skip
Last night I cleaned it down to a toothpick.
The brushed aluminum laminate top has some pitting/staining that would not go away with my recipe....
1) Windex
2) Bar Keeper's Friend (liquid toilet bowl cleaner version).
3) Rinse or wipe with filtered water.
Before work this morning, I installed all new electrolytics.
Tonight, I fixed the automatic cue. It was not working. I re-greased the gears and gave it a little nudge and, presto it is working !!
33rpm seems stable, but 45rpm is terribly unstable. I'll fiddle with that this weekend .....and the cartridge needs love or replacement.
BTW, is there a standard method (or trick) of working on turntables ? ....because it is difficult to work on the underside (flipped upside down), and also test the player in action ??
Erratic 45rpm was solved, dirty trimmer.
With the turntable right-side-up and the bottom removed for access, I've put spacer strips (scraps of wood) around the base, and let the unit hang off my workbench. I then use a mirror to see the exposed underside,, and adjust speed trimmers or watch the gears work.
With the turntable right-side-up and the bottom removed for access, I've put spacer strips (scraps of wood) around the base, and let the unit hang off my workbench. I then use a mirror to see the exposed underside,, and adjust speed trimmers or watch the gears work.
Last edited:
Due premise - I have built many tonearms, but I understand very little about turntables** - However I have a LUX 272 for a lifetime and this is how I modified it. From the outside there's nothing visible.
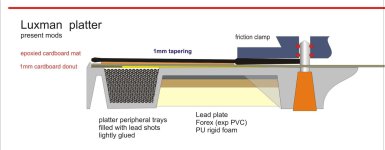
Electronics and motor for me are very reliable, what is wrong is the platter = rings like a bell; the plinth = non-existent, drum like; and the arm wand.
This is the modification to the platter (attachment)- do not exaggerate with the lead shots, the weight must remain well under 3kg otherwise the motor would suffer.
For the plinth - glue a lead sheet + thick foam to the upper one, but completely isolate the lower closing surface (MDF + glued felt):
throw away the feet and replace them with rigid supports (non metallic), This way you'll get a plinth + a separate subplinth.
Tone arm. just marginal improvements - reinforce the headshell (alu or brass plates), increase the CW in order to have a wider range of adjustments + lowering eff mass. Glue a 5 - 6 mm wide strip of alu tape to the underside of the steel wand - this cuts quite well the resonances on the sibilants.
just one step at time, always controlling what done by tapping + stheto and listening
have fun -- carlo
p.s. i did also something to stiffen the CW de-coupling - but don't remember how, from it's color seems red high temp silicone glue
** of tonearms too?
Attachments
Last edited:
I got this unit completely working, but still looking for it's clear lid. Based on the way it was stored, it is likely gone forever.
The Shure cartridge (M1000e) needed a new stylus. I looked at the tip with my jewlers lupe...and there was nothing there, like it had fallen out or broken off.
Installed new stylus (cheapo, amazon) and discovered the cart itself only played one channel. Measured the resistance, R channel 1.6k ohms, L channel 2gig ohms. Left channel gone.
Ordered a budget Ortofon cartridge under $100, new headshell wires...and I now have a working turntable.
Bad news, my Aunt and Cousin want it back.
I fixed it as a favor, and I know they will trash/neglect it once again.
New plastic cover can be bought for about $160, but I ain't paying for it, and neither will they.
Quite sad. The value of these objects, these technologies is only in the skill, the passion we dedicate to them. Without it, they are only old scrap again.
My congratulations for your clever work -
carlo
ps - not so difficult to put together a decent cover with some Plexy and the proper glue
My congratulations for your clever work -
carlo
ps - not so difficult to put together a decent cover with some Plexy and the proper glue
Re: the cover. @nocdplz comment is on the money. I've done several. Rather than fitting on the top of the plinth, I've made them a bit larger so they rest on the same supporting surfaces as the TT itself, and then notched the cable locations on the back side. Quick, easy, cheap, and easy to maintain. Go a little thicker than you might think with the plexi/acrylic and it will last forever and protect the whole TT, not just as a dustcover.
Skip
Skip
- Home
- Source & Line
- Analogue Source
- Luxman PD277 (barn find)