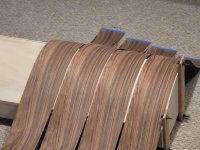
Next stage on my speaker build is to apply the veneer strips to the rounded sides. I picked up Rosewood veneer that is 1/42" (0.6mm) thick, non-backed. Beautiful wood.
Any recommendations for an adhesive to the birch ply sides? I have not worked with unbacked veneer before.
Thanks!
Any recommendations for an adhesive to the birch ply sides? I have not worked with unbacked veneer before.
Thanks!
Attachments
Evostik contact here. Rollered on. You get through quite a lot though so gets costly. The spray adhesive mentioned if contact would be my next try
Years ago, I glued large pieces of veneer (oak) on flat surfaces to finish a cabinet with a neoprene adhesive (contact glue). More than 30 years after, the cabinet clean. More recently with a rounded edge, I had a self-adhesive veneer (need to heat it with an iron). I prefer the neoprene solution. No experience in case of small pieces that should need some position adjustment.
I have used Spray 77 on other applications (like table tennis paddles). I will check out 90.Spray 90
Evostik contact
Both look interesting as well. How long are set times? Trying to figure out how to place equal pressure on the veneer to hold it in place along the bend.neoprene adhesive (contact glue)
Neoprene is very fast.You apply it on both parts, wait it is no more sticky and then put in place. When I did it for large rectangular pieces, the cabinet side was horizontal, facing up. I had 2 pieces of wood like ruler (maybe 5mmx5mm section by 30cm long) to keep the 2 parts to glue separated. The veneer was placed on the "rulers", adjusted to have the about the same margin to cut on the 4 sides (the veneer was larger than the cabinet face by 5mm on each side). Then I pressed on the center to glue them together progressing to the sides. I had a cloth to apply the pressure on the veneer without marking it. When you are close to the "rulers, just remove them to finish. This glue is strong and fast. No way to adjust when the process is engaged. At this time, I did that with my father. We ran some tests before using it.How long are set times? Trying to figure out how to place equal pressure on the veneer to hold it in place along the bend.
If I understand from your picture, you want to glue strips of veneer side to side. In such a case, my fear is to have a room between 2 strips or that one strip goes over the previous one... It needs a precise cut of each strip... Not being extremely skilled in cutting, I prefer the situation where the veneer is larger than the surface to cover.
Anyway, in such a case, I would go for a "slow" glue (one that allows you to remove the piece) and a slow process. I am thinking loud... Starting from the center (the highest point on the picture) going to the side, using the contact on the edge of the previous strip. Why not use a "counter shape", some wood block at the width of each strip to apply a pressure the necessary time. The glue shouldn't escape to the previous strip at the contact edge as a wood glue in excess could do... Even if you remove it, it will make some spots under the finishing. So maybe some tape to protect the previous strip in case of.
Not an easy question or job...
Some years ago (10?) I made line arrays, about 10cm width by 1.9m if I remember, I had only one piece of veneer to cover on side.
Yes, still figuring out the process myself.understand from your picture, you want to glue strips of veneer side to side. In such a case, my fear is to have a room between 2 strips or that one strip goes over the previous one... It needs a precise cut of each strip...
I have a paper cutter, so will cut the strips with that to precisely the width I want (4"), then leave an overhang on the back to trim off flush.
I think i will leave a 1/8" gap between strips, and then fill that in with something, maybe Bondo wood filler. I would used LOTS of painters tape to top the veneer and protect it as I fill in and sand down those gaps to be flush.
Still a lot of thinking and planning before I touch the adhesive.
TONS of info here. Bottom of the page features this resource.
Suffice it to say, proceed with caution when using an unbacked veneer and attempting butt joints. Shrinkage and gaps will appear if all the rules aren't followed—particularly related to ambient humidity and what type of glue and the moisture state of both the veneer and the substrate. NOT beginner friendly. I'd recommend sourcing a paper backed veneer—much more forgiving—and easier to work with and a wider range of glues are suitable. For unbacked veneers that are being applied new (as opposed to a repair)—I would NEVER use a PVA (ie titebond)—Better Bond X-Press is what you want for a long lasting speaker application....
Suffice it to say, proceed with caution when using an unbacked veneer and attempting butt joints. Shrinkage and gaps will appear if all the rules aren't followed—particularly related to ambient humidity and what type of glue and the moisture state of both the veneer and the substrate. NOT beginner friendly. I'd recommend sourcing a paper backed veneer—much more forgiving—and easier to work with and a wider range of glues are suitable. For unbacked veneers that are being applied new (as opposed to a repair)—I would NEVER use a PVA (ie titebond)—Better Bond X-Press is what you want for a long lasting speaker application....

Lime glue (bone glue) is the real stuff. I used PVA but it shrinks and caused cracks.
Bone glue got several advantages but longlasting isn't one of them. It can grow mold ie.
If you want to avoid shrinking, apply the PVA glue to the veneer and then, after it dried, glue it on by heating it up again with an iron.
Thanks. Definitely took note of the this one: "Pre-Catalized Powdered Resin (PPR) Glues are suitable for cold and hot pressing. The choice between a PPR adhesive and standard cold press glues should be based on the type of use the veneered project will be subjected to. PPR glues such as Ultra-CAT™ are more heat/water resistant. This type of glue is also ideal for bent laminations, crotch grain veneer, and thick veneer."TONS of info here. Bottom of the page features this resource.
I think I will try an alternative approach with this unbacked veneer, since I will be applying in strips anyway:
1) seal the plywood with polycrylic or polyurethane.
2) cut the veneer into my desired size strips, and stain to finish.
3) apply water-based poly to the backside and front side
4) use a fast-sticking adhesive like the neoprene or Spray 90 applied to both the curved plywood and the backside of the sealed veneer
5) apply the veneer strips front to back, which a slight gap (1/8in) between strips.
6) fill the gaps with Bondo wood filler, and sand flat.
7) finish the whole thing with a thin coat of epoxy
The usual method when working with multiple pieces of veneer is to join them together using veneer tape. Veneer tape is a thin paper tape with adhesive on one side which needs wetting (think postage stamp). The strips can be held in place with veneer pins while taping them. When all seams are taped, you apply the entire sheet with the tape side out as it's sanded off when everything is dry and stable (it's very thin and sands easily). The veneer edges need to be straight and I suppose there are a number of ways to do it. I've used a jig which clamps two pieces of veneer together with a slight overhang beyond the jig. The jig is used on a router table with a bearing bit which will trim the two veneer pieces flush and straight.
Try on a scrap piece first, before the actual job, to get experience with the adhesives and other materials involved.
A light surface preparation with rough abrasive (80-320 grit) paper, with blow off later, might remove any residues that hamper adhesion.
Contact cement can be thinned, and solvent removed, but the job will be permanently stained.
A light surface preparation with rough abrasive (80-320 grit) paper, with blow off later, might remove any residues that hamper adhesion.
Contact cement can be thinned, and solvent removed, but the job will be permanently stained.
Many interesting advice in all those posts!I think I will try an alternative approach with this unbacked veneer, since I will be applying in strips anyway:
1) seal the plywood with polycrylic or polyurethane.
2) cut the veneer into my desired size strips, and stain to finish.
3) apply water-based poly to the backside and front side
4) use a fast-sticking adhesive like the neoprene or Spray 90 applied to both the curved plywood and the backside of the sealed veneer
5) apply the veneer strips front to back, which a slight gap (1/8in) between strips.
6) fill the gaps with Bondo wood filler, and sand flat.
7) finish the whole thing with a thin coat of epoxy
I didn't know about the paper backed veneer. The only 2 one I know quite easily available here are unbacked or already with glue (similar to the process above with PVA and iron).
My experience triying to fill some gaps is not really good... Maybe it will be easier with the wood filler you target (it is difficult to know what are the equivalent product between countries!).
There is also the suggestion to glue together the pieces before assembly on the cabinet. I didn't know it for veneer but I already crossed that (there are video on youtube) from guitar makers. They glue together pieces of wood to make for example the top. The process is the same. The edge of the 2 pieces are made straight with a small hand planner (their parts are thicker than veneer). To do that, the 2 pieces are back to back like if you fold them with an hinge at their edge (I hope I am clear...).
PS : have a look to the link from @pfarrell : many explanations on how to join pieces of veneer (better than mine!) and tools.
Last edited:
Interesting. I like that idea. And may try with blue painters tape.usual method when working with multiple pieces of veneer is to join them together using veneer tape.
so the look will be wood veneer, bondo, wood veneer, bondo, etc. ?I think i will leave a 1/8" gap between strips, and then fill that in with something, maybe Bondo wood filler.
This is the way to go. The only question is which glue?The usual method when working with multiple pieces of veneer is to join them together using veneer tape.
I have only used paper-backed veneer with water-based contact adhesive for dozens of projects. Very easy to work with and provides professional results.
Not sure what glue to use for un-backed veneer.
- Home
- Design & Build
- Construction Tips
- Veneer adhesive?