I am building a speaker with curved sides using a couple layers of bendable 3/8" birch ply (wiggleboard).
Question #1: What glue is best under tension to attach the bent sides to the skeleton frame? There will be front, back, and 5 pieces horizontal crosspieces, all 3/4" ply. I was planning to use titebond 3 along each skeleton edge to attach to the bent ply, and some screws down each end to hold in place while it dried.
Q#2: for the second layer, i intend to coat the entire first bent panel with glue, and then wrap the second panel. Is the same titebond 3 a good choice for this as well?
We typically used Capenter’s yellow glue.
Our first build using your proposed technique were burned, the ply did not bend well around the frames and the surface had lots of lumps. (i might have a picture, can’t get at that archive at the moment).
In out second try, Chris preformed the outer panels in a vacuum bag. The mold took longer to build than the loudspeaker (almost).
dave

Ugh. I have have been afraid of that. Well, I guess I have some work to do on my bending plan.Our first build using your proposed technique were burned, the ply did not bend well around the frames and the surface had lots of lumps
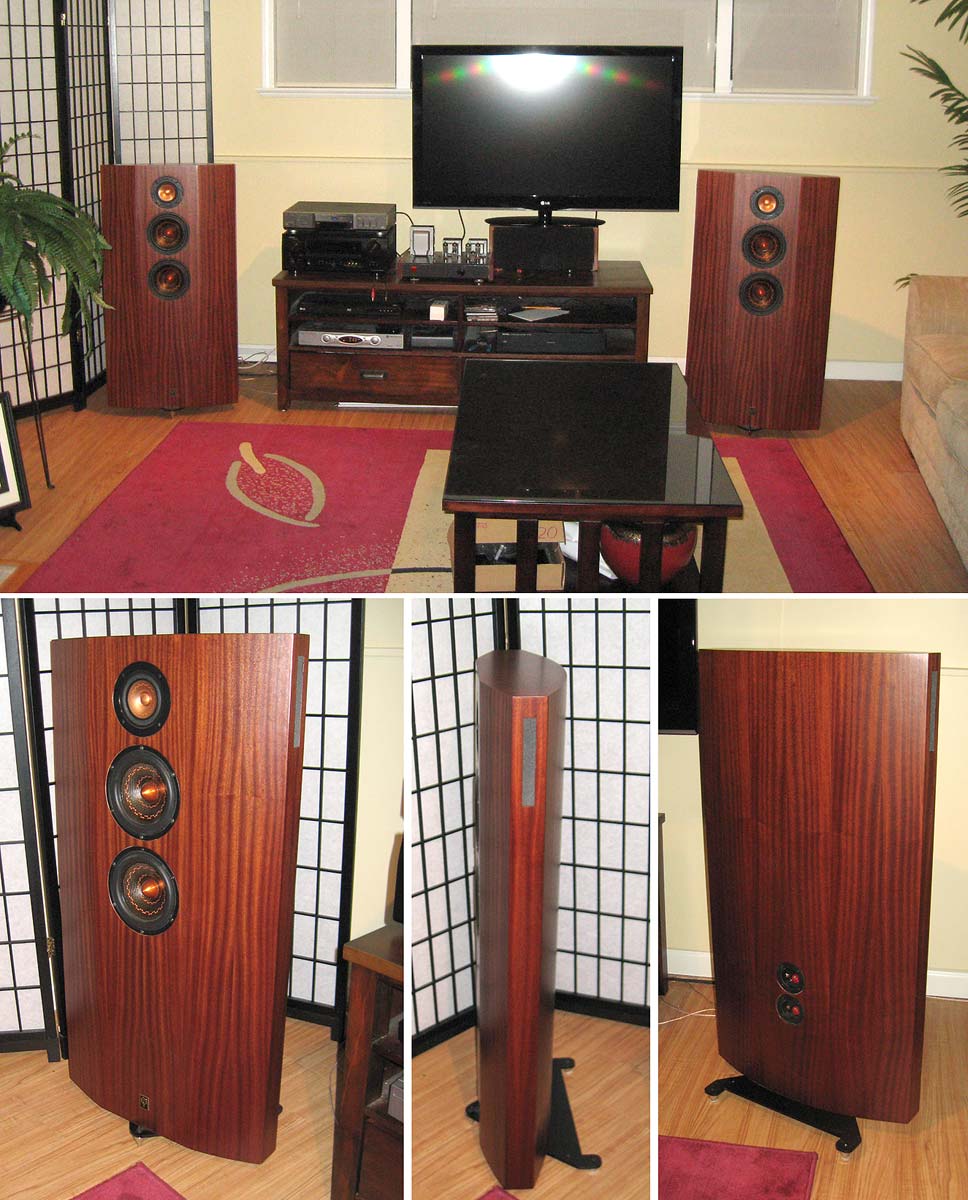
Those are some beautiful speakers. And a shame that awesome frame is hidden.
I would suggest laying up 3 courses of 1/4' ply over a curved form. It will be super strong, easier, produce a more fair curve and will maintain the curvature with very little spring back. Also, no screws would be necessary. Titebond 2 is perfectly fine for a layup like this. Glueing and vacuuming all three layers at once over a carefully faired form would be my approach.
Vacuum pumps adequate for the task can be had for $100 bucks or less. Vacuum bags are often found in woodworking outlets but composite sypply outlets have all the toys. Hardware store plastic sheeting works too.
Vacuum pumps adequate for the task can be had for $100 bucks or less. Vacuum bags are often found in woodworking outlets but composite sypply outlets have all the toys. Hardware store plastic sheeting works too.
I will look into the vacuum pumps. Thank you.would suggest laying up 3 courses of 1/4' ply over a curved form
I am going to try some 2x4s clamped to each side of the wiggle ply at each end, right up next to the front and back baffles. I will need to cut the wiggle ply longer than necessary, but I am hoping it will help to stablize the buckling during initial gluing. Then trim it up later once all done.
Also planning to do each panel in multiple slower steps, glue one edge first, then once dry and strong overnight, start the bend to the other edge. We shall see. If it works, awesome. If not, I tear it off, start over, and build a panel form and vacuum setup.
@jayme Yes to making an oversized blank and trimming to size. Glueing up a continuous curve should be done in one shot. It would be impossible to achieve a strong, uniform glue line trying to bend a curve in bit by bit. Try a small test panel if you have any doubts.
For clarity, I was suggesting laminating the curves with a traditional plywood with biased plies, not the bendy stuff with unidirectional plies. I was also assuming a relatively shallow bend along the lines of the beautiful speaker Dave posted. This produces a curved plywood panel in essence, with each layer of plywood becoming a ply in the larger construction. This is distinctly different in terms of strength than a bent piece of plywood. I've had very little experience with wiggly/bendy plywood so others may provide more valuable input but it stands to reason that it would be even easier lay up into a fair curve than other products due to the grain orientation. I've made laminations by kerf cutting plywood for curved cabinetry, various projects using solid wood strips thicknessed to 1/8" or less and others with meranti marine plywood with good results. A 1" wide x 3mm marine ply x 5 layer test piece, bent to over 180 deg with ~4" radius lived outside my shop for 2 years (PNW) without any obvious degradation. This was glued with Titebond II and was incredibly strong btw...
The effectiveness of vacuum clamping becomes apparent pretty quickly when you do the math. A reasonably good seal should yield 12-14lb per square inch. even a ****-poor effort at 5psi equates to over 700lbs sqft.
How large are the sides/panels and what's the intended bend radius? That information will dictate the best product and method to use.
Maybe just use actual stitch and glue for the bendy bits for boat building as described in the resources on the West Systems site. Its easier and more durable than furniture making methods
Using screws to anchor down a bent bit of ply can create deformations. Try ratchet straps for side panels and epoxy thickened with wood flour for 'welding' the seams. Works even if edge to edge
Using screws to anchor down a bent bit of ply can create deformations. Try ratchet straps for side panels and epoxy thickened with wood flour for 'welding' the seams. Works even if edge to edge
Randy,
I'm familiar with stitch and glue to form chines due to near impossibility of achieving compound curves in plywood but not as a method to produce a panel.
I stopped short of suggesting cold molding but it's another useful technique.
It's probably tough to find better info on making and fairing curves than that from boat building sources
All good advice, thanks. I have rachet straps, great idea on that. Altho that might get a bit tricky to combined with the clamp method I was thinking.
I am going for a look similar to yhe Sonus Faber Sonnettos. The side panels are 13" deep x 40" high, pre-bend. Total bend is about 30deg. I have a 10deg bevel on the front baffel, and a 20deg on the smaller rear baffel. Width goes from 8" for the front baffel, 9.5" at the max in the middle, 4" for the rear. Not too aggressive of a bend, and seems to be doable when I bend the ply against one of the skeleton braces.
I will post a picture when I get home from work.
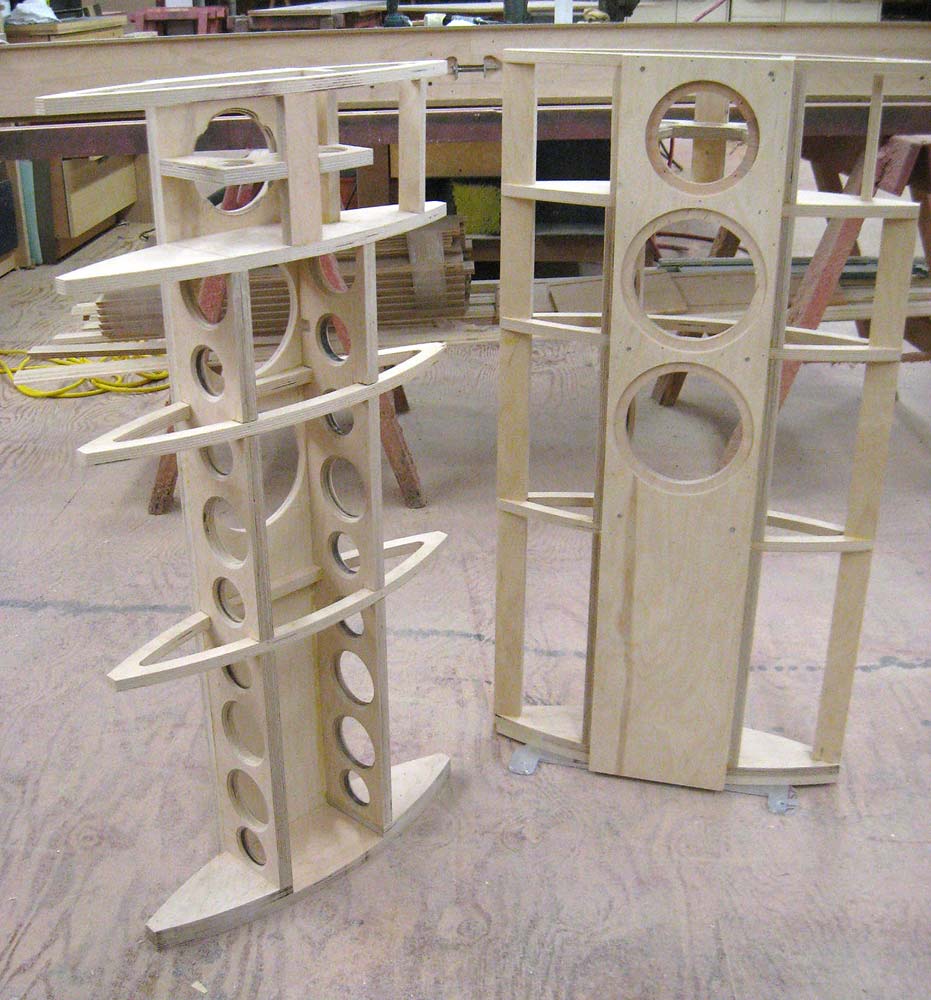
Picture of the first cabinet skeleton. Definitely more work than a standard rectangular box.

I cut the bendable ply side panels down to 24 inches, so have 8 of them. The plan now is to clamp each panel end between two 2x4s to keep the ends from buckling, and then use the rachet straps to press the panels down over the skeleton. I will go the epoxy + wood flour route to attach the inner panel layer to the skeleton, and then just normal wood glue for the outer layer.
Fingers crossed that 2 layers of this stuff, glued together to be 3/4” thick total, should be pretty stiff, especially with the bend.
If your frames are just screwed in place and not glued, you could attach them to 2x4s, use that as a bending jig and epoxy the two plywood layers together. Having preformed side panels removes tension from the equation when fitting them to the frame
Better still, make another set of curves, ~ 1/4" smaller, skin that with masonite and bend/epoxy the panels over that.
Side question: any benefit to using something like Benite conditioner on the side panels before I fit them? It supposedly "hardens” wood by penetrating the cell structure.
Yes, for fair curve stuff in developable panel. And cold moulding for compounds, although below is an example where I backfilled with wood flour and epoxy goop and ground the ply away for compounds. The goop is structural and also forms a core in the compounds. See the thick fillets in the other seams. The whole thing got sanded and then sandwiched in glass. Its very inert, motor vibrations do not transmit much to the steering holdRandy,
I'm familiar with stitch and glue to form chines due to near impossibility of achieving compound curves in plywood but not as a method to produce a panel.
I stopped short of suggesting cold molding but it's another useful technique.
It's probably tough to find better info on making and fairing curves than that from boat building sources
I have been wanting to make a speaker like this using a small FR in the horn and using S&G and hardwood 4mm brace ply. Design and construction are the easy part. Modelling the horn acoustics is a bit more difficult for me. One day when I have a legit horn to work with, I'll do something like this pic
They are glued. Screws are used for clamping.frames are just screwed in place and not glued
Clamps on 2x4s on each end. Skeleton sitting on it. Not bad. Not perfectly tight to the curve, but close.

I am going to take everyones advice and build a mold to sit under the bending ply. Should be easy to cut the curve into several 2x4 crossbars.
I plan to use titebond on the front and back edges, which should be nice and tight and strong. And the epoxy + wood flour for the splines. Hopefully that helps maintain a strong bond even if there are tiny gaps.
This will all be next weekends project tho.
Well, surviving the heat. Made significant progress. Made a form to help.

And used rachet straps to bend the ply.

Not bad. Sloppy glue job, but all will be hidden anyway so not concerned.


The gaps will be filled with epoxy resin.
And used rachet straps to bend the ply.
Not bad. Sloppy glue job, but all will be hidden anyway so not concerned.
The gaps will be filled with epoxy resin.
The moisture cure urethane like Gorilla glue works well for laminating I found.
We used to cut and finish router the profiles for large negative/positive forms, then would screw together/clamp the thin glued layers for full sized airplane mock ups. Always oversized, then trim to desired size after curing.
We used to cut and finish router the profiles for large negative/positive forms, then would screw together/clamp the thin glued layers for full sized airplane mock ups. Always oversized, then trim to desired size after curing.
Interesting thought. I would also think that the expansion would fill any gaps as well. I may consider that for speaker #2.moisture cure urethane like Gorilla glue works well for laminating
I used titebond 3 for the laminating the first one because it was thinner and had a longer working time than red titebond so that I had time to get the second panel laid on and clamped down properly. But I had to use a LOT of glue. I will likely go through a gallon on this project...
- Home
- Design & Build
- Construction Tips
- Speaker construction: Best adhesive under tension?