I hinted at this build previously in another thread, and it seemed to entice some builders as to what I might be doing. The premise of the theme this year was to attempt a multichamber woofer alignment. I had some drivers, and an initial idea started that snowballed into this exercise.
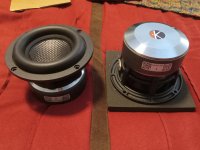
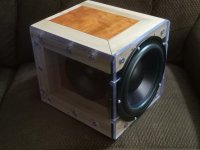
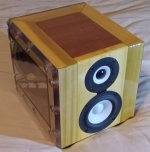
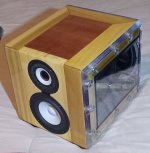
I started with a 3 ltr cherry veneered cabinet that I picked up last summer at one of Meniscus' last sale days. Rear is 3/4", the rest is 1/2" material. I also procured a pair of Kartesian SUB120-8 woofers that same outing for these boxes. The idea was to use a pair of DSA135 PRs to either side, and a yet unnamed tweeter as their companions. I'm pretty sure I hinted at this build in the Wavecor new Cone tweeter (TW045WA01) thread, as that is what I chose to be of equal driver quality. I just could not find another treble driver I wanted to use here.
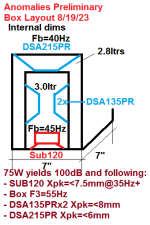
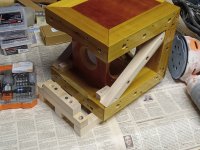
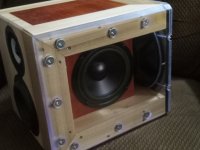
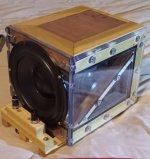
Then the theme came to be, and I used a bunch of 2x2 poplar from Home Depot and the miter saw to extrapolate the exterior secondary chamber. The further goal to have the DSA215 PR on the rear of the cabinet to tune the rear chamber. Yes, I am using a Double-Bass-Reflex with PRs as I've not seen it done anywhere else. The rear chamber was about 2.8 ltrs all done. Being the 2x2 poplar braces the exterior of the inner box volume, there is no internal bracing. This is something else I have wanted to do for a while. To top it off, the sides and rear would be clad in 3/8" Lexan panels to finish the enclosure and show off the internal construction. The staggered tunings of a DCR, or as in this case DBR (like Fostex), are meant to spread out the tunings in the bass and keep the active driver happier and reduce its xmax load. I feel this application was successful.
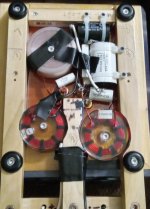
Using; almost an entire roll of 1/8" Neoprene adhesive sealing tape, a bunch of poured epoxy to fill in the gaps between the inner and outer cabinets and the mitered poplar joints, a bunch of flush-head 1/4-20 stainless steel bolts and trim-screws, double-thick poplar for the front baffles, and some magic eraser melamine foam and wool/denim fill materials ensued to come to project fruition.
The Lexan sides were flexing with internal pressures, so I had to add some cross-members to mount their centers and keep them taut and stiff. The rear PR had the mounting holes in the Lexan drilled and tapped, and the Lexan panels were drilled and tapped to accept machine bolts to adjoin the rear vertical edges.
Due to the construction and the Wavecor/Kartesian drivers, the name Anomalies stuck.
Then I took to Jurgen Micka's on-line multichamber bass response modeler: https://www.micka.de/en/advanced.php
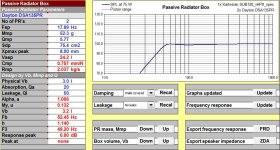
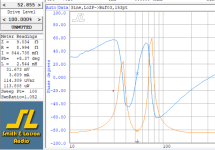
This allowed to find the proper tunings to make this perform as required without boomy or one-noted bass response. It takes a bit of learning to use it, but things have to be entered 'just so', or it will show skewed results. It showed tunings of the relative chambers to be 55Hz for the inner, and 70hz for the outer. Mind you, the series tunings will show as different when measured, and came to be 84 and 38Hz respectively.
Additional notes here- the DSA135 PRs have consistently measured heavier than spec and tune lower than intended. I ended up adding 10grams to each DSA135 and 74grams to the DSA215. The model in Micka in combination with the PR section of Unibox to help find the masses required came out to 35grams and 70grams. I used the half constructed cabs without the rear chamber walls to measure the tuning to 53Hz for the 10gram masses on the DSA135, which is very close to the targeted 55Hz.
Then problems arose when I started trying to utilize the Kartesian SUB120-8 woofers. I feel the manufacturer could improve these, but did not reply to my query. I feel for $100 each that these should be more error free than I experienced herein.
Problem #1; Another poster pointed me to another user who had had issues with them being noisy. There is no air-pressure reduction path for the woofer when in rearward travel. There is no pole-vent, no vent in the bass-cone, and no core periphery or phase plug to allow this. The other user showed me how he used an exacto knife to cut 2 holes in the cone behind the dustcap to relieve the pressure issues, of which I also obliged. I cut one set of holes, and the noise was improved but still present. I then removed more material, and I ended up with 2x holes, one to either side of the voice coil, of about the diameter of a US dime. I was satisfied with the outcome, and placed them back in their boxes while I worked on the cabinets.
Problem #2; I had the cabinets done enough to try and measure and target the tunings, so I pulled them out of their boxes to attempt the process. I ran them free air with some test tones to confirm reliable operation. The first one was fine, but the second one created an awful racket!! It literally sounded like aluminum oil-canning, but I could not find anything wrong with the cones or the excursion itself. While moving the cones by hand, I rotated the driver to look at all of the operation from all angles for forward and rearward motion. The rearward motion had one spot of the spider popping rearward once past a certain xmax, and would return to flat upon position zero. I got out the Aleene's Tacky Glue and a cotton swab. Then I added the glue to the spider around the area of protest on both surfaces of the spider and let it dry. It did not reoccur upon testing after the repair.
I also had to apply E6000 to the terminals on the Kartesian and Wavecor drivers because I can't stand loose terminals.
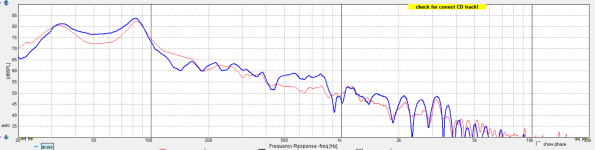
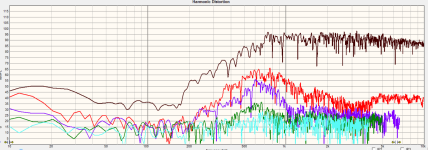
FR/HD measurements of the Kartesian were decent, albeit lower sensitivity than I was hoping for. Since I targeted these for the theme, I ran with them, but I also purchased a set of SB Acoustics SB12CACS25-04 as a backup plan if not totally satisfied or if the Kartesians decided to just up and die for another unforeseen reason. At this point I was pretty disappointed and almost washed my hands of them for this project. The xover utilized here was of a series topology, as the name Anomalies pretty much required I do something out of the normal. I also recut the extra 1.5mm radius earlier on the baffles while in the last construction stages so I could just drop the SB12 in after the event was over. At the event and at home, I felt the sensitivity was just too low for my typical use being at ~75dB net for the Kartesian SUB120-8 (Version 1). The FR/HD for the SB12 were also decent, and better than that of the previous woofer by way of more reduced distortion. The swap post-event yielded a much improved sensitivity of about 80dB for the SB12CACS25-04 (Version 2). The bass also sounded more palpable and it blended well with the TW045 much better in both looks and sound. I only had to remove 2 resistors to make the SB12CAC happy and sound right with the proper bass weight.
Edit: xover point is about 1.8kHz, apparently I forgot that bit of info.
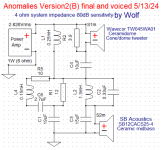
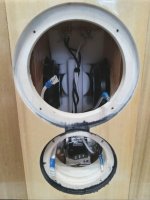
Being the volume of this box was so packed full of the intended items, I had to get clever for the xover placement. The tweeter highpass capacitor and a few resistors are placed with strong plastic velcro directly behind the tweeter on the inside top panel, and the rest was placed underneath the cabinet between the feet rails that also supported the input terminals out back. I had just enough thickness and real estate area to make it all fit. I even potted the coils for the tweeter that I personally wound by hand. It was the first time I'd done this, but it was just something that made them easier to mount. I used stainless screws for the coil center mountings, as it did not affect the inductance values.
Conclusion? I like the way these sound, quite a bit in fact. The tweeter has an open and clean quality, and the midbass is really tuneful and sounds great.
Was it worth the effort? For the looks, absolutely! The cherry inside the poplar for the contrast, the wrapping of the Poplar around the cabinet under the transparent sides lets you see everything you want to know or experience. For the work required? Man- these took a LOT of work, a LOT of materials, and a LOT of sound optimization; to get them to sound right. Would I do it again? Likely not. To say I've done a DBR with PRs that nobody else has attempted? That is the priceless quality to my efforts.
EDIT: I just could not leave well enough alone apparently. Something didn't sound like I wanted it after the initial excitement subsided. Normally I don't take this long to get it right. All I did was tweak a couple resistor values because they seemed a hair chesty and almost dull. I don't know that many would have noticed the change to be honest, but it makes them seem more sensitive and a bit more open sounding. I have replaced the graphics pertaining to the previous version.
I hope you read through this and found you learned something from it. I know I did. As to below, this post shows from Version 2, the next post will be Version 1, just to keep them separated. Post 3 will have cabinet images...
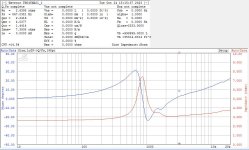
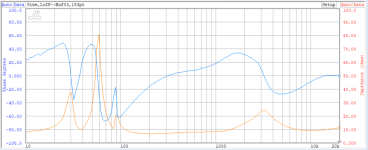
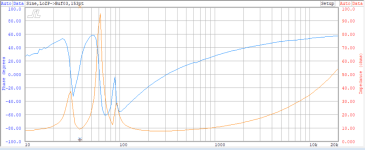
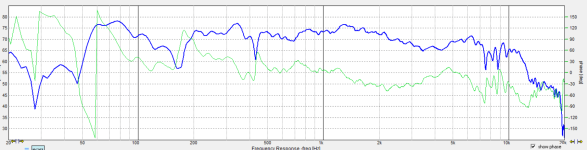
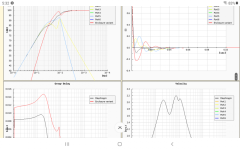
1- is an inaccurate summation of the rear-PR nearfield and the V2 system gated response. Bass output should be lower than pictured.
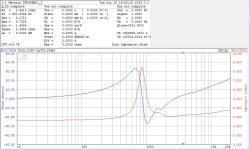
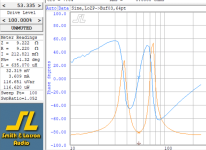
2 and 3 are of the nearfield PR response of V2.
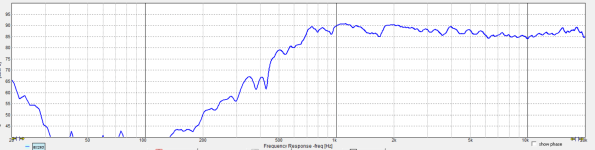
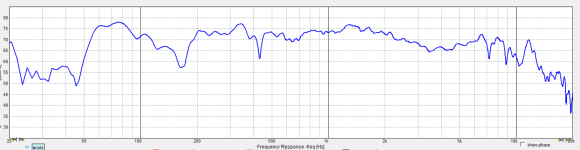
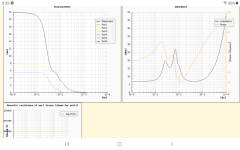
4- gatedFR of Version 2
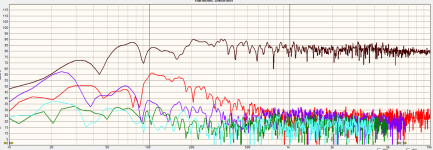
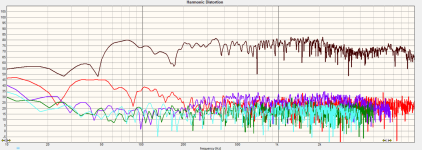
5- HD of V2.
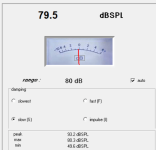
6- relative sensitivity of V2
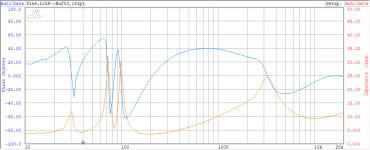
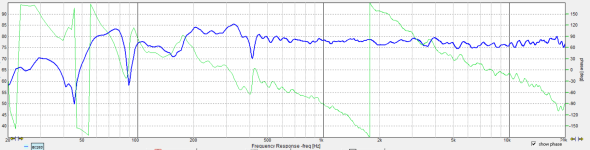
7- V2 Impedance
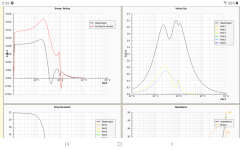
8- xover of V2
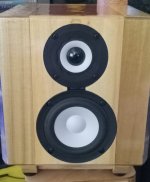
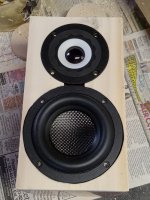
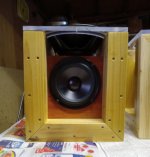
9-front baffle of V2
I started with a 3 ltr cherry veneered cabinet that I picked up last summer at one of Meniscus' last sale days. Rear is 3/4", the rest is 1/2" material. I also procured a pair of Kartesian SUB120-8 woofers that same outing for these boxes. The idea was to use a pair of DSA135 PRs to either side, and a yet unnamed tweeter as their companions. I'm pretty sure I hinted at this build in the Wavecor new Cone tweeter (TW045WA01) thread, as that is what I chose to be of equal driver quality. I just could not find another treble driver I wanted to use here.
Then the theme came to be, and I used a bunch of 2x2 poplar from Home Depot and the miter saw to extrapolate the exterior secondary chamber. The further goal to have the DSA215 PR on the rear of the cabinet to tune the rear chamber. Yes, I am using a Double-Bass-Reflex with PRs as I've not seen it done anywhere else. The rear chamber was about 2.8 ltrs all done. Being the 2x2 poplar braces the exterior of the inner box volume, there is no internal bracing. This is something else I have wanted to do for a while. To top it off, the sides and rear would be clad in 3/8" Lexan panels to finish the enclosure and show off the internal construction. The staggered tunings of a DCR, or as in this case DBR (like Fostex), are meant to spread out the tunings in the bass and keep the active driver happier and reduce its xmax load. I feel this application was successful.
Using; almost an entire roll of 1/8" Neoprene adhesive sealing tape, a bunch of poured epoxy to fill in the gaps between the inner and outer cabinets and the mitered poplar joints, a bunch of flush-head 1/4-20 stainless steel bolts and trim-screws, double-thick poplar for the front baffles, and some magic eraser melamine foam and wool/denim fill materials ensued to come to project fruition.
The Lexan sides were flexing with internal pressures, so I had to add some cross-members to mount their centers and keep them taut and stiff. The rear PR had the mounting holes in the Lexan drilled and tapped, and the Lexan panels were drilled and tapped to accept machine bolts to adjoin the rear vertical edges.
Due to the construction and the Wavecor/Kartesian drivers, the name Anomalies stuck.
Then I took to Jurgen Micka's on-line multichamber bass response modeler: https://www.micka.de/en/advanced.php
This allowed to find the proper tunings to make this perform as required without boomy or one-noted bass response. It takes a bit of learning to use it, but things have to be entered 'just so', or it will show skewed results. It showed tunings of the relative chambers to be 55Hz for the inner, and 70hz for the outer. Mind you, the series tunings will show as different when measured, and came to be 84 and 38Hz respectively.
Additional notes here- the DSA135 PRs have consistently measured heavier than spec and tune lower than intended. I ended up adding 10grams to each DSA135 and 74grams to the DSA215. The model in Micka in combination with the PR section of Unibox to help find the masses required came out to 35grams and 70grams. I used the half constructed cabs without the rear chamber walls to measure the tuning to 53Hz for the 10gram masses on the DSA135, which is very close to the targeted 55Hz.
Then problems arose when I started trying to utilize the Kartesian SUB120-8 woofers. I feel the manufacturer could improve these, but did not reply to my query. I feel for $100 each that these should be more error free than I experienced herein.
Problem #1; Another poster pointed me to another user who had had issues with them being noisy. There is no air-pressure reduction path for the woofer when in rearward travel. There is no pole-vent, no vent in the bass-cone, and no core periphery or phase plug to allow this. The other user showed me how he used an exacto knife to cut 2 holes in the cone behind the dustcap to relieve the pressure issues, of which I also obliged. I cut one set of holes, and the noise was improved but still present. I then removed more material, and I ended up with 2x holes, one to either side of the voice coil, of about the diameter of a US dime. I was satisfied with the outcome, and placed them back in their boxes while I worked on the cabinets.
Problem #2; I had the cabinets done enough to try and measure and target the tunings, so I pulled them out of their boxes to attempt the process. I ran them free air with some test tones to confirm reliable operation. The first one was fine, but the second one created an awful racket!! It literally sounded like aluminum oil-canning, but I could not find anything wrong with the cones or the excursion itself. While moving the cones by hand, I rotated the driver to look at all of the operation from all angles for forward and rearward motion. The rearward motion had one spot of the spider popping rearward once past a certain xmax, and would return to flat upon position zero. I got out the Aleene's Tacky Glue and a cotton swab. Then I added the glue to the spider around the area of protest on both surfaces of the spider and let it dry. It did not reoccur upon testing after the repair.
I also had to apply E6000 to the terminals on the Kartesian and Wavecor drivers because I can't stand loose terminals.
FR/HD measurements of the Kartesian were decent, albeit lower sensitivity than I was hoping for. Since I targeted these for the theme, I ran with them, but I also purchased a set of SB Acoustics SB12CACS25-04 as a backup plan if not totally satisfied or if the Kartesians decided to just up and die for another unforeseen reason. At this point I was pretty disappointed and almost washed my hands of them for this project. The xover utilized here was of a series topology, as the name Anomalies pretty much required I do something out of the normal. I also recut the extra 1.5mm radius earlier on the baffles while in the last construction stages so I could just drop the SB12 in after the event was over. At the event and at home, I felt the sensitivity was just too low for my typical use being at ~75dB net for the Kartesian SUB120-8 (Version 1). The FR/HD for the SB12 were also decent, and better than that of the previous woofer by way of more reduced distortion. The swap post-event yielded a much improved sensitivity of about 80dB for the SB12CACS25-04 (Version 2). The bass also sounded more palpable and it blended well with the TW045 much better in both looks and sound. I only had to remove 2 resistors to make the SB12CAC happy and sound right with the proper bass weight.
Edit: xover point is about 1.8kHz, apparently I forgot that bit of info.
Being the volume of this box was so packed full of the intended items, I had to get clever for the xover placement. The tweeter highpass capacitor and a few resistors are placed with strong plastic velcro directly behind the tweeter on the inside top panel, and the rest was placed underneath the cabinet between the feet rails that also supported the input terminals out back. I had just enough thickness and real estate area to make it all fit. I even potted the coils for the tweeter that I personally wound by hand. It was the first time I'd done this, but it was just something that made them easier to mount. I used stainless screws for the coil center mountings, as it did not affect the inductance values.
Conclusion? I like the way these sound, quite a bit in fact. The tweeter has an open and clean quality, and the midbass is really tuneful and sounds great.
Was it worth the effort? For the looks, absolutely! The cherry inside the poplar for the contrast, the wrapping of the Poplar around the cabinet under the transparent sides lets you see everything you want to know or experience. For the work required? Man- these took a LOT of work, a LOT of materials, and a LOT of sound optimization; to get them to sound right. Would I do it again? Likely not. To say I've done a DBR with PRs that nobody else has attempted? That is the priceless quality to my efforts.
EDIT: I just could not leave well enough alone apparently. Something didn't sound like I wanted it after the initial excitement subsided. Normally I don't take this long to get it right. All I did was tweak a couple resistor values because they seemed a hair chesty and almost dull. I don't know that many would have noticed the change to be honest, but it makes them seem more sensitive and a bit more open sounding. I have replaced the graphics pertaining to the previous version.
I hope you read through this and found you learned something from it. I know I did. As to below, this post shows from Version 2, the next post will be Version 1, just to keep them separated. Post 3 will have cabinet images...
1- is an inaccurate summation of the rear-PR nearfield and the V2 system gated response. Bass output should be lower than pictured.
2 and 3 are of the nearfield PR response of V2.
4- gatedFR of Version 2
5- HD of V2.
6- relative sensitivity of V2
7- V2 Impedance
8- xover of V2
9-front baffle of V2
Attachments
-
 AnomaliesV2_SystemFR_Blend.png15.1 KB · Views: 207
 -
 k8b66ur350u4.jpg152.2 KB · Views: 200
 -
 AnomaliesV2-Z_CabA.png31.2 KB · Views: 177
 -
 Anomalies2pt83VSensitivity.png19.2 KB · Views: 139
 -
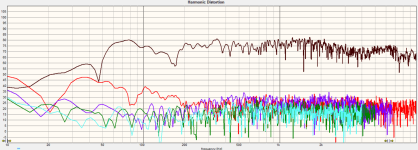
 2pt4shortedHD_-17dB.png83.2 KB · Views: 141
 -
 PR-RTA.png9.9 KB · Views: 125
 -
 Nearfield PR FR.png42 KB · Views: 129
 -
 AnomaliesResistorAdjust_5-13-24.png47.9 KB · Views: 102
 -
 AnomaliesV2_UpdatedXover_5-13-24.png39 KB · Views: 110
Last edited:

Version 1 follows, the version I was not as happy with...
1-verified CabA tuning
2-verified CabB tuning
3- V1 xover
4- Kartesian woofer in cab impedance
5- initial drawing or target, likely not to scale or correct.
6- V1 on axis FR
7- V1 system impedance cab A
8- V1 system imedance cab B
9- spec Kartesian Unibox initial 3 ltr box model.
10- TW045WA01- sample 1 impedance
11- TW045WA01- sample 2 impedance
12/13- sample 1 FR/HD
14/15- sample 2 FR/HD
16/17- SUB120 Sample1 FR/HD
18/19- SUB120 Sample 2 FR/HD
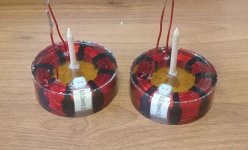
20- Kartesion driver photo
1-verified CabA tuning
2-verified CabB tuning
3- V1 xover
4- Kartesian woofer in cab impedance
5- initial drawing or target, likely not to scale or correct.
6- V1 on axis FR
7- V1 system impedance cab A
8- V1 system imedance cab B
9- spec Kartesian Unibox initial 3 ltr box model.
10- TW045WA01- sample 1 impedance
11- TW045WA01- sample 2 impedance
12/13- sample 1 FR/HD
14/15- sample 2 FR/HD
16/17- SUB120 Sample1 FR/HD
18/19- SUB120 Sample 2 FR/HD
20- Kartesion driver photo
Attachments
-
 Sub120SPECmodel.jpg102.4 KB · Views: 88
 -
 TW045-1Z.jpg81.3 KB · Views: 92
 -
 TW045-2Z.jpg83.3 KB · Views: 64
 -
 Anomalies-Ceramicone-CabA_FR+6inches_50inchDist.png33.4 KB · Views: 67
 -
 Anomalies-Ceramicone-CabA_FR+6inches_50inchDist_HD.png91.1 KB · Views: 65
 -
 Anomalies-Ceramicone-CabB_FR+6inches_50inchDist.png36.8 KB · Views: 68
 -
 Anomalies-Ceramicone-CabB_FR+6inches_50inchDist_HD.png89.3 KB · Views: 68
 -
 AnomaliesVersion1CabBSystemZ.png30.1 KB · Views: 70
 -
 AnomaliesVersion1CabASystemZ.png30.6 KB · Views: 60
 -
 1stchamberA.png40.1 KB · Views: 67
 -
 AnomaliesBoxPrelim.png9.3 KB · Views: 74
 -
 AnomaliesBassTuningCheckedCabB.png30.4 KB · Views: 91
 -
 Anomalies Version 1 Final Xover.png41.3 KB · Views: 78
 -
 1stchamberB.png38.4 KB · Views: 76
 -
 AnomaliesVersion1CabASystemFR.png37.2 KB · Views: 76
 -
 Anomalies-SUB120-CabA_HD.png81.9 KB · Views: 75
 -
 Anomalies-SUB120-CabA-FR.png35.6 KB · Views: 76
 -
 Anomalies-SUB120-CabB_HD.png84 KB · Views: 66
 -
 Anomalies-SUB120-CabB-FR.png49.2 KB · Views: 97
 -
 20230520_181455.jpg300.1 KB · Views: 102
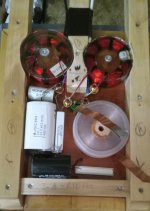
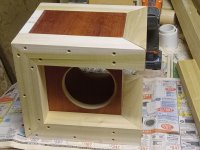
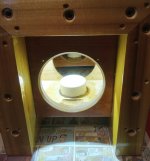
process images...
Attachments
-
 3z114lf7dgm5.jpg341.7 KB · Views: 113
 -
 04r75qnybsog.jpg238.4 KB · Views: 103
 -
 6w7bmlxn8m61.jpg215.6 KB · Views: 94
 -
 7lw2bhl69zhj.png87 KB · Views: 93
 -
 8tm1jv7a434s.jpg141.8 KB · Views: 91
 -
 a0ip5v6xkz82.jpg293.8 KB · Views: 96
 -
 c14zfptuaetg.jpg202.4 KB · Views: 94
 -
 cvlsz7v7yu71.jpg145.8 KB · Views: 92
 -
 d31o9n4j0nzr.jpg173.3 KB · Views: 86
 -
 da4ykbjjvp05.jpg132.9 KB · Views: 88
 -
 fm1esuk583gj.jpg204.3 KB · Views: 91
 -
 j8v1akwm0lew.jpg145.2 KB · Views: 103
 -
 ib7tpsbn1trv.jpg116.3 KB · Views: 108
 -
 jjdh5jbcgp8o.jpg179.8 KB · Views: 104
 -
 kblrooatfafj.jpg111.1 KB · Views: 92
 -
 p7hu3tud40fx.jpg147.6 KB · Views: 94
 -
 o5j2b8yl6ort.jpg127.4 KB · Views: 97
 -
 rsel3tj4jlok.jpg127.8 KB · Views: 94
 -
 shqr1nw4lt3r.jpg119.2 KB · Views: 99
 -
 u0vi94brcee5.jpg259.8 KB · Views: 118
Total dims without rear input terminal tongue are 9.25" wide x 10.25" deep x 10.5" high including feet.
Attachments

I thought I had the order correct, but apparently they shifted. My apologies. Not sure I would be able to get them corrected as even rotating my phone changes their relative positions.
This is a “squeeze maximum juice out of tiny orange” project if there ever was one. Nice work. Was always curious about the Wavecor TW045WA01 twin-cone tweeter, that’s a nice touch.
It looks like you used 3/4” wood, correct me if I’m wrong. Were you ever tempted to use, say, 1/4” steel plates or something else similarly ridiculous to take up less cabinet volume?
The Lexan is 3/8".
The baffle is 1.5".
The cherry box back is 3/4", the rest is 1/2".
The 2x2 are 1.75" square stock.
The baffle is 1.5".
The cherry box back is 3/4", the rest is 1/2".
The 2x2 are 1.75" square stock.
Sent images to a friend who replied, "Wow, you thought both inside and outside of the box!"
Others:
"Steam punk speaker- what’ll they think of next?"
"When someone says they have a pair just like those at home, you know they are lying."
You'll never see another pair like these....
Others:
"Steam punk speaker- what’ll they think of next?"
"When someone says they have a pair just like those at home, you know they are lying."
You'll never see another pair like these....
I do wish I could have been there to see and hear them.... Very creative design. There is a lot going on inside a small box !
I updated the original post with new on axis FR and a cleaned up xover schematic with only 2 resistor changes. Sometimes xover creep sets in, or excitement for the new build and the forest is not seen through the trees. The rest of the graphics pertaining to the V2A are not that different from V2B and can be visually understood.
I think the 200Hz+ ripples are inner 1st chamber resonances, so a little more fill is likely needed.
Somebody asked a query over on MAC;
"After spending some time with that tweeter, what would you say the benefits are over a standard dome tweeter?"
....and I'm adding my response here:
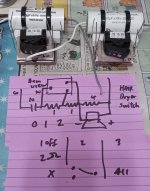
I guess this above partially answers your question. Off axis isn't as bad as one would believe. It is a sensitive and finicky booger, and tweaking minute values shows up in the sonic qualities. I find it also is a pretty clinical/analytical and clean sounding device. It will reveal flaws in components and source content. So much so, it is easy to make it too dull to compensate for the blemishes. Depending on whether it fatigues me from here on out, I might even add an ohm back in on the hair-dryer switch for ease of listening. That won't do much but maybe help the HD signature a smidge and take the 'edge' off. This is because I removed 3 ohms on the main resistor and 2 on the 'trough-compensation' LCR.
I'll give it a week and see what I think....
Somebody asked a query over on MAC;
"After spending some time with that tweeter, what would you say the benefits are over a standard dome tweeter?"
....and I'm adding my response here:
I guess this above partially answers your question. Off axis isn't as bad as one would believe. It is a sensitive and finicky booger, and tweaking minute values shows up in the sonic qualities. I find it also is a pretty clinical/analytical and clean sounding device. It will reveal flaws in components and source content. So much so, it is easy to make it too dull to compensate for the blemishes. Depending on whether it fatigues me from here on out, I might even add an ohm back in on the hair-dryer switch for ease of listening. That won't do much but maybe help the HD signature a smidge and take the 'edge' off. This is because I removed 3 ohms on the main resistor and 2 on the 'trough-compensation' LCR.
I'll give it a week and see what I think....
Yep, the weird thing I've been fighting was a box coloration. While I was in attacking the tweeter switchboard, I shoved a roll of wool batting in behind the tweeter. They immediately sounded better. No more peaking in the lower mids. It was hard to know it was the box because it was double insulated from the outside.
Why I went in there you ask? I wanted to change the switch padding. The added 1 ohm resistor was previously making the tweeters too subdued. This meant if anything i needed less added resistance. I placed a single 1 ohm resistor across both of the previous (in series) 1 ohm resistors. This allows the added adjustment to 0, 0.5,or 0.66 ohms. While I was in there, I also added a Russian Teflon 0.1uF across the 10uF Zen Cap, just for the heck of it.
I'm now rounding 3rd base, and I see home up ahead. I already think these are the best 4" 2ways I've built. They have the clarity I wanted, the bass I desire from smaller builds, and the capabilities of a much larger speaker.
More to come as I finalize the preferred resistance and verify final measurements.
I found a problem in that the 12 ohm resistors measured 11.8 and 12.4 ohms. Fixed that to be a solid 12 ohms. Then I added the 0.5 ohms back in on the switch. I do believe they are now correct as they should be. From the schematic on 5-13, all I did was add back in a series 0.5 ohm to the 10uF cap. If position is something that may make it difficult, it could swap positions of the 0.5 ohm resistor to the top-line in the schematic as an alternative. IE- Between the 0.25mH coil, input, and tweeter + connections.
This is a plot of Left vs Right speaker before the 0.5 resistor was added back in. It may look like the tweeter is subdued, but it is not. 3dB/div.

I plan on taking some horizontal polar measurements soon...
This is a plot of Left vs Right speaker before the 0.5 resistor was added back in. It may look like the tweeter is subdued, but it is not. 3dB/div.
I plan on taking some horizontal polar measurements soon...
Is your crossover is sensitive to component tolerance ? How can you avoid that ?
I always try to avoid such thing.
But perhaps your resistor has quality control problem ? Out of tolerance ?
I always try to avoid such thing.
But perhaps your resistor has quality control problem ? Out of tolerance ?
All xovers are sensitive to component tolerances. If they are +/-10%, this means one could be -10% and the other channel could be +10%. If you don't measure your parts, you have no way of knowing. If you use 1% or 2% parts, the likelihood is less, but still could be 2% or 4% deviation between channels. Then when you figure ALL the parts in the xover have a tolerance, deviation could be huge!
All the other parts in my xovers were measured already, and I grabbed a pair that weren't and paid for it. The lower the deviation, and the use of real parts values in the simulation will yield better reliability.
All the other parts in my xovers were measured already, and I grabbed a pair that weren't and paid for it. The lower the deviation, and the use of real parts values in the simulation will yield better reliability.
As connected, just finally corrected the schematic and added details...

- Home
- Loudspeakers
- Multi-Way
- Anomalies V1/V2 project, InDIYana 2024 "Inner Sanctum" build...