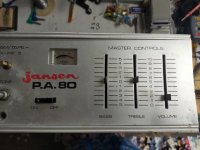
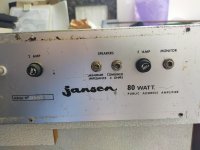
Hi, Im looking for assistance to problem-solve a 1972 80 watt PA power amp made by Jansen in New Zealand (we have 240 volts mains power)
Im running it with a matching 2x12 cabinet to play bass guitar through
The amp makes a lot of loud scratching and popping noise when powering up for about 30 seconds, and also when powering down
When it calms down after powering up it runs ok, but I get an intermittent low volume drop after a few minutes of playing. Occasionally the volume increases again after a strong signal but it is intermittent and unpredictable
Checked the internal amp for any obvious problems and found a burnt resistor. Replaced it, but the problem remains
The PA amp has obviously not been used for a long length of time
I wonder if the two power transistors (RCA 40636) and large caps ((3000 mfd) in the power section need replacing. How can I test these or trace the volume drop issue?
Any advice welcome : )
Sounds more like a dry solder joint somewhere rather than a defective component.

Tap every single component, wire, solder junction, pot, switch, etc. with a plastic BIC pen or similar insulating stick (not with a metallic screwdriver or similar) searching for points where you find a pop, click or thump.
Then resolder there, tighten a nut, whatever, to restore poor contact.
Clean pots jacks switches with contact cleaners.
Those amps often used plug-in boards, sometimes edge connectors.
If so, remove/unplug, clean,/wipe contacts and reseat.
You have a poor contact/mechanical problem.
Then resolder there, tighten a nut, whatever, to restore poor contact.
Clean pots jacks switches with contact cleaners.
Those amps often used plug-in boards, sometimes edge connectors.
If so, remove/unplug, clean,/wipe contacts and reseat.
You have a poor contact/mechanical problem.
Those are valid candidates if this amp is not powered on for a long time. Post a picture of them to keep you rolling.and large caps ((3000 mfd) in the power section need replacing
The most common problem like this is the feedback decoupling capacitor. Typically, about 100uF and a low voltage ~6.3V, 10V. These large value low voltage capacitors dry out and have a limited life span. Poking it may cause the problem to come and go, and then you know exactly which part it is. You need a steady sound/music to do this. You can also have dust or failed solder. Tapping gently with a plastic handle can locate the problem. Any switch or volume control is also suspect. You can buy contact cleaner from the auto parts store.
OMG, that is a really old one.RCA 40636
Instead of searching I would re-solder every joint.
Spray contacts, switches potentiometers with deoxide or 'WD40.
Check all elelectrolytics of SMALL size.
Tap every single component, wire, solder junction, pot, switch, etc. with a plastic BIC pen or similar insulating stick (not with a metallic screwdriver or similar) searching for points where you find a pop, click or thump.
That s what i once did with my Ibanez guitar amplifier years ago and it worked, but i wouldnt use this method nowadays and start by trying to detect visually the badly soldered component, or just resoldering about evrything, wich i did in my amp.
If the faulty contact is in a critical part of the schematic you could end with things like a current source wich has its reference
diodes disconnected FI and the immediate destruction of the amplifier a a result.
There s not much risk if the failure is in the preamp part of the amp but if it s the power amp then that s quite risky.
Thanks for all the advice from everyone, very helpful : )Those are valid candidates if this amp is not powered on for a long time. Post a picture of them to keep you rolling.
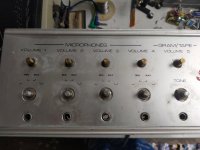
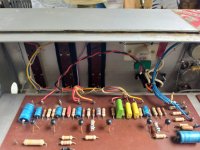
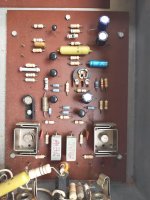
Here are a few photos of the different sections
Attachments
-
 channel eq board.jpg421.9 KB · Views: 125
 -
 channel section of amp.jpg289.5 KB · Views: 120
 -
 eq & vol board.jpg402.6 KB · Views: 122
 -
 EQ section of amp.jpg324.8 KB · Views: 124
 -
 power board.jpg444 KB · Views: 117
 -
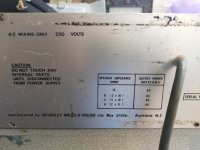 power specs.jpg304.4 KB · Views: 123
 -
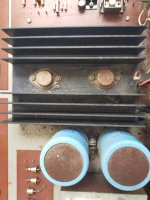 pwr caps and pwr transistors.jpg404.5 KB · Views: 125
 -
 rear section.jpg311.7 KB · Views: 118
 -
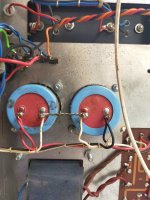
 trannie, Caps and pwr diodes.jpg435.6 KB · Views: 119
OMG, that is a really old one.
Instead of searching I would re-solder every joint.
Spray contacts, switches potentiometers with deoxide or 'WD40.
Check all elelectrolytics of SMALL size.
Small electrolytics are apparently from Phillips, these are quite reliable on the long term, not saying that they cant fail
after 50 years, but given the pics there s as much possibilities, if not more, than the problem comes from the potentiometers
or the switches, anyway the photos raise some nostalgy of another era.
On the eq & vol board, third blue philips cap from left, suspicious.
Three caps are later replacements on the power board(not axial but radial), check their solderings.
All components which 'warm up', check / reflow the solderings.
Three caps are later replacements on the power board(not axial but radial), check their solderings.
All components which 'warm up', check / reflow the solderings.
Ceramic IC's...raise some nostalgy of another era
Tap all components and joints as suggested before, clean whatever was suggested, but your pictures add special suspects: those slider pots are open on the front, and tracks are fully exposed to dust, oxígeno and ambient humidity. Be specially careful cleaning them and you might have to replace a few.
I would be surprised if they do not crackle or have dead spots.
Wahab's suggestion is sensible, do your tapping and testing with amp plugged into a lamp bulb limiter, 40W to 75W bulb, just in case.
No signal through the amp but all pots halfway to hear any noise.
I would be surprised if they do not crackle or have dead spots.
Wahab's suggestion is sensible, do your tapping and testing with amp plugged into a lamp bulb limiter, 40W to 75W bulb, just in case.
No signal through the amp but all pots halfway to hear any noise.
I have had beautiful solder joints in Peavey equipment pop in and out. Pushing the lead on the solder side with a meter probe caused the output to change from centered to +180 vdc. Appearance is not everything. Chopstick or dead ball point as probe is safer.
Cracked pcb land is also possible. I have a Peavey MMA-875t that works great out of the case, drops all input from the mixer boards as soon as I put the case back on. I've hidden that one behind some furniture for a really boring day.
This amp is old enough bad welds inside the components is a possibility. While listening to the radio, push on the component bodies to see if they pop when stressed. After all the other checks, of course. Use trash speakers so you do not damage anything valuable with DC. I use old car speakers.
Last edited:
Somewhere in my junk is my "test speaker". If you are fixing amps, then you need such an instrument. It's a small speaker, for portability, with a series capacitor(s), resistor and Zener clamps and alligator clips. This is what you connect to a misbehaving amp, and a few other places on service calls. You need some kind of speaker to trace noise and intermittent problems.
Thanks for all the advice, extremely helpful 🙂
Tested stability of components using a bamboo skewer on top side and underside of boards, while playing a CD at low volume through the pwr amp & spkrs.
Accidentally also shorted two legs of one of the channel IC's (Motorola MC1303L) which produced an audible pop and pushed the amp back to full pwr!
Will take sliders and pots out for cleaning as they are very scratchy
Someone has definitely been here before me in the past...🙂
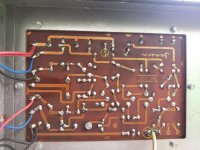
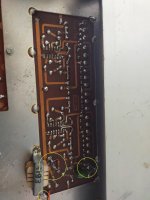
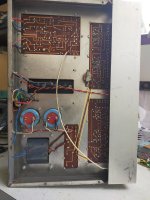
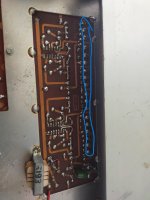
Here are some pics of the underside of the circuit boards:
Tested stability of components using a bamboo skewer on top side and underside of boards, while playing a CD at low volume through the pwr amp & spkrs.
Accidentally also shorted two legs of one of the channel IC's (Motorola MC1303L) which produced an audible pop and pushed the amp back to full pwr!
Will take sliders and pots out for cleaning as they are very scratchy
Someone has definitely been here before me in the past...🙂
Here are some pics of the underside of the circuit boards:
Attachments


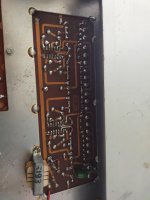
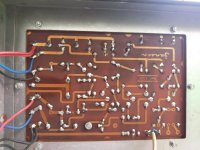
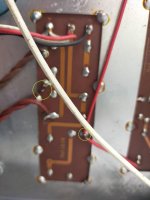
Just some joints to check.
Replace these stretched wires (yellow parallel lines).
Replace these stretched wires (yellow parallel lines).
Attachments

Thanks everybody for all your advice, incredibly helpful and much appreciated 🙂
Intriguingly, after powering the amp off and on frequently as part of the problem-solving, both the volume problem and scratch/pop sounds have now disappeared. The amp seems a lot more stable powering up and off, and during use - is this a common occurrence in 70s SS amps after years of non-use?
The next presenting issue is the general noise floor - the background static is very noticeable, so any suggestions people have for improving the static noise floor would be great 🙂
Probably applying voltage across tarnished junctions perforated the crud improving contact.
You also operated pots and switches, scratching is sort of self cleaning.
I would not call that "repairing" though, it can raise its ugly head again at any moment.
You also operated pots and switches, scratching is sort of self cleaning.
I would not call that "repairing" though, it can raise its ugly head again at any moment.
HI folks, the PA is working well. Im using it for recording bass guitar through one of the channels and really like the tone I get from it through a 2 x 12 cabinet
However the static 'noise floor' is showing up in the recordings, and I'm keen to know if its worth upgrading components to lower it, and which ones, generally speaking?
If on the other hand, high noise is to be expected from this 1970s SS PA design, are there inexpensive design changes that can be made?
Thanks in advance for your feedback
- Home
- Amplifiers
- Solid State
- 1970s power amp PA volume problem