Multi material loudspeaker enclosures
I would like to post this here because it might be of interest to builders, and has only been mentioned in the full range SEAS build.
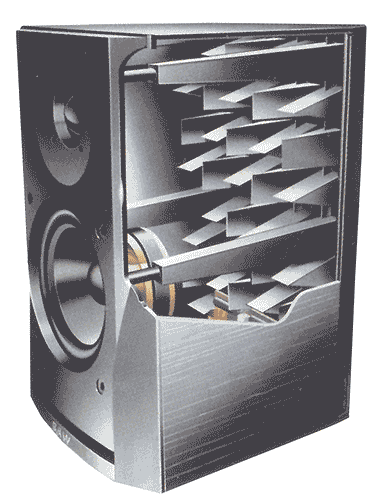
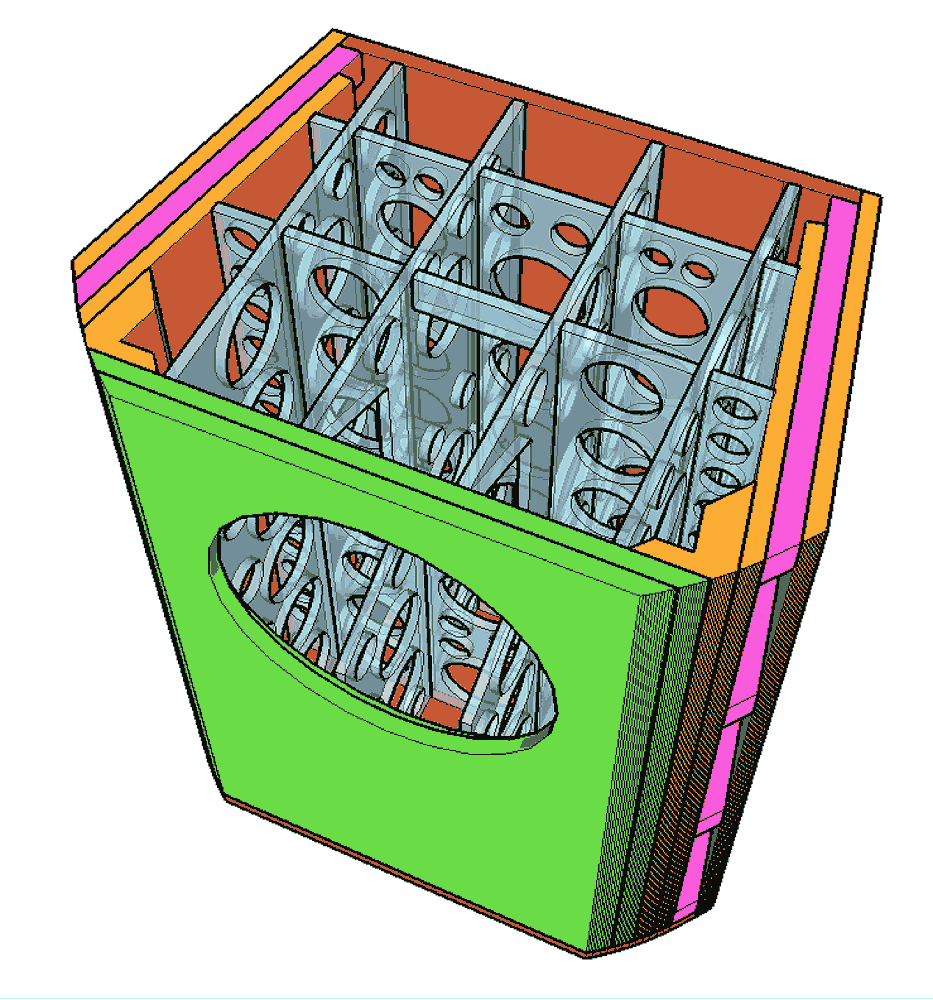
The ideas are applicable to many loudspeaker enclosures. I am not claiming anything original, just an application of a number of known techniques to improve the enclosure. It was done in the hope that it would improve on an existing enclosure and it did. A 62L sealed box for the SEAS Exotic was replaced by a similar volume enclosure and the same drive units. The original box was strongly made of 18mm birch ply to SEAS app note. The second one (still based on 18mm birch and hardwood ply) follows these guidelines;
Make the angled shape by assembling flat panel sections to ribs (like boat building) and put lengthways braces to support the sections.
Stick 1mm commercial rubber sheet to the panel sections with plentiful spray contact adhesive. (PSCA)
Cut rectangular tiles and stick with PSCA. (I used a stout 8mm tile)
Cut 15mm wool felt to shape and fix to sides and ends with, yes! PSCA.
(So we have ply, rubber, ceramic tiles and wool all with lossy adhesive between.)
Cut from 50mm thick foam a double wedge shape about 80mm tall by holding a template on it and band sawing. This only took a few hours to produce about 120 pieces which were just pushed down onto PSCA.
The method is surprisingly easy when once the ply fames are done. Cutting the rubber and tiles was only a matter of a few hours. The spray adhesive was also very quick to use. Fitting the thick wool felt was a slower job. The finished sides were supported by clamping bracing pieces between them and the ends glued in. Then the back and front.
The drive units were installed into the new enclosure and initially they sounded quieter is if something was missing. It became clear that they produced less self-noise and the music was cleaner and clearer. I have been using them for two months and the system sounds very good. The same drive units sound better in the better cabinet.


I would like to post this here because it might be of interest to builders, and has only been mentioned in the full range SEAS build.
The ideas are applicable to many loudspeaker enclosures. I am not claiming anything original, just an application of a number of known techniques to improve the enclosure. It was done in the hope that it would improve on an existing enclosure and it did. A 62L sealed box for the SEAS Exotic was replaced by a similar volume enclosure and the same drive units. The original box was strongly made of 18mm birch ply to SEAS app note. The second one (still based on 18mm birch and hardwood ply) follows these guidelines;
- A different shape to alter the flow of pressure around the speaker
- Division of panels into smaller varied sizes and bracing
- Multi material layers construction using stiff and also “lossy” layers
- Extra thickness front and back panels
- Anechoic style foam wedges on the back to reduce reflection to the front
Make the angled shape by assembling flat panel sections to ribs (like boat building) and put lengthways braces to support the sections.
Stick 1mm commercial rubber sheet to the panel sections with plentiful spray contact adhesive. (PSCA)
Cut rectangular tiles and stick with PSCA. (I used a stout 8mm tile)
Cut 15mm wool felt to shape and fix to sides and ends with, yes! PSCA.
(So we have ply, rubber, ceramic tiles and wool all with lossy adhesive between.)
Cut from 50mm thick foam a double wedge shape about 80mm tall by holding a template on it and band sawing. This only took a few hours to produce about 120 pieces which were just pushed down onto PSCA.
The method is surprisingly easy when once the ply fames are done. Cutting the rubber and tiles was only a matter of a few hours. The spray adhesive was also very quick to use. Fitting the thick wool felt was a slower job. The finished sides were supported by clamping bracing pieces between them and the ends glued in. Then the back and front.
The drive units were installed into the new enclosure and initially they sounded quieter is if something was missing. It became clear that they produced less self-noise and the music was cleaner and clearer. I have been using them for two months and the system sounds very good. The same drive units sound better in the better cabinet.
Last edited:

Dividing the individual panel sections into different sizes and shapes makes a big difference in distribution of individual panel resonance modes. You won't be able to completely get rid of panel resonance, but at least you're spreading them out into different frequencies. It helps to use golden ratios for overall box dimensions, in efforts to spread out the fundamental resonance modes, but that's not always practical.
The foam is not deep enuff to do much. Something more dramatic like this:
The orientation and shape of the braces makes them less effective than they could. Some guidlines:
0/ the aspect ratio of the subpanels created by a brace should be larger than teh panel being braced
1/ braces should stretch across the box.
2/ braces should be placed asymmetrically
wrt 0/ the braces would work better vertically
1/Where you have 2 (or more) braces, it would be best to have one brace spanning side-side.
If the squishy stuff leads to lower (potential) panel resonances (change in mass /stiffmess ratio), and lower Q of those resonances they will likely be more audible.
dave
Thanks for chipping in with some tips for anyone thinking of building their own speakers. I hope this encourages someone to experiment for themselves. I am delighted that I now feel I have got the maximum out of the SEAS Exotic units and can't see myself making any thing to follow these. I wish I could spend more time listening to all the wonderful music.
Actually, 'we' learned the hard way that only need max ~70% and offset based on UL/CSA drop testing formed/seam welded up 10 ga CRS (cold rolled steel) reinforced with various sizes of 1/4" angle iron bracing for sub panel, lifting eye bolts mounting with formed 'Z' flange to hang/seal the 10 ga CRS door(s) and later when doing explosion containment along with making various sizes/types of industrial construction cardboard boxes to reduce number/type of wood pallets and/or withstand the ever increasing harsh/brutal shipment handling.1/ braces should stretch across the box.
2/ braces should be placed asymmetrically
wrt 0/ the braces would work better vertically
1/Where you have 2 (or more) braces, it would be best to have one brace spanning side-side.
Ideally at a golden or acoustic ratio or at a panel's odd harmonics, i.e. 1/3, 1/5, etc.
Better to list along longest span 😉
Ideally want to tie all six sides together to keep it from 'breathing', which in turn allows either thinner panels and/or lower stiffness (MOE) panels
- Home
- Loudspeakers
- Multi-Way
- Multi material enclosure build