First of all: I didn’t really noticed this forum before. I think I have stumbled across some threads in my research to do this project. Now that I have registered, I think it is nice to share my attempts to recreate a NAD 3020 (or actually 3120). So here it is, hope you like it! I certainly enjoyed creating it (and continue to enjoy it when listening to it)!
Disclaimer: just as I was about to start this thread I noticed that other people have played with the idea to recreate this fantastic amp themselves. So yeah there might indeed be a sect going on right here 😉, I hope this doesn't bother anybody too much then. I did this project as a big learning thing and just for fun. Didn't really study electronics so at times it was a bit of a learning curve and I am still figuring things out. The amp is working perfectly fine though but if there are things that are odd in my attempts and design, please let me know!
The circuit design of the amp is – of course – not mine but from NAD. So credits to them for creating this lovely sounding historic piece of equipment. I recreated the boards myself to fit my needs (see below) and added some features to it (and left some out). I tried to keep it as close to the original as possible but ended up creating a simpler version more like a 3120 (or even more simple with just a volume knob).
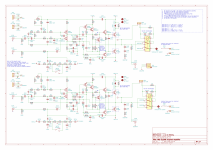
Schematics
My attempts started last year when I got the idea to build my own amp. Just to see how far I can get and if I could – in theory – end up with a fully working device. A bonus would be that it sounded half decent and didn’t start a house fire… 😊
Searching for a suitable candidate I found that the design of the NAD 3020 would suit my needs. I wanted a proven concept, not too complicated and not too powerful. Furthermore, it had a nice small form factor and of course had somewhat of a reputation.
First I recreated the schematics in KiCAD. I’ve used the schematics from the 3020B as a reference and worked from there. The main difference is the lack of balance control, mono buttons and muting. I also used more foil based capacitors replacing some of the electrolytic caps in the signal paths.

The lack of a proper input selection switch eventually made me design a digital logic board with LED’s and relay switches. A microchip PIC16F628 does the switching but also acts as a power-on delay and controls the speaker outputs for muting and protection. The protection that has been integrated is DC detection, AC dropout (acts as a soft power-down) and of course the delayed power-on. The soft clipping is of course also integrated into the amp.
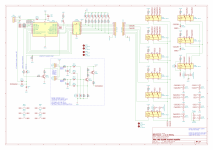
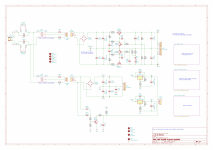
I incorporated some extra power supplies for the digital 24V and 5V rails (needed for the relays and PIC). These are all relatively low powered and taken from the main positive power-supply, so the digital signals are separated from the pre-amp and phono stage.
PCB designs
The design of the PCB’s took some time to develop. I wanted to etch these myself and therefore used a maximum PCB size of 100x160mm (most boards are a little smaller in length). All boards are single sided and I have used as little jumpers as possible.
The design resulted in a power-amp PCB per channel, one PCB for the phono and preamp stage and one PCB for the power-supply. The last board I etched was the logic board and input selection board. They fit nicely together onto one 100x160 board. In the end I added a separate fuse-holder board and speaker inductor board.
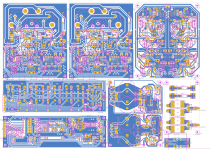
I’ve taken special care to route all ground planes (if any) and ground wires back to a single point. Took some time to carefully prevent ground-loops when interconnecting the boards. As far as I can tell it all worked out as there are no hums, noises or anything like that. There were some oscillations going on in the phono-stage so I ended up tweaking that somewhat and making it look more like the 3020i version of the amp. I added some extra capacitance around the transistors but I might look into that a bit deeper somewhere in the future.
Parts
Most parts were readily available. I mostly used Elna Silmics and replaced some elco's with MP caps. I have found a source for most transistors (especially the SD669 and SB649 are a bit harder to find). The power transistors are still readily available from Mouser so I kept those into the design as I just really like these shiny metal things if only for the looks 😊
The hardest part was to find fitting balance and volume control pots with the center tab for loudness. In the end I ditched the tone and loudness control pots and figured I could do without since I never use those anyway. This actually made me decide I could just go for a 3120 version. The volume control is a nice quality pot from Alps (which by itself costs a small fortune).
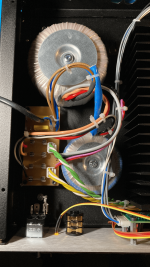
I used two toroidal transformers (2x24VAC for the poweramp and 2x30VAC for the pre-amp). The smaller pre-amp transformer has a bit more headroom for the required output voltages. The powersupply does run a bit hotter than the original design because of the bigger voltage drops, but nothing out of the ordinary. Just added a suitable heatsink and we’re good to go! The result is a nicely separated powersupply for the pre-amp and poweramp. Wires are all helutherm 145 with JST connectors in various shapes and sizes. Gives it a nice quality feel. I soldered all the signal wires.
Build
Now that everything is there, it was time to find some nice case to put it all in. I did a small CAD drawing and decided that it could (and should) fit into a 80mm high case. I’ve used a cabinet from an Italian supplier (MODU Pesante). I’ve got an oversized heatsink that goes right into the middle of the amp. The poweramp PCB’s are mounted with some L-shaped aluminum pieces to the heatsink so that it comes out in one big module if unscrewed from the bottom.
I’ve finished the design with amber LED’s and some retro push buttons because why not... The logic board is nicely positioned behind the LED’s with male connectors on the PCB, precisely aligned with the front. This was a bit of a puzzle on the PCB design. But pushing these buttons gives me the rewarding sound of multiple clicking relays and that is just fantastic as it sort of makes the thing 'modern' 👍
In the end I decided I will just skip the pre-amp output on the case and wire the pre-amp directly to the power-amp internally. I might add these typical NAD 3020 jumpers to the back in the future to play around with. The connections are there on the PCB (main in / lab in / pre-out).
So here is the end result!
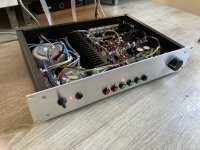
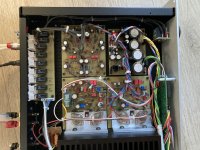
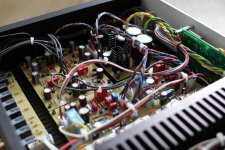
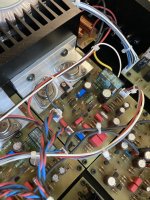
All in all it was (and still is) great fun. Hope you like it!
P.s. I’m still contemplating if I should upgrade the PCB’s with prototype boards from PCBway or similar but it’s not cheap and you end up with 5 copies and I kinda like the idea that I’ve built the entire thing from scratch (including the boards). Let me know what you think!
Update:
As per request I've included the PDF files and BOM. I do a separate post about the software, that's a whole new story
Update 2:
As of writing all of this, I was trying to panelize the boards and correct some design issues I had in my own etched boards. Just noticed there were some small errors in previous PDF's (there was a couple of rotated footprints). I've updated the PDF files to correct this. Furthermore, there was some interest in the schematics as well, I've included the KiCAD schematics, see attachments.
Disclaimer: just as I was about to start this thread I noticed that other people have played with the idea to recreate this fantastic amp themselves. So yeah there might indeed be a sect going on right here 😉, I hope this doesn't bother anybody too much then. I did this project as a big learning thing and just for fun. Didn't really study electronics so at times it was a bit of a learning curve and I am still figuring things out. The amp is working perfectly fine though but if there are things that are odd in my attempts and design, please let me know!
The circuit design of the amp is – of course – not mine but from NAD. So credits to them for creating this lovely sounding historic piece of equipment. I recreated the boards myself to fit my needs (see below) and added some features to it (and left some out). I tried to keep it as close to the original as possible but ended up creating a simpler version more like a 3120 (or even more simple with just a volume knob).
Schematics
My attempts started last year when I got the idea to build my own amp. Just to see how far I can get and if I could – in theory – end up with a fully working device. A bonus would be that it sounded half decent and didn’t start a house fire… 😊
Searching for a suitable candidate I found that the design of the NAD 3020 would suit my needs. I wanted a proven concept, not too complicated and not too powerful. Furthermore, it had a nice small form factor and of course had somewhat of a reputation.
First I recreated the schematics in KiCAD. I’ve used the schematics from the 3020B as a reference and worked from there. The main difference is the lack of balance control, mono buttons and muting. I also used more foil based capacitors replacing some of the electrolytic caps in the signal paths.


The lack of a proper input selection switch eventually made me design a digital logic board with LED’s and relay switches. A microchip PIC16F628 does the switching but also acts as a power-on delay and controls the speaker outputs for muting and protection. The protection that has been integrated is DC detection, AC dropout (acts as a soft power-down) and of course the delayed power-on. The soft clipping is of course also integrated into the amp.

I incorporated some extra power supplies for the digital 24V and 5V rails (needed for the relays and PIC). These are all relatively low powered and taken from the main positive power-supply, so the digital signals are separated from the pre-amp and phono stage.

PCB designs
The design of the PCB’s took some time to develop. I wanted to etch these myself and therefore used a maximum PCB size of 100x160mm (most boards are a little smaller in length). All boards are single sided and I have used as little jumpers as possible.
The design resulted in a power-amp PCB per channel, one PCB for the phono and preamp stage and one PCB for the power-supply. The last board I etched was the logic board and input selection board. They fit nicely together onto one 100x160 board. In the end I added a separate fuse-holder board and speaker inductor board.

I’ve taken special care to route all ground planes (if any) and ground wires back to a single point. Took some time to carefully prevent ground-loops when interconnecting the boards. As far as I can tell it all worked out as there are no hums, noises or anything like that. There were some oscillations going on in the phono-stage so I ended up tweaking that somewhat and making it look more like the 3020i version of the amp. I added some extra capacitance around the transistors but I might look into that a bit deeper somewhere in the future.
Parts
Most parts were readily available. I mostly used Elna Silmics and replaced some elco's with MP caps. I have found a source for most transistors (especially the SD669 and SB649 are a bit harder to find). The power transistors are still readily available from Mouser so I kept those into the design as I just really like these shiny metal things if only for the looks 😊
The hardest part was to find fitting balance and volume control pots with the center tab for loudness. In the end I ditched the tone and loudness control pots and figured I could do without since I never use those anyway. This actually made me decide I could just go for a 3120 version. The volume control is a nice quality pot from Alps (which by itself costs a small fortune).
I used two toroidal transformers (2x24VAC for the poweramp and 2x30VAC for the pre-amp). The smaller pre-amp transformer has a bit more headroom for the required output voltages. The powersupply does run a bit hotter than the original design because of the bigger voltage drops, but nothing out of the ordinary. Just added a suitable heatsink and we’re good to go! The result is a nicely separated powersupply for the pre-amp and poweramp. Wires are all helutherm 145 with JST connectors in various shapes and sizes. Gives it a nice quality feel. I soldered all the signal wires.

Build
Now that everything is there, it was time to find some nice case to put it all in. I did a small CAD drawing and decided that it could (and should) fit into a 80mm high case. I’ve used a cabinet from an Italian supplier (MODU Pesante). I’ve got an oversized heatsink that goes right into the middle of the amp. The poweramp PCB’s are mounted with some L-shaped aluminum pieces to the heatsink so that it comes out in one big module if unscrewed from the bottom.
I’ve finished the design with amber LED’s and some retro push buttons because why not... The logic board is nicely positioned behind the LED’s with male connectors on the PCB, precisely aligned with the front. This was a bit of a puzzle on the PCB design. But pushing these buttons gives me the rewarding sound of multiple clicking relays and that is just fantastic as it sort of makes the thing 'modern' 👍
In the end I decided I will just skip the pre-amp output on the case and wire the pre-amp directly to the power-amp internally. I might add these typical NAD 3020 jumpers to the back in the future to play around with. The connections are there on the PCB (main in / lab in / pre-out).
So here is the end result!


All in all it was (and still is) great fun. Hope you like it!
P.s. I’m still contemplating if I should upgrade the PCB’s with prototype boards from PCBway or similar but it’s not cheap and you end up with 5 copies and I kinda like the idea that I’ve built the entire thing from scratch (including the boards). Let me know what you think!
Update:
As per request I've included the PDF files and BOM. I do a separate post about the software, that's a whole new story
Update 2:
As of writing all of this, I was trying to panelize the boards and correct some design issues I had in my own etched boards. Just noticed there were some small errors in previous PDF's (there was a couple of rotated footprints). I've updated the PDF files to correct this. Furthermore, there was some interest in the schematics as well, I've included the KiCAD schematics, see attachments.
Attachments
Last edited:
Keep it as it is. There's no reason to replace the boards.
BTW, the 3020 has a special place. We sold 100s of them. I have owned many. Need to get my 7020 back into full working order.
dave
dave
Nice complete work!
If you want to share with us you need to post pcb and software😉
Oh I don't mind sharing that as well. I added the PDF attachments, see first post.
About the software. If you'd ask openGPT you'd probably get functioning results just as well but since you've asked let me tell you what I've done 🙂. Think I started working with microchips about 10 years ago or so and I'd really wanted to have the "in-depth experience". I didn't jump into C but instead started to learn assembly for this specific PIC the hard way (by endlessly looking through the datasheets and searching online for examples).
Anyway, I've programmed this in assembly so the program is quite unreadable 🤣. Furthermore, you'll need a way to compile it. It is written so that the MPASM compiler can compile this program. Sadly, support for this compiler stopped after MPLAB IDE version 5.35. So you'll need that or previous versions to make it work. But you can still download all their previous IDEs from the microlab website. Or just load the hex file onto the pic. Files are included in this post for all you assembly nerds out there!
I implemented the following:
- When switched on, the amp does a little startup routine. The LED is blinking and after some delay, the input and speakers are switched on. It always defaults to the first normal input from the right (skipping the phono input). I could have used the EEPROM for some input selection storage but figured this is just fine for my applications.
- Before switching on the speakers, the program ALWAYS checks for a signal on pin RA5 (see circuit diagram). That's the combined input for all the protection circuits in the amp.
- After poweron, the main program loop is started. It checks for a button pressed and checks constantly for a high signal on pin RA5. It's 4 mhz so no worries that it wouldn't detect the protection fast enough!
- I only had room for six pushbuttons. I like to keep it minimalistic (and ran out of pins on the microchip 😉) So if a button is pressed, it can do one of the following things:
- If a new input is selected, it switches to that input.
- If one of the tapedecks is selected, it switches to that tapedeck (for monitoring) and keeps the original selected input activated as a source (tapedecks are the left two buttons)
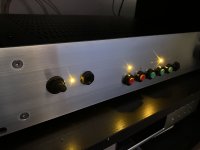
- If the first tapedeck is selected and afterwards the second tapedeck, it will use the first tapedeck as source and select the second tapedeck as destination (monitor). The red light comes on.
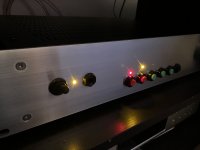
- Finally, if the active input is pressed again, the amp will go into mute and the powerled will turn off (to indicate that is in mute). The headphone jack is still activated (and therefore unprotected, that's the only downside of this amp I guess).
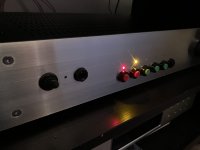
- If the power is turned off, the amp will go into protection. The powerled will blink and die slowly as the caps are drained.
There is a slight disadvantage that the recording inputs from the tapedecks are always connected to the input signal but there's usually no noise on the input side of recording equipment (usually, except maybe on noisy soundcards etc), so that wouldn't be too much of a problem.
So anyway, I've included the piece of code in the zipfile (you can edit it with any normal text editor) and the hex file that can be loaded into the programmer. I use a pickit3. Hope its helpful!
Attachments
a lot of amp diy in here and you choose 40 years ampli ,, you are special man , bro !!!!!!!
That's it!
Thanks,now this is a complete guide for everyone to follow 😊
Thanks,now this is a complete guide for everyone to follow 😊
@Johan_vd_W Lovely design, I was thinking of this amp for a few months, Like the way you have incorporated the Tape feature in the code.
Yellow Led's give it a different kind of glow.
only thing i would want to chane is the switches - maybe something like these in below screenshot.

Yellow Led's give it a different kind of glow.
only thing i would want to chane is the switches - maybe something like these in below screenshot.
JOHAN: Anyway, I've programmed this in assembly so the program is quite unreadable 🤣. Furthermore, you'll need a way to compile it. It is written so that the MPASM compiler can compile this program. Sadly, support for this compiler stopped after MPLAB IDE version 5.35. So you'll need that or previous versions to make it work. But you can still download all their previous IDEs from the microlab website. Or just load the hex file onto the pic. Files are included in this post for all you assembly nerds out there!
Microchip makes nifty PICs but they don't get software. I use common sense platforms like Arduino and STM where I program in C or in Arduino pseudo-C. Hardware is supported by libraries so the same application will work on multiple MCUs. I use platformIO most of the time.
There are some PIC tutorials, with emphasis on C code, here https://embedded-lab.com/blog/embedded-lab-experiments/ There is an error on this page. PICs are not easy to use, IMO. However, the provided examples seem practical.
One of the most popular and easy to use microcontroller families available in the market today is the Microchip “PIC microcontroller”. The following experimental PIC tutorials are intended to facilitate the learning of PIC microcontroller interfacing and programming. Each topic is started with the background theory followed by simple experiments to explain how the theory can be implemented into actual applications. I am emphasizing the use of high level language (C) for PIC programming. The C compiler used in writing the programs is mikroC Pro for PIC from MikroElektronika. You can download and install the demo version of this compiler that limits the size of the output HEX file to 2K. PIC16F688 and PIC16F628A microcontrollers are chosen for the most basic experiments whereas the advanced topics are discussed with PIC18F2550. I hope some of you will find these tutorials helpful for coming up to speed on PIC microcontrollers. If you have any suggestions or comments, you can email me at [admin (at) embedded-lab.com].
You're my hero Johan! I was just looking for something/someone like this... Thanks for sharing!
- Home
- Amplifiers
- Solid State
- NAD 3020 inspired home made amp