Hi all,
Over a long period I built a XONO 2019 with boards, documentation and help from RSTaudio (Ralph Stens).
First of all, the boards are very high quality.
Even higher quality is the documentation and preparation done by Ralph. This is unseen!
Also the questions asked about building this project got anwered real fast and professional!
This is a hobby project for him (according himself), which is hard to believe, or his days are 48hrs...
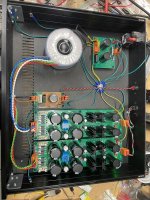
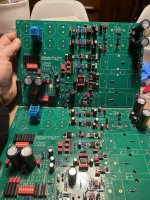
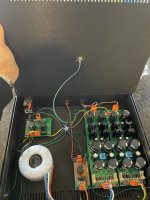
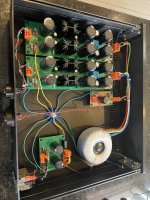
I chose to use DC coupling, so no caps. Ralph sent the boards with the smd components already mounted. I was sure to do some (remote) controlling, so the relays got ordered too, but without the microprocessor designed by Ralph. Allthough I have no doubt this is a very complete en welldesigned control part, initially I was thinking of controlling the phono-pre through the menus of the (diy) preamp, I love to play with arduino-style controllers as well! In the end, I went with standalone arduino-control on arduino boards.
So now my freshly built Xono is 'ON' for 2 weeks nonstop. Even from the beginning it was playing very good.
I am not used to describe sound characteristics.
Also, I can only compare to my previous, cheap-ish but too good for the price, ifi ZEN phono stage.
The Xono is fed by a presumably 'moderate' record player: a refurbished and tweaked Lenco L75/S with standard jelco tonearm (heavier headshell) and new Denon DL103 cartridge.
the ifi ZEN is no comparision for the Xono, with immediately very black backgrounds noticeable which the ifi couldn't do. I never heard before such very black background from a record.
Then there is a drive and speed to the music that could be a relationship between the Lenco's idler drive mechanism and fast electronics, enhancing eachother. That's a quality the IFI had too, in lesser extent. Extension is deep and high, the treble is supersmooth, as extending as my hearing goes. Bass control is tight and deep, much deeper than the ifi could do. The real magic sits in the middle: midrange is so fluent, so musical. Wooden instruments sound wood-ish, brass sounds brass. Percussion is superprecise. Attack and decay are clearly 'visible' elements. Very high resolution, much detail without being analytical at all. The ifi lacked this musicality, this fluentness. The ifi was way more analytical and very bright in comparision.
I have several times the same recordings both on CD, LP and digital. Before Xono, CD really shined. Content was best reproduced through this CD-player even compared with high-resolution digital (and Chord DAC). The record player was since the DL103 on par with digital. Now with the xono, me and friends are really convinced by the sound of Xono, surpassing the CD quality. Not that it's better, is just different with more analog sound, fuller, smoother especially midrange, simply more musical. Then the CD, allthough very good, could be a little clinical, without emotion.
The bad news: I have to buy lots of expensive LP's now!
More bad news: It makes me think about the lesser thing on the turntable: the tonearm.
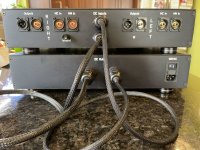
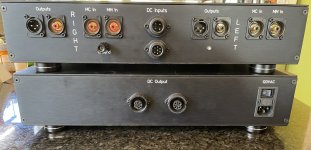
Does premium cabling do this unit any good? Now it's standard power cabling and Pro-audio XLR cabling (Recordplayer already has chord clearway). If this unit could do even better with better cabling, that would be an upgrade.
System:
==> balanced to ==>
Aleph 5 power amp.
==> audioquest rocket 44 ==>
B&W 802S3 speakers (awaiting Klipsch Forte IV)
I must thank Mr. Ralph Stens, not only for the boards, but this very complete documentation as well.
Software is as follows:
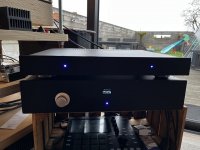
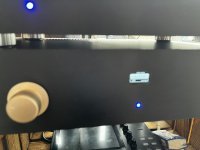
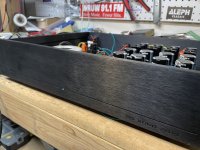
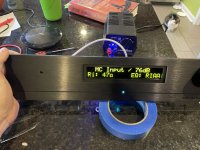
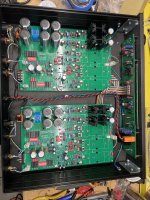
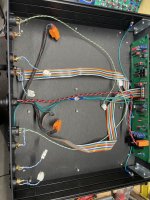
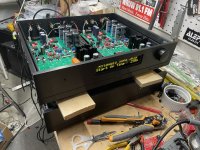
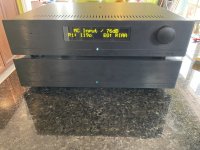
Mechanic is less fun to do: this time I used a part to route a 6mm axle through the panel to make the encoder much better. The display cutout went better on my preamp. No power-on button this time, it is simply always on. The leds are provided with light guides, which is a whole lot better than just ramming a led in a 10mm frontpanel. With blue led it looks gorgeous. The 1U audio enclosure was a bit difficult: had to alter some components and cooling sinks. The arduino is with his usb protruding the backpanel, so updates to software are easy. A simple but quiet 12VDC psu is added for arduino and relays. Designing a pcb of my own with atmega328p is practically not possible for me, so I stick with the full arduino boards.
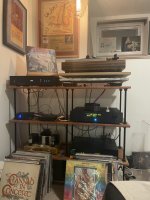
See pics (power source for Aleph5 in first pic background ;-) )


Over a long period I built a XONO 2019 with boards, documentation and help from RSTaudio (Ralph Stens).
First of all, the boards are very high quality.
Even higher quality is the documentation and preparation done by Ralph. This is unseen!
Also the questions asked about building this project got anwered real fast and professional!
This is a hobby project for him (according himself), which is hard to believe, or his days are 48hrs...
I chose to use DC coupling, so no caps. Ralph sent the boards with the smd components already mounted. I was sure to do some (remote) controlling, so the relays got ordered too, but without the microprocessor designed by Ralph. Allthough I have no doubt this is a very complete en welldesigned control part, initially I was thinking of controlling the phono-pre through the menus of the (diy) preamp, I love to play with arduino-style controllers as well! In the end, I went with standalone arduino-control on arduino boards.
So now my freshly built Xono is 'ON' for 2 weeks nonstop. Even from the beginning it was playing very good.
I am not used to describe sound characteristics.
Also, I can only compare to my previous, cheap-ish but too good for the price, ifi ZEN phono stage.
The Xono is fed by a presumably 'moderate' record player: a refurbished and tweaked Lenco L75/S with standard jelco tonearm (heavier headshell) and new Denon DL103 cartridge.
the ifi ZEN is no comparision for the Xono, with immediately very black backgrounds noticeable which the ifi couldn't do. I never heard before such very black background from a record.
Then there is a drive and speed to the music that could be a relationship between the Lenco's idler drive mechanism and fast electronics, enhancing eachother. That's a quality the IFI had too, in lesser extent. Extension is deep and high, the treble is supersmooth, as extending as my hearing goes. Bass control is tight and deep, much deeper than the ifi could do. The real magic sits in the middle: midrange is so fluent, so musical. Wooden instruments sound wood-ish, brass sounds brass. Percussion is superprecise. Attack and decay are clearly 'visible' elements. Very high resolution, much detail without being analytical at all. The ifi lacked this musicality, this fluentness. The ifi was way more analytical and very bright in comparision.
I have several times the same recordings both on CD, LP and digital. Before Xono, CD really shined. Content was best reproduced through this CD-player even compared with high-resolution digital (and Chord DAC). The record player was since the DL103 on par with digital. Now with the xono, me and friends are really convinced by the sound of Xono, surpassing the CD quality. Not that it's better, is just different with more analog sound, fuller, smoother especially midrange, simply more musical. Then the CD, allthough very good, could be a little clinical, without emotion.
The bad news: I have to buy lots of expensive LP's now!
More bad news: It makes me think about the lesser thing on the turntable: the tonearm.
Does premium cabling do this unit any good? Now it's standard power cabling and Pro-audio XLR cabling (Recordplayer already has chord clearway). If this unit could do even better with better cabling, that would be an upgrade.
System:
- Xono2019 by RSTaudio with modified Lenco L75S and DL103 cartridge (balanced interconnect PRO-audio)
- Marantz UD7007 CD-player (balanced interconnect PRO-audio)
- Roon with RPI on Chord Qutest DAC (unbalanced interconnect Chord clearway) (with sometimes cheap tube stage inbetween, allows for extra gain)
==> balanced to ==>
Aleph 5 power amp.
==> audioquest rocket 44 ==>
B&W 802S3 speakers (awaiting Klipsch Forte IV)
I must thank Mr. Ralph Stens, not only for the boards, but this very complete documentation as well.
Software is as follows:
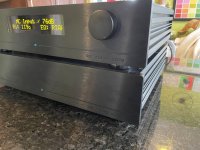
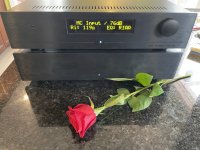
- Power on: After logo show, device is in mute-state, warmuptime is active 60mins. Display showing minutes countdown every minute, seconds countdown last 2 minutes. Led is slowblinking while warmup. Overrule possible.
- After that, unmute, display shows settings. Display always goes out after 30sec. Turn or press encoder to wake display. Longpress encoder to alter settings, one after the other, with MC/MM showing it's dedicated values. While setting, display does not go sleep, so tweaking sound while listening is easier (allthough no remote control).
- Mute by shortpress, that is often used. Display shows mute, but sleeps after 30sec. Led blinks while sleep.
- Software was fun to do! Compared to the preamp I learned a lot: software is as smooth as can be. No program delays, always running fullspeed. (I am not a professional).
Mechanic is less fun to do: this time I used a part to route a 6mm axle through the panel to make the encoder much better. The display cutout went better on my preamp. No power-on button this time, it is simply always on. The leds are provided with light guides, which is a whole lot better than just ramming a led in a 10mm frontpanel. With blue led it looks gorgeous. The 1U audio enclosure was a bit difficult: had to alter some components and cooling sinks. The arduino is with his usb protruding the backpanel, so updates to software are easy. A simple but quiet 12VDC psu is added for arduino and relays. Designing a pcb of my own with atmega328p is practically not possible for me, so I stick with the full arduino boards.
See pics (power source for Aleph5 in first pic background ;-) )
Attachments

Congratulations! That looks great, and you did the software yourself, too! Nice job!
I am days away from finishing mine. I have a few final parts in transit from Digi-Key arriving later this week. I’m looking forward to hearing it!
I am days away from finishing mine. I have a few final parts in transit from Digi-Key arriving later this week. I’m looking forward to hearing it!

Very nice! You clearly have no problem with mechanics, as the front is beautifully machined! Hard to do on 10mm black anodized aluminium. I do not have the tools for that. All is done using common handheld machines (used smart!).My power supply is ready to go.
Very good grounding/earting!
What output voltages do you have? I think you're US-based, so 120V primary? In my area, what needs to be 230V is most of the times 236 to 245V. On top of that, here in the street is a so-called 'triangle' network, not a 'star' network (at the high-voltage transformer in the street). That means there is no real N. Both phases measure 115V to earth, between phases it's 230V.
Are you gonna do the software yourself too? I can see an auxiliary power supply for digital, so I guess you will be relay-controlling it. I made the choice to put the controller, display and control knob in the bigger psu enclosure, just passing I2C and 5V/12V to the audio enclosure.
As a sneak peak: it sounds stunning! (on top of yours already stunning looks). Never heard such a good phono stage, surpassing every other medium I have. Just give it A LOT of time in ON-state before analysing sound. You can listen, but not analyze. 2weeks at minimum.
Keep up the good work!

I'm on 120VAC, but realistically I see 124-125V. I measured my PSU unloaded and I see 15.xV on the digitial supply and +/- 48.xV on the each of the CapMx supplies.
The chassis is the good work of Gianluca and the team at Modushop. I did a drawing in Front Panel Express and he implemented it on a standard 2U chassis.
I'm using Ralph's controller and software. I tested the controller PCB, and now I need to fasten the smoked lexan to the chassis
Your DIY software strategy is far out of my skillset. This project is quite ambitious using the "off the shelf" solution and any attempted to make DIY software would make my head spin. It would also delay several other projects on my list.
I'm still in awe of the PSU design. Dual mono. CLC CapMX to other box with CLC to Reg. Simply amazing.
I'll post pix of the phono stage box when it's ready.
Attachments
Last edited:
Wow that will look good!
Ralph's controller design is way more ambitious to me! At least, the pcb and circuit design is. Amazing work. I took something I had laying around and played with before. So I just know a very little bit of it... Happy and proud it's working, and it's very good at it!
Yours will for sure do that too soon!
I got the last parts this week, and last night I finished wiring. I got the power supplies set up, then did the bias setting. I did an initial setting and then adjusted it after a few hours. I’ll do some final checking since it’s been cooking overnight. I put a few mV signal in from a signal generator and checked output voltage. It looked right.
The last things to do include attaching the smoked lexan to the front panel and running wires the top plates to the chassis star grounds.
Today is the day I’ll get to hear it!!!
I have to say how impressed I am with the level of effort that Ralph put into this project. There is so much detail to be considered - and he has it covered. It’s baked into the design and his document package. You can tell this is a case of kaizen (continuous improvement) based on passion for making the ultimate phono section.
In the final wiring and assembly process I came to appreciate the wiring disconnects and the modularity and serviceability these provide. Very nice!
Attachments
Last edited:
Now it’s fully assembled. I’m going to hook it up and warm it up. I’ll spin vinyl after lunch.
Attachments
-
 CA0C4B33-378B-4DC7-B4C8-D97614F99A93.jpeg475.3 KB · Views: 255
 -
 F5208B81-B7F0-4250-95F3-39EEBC0C0EBD.jpeg446 KB · Views: 255
 -
 65F9D55F-AFF6-4C9D-9E05-D8E9754D233C.jpeg513.6 KB · Views: 255
 -
 7672478D-50D9-40B1-93C9-5ED2CF19C62F.jpeg545.7 KB · Views: 255
 -
 7FB761CD-0416-4876-B71E-B4A4D27AC66A.jpeg524.7 KB · Views: 248
 -
 7671267C-CDAC-4712-BA82-D734A3FB3C8B.jpeg346 KB · Views: 251
 -
 39FCA825-CB8E-420E-A778-59AA1F378047.jpeg471.3 KB · Views: 236
 -
 67343688-9F67-473A-AC95-328637F480FC.jpeg609.9 KB · Views: 300
A really fantastic build! I am sure you wanna listen to some good sound this evening!
I also have a XONO-clone. It sounds great.
Cheers
Dirk
I also have a XONO-clone. It sounds great.
Cheers
Dirk
Beautiful job guys.
I’ve wanted to build an end game phono amp for a while and it looks like you both succeeded in that.
I’ve got a Salas UltraFSP kit I still haven’t gotten to. This RST Xono 2019 looks a bit more complicated.
It looks like Ralph only offers the boards (with option of SMD JFETs mounted?) and no full kits.
How hard was it to source everything (he provides BOM through code accessed build guide?…is it a Mouser cart or similar?) and how would you rate the level of difficulty?
To begin I emailed Ralph to figure out which items to get from him. I worked through choices on the DIP Switches vs. Microcontroller, SMD JFETS vs classic, DC Servo vs cap coupled, etc. I think you can read about that on the site. I got boards with preinstalled SMD JFETS and pre-matched RIAA caps. I also got the front display, remote control, and the chip with the software on it. There were other options I didn't need like the programming board interface and board for additional EQ curves.
From there you get a package of documentation for each board: BOM, Assembly instructions, folders of data sheets, etc. Very detailed. Auf Deutch und Englisch. He also has a FAQ you get access to, and he's super responsive to Q&A via email. So support is fantastic.
There's no "One-stop-shop" for the BOM. He has pre-made carts at Reichelt (German version of Mouser or Digikey?) that get you perhaps 75% of the way there. You could try to do it at DK or Mouser, but I went for the "easy button". I got the transformer from the vendor he recommended with a few emails and a paypal. I worked with Gianluca at Modushop on the chassis. I forgot to get the knob from Gianluca, so I got one on eBay, I think. The rest came from Mouser and Digikey. The IR Receiver for the remote control came from Ralph. I couldn't find it at any US vendor and the EU vendors wouldn't ship to USA. So he helped me out on that. With this parts count inevitably you miss something. I forgot some caps, a voltage reference IC, and then some more caps, and finally some more caps.
Difficulty - it's an advanced project, there's no doubt. That's based on parts count alone. Plus there's BOM management, all the soldering, and doing the chassis work. That said, it's a matter of taking your time. What worked for me was being meticulous. I'd start with the BOM - first resistor value. I'd measure them to confirm, then install them. Then check mark them individually on the BOM and schematic. Only one value out of a bag at a time. When that one is done, make sure there are no stray resistors on the table. Then on to the next value. Repeat. When I found out I was missing an item I'd make a note and highlight it and move on. I tried to get it to one final DK order. I think it ended up being 4. Ooops. One was a case of ordering 2 of something when I should have ordered 4. That resulted in an order with parts cost equal to shipping cost. Classic.
Ralph's documentation is quite thorough, and it has a nice "commissioning" section for each board. Think of the project as being modular, and the connectors make it easy, too. You fire up each Power supply board. Check. Hook up umbilicals, then check voltage on the other chassis. OK. Hook up to boards. Check. Phono board PSU is OK - now put the 0R resistors in that send the power over to the phono stage section of the boards. If at any point along the way you have a problem, you address it before moving on. Very logical, well-documented, and planned. I have really come to like these Wago PCB connectors and Hirschmann connectors, they help make the process easier.
Hello,
"It looks like Ralph only offers the boards (with option of SMD JFETs mounted?) and no full kits."
Putting together a complete kit would take me way too much time. However, I am happy to help if one or the other component is not available.
What I do from time to time is to build a completely finished device.
Continue to have fun with the XOno's
Ralph
I let the RS Xono warm up for a few days to settle into temp equilibrium. Last night I sat down for my first serious listening session. I'm hearing the same things I have read about in the reviews by others - no surprise.
My RS Xono 2019 is built using the SMD JFETs from Ralph, RIAA EQ only, DC Servo, the microcontroller with the large front display, and a remote control. One key point in my initial attraction to this project for me was the ability to adjust MC loading "on the fly" from the front panel, and it lives up to the expectations. The remote is an added bonus because I can adjust the loading from my couch. No more DIP switches inside or on the back. The other key features were 76dB MC gain, balanced outputs, and flexibility for MM and MC cartridges. It ticks all the boxes for today and potential future setups.
A few words about the rest of the system for context. I'm running the following equipment:
Technics SP-10 MkII turntable with SME V tonearm and ZYX Airy 3 low output moving coil cartridge
RS Xono 2019 phono stage
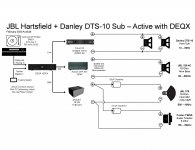
DEQX HDP-4 Preamp / Active Crossover / Room Correction / DAC
JBL Hartsfield replicas with Fostex T925A Supertweeter and Danley DTS-10 Subwoofer
Power amps:
SissySIT - 500+ Hz
Adcom GFA555 - 80-500Hz
Crown K2 10-80Hz
So.... How does it sound?
Long story short - It sounds incredible!!! I'm running it at 76dB gain for my low output MC, and it's dead quiet on my horn system. I can thank Ralph for his attention to detail on the power supply for this. It's fully dual mono, and it employs a CLC + Cap Multiplier per channel in the power supply box, then another CLC + well-designed regulator circuit in the main box. Overkill? Maybe. But the proof is in the pudding.
I wanted to run it through a wide range of musical favorites to get a sense of how the Xono performs. I played Johnny Cash (American III), Orff Carmina Burana (MTT - Cleveland Orchestra), The Church (Starfish), Jimmy Cliff (Wonderful World, Beautiful People), Tanith (In Another Time), Rush (Moving Pictures), Tarot (Relections), and Clannad (In Concert). So a mix of acoustic, electric, and orchestral. Simple and complex. Old and new. Quiet and loud. Male and Female Vocals.
I mentioned how quiet it is, and this translates to stunning clarity, microdynamics and macrodynamics. I'm hearing things at low levels I've never heard before. For example, I heard parts of the bassline in "Reptile" by The Church that never stood out before. I'm hearing nuances and separation of backup singers on Jimmy Cliff's LP that I've never heard before. Snap of percussion is incredible on front-end attack and decay. Cymbals sound clearer. Another area that shines is bass. It goes deep and tight like nothing I've heard from my system before. I was startled with some deep bass in Carmina Burana, and the bass theme continued with the rock & reggae LP's. Sense of space and 3D is improved, too. Soundstage width and height is bigger with a more pronounced separation of voices and instruments. It simply lets the music flow with beautiful clarity.
This build took quite a bit of time with gathering the parts, getting the custom chassis work done, and then the meticulous building. And Ralph's support on every step of the journey was excellent. If you're considering a build, it's absolutely worth the effort. I think I found my "end game" phono stage. I'll get back to building power amps and buying more records!
My RS Xono 2019 is built using the SMD JFETs from Ralph, RIAA EQ only, DC Servo, the microcontroller with the large front display, and a remote control. One key point in my initial attraction to this project for me was the ability to adjust MC loading "on the fly" from the front panel, and it lives up to the expectations. The remote is an added bonus because I can adjust the loading from my couch. No more DIP switches inside or on the back. The other key features were 76dB MC gain, balanced outputs, and flexibility for MM and MC cartridges. It ticks all the boxes for today and potential future setups.
A few words about the rest of the system for context. I'm running the following equipment:
Technics SP-10 MkII turntable with SME V tonearm and ZYX Airy 3 low output moving coil cartridge
RS Xono 2019 phono stage
DEQX HDP-4 Preamp / Active Crossover / Room Correction / DAC
JBL Hartsfield replicas with Fostex T925A Supertweeter and Danley DTS-10 Subwoofer
Power amps:
SissySIT - 500+ Hz
Adcom GFA555 - 80-500Hz
Crown K2 10-80Hz
So.... How does it sound?
Long story short - It sounds incredible!!! I'm running it at 76dB gain for my low output MC, and it's dead quiet on my horn system. I can thank Ralph for his attention to detail on the power supply for this. It's fully dual mono, and it employs a CLC + Cap Multiplier per channel in the power supply box, then another CLC + well-designed regulator circuit in the main box. Overkill? Maybe. But the proof is in the pudding.
I wanted to run it through a wide range of musical favorites to get a sense of how the Xono performs. I played Johnny Cash (American III), Orff Carmina Burana (MTT - Cleveland Orchestra), The Church (Starfish), Jimmy Cliff (Wonderful World, Beautiful People), Tanith (In Another Time), Rush (Moving Pictures), Tarot (Relections), and Clannad (In Concert). So a mix of acoustic, electric, and orchestral. Simple and complex. Old and new. Quiet and loud. Male and Female Vocals.
I mentioned how quiet it is, and this translates to stunning clarity, microdynamics and macrodynamics. I'm hearing things at low levels I've never heard before. For example, I heard parts of the bassline in "Reptile" by The Church that never stood out before. I'm hearing nuances and separation of backup singers on Jimmy Cliff's LP that I've never heard before. Snap of percussion is incredible on front-end attack and decay. Cymbals sound clearer. Another area that shines is bass. It goes deep and tight like nothing I've heard from my system before. I was startled with some deep bass in Carmina Burana, and the bass theme continued with the rock & reggae LP's. Sense of space and 3D is improved, too. Soundstage width and height is bigger with a more pronounced separation of voices and instruments. It simply lets the music flow with beautiful clarity.
This build took quite a bit of time with gathering the parts, getting the custom chassis work done, and then the meticulous building. And Ralph's support on every step of the journey was excellent. If you're considering a build, it's absolutely worth the effort. I think I found my "end game" phono stage. I'll get back to building power amps and buying more records!
Attachments
What part of the sound quality is the Power Supply?
Will using a Xono power supply design with a Pearl 2 provide an upgrade?
Once the Xono is dialed in... is the Arduino necessary? Can it be turned off? Is the internal relay configuration static when the controller is shut off?
How much better is it to use programmable relays for configuration than using a manual switch?
-Mostly my comment here is that the steps taken to allow for remote control might be introducing noise into the circuits? So that the circuits might actually sound better with manual configuration.
Does the firmware support a simple html server with a 100baseT connection?
BTW, my hat's off to Randy.... I thought my set up was complicated enough. ;-)
Last edited:
Ralph has to answer where the secret sauce is.
The microcontroller is on its own power supply. The donut is the shared element, past that it's all independent. And the relays are working in parallel with the on-board DIP switches. That's a long way of saying I doubt turning off the controller or going only with DIP switches makes any sonic difference.
As far as programming it goes - that's back to Ralph. I know my limits!!!
As for rhthatcher, this is definitely my end game phono pre.
This device sounds stunning. AFAIK This is a thoroughly designed circuit, based on already praised designs from pass labs which I love, and Ralph’s experience in electronics design is only helping this in een even better sound with more-modern-than-pass alterations. I’m not an electronics designer, but I wish I were if I see this dedication to a circuit design. (I could have been for sure…😉)
I went with just the boards, also dc coupling. And the pcb for psu, with the transformer from Muller. The 230v dc filter is there too.
I did go with the relays but designed my own control system based on an arduino, with a small oled display. Control is cool, good working, much better than my line pre. It really handles as a bought device! I built the control system in the psu enclosure, and just bring i2c and power to the audio enclosure. There relay control, a small diy pcb, is in the back, quite separated from audio pcb.
With these arduinos, you could do anything to control, just a knob, a Bluetooth app, network,… as long as you program it. ..
It took a lot of time to build. It took a lot of time to have parts. I paused for 12months in building process (mechanics🙄) ! So it took year-and-a-half 😉.
I did alter some components due to availability/laying around and the 1U height enclosure, but mostly followed the BOM.
I have here fresh Klipsch forte’s 4 to listen to! I have to say this phono pre is the best sounding source for them. This liveliness, level of detail,… As above, no noise at all at 76db. It is very accurate at getting everything out of that groove!
I didn’t try with MM for now.
I can recommend this, when committed to really diy a really high level device, on a really high level. Then this succeeds! And you have to take the time. Documentation and bom is very extensive and should be enough. When not, Ralph’s email-help and support is just there! Do consider the cost of this project to succeed. Do count into that the many records you will want to buy. No kidding.
I learned where I made mistakes in my previous line pre project, although it sounds as meant. This very successful phono pre build means a lot to me and gives a boost!
Thanks and many credits to Ralph for such a super project!
Can I ask you guys what you were using prior to building this project?
Can you comment on this xono circuit’s jfet amplification topology…in comparison to something like the Ultra FSP which is supposed to be a Le Pacific derivative?
Sorry, I haven’t read much about the xono.
I did read through Ralph’s main page…it was a lot to take in.
All the integrated flexibility sounds remarkable and convenient in how it’s automated via relay/processor control.
I knew I wanted to have more flexibility regarding gain and loading with whatever else I built.
I never really thought about how being able to change something like cartridge loading from your listening position would even be plausible.
- Home
- Amplifiers
- Pass Labs
- New build: Pass XONO 2019 (RSTaudio)