I recently acquired a set of ESL63's.... pretty nice cosmetic condition, but lots of popping and hissing, mainly from the top panel. I did some online research and read the service manual. I have determined that the main problem is the stators have separated from the frame in quite a few spots. I found a youtube video with one suggestion for repair, but thought I should reach out to this group for advice on the best way to do the repair. I have removed the metal grill and the dustcover, but the panels are still assembled. I saw a DIY forum post that suggested a polyurethane glue. Any advice would be appreciated. These are serial number 29xxx. I have only looked at one speaker, but both speakers have the same noisy symptoms.
thank you for the reply
I have only found one youtube video that shows a repair of the stator separating from the frame. it says glue, but doesn't specify what type of glue. I have found two sites that mention blue, one polyurethane and the other epoxy. I am hoping someone has a better way to pull the stator out to the frame.... I am concerned about puncturing the membrane.
My hope is to fix it without a total rebuild.
the one video I found was from 'Moggy's hifi antics'.
You can try to re-glue the stator without ripping the panel apart, but I've never seen that work out well. The best way is a complete tear down of the panel and regale and then replace the diaphragm. I'd suggest an ER Audio rebuild kit. It gives you everything you need (because your other 7 panels are probably on their last legs) to rebuild the panels and replace the dust covers if needed.
Good luck, they are great speakers when working well.
Sheldon
Good luck, they are great speakers when working well.
Sheldon

+1
With the stators loose and the panel popping and hissing, you can be pretty sure the diagram is already damaged as well.
With the stators loose and the panel popping and hissing, you can be pretty sure the diagram is already damaged as well.
Repairing only one panel, if that is even possible without any experience, will only leave you with a speaker that "plays again", never with a true well performing ESL. I second the suggestion by Sheldon @stokessd to buy an ER audio set . Be prepared to invest a lot of time and research to make it work.
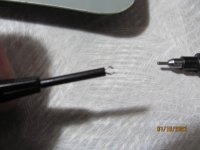
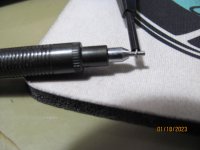
what I have come up with so far is to clip the sections broken away with the clips pictured (I have several of them).... I would start near the center sections where the stator is not touching the membrane and work out from there (to minimize the possibility of poking the membrane)... I will clip the stator and pull it back with one hand. with the other hand, I will use a toothpick to apply a small amount of the gel superglue and while continuing to hold the clip, use another toothpick to apply accelerator to the gelled superglue.... then I will move to the next section. that is my best plan at this time.... I realize that I may not be successful, but the speakers seem to be in very nice condition otherwise. it does seem like a lot of work and I have to be very careful, but if successful, I will save a lot of other work.
the reason I am considering the gel superglue is that it is not runny like regular superglue and with the accelerator, it dries very fast. If someone has another thought about glue, I welcome those thoughts.
I have never hear a set of ESL63's, but I have read so much about them that I believe they are worth the effort.
I also have a set of Gradient SW63's to go with them.
Attachments

While you're in there, gently tap on the stators of the other panels to check if those are still fully attached. I bet you will find most of them to have problems as well.
Good luck... and keep in mind chances are 90% the panel will still buzz after you glue the stator back on, because the membrame will likely have a rip from the arcing. Better to first remove the panel from the speaker and open it up so you can inspect the condition of the membrame.
Good luck... and keep in mind chances are 90% the panel will still buzz after you glue the stator back on, because the membrame will likely have a rip from the arcing. Better to first remove the panel from the speaker and open it up so you can inspect the condition of the membrame.
I faced the same dilemma a few years ago. Then I realized that there are over 1,000 individual cells, that would need glue in a pair of speakers. That is a lot of precision work to undertake. It would only take one mistake where glue goes through one of the holes and onto the diaphragm to ruin the panel.
I decided to go the ER Audio route and I would do it again if I fixed another set. I found that all the panels had problems once I had everything apart.
I decided to go the ER Audio route and I would do it again if I fixed another set. I found that all the panels had problems once I had everything apart.
Don't forget if you do glue a stator improperly, it can be VERY hard to recover from that mistake without damaging the panel parts. I occasionally get panels that have been improperly glued, and it's been a mixed bag of being able to tear them down reliably to rebuild properly.
Sheldon
Sheldon
I have thought about that and that is why I am not rushing into the repair. I hope you or someone out there can make a recommendation about the type of glue to use to give me my best chance of success. I realize that it may be a lost cause, but it seems like I should at least try it on one panel first.Don't forget if you do glue a stator improperly, it can be VERY hard to recover from that mistake without damaging the panel parts. I occasionally get panels that have been improperly glued, and it's been a mixed bag of being able to tear them down reliably to rebuild properly.
Sheldon
I am thinking that the gel superglue I was thinking about may not be the best choice.
I did try powering up the speakers in a dark room and could not see any arcing. I think I'll give it a brief effort, but going forward with low expectations of success.
does anyone have any suggestions about the type of glue to use?
does anyone have any suggestions about the type of glue to use?
very interesting and informative post... thank you!
You can use a polyurethane glue to bond the stators to the support structure. But you'll also need new diaphragm material, and a suitable conductive coating to reassemble the panels after you completely tear them down to reglue the stators. That's why I suggested the ER audio kit, it provides you everything you need to be successful.
Sheldon
Sheldon
Luckily, on my Quad 63, the old heroic Victorian glue on the stators was still unbroken. I didn't want to test the aging and then risk provoking breakages by pressure testing with my fingers just to test the durability. Instead, I spot-glued the grid onto the stator plates with epoxy by a small mixing syringe from the outside. Very, very carefully so that no glue gets behind the stator, only a microdrop in each corner of each "square". Incredibly tedious work, but it paid off well. The sweet sound remains. I have new input MKP capacitors and Mills resistors lying around. They take up a lot of space, so the base plate must be built up a bit. The black stripes are English btw. 🙂
Attachments

- Home
- Loudspeakers
- Planars & Exotics
- ESL63 repair question