Hi,
together with my best friend I'm going to build a pair of Silbury speakers (but same applies to many other speakers) and I opened this thread to have confirmations that what I'm doing is correct, and information on how to properly do things. I'm reading this very interesting site: http://www.troelsgravesen.dk/ full of information, and indeed together with my friend we did a similar tool to drill holes.
By now we have tried to drill the holes in two steps on some samples of wood before drilling the wood dedicated for the speakers:
The rear chamfer has been done with this tool: https://m.media-amazon.com/images/I/51YyV9z+E4L._AC_SL1000_.jpg
The front hole has been done with this tool: https://m.media-amazon.com/images/I/61QI3Mab-iL._AC_SL1500_.jpg
The hole has been done by a tool similar to this one fixed to the milling machine: http://www.troelsgravesen.dk/tips/bb.jpg
I would like not to cut the big curve freehand, so I would like to ask if there's something I can build to properly cut the curve.
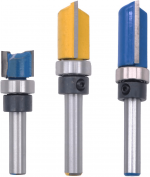
The third point is how to chamfer the sides of the speaker: is it needed to use again the milling machine with a tool like this one: https://m.media-amazon.com/images/I/41f3FpwBAML._AC_SL1000_.jpg or the saw incluned by 45°? How deep the chamfer must be on the side of the speaker?
Thank you in advance,
Roberto
together with my best friend I'm going to build a pair of Silbury speakers (but same applies to many other speakers) and I opened this thread to have confirmations that what I'm doing is correct, and information on how to properly do things. I'm reading this very interesting site: http://www.troelsgravesen.dk/ full of information, and indeed together with my friend we did a similar tool to drill holes.
By now we have tried to drill the holes in two steps on some samples of wood before drilling the wood dedicated for the speakers:
The rear chamfer has been done with this tool: https://m.media-amazon.com/images/I/51YyV9z+E4L._AC_SL1000_.jpg
The front hole has been done with this tool: https://m.media-amazon.com/images/I/61QI3Mab-iL._AC_SL1500_.jpg
The hole has been done by a tool similar to this one fixed to the milling machine: http://www.troelsgravesen.dk/tips/bb.jpg
I would like not to cut the big curve freehand, so I would like to ask if there's something I can build to properly cut the curve.
The third point is how to chamfer the sides of the speaker: is it needed to use again the milling machine with a tool like this one: https://m.media-amazon.com/images/I/41f3FpwBAML._AC_SL1000_.jpg or the saw incluned by 45°? How deep the chamfer must be on the side of the speaker?
Thank you in advance,
Roberto
Is this a fullrange speaker or multi-way?How deep the chamfer must be on the side of the speaker?
Hi Roberto,Hi,
together with my best friend I'm going to build a pair of Silbury speakers (but same applies to many other speakers) and I opened this thread to have confirmations that what I'm doing is correct, and information on how to properly do things. I'm reading this very interesting site: http://www.troelsgravesen.dk/ full of information, and indeed together with my friend we did a similar tool to drill holes.
By now we have tried to drill the holes in two steps on some samples of wood before drilling the wood dedicated for the speakers:
The rear chamfer has been done with this tool: https://m.media-amazon.com/images/I/51YyV9z+E4L._AC_SL1000_.jpg
The front hole has been done with this tool: https://m.media-amazon.com/images/I/61QI3Mab-iL._AC_SL1500_.jpg
The hole has been done by a tool similar to this one fixed to the milling machine: http://www.troelsgravesen.dk/tips/bb.jpg
I would like not to cut the big curve freehand, so I would like to ask if there's something I can build to properly cut the curve.
The third point is how to chamfer the sides of the speaker: is it needed to use again the milling machine with a tool like this one: https://m.media-amazon.com/images/I/41f3FpwBAML._AC_SL1000_.jpg or the saw incluned by 45°? How deep the chamfer must be on the side of the speaker?
Thank you in advance,
Roberto
I built the Frugalhorns (planet10 got the plans) and they do also have a curved back. I used a 6mm MDF panel as a sample, cut the shape with a jigsaw, smoothed the curve with sandpaper and used a router bit with copy-ring to get four times the same result from hardwood panels. Doing it once by hand might work but four times the same result freehand...You can also build a circle but if I remember correctly in my case the radius was >1m and I don't have the space for such a project.
I assume if you don't have access to a CNC the best results are achieved with a well done template and a router + copyring.

I use a Jasper Circle Jig, works well for cutting the driver holes and rebates, can be used for woofers to 8" (about 17cm); attaches to my router.
https://www.soundlabsgroup.com.au/p/Jasper-Jig-240/Jasper+Tools+Circle+Jig+Model+240
Geoff
https://www.soundlabsgroup.com.au/p/Jasper-Jig-240/Jasper+Tools+Circle+Jig+Model+240
Geoff
Last edited:
go ahead and cut the back curve freehand. you can use a thin strip of wood, slot the ends, flex it into a bow shape and secure with a knotted string to trace a smooth arc.
I can't see the actual construction detail, but it looks like one or more sheets of thin ply will be glued and clamped to the back and bent into the curve.
if you make a relatively smooth cut with a jigsaw the plywood will follow the "average" of the curve as if it were perfect.
BUT you will need to use polyurethane construction adhesive to glue the parts up, use a lot and all the gaps will be filled with the slight foaming action. use a chisel to level the joint in a few hours, after it becomes rubbery and before it becomes hard. this joint will be incredibly strong but quite unattractive, so veneer is in order. don't try this with any other glue. you can forgo all the clamps and simply screw the material on, clamping only at the point you are drilling and screwing. let it cure for 48 hours and remove the screws.
as for the chamfer, you can only go so wide with a router bit. table saw is a good solution if you have one.
also a handheld power planer will make short work of a wide chamfer, and is extremely useful for all sorts of panel trimming/fitting if the work is too big to take to the tool.
Thanks S4m, so something like this one? https://m.media-amazon.com/images/I/61sYBnOUxiL._AC_SL1500_.jpgI used a 6mm MDF panel as a sample, cut the shape with a jigsaw, smoothed the curve with sandpaper and used a router bit with copy-ring to get four times the same result from hardwood panels.
Here is even worst with more than 3 meters, indeed.I remember correctly in my case the radius was >1m and I don't have the space for such a project.
Thanks! We will try the way you suggest!I assume if you don't have access to a CNC the best results are achieved with a well done template and a router + copyring.
Attachments
Thank Geoff, great tool! I will probably build something in wood as per the first link I posted, to be able to cut driver holes for 12 and 15" speakers as well, as I have some. Here I will use MA11ms and MA10.3 so smaller cuts are needed for speakers.I use a Jasper Circle Jig, works well for cutting the driver holes and rebates, can be used for woofers to 8" (about 17cm);
you will need to use polyurethane construction adhesive to glue the parts up, use a lot and all the gaps will be filled with the slight foaming action. use a chisel to level the joint in a few hours, after it becomes rubbery and before it becomes hard. this joint will be incredibly strong but quite unattractive, so veneer is in order.
I would like to avoid to veneer, will then other kind of glue be preferred?
Hi,
Basically you want to make a jig or a fence to follow. The jig will be good for circles. The fences will be good for non-circles like curves or squares or anything really. The key is to pre-make the fence/jig for your design and then you can apply it over and over to the timber.
Example, here's a homemade jig for doing circles (big ones, any size). Using a bit like you linked, but make sure your bit can extend the depth you want if you want to cut through the timber entirely vs just making a bevel or shelf. I fit the router base into a slot I cut with a jigsaw into a board I used as the `jig' and put a screw through the middle into the timber and I placed a metal washer between the two pieces for easy turning.

Drill a pilot hole to insert your router bit. Then you're ready to go.

Go around once, slowly, and you'll get a nice clean circle of your size choice. If it's really thick timber, it may be best to do two passes; first pass at partial depth, last pass at full depth. This one was done in one pass in 1/2" thick material.

The same concept applies to make a fence. You use timber at the shape or size you need and clamp it down. Then just guide your router or jigsaw along the fence. To make a curved fence, use a jigsaw to do the initial rough cut of the shape. Then smooth it out either with sanding or a router to finish. Once that's finished, it's your curved fence. Clamp it onto other timber and cut along its edge to replicate.
Very best,
Basically you want to make a jig or a fence to follow. The jig will be good for circles. The fences will be good for non-circles like curves or squares or anything really. The key is to pre-make the fence/jig for your design and then you can apply it over and over to the timber.
Example, here's a homemade jig for doing circles (big ones, any size). Using a bit like you linked, but make sure your bit can extend the depth you want if you want to cut through the timber entirely vs just making a bevel or shelf. I fit the router base into a slot I cut with a jigsaw into a board I used as the `jig' and put a screw through the middle into the timber and I placed a metal washer between the two pieces for easy turning.
Drill a pilot hole to insert your router bit. Then you're ready to go.
Go around once, slowly, and you'll get a nice clean circle of your size choice. If it's really thick timber, it may be best to do two passes; first pass at partial depth, last pass at full depth. This one was done in one pass in 1/2" thick material.
The same concept applies to make a fence. You use timber at the shape or size you need and clamp it down. Then just guide your router or jigsaw along the fence. To make a curved fence, use a jigsaw to do the initial rough cut of the shape. Then smooth it out either with sanding or a router to finish. Once that's finished, it's your curved fence. Clamp it onto other timber and cut along its edge to replicate.
Very best,
Hi Allen, it is a fullrange speaker: https://www.wodendesign.com/Silbury.htmlIs this a fullrange speaker or multi-way?
https://www.wodendesign.com/images/Silbury-3D.gif
Ron Clarcke's curved mouth is the most challenging part IMO.
Example, here's a homemade jig for doing circles (big ones, any size).
View attachment 1105789
Thanks MalVeauX,
we have indeed done something similar (here below before understanding it was needed a bigger hole around the drill to push away cutted wood and avoid burning it):
It worked also for the rear chamfer:
But for a radius above 3 meters it is not a possibility. I will try the trick of the thin wood handcutted and sanded as a master to copy the curve to the other four speaker mouth sides.
it's the gaps in the joint that will make the joint unattractive, not the glue necessarily. this technique isn't "fine woodworking" but many times you can't (or don't want to bother) to make a joint perfect. the urethane construction adhesive comes in a caulk gun tube and is the consistency of peanut butter. it stays where you put it and can be worked with a finger or palette knife to make filleted joints. makes a very strong airtight cabinet with minimal hassle. the only other glue I think that would work is epoxy (with volume filler) but I don't recommend that. epoxy is messy, expensive and toxic.I would like to avoid to veneer, will then other kind of glue be preferred?
It appears as though there is no chamfer. This is sometimes done with fullrange designs because the larger source directs more of the energy of the higher frequencies away from the baffle edges.it is a fullrange speaker
for reference, the product is Loctite PL Premium in the USAThanks @tommus, I will search it here in Italy/EU.
Big Woden horn, for WA Alpair 10x, A11ms, Pluvia 11Is this a fullrange speaker or multi-way?
dave
Looks like you have been well served.
A couple comment:
Jasper jig is fancy (pricey) substitute for a piece of scrap & a tape measure
A router or CNC to do pretty rebates. Add a 45 degree on the backside, but a big rasp is cheaper more effective & quicker
Chris did a nice description of how to do the backside curves - in the FH3 planset.
Thanx,
A really effective chamfer round over needs to get up to 3-4” to really fight edge-diffraction, and for BS it would need a fat suit. Given the usual drivers most chafer on 18mm is mostly cosmetic, less so for A11ms
I wouldn’t fret about it. Looking at a trapezoidal miniOnken to see the contortions we go thru for big chamfers.
dave
- Home
- Loudspeakers
- Full Range
- Wood working newbies: how to cut speakers' holes and curves