I just did a set of five Advent Minis with 5 1/2" (5 1/4"?...can't remember) drivers. I've done other speakers previously that were larger, but didn't find these any more challenging. Where are you finding frustrations? Might have a tip or two depending upon the areas of difficulty.
I have no trouble with any other drivers until I try to do the 3-inch surrounds? I cant cut away the dust cap for fear of cutting or damaging the tiny voice coil wires so I can put shims in to stop any rubbing but even if I did do that successfully there is nowhere to buy replacement dust caps for these that I know of? I haven't had any replies, so I went ahead and glued the inner section of the surround, it sounds and feels ok (no rubbing) I will water down the glue for the outer section so the surround can slide and find its own equilibrium. That's the theory anyway. lol, I will wait for your reply before I do that.
Glad you wrote back. No need AT ALL to disturb the dust cap or mess around with shims. I don't know if it's OK to link to a thread in a different forum or not; hopefully no one minds. Here's some pics and tips in a post I did of the most recent pair of Advent Minis...
Advent Mini Surround Refurb
Sounds like you've glued the inner surround lip to the cone already, and are about to glue the outer surround lip to the basket, right? Are you using glue that came included with the replacement surround... clear, rubber-solvent based, that sets up fairly quickly kind of like contact cement? If so, all you need to do to make sure the cone stays centered in the voice coil is..
1. First, work the tip of the glue dispenser between the surround lip and basket, and squeeze a small bead around the circumference.
2. Go around with your finger and press the surround down onto that beat to spread the glue, but don't keep pressing so it stays there... you just want to spread the glue a bit at this point.
3. Now, start going around again and pressing the surround back down to the basket, moving all around the driver. Stop frequently and "exercise" the cone... gently press the cone down once or twice with three or four finger symmetrically and let it rebound, then go around and continue pressing down the surround edge. Exercise the cone.... seat the edge.... exercise the cone.... seat the edge. The edge will grab as the glue continues to set, and the cone will be perfectly centered in the voice coil.
I've done a BUNCH of speakers, and never had one rub with this method. I've never had to remove a dustcap or mess with shims to do a surround.
Good luck! Let me know how it turns out.
Oh... and I wouldn't "water down the glue." If you're using something other than the intended glue for these materials/this job, just wait and get the right glue.
Thanks for the reply. I'm using a non-acidic water-based PVA glue, I bought it along with some surrounds from Queensland speaker repairs if I remember correctly? I've used it on many surrounds since. Yes, I have glued the inner lip down already. The method you described is how I do things except for the glue that is used. I have used solvent-based glues years ago but I much prefer to use PVA glue, it gives me more time to work with it and it dries clear. These surrounds have a 3mm outer lip to glue down, that's, where the problem stems from, the outer lip needs to be bigger. It's after midnight here so I had better get some sleep. Thanks for your reply again Musechaser, it's appreciated.
Your link is munged (has bits of two URLs in it). Try this:link to a thread in a different forum or not; hopefully no one minds. Here's some pics and tips in a post I did
https://audiokarma.org/forums/index.php?threads/reviving-some-advent-minis.992803/#post-15532478
Thank you...sorry about that. I went back to the original post above in order to fix the link, but I must be blind. Where is the "edit post" function on this forum?Your link is munged (has bits of two URLs in it). Try this:
https://audiokarma.org/forums/index.php?threads/reviving-some-advent-minis.992803/#post-15532478
Ok..this is an edit to this post. Is the option to edit your own posts time-limited here? I see the option on this one now, but no previous posts.
You get about 15 minutes to catch your typos. Apparenty there is some tradition on this forum of deep retro-editing to make trouble; hence the limit. If it was really important you can (!)Report yourself and ask a mod for an edit. In this case I think most readers will stumble, then read down-thread to see if there is a better link.
Yay! I finally got it. The first try ended up with a slight rub on the voice coil, my second try nailed it. Thanks for the help and suggestions fellas, it is appreciated.
Have proper exact replicas surrounds are a lot more complex then they seem. The right angle to the corresponding flange is utmost important, sizing and glue. Everything counts so you want them right on que. I've always got my replacements and glues through them https://www.simplyspeakers.com/
You will find all the Infinity and all the other popular brands and sizes. If not the guys will probably find you some, they are a helpful crew over there https://www.simplyspeakers.com/
They stock factory glue, the black and the clear. It bonds super well leaving just the right about of pliability. Prep the surfaces super well and clean and they will never work apart until you want them to come apart. Once that glue sticks it stays stuck!
- Home
- Design & Build
- Construction Tips
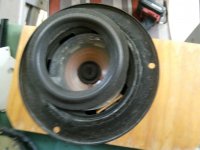
- Tips for refoaming Infinity 3-inch mid-driver surround.