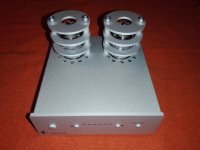
I have noticed that the 12AX7 tubes are "submerged" inside the case, and the filaments radiate a lot of heat into the cabinet. Literally, there is more heat retained inside than dissipated by the upper rings, because the heat rises only through the installation hole of each tube. Very little.
In summer, when we rest our hand on the box, we find that the accumulated heat is enough to shorten the life of this MM/MC preamplifier, which, by the way, works wonderfully.
This pre RIAA is touted as "tube rolling" and I have something to say about that.
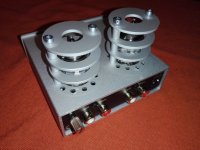
To change the tubes, a small Allen key is needed to disassemble the protection baskets of the tubes, and take out the housing, which has two screws at the bottom and then slides easily.
All good so far, but (as with all tube preamps/amps) handling will cause wear on the pressure terminals. It's not to do "Tube Rolling" once a week. On the PJ Tube Box S2, the sockets press firmly onto the pins, and must be handled with extreme care, exerting a slight circular and upward motion simultaneously. Let's not forget that it is a PCB, fragile by nature to mechanical traction. So since it's summer here, I used it these months without the box, but I decided to overcome the inconvenience of ventilation and definitely leave the original tubes provided by Pro Ject. It looks like the item I received is JJ Electronics. They are good tubes, and if I don't get a (unlikely) gift of two NOS tubes from some prestigious brand, they will stay in place until they show signs of exhaustion.
Well , let 's get to work then !
In summer, when we rest our hand on the box, we find that the accumulated heat is enough to shorten the life of this MM/MC preamplifier, which, by the way, works wonderfully.
This pre RIAA is touted as "tube rolling" and I have something to say about that.
To change the tubes, a small Allen key is needed to disassemble the protection baskets of the tubes, and take out the housing, which has two screws at the bottom and then slides easily.
All good so far, but (as with all tube preamps/amps) handling will cause wear on the pressure terminals. It's not to do "Tube Rolling" once a week. On the PJ Tube Box S2, the sockets press firmly onto the pins, and must be handled with extreme care, exerting a slight circular and upward motion simultaneously. Let's not forget that it is a PCB, fragile by nature to mechanical traction. So since it's summer here, I used it these months without the box, but I decided to overcome the inconvenience of ventilation and definitely leave the original tubes provided by Pro Ject. It looks like the item I received is JJ Electronics. They are good tubes, and if I don't get a (unlikely) gift of two NOS tubes from some prestigious brand, they will stay in place until they show signs of exhaustion.
Well , let 's get to work then !
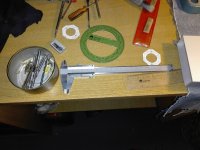
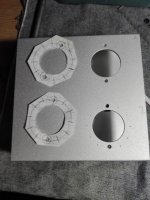
We will need tools to work metal, the material is anodized aluminum, it is soft, but also the wicks should preferably be new or well sharpened.
A simple collegiate protractor will serve to mark the points to be drilled, they will be 10 for each tube, and work from smallest to largest, to achieve accuracy and neatness.
A simple collegiate protractor will serve to mark the points to be drilled, they will be 10 for each tube, and work from smallest to largest, to achieve accuracy and neatness.
Attachments

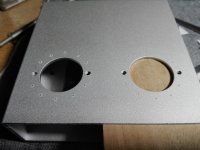
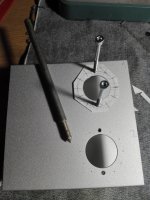
After marking with a punch on the points of the grid, we remove it and proceed to drill, first with a 1 mm bit and then 4.5 mm.
Attention ! Mark the threaded holes with a pencil so as not to drill on them! (the school rubber will remove the mark without leaving traces on the anodized)
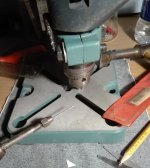
To drill without vibrations, it is convenient to hold the box with a press, protecting it with some cloth and filling it inside so that it does not flex when tightening the drill.
The space to fill is 27 mm.
Attention ! Mark the threaded holes with a pencil so as not to drill on them! (the school rubber will remove the mark without leaving traces on the anodized)
To drill without vibrations, it is convenient to hold the box with a press, protecting it with some cloth and filling it inside so that it does not flex when tightening the drill.
The space to fill is 27 mm.
Attachments


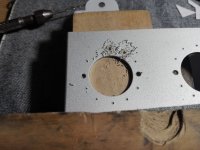
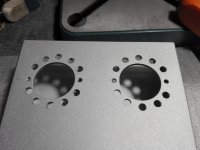
Finally, we remove the burrs in the holes with a round file and inside the box with a flat file. It is important to have tools for small tooling jobs.
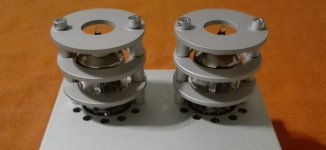
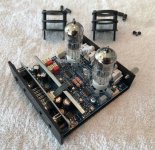
The rest are the general photos of the finished work and the appearance of the refurbished ProJect Tube Box S2 with extra ventilation. 👍
Don't hesitate to ask any questions ...
The rest are the general photos of the finished work and the appearance of the refurbished ProJect Tube Box S2 with extra ventilation. 👍
Don't hesitate to ask any questions ...
Attachments


You should still be able to find proper IERC tube coolers on ePray, Pearl HiFi seems to have stopped manyfacturing but some firms still have some in stock. (e.g. partsconnexion) Once they are gone, they're gone. If memory serves me right then Bill Perkins (Pearl HiFi) has made over 300 000 coolers.
Attachments
Actually, what I wanted was to extend the life of the internal components of the preamplifier, you can read it in the attached.
There are some very temperature sensitive capacitors very close to the bottom of the tubes.
Also, the idea was to keep the original look.
Thanks anyway for the contribution.
https://www.diyaudio.com/community/threads/audio-reviewers-are-they-serious.376267/page-6
Post 102
There are some very temperature sensitive capacitors very close to the bottom of the tubes.
Also, the idea was to keep the original look.
Thanks anyway for the contribution.
https://www.diyaudio.com/community/threads/audio-reviewers-are-they-serious.376267/page-6
Post 102
Last edited:
- Home
- Amplifiers
- Tubes / Valves
- Increase cooling of tubes Project Tube Box S2