Hello,
My usual forum for anything DIY Audio is at Full Range speakers. But I have an issue with a Yamaha RPU100. These are very old USB 1 units of which I have both as a new purchase and one from Ebay.
The unit in question has given full performance on and then off for no reason after sitting unused for years due to other setups.
I've had the case off to inspect for any damage. These units have been lightly and carefully used.
For all that I can only diagnose the problem as being outside the case at the
speaker flip terminals (the red and black sort.) and that something, some wire fragment from the twisted bare leads, is shorting out the audio. Just reassembling everything may get it going. But if moved, things go dead again.
The flip terminals are not easily removed as in other older audio where something unscrews and you change the part. These flip terminals go to
a fine wire block that is soldered onto a tiny 'daughter board" inside the case.
There's nothing visibly damaged to repair if I were good enough to do that.
That leaves the outside and anything I can use to clean out the cavity of the flip terminals. Compressed air with a fine tube nozzle will just move whatever it is around.
Other things I thought of: Are there any fine pin jacks that can be used instead of bare twisted wire? Or is that even acceptible?
The other last resort I thought of was to cut into the shell of the flip terminals and then inspect and blow out what wire fragment might be in there.
If this topic has to be moved to some other subforum, apologies. I have not dealt with such questions before.


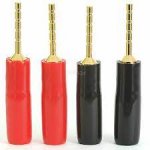
Yes that's the style. What are the names of the pin style jacks? Parts Express or other?
I'm nonplussed by the whole problem. At wits end after repeatedly exchanging parts, speakers etc. Today the unit is not giving audio again. I don't expect anyone here to respond to such an intermittent problem. Sooner or later I'm going to have to look inside the terminal block by cutting out just a side to get some access.
But the pin jack is definately something to try.
If you use the front panel switch to turn off all the speaker outputs, does the headphone jack work ok?
I have looked at your previous thread, which I admit to finding hard to follow.
Troubleshooting a Yamaha RPU 100 receiver
I would consider the chances of an external short when the speaker wires have been removed from the spring clips to be extremely low, especially if you can't see any external stray strands of wire.
Troubleshooting a Yamaha RPU 100 receiver
I would consider the chances of an external short when the speaker wires have been removed from the spring clips to be extremely low, especially if you can't see any external stray strands of wire.
Speaker Pin / Spade TerminalsYes that's the style. What are the names of the pin style jacks? Parts Express or other?
As I mentioned it confuses me as well and has me spinning. The unit itself seems solid in all respects.
For the headphone jack, well I have never had any.
For the headphone jack, well I have never had any.
If the output is being shorted, the headphone jack should work ok if the speaker switches are all turned off.
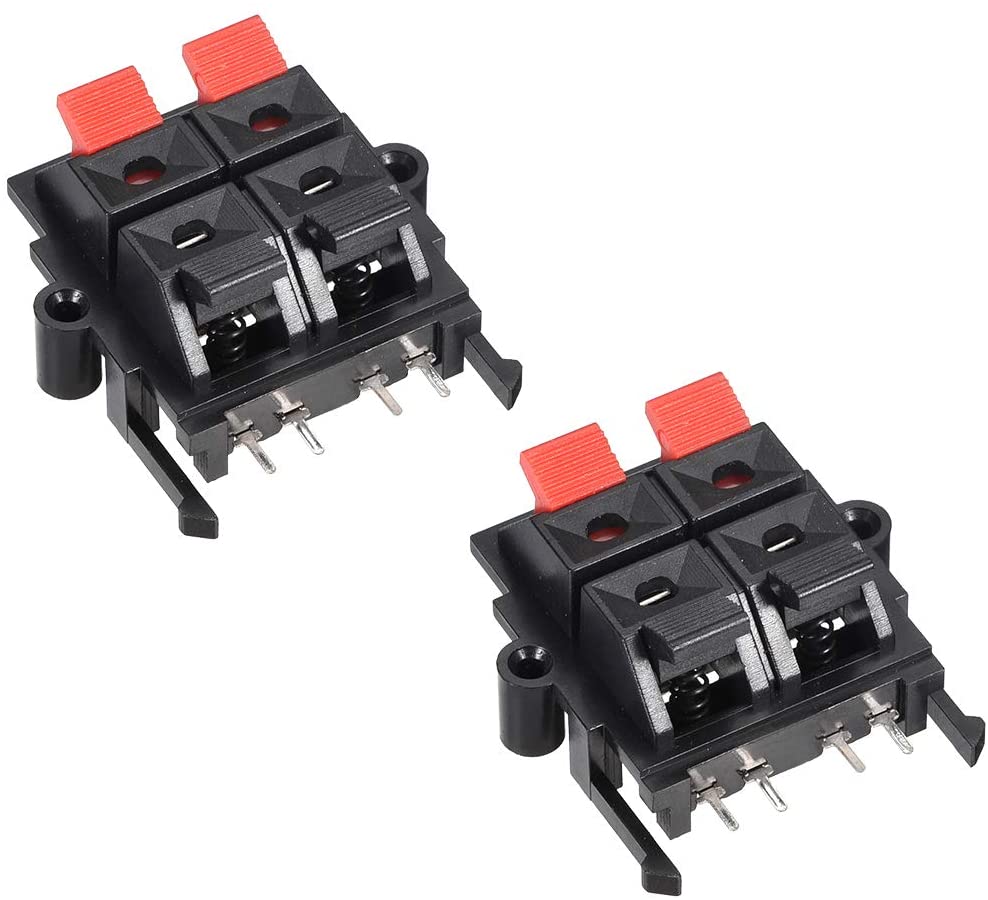
Do the speaker connectors solder into the main circuit board, like this one?
I had a PC monitor which cut-out, came back if smacked, or SMACKED, but always cut-out again. That was just one wire. Your connector may be 4 wires, 2 snaps, and 2 screws; you can't smack it hard enough to shift with all that holding it in.
Take amplifier cover off and inspect the solder joints with bright light and magnifier.
Last edited:
I noted someone said I had made this topic previously. Apologies for that I had forgotten. Such a post did not turn up in the 'suggested readings' when I made it.
CRTs: the good old days of banging on a monitor or a television. 🙂
I explained what the modular style of the terminal box is or tried to. It isn't like the picture. Or if those are simply standard with another set of terminals
inside then I'll have to cut into the box. The terminal box (of the four flippers) has two screws holding it in place. But those just release the box from the _inside_. That is what has made this harder than reasonable: a design tweak. Like the old message on that back of your table radio: No user serviceable parts within. The sub assemblies are not at all easy to view or access.
I may let this go for a while and think about how to enter the terminal box with extreme care. Once done it can't be patched.
Thanks for answering.
I am back and did some things. I got the pin plugs shown above and connected those.
But I'm onto another issue. In fiddling with the rear of the receiver, what I use for an FM antenna needs a better connection. If you can get a good shot of the rear of the Yamaha from above, to the left is a 75 ohm jack which is marked on the panel. I connected a straight wire to that at the pin center but what is needed is a straight wire with the proper (balun?) or plug at the end. I did connect a cable with what appears to be the correct pin style end-- but it is a screw type standard home patch cable.
Can someone here show the correct 75 ohm plug end to which I can connect
a wire antenna-- just to get some FM audio? The jack end looks like an RCA phono jack visually - a pin center with a plain round sleeve.
I think the shielding or the grounding-- whatevs that I lacked was producing the on again off again behavior.
I found a patch cord in one of my left over parts from jobs long ago-- likely from a television out. That is serving as an antenna. But I'll run it for a while, turn it on and off etc to see if it's stable. It fell into my hand while I was looking for something else.
But please say how to describe the part exactly-- 75 ohm pin center with plain (not screw type) sleeve.
But please say how to describe the part exactly-- 75 ohm pin center with plain (not screw type) sleeve.
Last edited:
My old Pioneer tuner works with one of these
https://www.fnac.pt/mp10833941/Hama...wcB&oref=3ce0523a-a505-48b3-fc77-95eb30049517
The original was made of a T with 80cm simple wires each side.
https://www.fnac.pt/mp10833941/Hama...wcB&oref=3ce0523a-a505-48b3-fc77-95eb30049517
The original was made of a T with 80cm simple wires each side.
Last edited:
I don't think it's the RG59 above but a further rummage in my leftover box found a pig tail
where one end screws on in the usual coax style and the other end can go and fit snugly to the 75 ohm jack. I still don't know what it's called.
I'll continue to monitor all this. I have a jungle of odd wires strung up now including a standard coax with a loop on one end (looking like a lariat) acting as the antenna and connected to that pigtail going into the receiver. Through all this I think general reception is less than clear channel FM but it's functioning.
The other mods were necessary, though, since the receiver has more inputs for a PC etc.
Another issue may be a volume control that is going which cuts in an out. No way to clean that that I know of.
Thanks for your patience. I'm just trying to get the unit to work to monitor a couple of things.
Spray the volume and ALL pots, switches and jacks, work them a few times.
Jacks, put pins and remove.
Seems like a loose contact, usually age and dust related issues.
Jacks, put pins and remove.
Seems like a loose contact, usually age and dust related issues.
The volume is a large vernier (I think) shaft which I can perhaps force some canned air into. But even when I had it apart (I have two of these), very little is exposed when you get the case off.
I will try the compressed air. Perhaps it has to do with the nature of all the electronics-- like there's a pause and then the audio will begin. I'm guessing at all this though.
Definite progress from all the false starts and dead ends I've had with this.
I will try the compressed air. Perhaps it has to do with the nature of all the electronics-- like there's a pause and then the audio will begin. I'm guessing at all this though.
Definite progress from all the false starts and dead ends I've had with this.
I use a glass syringe half filled with iso alcohol to flush out dirt and debris from mechanical stuff like that.
The air in the syringe creates a spray effect.
Half a liter of alcohol is the same price as 150 ml in spray can, which is also containing a green house damaging propellant.
I then let it dry out, and then use contact spray, again working the parts.
Works...
The air in the syringe creates a spray effect.
Half a liter of alcohol is the same price as 150 ml in spray can, which is also containing a green house damaging propellant.
I then let it dry out, and then use contact spray, again working the parts.
Works...
Vintage SMK 75 Ohm to 300 Ohm Push-On "F" Type Balun
This is what I landed on for the shape of the 75 ohm plug end. I don't need this vintage piece but the push on plug end with the pin center and metal shield around and to standard screw on cable connector that would be at the wall for cable tv.
It's been difficult for me to describe this even to Parts Express. Who knows where a listing of these are? I have another assembly to do similar to what I did with the first RPU100.
Here's something. No Radio Shacks anymore....
F Female to PAL Female Adapter
I don't know what PAL is unless it's for some video connect.
F Female to PAL Female Adapter
I don't know what PAL is unless it's for some video connect.
- Home
- Design & Build
- Construction Tips
- Flip terminals on audio receiver need repair/clean of debris