Hi,
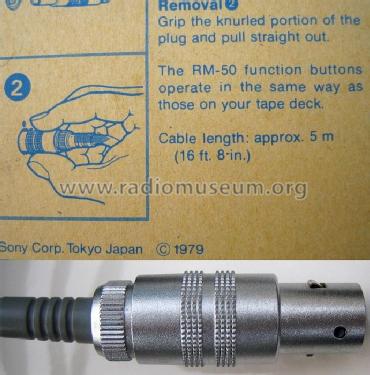
i currently restore a vintage Sony TC-K75 cassette deck, and I would like to know what is the reference of the connector used for the old wired remote. Here is a photo of the female part located on the tape deck itself:

I am looking for the male part of this connector : do you where to buy one ??
I have been searching for hours but cannot find it !
Thank you,
That is a 4 pin mini-DIN connector. Search RS, they have it,
Better known is the 5 pin, same size, used on PS2 kbd and mice.
Better known is the 5 pin, same size, used on PS2 kbd and mice.
It looks like a four pin Lemo connector. It may have been a custom spec for Sony. Looks to be an 0B size, now obsolete though still some stock floating around. There's 100s of different pin configurations of Limo connectors.
four pin lemo male plug - Google Search
Low voltage connector | LEMO Connectors | Push-Pull, Circular Connectors | Cables
four pin lemo male plug - Google Search
Low voltage connector | LEMO Connectors | Push-Pull, Circular Connectors | Cables
Last edited:

I have chat with a Lemo technician, he said that it is not a Lemo connector...and of course does not want to search for a compatible one ...
I would not like to change for another (female) connector because I would like to keep the device with its original parts ! but I have been searching for days and still not any solution on the horizon !
I would not like to change for another (female) connector because I would like to keep the device with its original parts ! but I have been searching for days and still not any solution on the horizon !
Could you add a hidden connector round the back panel that brings out the remote signals on something more mainstream like miniDIN? Then you can
use either.
use either.
The housing does look too thin to be a Lemo, and Sony likely would have sourced from a Japanese manufacturer. Who was the big OEM electronics connector maker in Japan back then?
You can cast it in epoxy putty.
Use mold release spray.
First check all pins work in the deck.
Then put the male pins in the socket, after wiring, having sprayed the socket first, and put a lump of epoxy putty with wet hands.
Wet hands prevent it sticking to your hands, and adding a few drops of water makes it smoother.
Shape it to whatever shape you feel like. Remove after it sets, and use.
Release spray is to prevent it sticking to the socket, so you can use it as intended, Sony made it remove able for some reason.
Voila...DIY cable end.
Male pins taken from strip connectors or whatever you can find.
Where is the original?
Maybe you can use the shell etc.
Epoxy putty is two part talc filled epoxy, it sets to a hard mass in a few hours, different types and colors are sold, just don't use the five minute or metal filled ones (the metal ones are used for casting repair, for example).
Last edited:
I think it could be a Hirose push/pull circular connector, but the keying is likely custom for Sony.
Keyword Search - HIROSE Electric Group [Connector]
Keyword Search - HIROSE Electric Group [Connector]
Could you add a hidden connector round the back panel that brings out the remote signals on something more mainstream like miniDIN? Then you can
use either.
Yes this an elegant solution, and I can do this for a unit I would own, but what I try to do is to propose the I.R. remote to everybody owning this Sony unit: so having to solder anything or to modify the chassis is not an option for most users...
S-video perhaps would fit.
it is also what I thought about yesterday evening: I am going to order a cheap S-video cable just to see if the pins fit in the receptacles and if the plug diameter is correct.
If yes, it would jut be necessary to cut the plastic squared pin that is located in the center of the connector, and supposed to go into the center of the female connector.
You can cast it in epoxy putty.
Use mold release spray.
First check all pins work in the deck.
Then put the male pins in the socket, after wiring, having sprayed the socket first, and put a lump of epoxy putty with wet hands.
Wet hands prevent it sticking to your hands, and adding a few drops of water makes it smoother.
Shape it to whatever shape you feel like. Remove after it sets, and use.
Release spray is to prevent it sticking to the socket, so you can use it as intended, Sony made it remove able for some reason.
This is a more complex solution that I do not feel confortable with, although it is clearly and "advanced" one: I am not a master of mold release spray !
-----------
Another possible approach would be to find a "modern" 4 pins female connector to replace the Sony original remote connector: the final user would "just" have to remove the original female remote connector / solder the 4 cables to the new one / install the new one at the same location than the original remote connector.
I measure the size of the original remote female connector to see if I find something similar that would not hurt the eyes when looking the unit...
Just 1 post before yours there was an answer and a nice technically sound (well, in fact superior quality) and esthetically pleasing solution offered by me but OK then, the offer is not valid anymore.
Attachments

Last edited:
@jean-paul:
oups I missed it ! What is the reference of this connector, and what is the "surgery" that you mean ?
oups I missed it ! What is the reference of this connector, and what is the "surgery" that you mean ?
Any oily spray will work as a mold release, WD40 is acceptable.
The paper on the back of stickers is coated with silicon release, and the paper used in baking is also sometimes waxed or silicon coated as a way to reduce sticking.
The paper on the back of stickers is coated with silicon release, and the paper used in baking is also sometimes waxed or silicon coated as a way to reduce sticking.
Or get a solid piece of acrylic or PVC, drill holes for the pins, and run the wires out the back.
This means precise placing of pins.
You also get quick set epoxy putty at crafts stores, you can lump it then coat with wax paper after pressing into a cylinder shape, the coating will make the surface glossy.
You can practice if not comfortable, it is cheap, about 4 Euros for a kilo, you need hardly 50 grams, maybe less.
In hours you will be at work, rather than days after actually getting to order the product you need, which seems difficult to get.
Last edited:
- Home
- Design & Build
- Parts
- What is this connector ?