There aren't many photos of this recently released horn circulating yet, so I wanted to post a few and add some commentary.

The finish is a *very* coarse spray applied texture finish. If you desire a domestic friendly finish, be prepared to spend a few hours per horn sanding, priming, sanding and painting these to a satisfactory finish.
No digital measurement tools were used in measuring this horn, so take the tolerance of the measurements to be within 1/32" total.

Compression driver mounting flange thickness 5/16"
Compression driver mounting flange to end of slot inside horn 7 1/8".

Inside of flange to start of horizontal flare rate change on outside of horn 6 9/16"

Using a 3/8" thick mounting plate will give 7 1/16" from the inside of the flange to the horn wall. A 1/2" thick mounting plate would move that to 7 13/16" . Ideally a pair of 6-7" woofers could be used mounted close to the compression driver.
Approximate wall thickness where proposed midrange taps to be drilled - 3/16" - determined by measuring the inside and outside, subtracting the difference and dividing by 2.
Width inside the horn at midrange tap location 1.5 inches approximately. 1.5" + 3/8" + 1" = 1 7/8 inches + flange thickness of woofer /mid if 1/2" mounting plates are used.

The finish is a *very* coarse spray applied texture finish. If you desire a domestic friendly finish, be prepared to spend a few hours per horn sanding, priming, sanding and painting these to a satisfactory finish.
No digital measurement tools were used in measuring this horn, so take the tolerance of the measurements to be within 1/32" total.
Compression driver mounting flange thickness 5/16"
Compression driver mounting flange to end of slot inside horn 7 1/8".
Inside of flange to start of horizontal flare rate change on outside of horn 6 9/16"
Using a 3/8" thick mounting plate will give 7 1/16" from the inside of the flange to the horn wall. A 1/2" thick mounting plate would move that to 7 13/16" . Ideally a pair of 6-7" woofers could be used mounted close to the compression driver.
Approximate wall thickness where proposed midrange taps to be drilled - 3/16" - determined by measuring the inside and outside, subtracting the difference and dividing by 2.
Width inside the horn at midrange tap location 1.5 inches approximately. 1.5" + 3/8" + 1" = 1 7/8 inches + flange thickness of woofer /mid if 1/2" mounting plates are used.
Good stuff ! Been wondering about the same syn application for the horn.
Would you give some picts of the back sides of the horn....that show all the ribs etc...
Big thx!
Would you give some picts of the back sides of the horn....that show all the ribs etc...
Big thx!
Continued:
Thoughts on maximum driver sizes - if 6-7" woofers are used on the horizontal plane, a 12" woofer would be the maximum on the same plane past the flare rate change, and that would be a tight squeeze, but possible. May have to machine a bit of material off the mounting flange if your 12" woofer has a wide flange.

On the vertical plane, up to an 18" woofer could be used, but that is if only a 10" woofer was used on the horizontal.

Rotated 90 degrees, so the vertical is up and down:

Thoughts on maximum driver sizes - if 6-7" woofers are used on the horizontal plane, a 12" woofer would be the maximum on the same plane past the flare rate change, and that would be a tight squeeze, but possible. May have to machine a bit of material off the mounting flange if your 12" woofer has a wide flange.
On the vertical plane, up to an 18" woofer could be used, but that is if only a 10" woofer was used on the horizontal.
Rotated 90 degrees, so the vertical is up and down:
I searched around and I did have a 6.5" woofer for mock up on the sides of the slot.

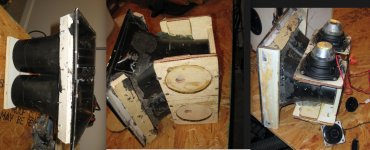
Some pictures of the ribs. I'd likely use a reciprocating saw followed by an angle grider with a coarse 40 or 60 grit flap wheel to remove the ribs to make the surface suitable for a mounting flange.

Some pictures of the ribs. I'd likely use a reciprocating saw followed by an angle grider with a coarse 40 or 60 grit flap wheel to remove the ribs to make the surface suitable for a mounting flange.

Thanks for those picts.
It's hard to get a good read still.
Any perpendicular side shots, say with the mouth on a table, to show curvature and depth lengths?
Without any drivers in picts?
Sorry for asking for more, but so far it looks like the diffraction slot may be long, the ribs high, or the curvatures messing up.
It would surely be so sweet if this thing could work for a syn....🙂


For reference the width of the ruler is 1". Over 16" the maximum distance is 1/2" from the edge of the ruler to the outer wall on the vertical.
Thanks again.
Looks like the diffraction slot is really long..is the 7 1/8 " meas you gave in first post their length?
I can't see putting any drivers on the horiz walls.
Are the vertical walls flatter?
Looks like the diffraction slot is really long..is the 7 1/8 " meas you gave in first post their length?
I can't see putting any drivers on the horiz walls.
Are the vertical walls flatter?
The slot is 7 1/8" from the flange where the compression driver mounts, as measured on the inside of the horn yes.
On either the horizontal or the vertical, a mounting flange of baltic birch would have to be glued to the horn after the ribs are removed. This could be accomplished with PL Premium. Some infill would be needed.
Yes, the vertical is flatter, with only 1/2" curvature over 16".
On either the horizontal or the vertical, a mounting flange of baltic birch would have to be glued to the horn after the ribs are removed. This could be accomplished with PL Premium. Some infill would be needed.
Yes, the vertical is flatter, with only 1/2" curvature over 16".
Mark, maybe these pictures from Bushmeister's X-Bush build will help you understand what I mean by making mounting flanges.


What a massive price for a plastic horn! It does look rather nice, though one should ask why they put in a classic diffraction slot into a modern horn like this?
Could one put the midrage tabs into the diffraction slot?
But I guess if you would use a DXC or comparable coax tweeter, you would skip those anyway.
Could one put the midrage tabs into the diffraction slot?
But I guess if you would use a DXC or comparable coax tweeter, you would skip those anyway.
Mark, maybe these pictures from Bushmeister's X-Bush build will help you understand what I mean by making mounting flanges.
Thanks,
Yep, i knew what you meant by making mounting flanges.
As I've tried to stay alert to builds using existing commercial horns for synergies.
(Have a pair of old large DDS horns i will try someday...)
If the concavity, rib removal, etc all works out with the 464 horn, i could see giving it a try, if i could get the ports close enough to the diffraction slot to go straight to a pair of 12"s or such using the dcx464. I just can't see any
sense in trying to put smaller mid cones on the diffraction slot.
Thx, last time i looked B&C didn't have the horn up yet.
Heavy sucker...that's good imo !
I prefer Bondo-Hair Long Strand Fiberglass Reinforced Filler to a glue like PL Premium, the Bondo sets up hard and machinable in under an hour, and can fill gaps of an inch. Using that kind of filler (Bondo-Hair is just one brand name) removal of the ribs wouldn't be needed.On either the horizontal or the vertical, a mounting flange of baltic birch would have to be glued to the horn after the ribs are removed. This could be accomplished with PL Premium. Some infill would be needed.
Placement of additional cone drivers really would be dependent on what compression driver you plan to use, if you are crossing at >400 Hz their entrance holes need not be any closer than around 8" from the compression driver mounting flange.
The photo below shows about a half-inch Bondo-Hair used, about a golf-ball sized quantity for each of the four entry holes, the plastic EV PA-60 horn assembly is considerably stiffer now..
Art
Attachments
Last edited:
Thanks for starting this thread. I was thinking the exact same and planned to post about it eventually if nobody else did.
Having built a two flare, 3 way synergy from plywood, it's pretty challenging and even more difficult to make look clean. This horn might be an excellent shortcut to putting together a new crowdsourced multi-entry design.
Speaking for myself, I've got a 2 Faital HF10AT and 4 B&C 12NDL76 and I've been contemplating what I want to do with them.
Thanks,
Yep, i knew what you meant by making mounting flanges.
As I've tried to stay alert to builds using existing commercial horns for synergies.
(Have a pair of old large DDS horns i will try someday...)
If the concavity, rib removal, etc all works out with the 464 horn, i could see giving it a try, if i could get the ports close enough to the diffraction slot to go straight to a pair of 12"s or such using the dcx464. I just can't see any
sense in trying to put smaller mid cones on the diffraction slot.
If one was using a more pedestrian 1.4" driver compared to the co-axial compression drivers available, smaller mid drivers at the slot might be an option.
I prefer Bondo-Hair Long Strand Fiberglass Reinforced Filler to a glue like PL Premium, the Bondo sets up hard and machinable in under an hour, and can fill gaps of an inch. Using that kind of filler (Bondo-Hair is just one brand name) removal of the ribs wouldn't be needed.
Placement of additional cone drivers really would be dependent on what compression driver you plan to use, if you are crossing at >400 Hz their entrance holes need not be any closer than around 8" from the compression driver mounting flange.
The photo below shows about a half-inch Bondo-Hair used, about a golf-ball sized quantity for each of the four entry holes, the plastic EV PA-60 horn assembly is considerably stiffer now..
Art
Art, I'd prefer to use an adhesive to attach mounting plates, polyester resin ( from which autobody fillers are made ) makes for a poor adhesive.
- Home
- Loudspeakers
- Multi-Way
- Suitability of ME464 as a multi-entry horn / synergy