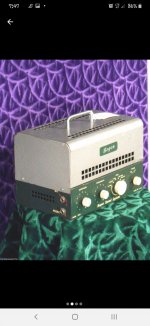
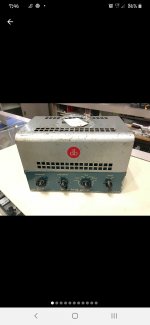
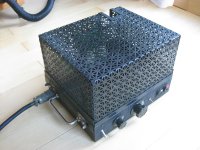
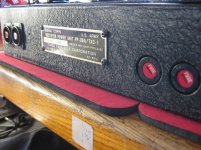
Hi all,,, I have this great little Bogen amp chassis that needs a cage cover, about 4" high, 7" deep & 11" long. I saw the perfect metal at Home Depot, but don't know how to quite pull it off. I tried looking for YT tutorials, but all you find is Farady & bird cages. Please check my photos for 2 different cage styles on my exact amp. I'm sure I wouldn't need a degree in Origami, but any tips? I'm not looking to do the exact replacement, just a rectangular cover that would be open air on all 5 sides.
Thanks all & stay well!!
Thanks all & stay well!!
Attachments
Last edited:

Fold a single piece of perf stock to make the front, top, and back.
Cut 2 pcs of sheet stock to make the sides. To join them, either use
angle stock, or bend 3 edges of each sheet stock, and bolt together.
You already have mounting holes on the amplifier.
Cut 2 pcs of sheet stock to make the sides. To join them, either use
angle stock, or bend 3 edges of each sheet stock, and bolt together.
You already have mounting holes on the amplifier.
Last edited:
Since you've most likely looked for a used one without success, maybe you can make a CAD model in Fusion 360, SolidWorks or your favorite software program.
Take or send the CAD model to a sheetmetal shop and get a quote. Or, you could also take it to a shop that has a waterjet cutter. The shop will most likely have a minimum setup fee.
If you don't know how to make a CAD model, advertise for somebody local to create the CAD model. Kids are learning CAD in high school. Or, you could download a student or educator copy of Fusion 360 for free. You also might check to see if there's a local maker space near you. They will have CAD programs you might be able to use.
This is DIY. Lots of NASA people in Florida, you shouldn't have a problem finding someone to make a CAD model, sheetmetal shops.
Basically what Rayma said.
To solder, you need a soldering iron. Cheap and available, you buy one and learn to use it.
Same with almost any hand tool.
BUT to cut, fold and spot weld sheet metal, you need shears (the machine, not hand driven glorified scissors), a folding press and spot welder.
Too expensive and complicated to buy so next best is to get somebody who does and uses them regularly.
In he old days tin sheet shops were everywhere, they made custom stuff such as rain gutters, kitchen chimneys, animal feeders, etc.
Sadly all of that is currently bought premade at Home Depot and similar places, so old shops have been disappearing one by one.
But maybe you can still find one.
Or an Air Conditioning shop who makes their own air conduits (or knows who makes them)
All of them have the necessary equipment and can make your cover in a jiffy, just you supply peforated metal sheet to save them the inconvenience of getting it.
CAD drawings are fine, but for "just one" maybe not justified learning the whole package, so I suggest you make a cardboard mockup to check dimensions, and then carry it to metal shop as a model.
As suggested above, you need one "inverted U" shaped piece made out of back wall, roof and front wall; plus right andn left walls, slightly taller so side "flaps" extend downwards over chassis sides and can be screwed to them using existing holes.
To join side walls to inverted U structure, each of them has 3 90 degree bent flaps, say 8 to 10mm wide, on top, front and back edges, spot soldered to main structure.
Alternatively you can make 2 or 3 1/8" (3.25mm) holes on each flap and pop rivet them together.
Best I can describe it without a drawing.
Locally we have welding shops that do metal fabrication. SLicing, folding, and tacking together should not be a challenge for them.
In You Tube searching, don't call it a cage. All you are really making is a metal box.
In You Tube searching, don't call it a cage. All you are really making is a metal box.
MVANDMAR,, this is exactly all I want. They have this exact mesh at Home Depot, that I could bring to some fabricate. What do I look for locally, machine shop, metal fabricator?
Many thanks to all.
Many thanks to all.
I suggest a welding shop. Sheet metal shops are usually more into HVAC ducts and such. But if a welder doesn't care to take on your project, ask him to suggest a shop that would.

A 11x7.75x4 cash box, cut an opening on the bottom to allow it sit on top of the amp, drill some holes on all side. Just an idea
 🙂
🙂 https://www.quill.com/pm-company-pmc04963-cash-box-7-compartments-pebble-beige/cbs/51044746.html
If you want to spend $50 max and spend an afternoon in your garage to make your own tube cage without knowing something about sheet metal, then you're free to hack away. That Bogen amp tube cage will look like a homemade tube cage.
There are several online companies that can provide a cover to your specifications if you can provide an accurate drawing for them to build from.
Could get something that’s very close to the original using the right equipment.
Paint will stick better to steel, would suggest a thickness of 16-17 awg.
Could get something that’s very close to the original using the right equipment.
Paint will stick better to steel, would suggest a thickness of 16-17 awg.
1950s amp cages are deceptively simple, but professionally replicating them today is expensive. The one at first post begins its life at the laser cutter/punching machine to obtain the shape and the holes. The square punch is uncommon on modern parts, so it could be replaced by a laser or water cut. Then you need 8 precision bends at the press brake machine; most are the inside fold of the front and back cover. Then you need two rounded bends with a special tool, and finally 4 spot welds. And then there is the painting. If you want a vintage hammered finish, there is an additional cost. Back then this part was built on large quantity with specialized tools; today the best you can hope to build with generic tools and low labor will resemble the cage of Vox night train or Mooer: a perforated metal sheet that has been cut in the shape of a cross, with 4 bends. It will require at least 2 mounting screws on each face. The solution described by Rayma at post #2 is the easyest way to do a cage at home, but it will definitely look handmade. The angle stock could be thin aluminium, very easy to work with a Dremel. If you've never tried making sharp folds on metal sheets and don't want to figure out how to do it precisely enough: cut the top, front and back as separate pieces and use further angle stock to keep everything togheter.
Last edited:
Of course one could go diy, here’s a video showing a method of bending the metal using basic materials.
Homemade Sheet Metal Bender - YouTube
I just figured that since it was a struggle to find this type of information, then maybe one of the competitive online companies would be a better way to go.
Homemade Sheet Metal Bender - YouTube
I just figured that since it was a struggle to find this type of information, then maybe one of the competitive online companies would be a better way to go.
If you are not looking for an exact replacement a similar cage to the one in the first pic looks doable at home with simple tools. I think the secret is knowing the limitations of your tools and skills.
Now if I was doing this I would go with easy to drill round holes and no handle on top so I could use lighter gauge metal that is easier to work with, probably 22-24g. An inexpensive sheet metal nibbler will cut it fine and a file can clean up the edges. Looks like 3 pieces would do the job, the 2 sides and the top. For the top those bends can be done by finding a pipe about the right size and bending the sheet around it. Use flat pieces of wood to keep the flat parts flat. Look up some sheet metal forming videos for inspiration. Leave little tabs on the sides that you can bend 90' to give the sides something to mount to.
I would do the top first and then use that as a template for the sides so whatever radius you make is easily duplicated on the sides. For bonding the sides to the top you can use a low heat braze or solder if you don't want to use screws. However some small button head cap screws would not look bad.
Aluminum or steel? Steel is easier to paint but aluminum is easier to work with and can be left bare if desired (a scotch brite pad will give a nice finish).
Also make a cardboard model first and assemble it just like you would a little craft project. Easy and it gives you your template.
Most important take your time, slow and meticulous is the way. Doing something like this with hand tools is a very slow process. This is a DIY site so we all enjoy the fun of making something ourselves. Now if you want to learn some new skills, make lots of mistakes, and invest the time in a project like this it is very satisfying. However if you just want a cover for the amp a local metal fabricator could do this in an afternoon.
Personally I find it gratifying to buy old instrument cases and adapt them.
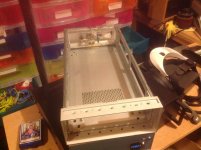
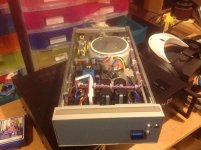
Here's an old HP function generator case I got off Ebay for £20 and fitted in a 500VA power supply for my class A amp. The case is superbly built and I often find you get first class components such as IEC mains connectors etc.
Mike
Here's an old HP function generator case I got off Ebay for £20 and fitted in a 500VA power supply for my class A amp. The case is superbly built and I often find you get first class components such as IEC mains connectors etc.
Mike
Attachments

Very cool,,, After making countless calls to every metal man withtinb20 miles, I found this shop that deals with lightweight bending like this,,
Only 45 bucks,,,, tho I'm very handy &often for something less than perfect, I'll let him do it.
Thnx
Only 45 bucks,,,, tho I'm very handy &often for something less than perfect, I'll let him do it.
Thnx
Normal sheet metal pricing is a dollar a hole. My count on your top would be 20 holes by a CNC G code punch. That would leave the setup fee at $25. Extremely reasonable.
One secret to getting along with small fabricating shops is to pickup your work on Friday afternoon a bit before quitting time. Have a cold case if beer in your car and with the boss's permission leave it for the crew.
Also of course pay your bill with cash, if allowed!
One secret to getting along with small fabricating shops is to pickup your work on Friday afternoon a bit before quitting time. Have a cold case if beer in your car and with the boss's permission leave it for the crew.
Also of course pay your bill with cash, if allowed!
Maybe you can't take credit for the design, but the execution looks wonderful!That is how mine was made with the front, back, and top being one sheet folded, then the two sides are spot welded on. Chassis is a repurposed military power supply so i cant take any credit for the design...
- Home
- Design & Build
- Construction Tips
- How to Fabricate Amp Cage?