Hi All.
I was hoping to remove the dust caps of 2 Jamo Loudspeaker Drivers I'm refoaming.
Would prefer to remove them without cutting, as my options will be to re glue the Caps after the operation, or replace them with new examples.
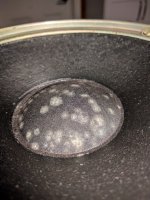
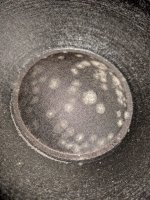
I prefer to re use the originals, but they are both spotted with mould.
They also appear to be of the woven variety rather than solid, and over the years may have lost their ability to be as air tight as they were when new???
If I do replace them then the ring of the old Caps will remain on the cones and might affect sound.
Can the old Caps be removed, by soaking with acetone, or will this damage the cones?
The replacement Caps appear to have a woven texture underneath but more solid in appearance on their domes.
thanks
Cliff
I was hoping to remove the dust caps of 2 Jamo Loudspeaker Drivers I'm refoaming.
Would prefer to remove them without cutting, as my options will be to re glue the Caps after the operation, or replace them with new examples.
I prefer to re use the originals, but they are both spotted with mould.
They also appear to be of the woven variety rather than solid, and over the years may have lost their ability to be as air tight as they were when new???
If I do replace them then the ring of the old Caps will remain on the cones and might affect sound.
Can the old Caps be removed, by soaking with acetone, or will this damage the cones?
The replacement Caps appear to have a woven texture underneath but more solid in appearance on their domes.
thanks
Cliff
Pictures please including close up at the right angles so we can see if the woven texture is intended to just keep dust out or also allow for heat dissipation.
In general dust caps are NOT glued to cone with thermosetting adhesives (which would make your task impossible) but with solvent based ones, which *sometimes* may be carefully soaked in approppriate solvent , softened and removed with no damage.
Problem is, if cone is "plastic" (Bextrene, etc.) solvent will make a softened/weakened ring: edicine is worse than maladie.
And if paper, it becomes softened too and it´s almost impossible to remove dustcap without tearing away and removing/cracking some cone fibers.
My point? it can be done technically and sometimes I do , but it´s dangerous.
My suggestion?:
1) draw some pencil marks on dustcaps and cone so they can later be realigned perfectlly.
2) carefully cut dustcap around *almost* touching cone but never actually doing it, with a VERY sharp knife.
A surgical blade (not "labelled" surgical quality but an actual Medical one) mounted on the proper handle will be best.
3) do your shimming for refoaming, recentering or whatever task you need.
4) apply an even bead of adhesive around dustcap you removed, same around glued remains, you may have to create some kind of thin nozzle to do it properly and apply minimum dhesive.
5) after carefully replacing dustcap, add a thin bead all around, centered on the joint.
6) let it dry overnight.
7) a good general purpose adhesive is good quality white vinyl/carpenter´s glue.
8) have a fine point artist´s brush handy to even out the adhesive bead if necessary.
9) it will dry almost transparent, and is the least intrusive way to do it.
The slight weight increase is irrelevant.
Alternatively, you can do 1 to 3 and use the "next larger" dustcap size to cover the ugly remains; again use adhesive recommended in 7 and don´t worry about the less than a gram old dustcap base remains.
Excellent explanation.
Thank you.
Gives me confidence in tackling the job.
I'll aim for re using the original caps, but if I can't remove the mould I might have to use the second option.
Thank you.
Gives me confidence in tackling the job.
I'll aim for re using the original caps, but if I can't remove the mould I might have to use the second option.
What model are the Jamo loudspeakers so that the maker of the drivers can be known ?
Jamo W-22175
Pictures please including close up at the right angles so we can see if the woven texture is intended to just keep dust out or also allow for heat dissipation.
I'll aim to re use the caps, but I'm not sure how easy it'll be to remove the mould stains?
Attachments

I would paint them over with light but black permanent marker ink.
"Paint" is heavy and rigid, you don´t want to add mass to that dustcap nor block its pores, it looks like pressed cloth and I bet you can breathe through it; "ink" is just solvent (which fully evaporates) and "colour", which may be just some kind of dye or anilin, with very light physical weight.
Get a rounded tip permanent marker and first touch up the whitish mold areas, let dry, and then try to even overall colour for invisibility.
Permanent marker ink in general is alcohol soluble, you may buy a refill bottle, put a couple drops inside, say, a beer bottle cap,,add a couple drops alcohol, and apply it with a small artist´s brush.
It will need a couple coats but make it easier to fine tune final colour.
Apply, let dry couple hours, retouch what´s needed, I am certain it will be "invisible".
If anything, your speakers might end up looking "too new to be true" he he.
Just go slow 🙂
The Glue used to fix Dust cover can be weakened with hot air..
Use a hot air gun with not more than 50 Degrees celsius for about 5 minutes.. then just lift them up..
this glue is not a two component glue..
the Second way is to use Nitro Thinner just on the part where the cone is glued.. and let work for 5 minutes then a second time..
And the Clone comes off
Use a hot air gun with not more than 50 Degrees celsius for about 5 minutes.. then just lift them up..
this glue is not a two component glue..
the Second way is to use Nitro Thinner just on the part where the cone is glued.. and let work for 5 minutes then a second time..
And the Clone comes off
I would paint them over with light but black permanent marker ink.
"Paint" is heavy and rigid, you don´t want to add mass to that dustcap nor block its pores, it looks like pressed cloth and I bet you can breathe through it; "ink" is just solvent (which fully evaporates) and "colour", which may be just some kind of dye or anilin, with very light physical weight.
Get a rounded tip permanent marker and first touch up the whitish mold areas, let dry, and then try to even overall colour for invisibility.
Permanent marker ink in general is alcohol soluble, you may buy a refill bottle, put a couple drops inside, say, a beer bottle cap,,add a couple drops alcohol, and apply it with a small artist´s brush.
It will need a couple coats but make it easier to fine tune final colour.
Apply, let dry couple hours, retouch what´s needed, I am certain it will be "invisible".
If anything, your speakers might end up looking "too new to be true" he he.
Just go slow 🙂
Brilliant solution. 🙂
The Glue used to fix Dust cover can be weakened with hot air..
Use a hot air gun with not more than 50 Degrees celsius for about 5 minutes.. then just lift them up..
this glue is not a two component glue..
the Second way is to use Nitro Thinner just on the part where the cone is glued.. and let work for 5 minutes then a second time..
And the Clone comes off
thanks hpro
great idea.
this way, no need to cut the cap, but I'll need to be careful not to dry out the diaphragm.
- Home
- Design & Build
- Parts
- Removing Loudspeaker Cone Dust Caps without using a razor?