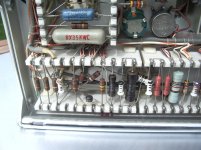
Some time ago I saw these these wonderful mounting supports on pinterest. I don’t mean the tube sockets, but the long arrays of mounting / soldering joints. Does anyone know what type or brand they are? Where can they be purchased?
Regards, Gerrit
Regards, Gerrit
Attachments

Those look like the type Tektronix used for their gear.
Maybe you can buy some Tektronix gear for parts?
Maybe you can buy some Tektronix gear for parts?
Those are Chinese copies of the high quality Tek strips from the 50s/60s.
The originals are long gone, but the copies can be found on ebay, etc.
Doubtful they are silver, but who knows.
The originals are long gone, but the copies can be found on ebay, etc.
Doubtful they are silver, but who knows.
Last edited:
Next, you might be asking about the correct solder to use.
Antique Radio Forums • View topic - Silver Content Solder For Tektronix Scopes
Antique Radio Forums • View topic - Silver Content Solder For Tektronix Scopes
Well, those Chinese copies don't "look" too bad, but like many Chicom copies they probably have little quality. The original Tek strips were porcelain and either clipped in or bolted on to the chassis. (early version) You needed very good soldering skills to successfully use them because too much heat would break the insert's bond with the porcelain. Tek used lower heat silver bearing solder with these. They sometimes turn up on eBay as well do the Tek plug-ins.
Attachments
I have used the Chinese copies before. They aren't all that bad, but you don't get much in the way of a mechanical connection with them.
I would strongly advise using brass screws to attach them to your chassis. The softer the screw, the better. You don't want to put a ton of stress on those ceramic threads.
I would strongly advise using brass screws to attach them to your chassis. The softer the screw, the better. You don't want to put a ton of stress on those ceramic threads.
IMG]file://[/IMG]Wow, that pic in the first post is some level of neatness...
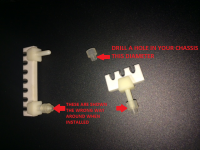
I've got some vintage terminals of this type which I haven't used yet, anyone have some idea of how they are meant to be mounted? The plastic post is glued in place. I suppose I could remove the clear plastic part, drill holes in FR4 and press fit and/or glue them in place. Not sure what the clear plastic part is for unless it's for temporary mounting in prototyping.
I've got some vintage terminals of this type which I haven't used yet, anyone have some idea of how they are meant to be mounted? The plastic post is glued in place. I suppose I could remove the clear plastic part, drill holes in FR4 and press fit and/or glue them in place. Not sure what the clear plastic part is for unless it's for temporary mounting in prototyping.
Attachments

Last edited:
You drill a hole just large enough for the narrow part of the plastic grommet. Then push that in, and push in the pin of the strip into that. That will slightly expand the grommet and thus fix the whole thing.
Jan
Jan
Re: Wiring in first post. Very neat indeed, but life is too short to spend that much time forming wires. Also, as they appear to be the filament supply they should probably be twisted.
Steve
Steve
Amazing! Thanks Jan and Steve. Steve, I don't understand what you mean by "These are shown the wrong way around when installed."
Inset the little sleeve thingy through the chassis from the side OPPOSITE to where you want the terminal strip. Inset the plastic posts on the term strip into the small diameter end of the sleeve thingy.
So when assembled the sleeves will be reversed from the way they are shown assembled to the posts in the picture. Make sense?
Steve
Steve
So when assembled the sleeves will be reversed from the way they are shown assembled to the posts in the picture. Make sense?
Steve
Steve
Got it, thanks. Although in that case I think pressing the terminal strip in would tend to push the sleeve out of the bottom of the board it's fitted in. But I guess the idea is to have the terminal laying close to the board.
Don't let the sleeve push back through. Just push the shaft on the term strip into the sleeve until it contacts the small dia. of the sleeve if any protrudes.
S.
S.
- Home
- Amplifiers
- Tubes / Valves
- Soldering and mounting supports