Finally, I’m able to contribute back to the community a little something after learning so much from so many helpful members. This is a way to test speakers by changing the volume, the stuffing and the type of enclosure in less than 30 seconds. It cost me less than $12..
Why an adjustable enclosure:
Why an adjustable enclosure:
- We all have speakers without T/S parameters so no simulation is possible
- Manufacture’s T/S parameters may be off by as much as + - 15%
- Non-broken in speakers have different parameters
- Modeling and exchanging different stuffing (fiberglass, poly, bubble wrap, foam, wool,etc.) to figure how it affects is time consuming to open and close an enclosure
- We want to see how our speaker performs in different enclosures. Using the below technique, you can change between a closed, vented, 4th and 6th order band pass, or a straight transmission line in 30 seconds. I changed from a vented test to a 6th order band pass enclosure in 9 seconds. For a tapered transmission line or horn, then a little longer. More on that in a later post.
- This technique works for 6, 8, 10, 12 inch speakers and with a little more cutting, any other size; or special order for larger sizes. A 4” speaker well have a different container.
Here’s how:
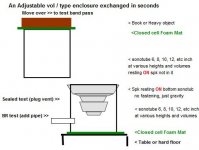
- Take your speaker to your big box store and look for a sonotube, a round cylinder. AND HERE IS THE MOST IMPORTANT POINT: Don’t get one where your speaker drops into it. Since the diameter varies by as much as a 1 /4 inch, you want one where the speaker sits on top of the sonotube. This solves a big problem about cutting end pieces for the sonotube – you don’t need them for testing. If you have a 4 inch speaker, ask for a discarded carpet cardboard tube.
- You will need:
- Two pieces of closed cell foam larger than the diameter of the sonotube and about 1 /4 inch thick. Buy at hobby store for a couple of dollars, cut a yoga mat or whatever.
- If your speaker is larger then a coffee table book, then you will need a flat board larger than your speaker
- A hole saw to drill a vent hole so you can use the round left over piece to plug the vent hole when testing a sealed enclosure using tape on both sides of the piece and covering the hole.
- While you are at the big box store, you might want to get different vent pipes sizes, fittings and reducers if you want to try vented or band pass configurations. As well as an adjustable pipe clamp (the one you screw to tighten) for an easy way to ‘square” the mark around the sonotube before cutting. When tightening, it will automatically “square” the line around the tube.
- Something heavy like a large book or ??
- Take the 48” sonotube and cut it into sections. I did; 24”, 12”. 8”, 4”. Best way to cut it “square”, is on a table saw using the rip fence but you can do it carefully with a saber saw. Most important is to have a “square” line drawn around it.
- Place the closed cell foam mat on your table with one section of the cut sonotube on top of that. The foam will seal the bottom.
- Wire your speaker with thin wire (we are just testing so thin will work) and rest your speaker on top of the sonotube with the wire coming out below the speaker’s rim. Remember, you did follow my advice and did not get the sonotube where the speaker “drops in.” It may be necessary to place “open” cell foam around both sides of the speaker’s rim to make a seal.
- You are now done if testing a closed enclosure. You may need to press down on the speaker’s rim at higher spls.
- To test stuffing, just raise the speaker and place different stuffing inside.
- To test vented: After hole is drilled, cut and glue a piece of donut shaped foam around the hole for the pipe seal. Then cut and insert different length pipes. For more accurate testing of the port’s spl, it needs a “flat plane” at the outside end of the pipe just like it has in a regular enclosure. Go to Dollar Store, spend one dollar and get a sheet of foam core (shout out to XRK member for his foam core thread where he has helped me so much.)
- To test band pass: On top of the speaker, place another cut sonotube section. Place an open cell foam sheet on top of the sonotube and place something flat and heavy above that. For 6th order band pass, have another vent in that top section.
There you go: the fastest, easiest and cheapest adjustable enclosure to test speakers.
Caveats – 1. Cylinders produce different harmonics than other enclosures so you need to take that into account. 2. The sealing between the sonotube and speaker needs to be tight otherwise the bass will be less. And others commenting can add to these concerns.
Last edited:
There have been views but no comments so if none after this, I'll close the thread and move on. However, as promised, here is how I convert the enclosure into a transmission line with a taper or you can do it straight.
1. Buy another sonotube so you can get the full 48 inches. This section sits on top of the speaker so along with the other one below the speaker sitting on the floor, will give you the 1/5 to 1/3 offset if needed.
2. Tapered = cut a vertical triangle out of the 48" sonotube and then fold to make a cone. Use strong tape to hold.
Hope this helps and gives ideas on how to make an adjustable enclosure that can easily test different volumes and types of enclosures in seconds.