Pioneer RT-707

Before I place it on ebay, I will ask here. I am willing to part with my favorite rtr. I have digitized all my valuable reels and do not listen to it often enough to keep it. I hate to pack it and ship it, but if someone is willing to pay for substantial shipping charge, since its heavy, no problem. I would prefer if someone picks it up or i deliver within 50 miles of Washington DC. I am in Germantown, MD.
Pioneer RT-707 is in great working shape and sounds awesome. Heads show normal wear for age. One light is out. Belt for counter is worn and needs replacement. Otherise all good. Normal contacts cleaning and you are good to go. These sell anywhere from $250 to $700. Make a reasonable offer and its yours.

Attachments

  • 20221120_143647.jpg
    20221120_143647.jpg
    300.1 KB · Views: 521
  • Like
Reactions: dreamth

Caps across VR tubes

Hi,

I'm currently working on a PP 807/6AU6 pentode amp with mosfet regulated screen grid supplies. I have some 0D3 VR tubes on the shelves, two in series should provide the desired 150 and 300V reference voltages for the mosfets. I know VR tubes turns into oscillators if they are shunted by caps larger than 0,1uF or so, but would it be correct to assume that this behaviour could be stopped by a big resistor between the tube and the cap as in my LazyCad drawing below? (Please ignore the lack of gate stoppers, protection diodes etc):

VR.jpg

No-feedback pentode amplifier

The idea of current drive amplifier based on no-NFB pentode topology seems pretty straightforward, however, there are some caveats that need to be addressed before embarking on such project. The common arguments against no-feedback pentodes are:
1. With no electric damping, boomy bass due to main speaker resonance.
2. Pentodes have higher distortion compared to triodes, therefore they need NFB to reduce it.
3. Pentodes have increased distortion with reactive loads, which most speaker's are.
4. Pentodes don't work well with output transformers, which benefit from low source impedance.

Is there anything else? Would be nice to see the complete list of problems before proceeding to how they can be addressed, mitigated or bypassed.

Help needed with preamp circuit

Hello:

I was wondering is anybody could lead me in the right direction with a rather simple preamp stage.

This preamp stage is designed by lampizator as a TDA1541 DAC tube preamp which is an I/V DAC chip, see pic Capture1. I built this for my TDA DAC and everything works great and very satisfied with the sound, however I'd like to expand it and also incorporate another USB DAC so I can toggle between the 2 using relays. The second USB DAC is Hidisz S9 which is a headphone DAC that only outputs about 168mV @ 1KHz at max volume.

While toggling between the 2 DACs, both going through the same lampizator tube preamp, the TDA1541 works the same as before however the Hidisz has a high pitch squeal. I was reading about it and I've added a 220 ohm grid stopper (see Capture2). It did lower the squeal but so did the overall output. Not sure if that's the right thing to do and I was wondering if I could do more to lower this squealing without affecting the FR. I played around with different values and 220ohm seems to be the best compromise. With this value, the output is about 1.7V compared to the TDA at 1.8V.


Thanks

Attachments

  • Capture1.JPG
    Capture1.JPG
    15.8 KB · Views: 136
  • Capture2.JPG
    Capture2.JPG
    16.4 KB · Views: 142

JL Audio A1400D in protection

Good Day. This JL Audio A1400 powers up in protection mode with 9.9v on the speaker + terminals. The listing below is the voltages on the output transistors (IRF540):
Location / Gate / Drain / Source
Q106 / 12.2v / 83mv / 83mv
Q107 / 83mv / 71v / 83mv
Q105 / 83mv / 9.9v / 83mv
Q104 / 9.9v / 71v / 9.9v

The 12.2v on the gate of Q106 is a little concerning. All of the outputs test good in the board. Wondering if the AHC132s on the output driver board are damaged but just decided to post for help before I start to remove stuff...

Attachments

  • IMG_20221123_172735.jpg
    IMG_20221123_172735.jpg
    666.2 KB · Views: 111
  • IMG_20221123_172754.jpg
    IMG_20221123_172754.jpg
    499.2 KB · Views: 106

Creating a own CM4 Streamer Carrier board

Hello

i have the idea of creating my own CM4 Carrier board which will be somewhat similar to the official IO board and will probably hire a PCB Designer off of Fiverr

i already had the idea of modding the existing IO Board as spoken here: https://www.diyaudio.com/community/threads/modded-rpi4-board-for-better-sq.381877/
but i think a own carrier board is potentially more viable/better and im probably also end up selling a few units here if people are interested

but i need some assistence designing it, what to look out for etc, would be someone willing to help me?

for example
i want to replace the LDO`s on the CM4 itself, can i just remove the LDO`s on the CM4 and feed 3,3V and 1,8V through the GPIO header? so we can place LT3045 on the Carrier board itself?
would a GNDLayer/ Layer1 / GNDLayer / Layer2 / GNDLayer design be beneficial?
would be extensive decoupling/power"buffering" and other things beneficial?
what should i look out for beside those?

i should also note that this board is just to make use of the CM4 with the different variants (so we can keep wlan/bt out and make use of the emmc) while isolating noise as much as possible (i will further reduce noise in software with underclocking etc)
i also had in mind to use the pcie lanes for a usb 3.0 controller for periphery (ssd storage, wlan/bt stick etc) and the otg usb 2.0 lanes for the dac
there will be no audio circuits so we can use for example the ian canada hats, it should be just a somewhat basic carrier board

Best Regards
  • Like
Reactions: 312elements

For Sale RAAL 70-20XR AM (pair)

My wife and I are separating after 17 years and I need to drum up money for a deposit on my own place.

I am selling my pair of RAAL 70-20XR (amorphous core) drivers, never used, one never even unwrapped. $900 + shipping, CONUS only. PayPal is the preferred method.

Ships from Oakland, CA.

Attachments

  • 695EE93F-37DE-46E0-A4D2-94155377F5CD.jpeg
    695EE93F-37DE-46E0-A4D2-94155377F5CD.jpeg
    363.7 KB · Views: 187
  • D4E9265C-F068-4B36-BCD0-48E487E50E30.jpeg
    D4E9265C-F068-4B36-BCD0-48E487E50E30.jpeg
    616 KB · Views: 165
  • A76D2C89-1E6D-4459-BA18-B12B0D898E52.jpeg
    A76D2C89-1E6D-4459-BA18-B12B0D898E52.jpeg
    547.6 KB · Views: 217
  • F7FB3D7E-4AFC-4EDB-A7E5-C5C735B05C98.jpeg
    F7FB3D7E-4AFC-4EDB-A7E5-C5C735B05C98.jpeg
    578.1 KB · Views: 202
  • 32ACC7D6-880E-4B75-B2FE-7F0F12174B00.jpeg
    32ACC7D6-880E-4B75-B2FE-7F0F12174B00.jpeg
    590.1 KB · Views: 203

Bias LED blinking and no sound out

Finally have everything hooked up in my 8136 OTL headphone amp(schematic attached and the thread can be found here), flipped on the power, PSU voltage is good, tubes glow nice, power draw is within 3mA of expected for the HV part, bias to the 8136s is a bit more than expected(~0.5V off) but then I looked into the amp and saw the LEDs blinking at ~5Hz.... and no sound comes out the headphones even with excessive signal in and the volume all the way up.

Found and fixed a couple of issues already like the CCS not working(replaced with a resistor now), the 56K bleed resistors not being hooked up and the LED bias not being connected properly(after fixing this I got the blinking I am now seeing).

My intuition is that the 47u cap parallell to the LEDs is the issue here but I have not tried cutting it out yet as that's a fair bit of work to put back if that's not it. Also not sure as to why that didn't show up in the simulation if so.

The other idea I have is that my crappy wiring has made enough inductance somewhere to create an LC oscillator but I don't really think that's what it is, it's not like I've wound all my wires into a coil, it's just far from actually good...

Could also be something up with the NFB but I am not sure what if that's the case.

Obviously something else could be disconnected but poking around I haven't noticed anything besides what I have already fixed and as its the same for both the left and right audio channels and all LEDs are blinking at the same rate I am more inclined to say that something is up with my circuit.

Here is a scope image with the AC(as it rests at about 3.7V) over the LEDs(yellow) and the output to the headphones(blue). The voltage out seems really really extreme at over 50V, but no sound out. The output frequency is the same as the cathode voltage but a different waveform. There is no change with signal applied, input open or input shorted:
20221115_205244.JPG


A scope image of the plate of the 12AX7(node called Bot in the sschematic in blue and the bias in yellow. First with signal input and second without.
20221115_210004.JPG

20221115_205957.JPG

Schematic in LTSpice:
Screenshot_20221115-195736~2.png


To me it looks like the issue is in the 8136 circuit and that the output from the 12AX7s get shorted to ground at roughly a frequency of 5Hz. The Bot node looks alright besides the dips, it seems to be resting a bit low but the signal seems to be getting through fine.


*edit:
The PSU schematic is now attached

Attachments

  • 20221116_000005.JPG
    20221116_000005.JPG
    224.8 KB · Views: 118

Corner Horn Imaging FAQ

This Frequently-Asked Questions (FAQ) list discusses corner-horn loudspeaker imaging, how to achieve outstanding imaging, and typically encountered issues with corner horn imaging.

Several manufacturers currently make or have made corner-horn designs: the Klipschorn and the Klipsch Jubilee, Voigt, Vitavox, ElectroVoice, JBL, and smaller companies like Pi and Decware, etc. Additionally, there are DIY corner horn designs that exist.

"Can I get Outstanding Imaging from a Corner-Horn Speaker?"

Yes. Good corner-horn imaging can be unsurpassed, in fact surpassing the imaging performance of dipole and bipole radiating loudspeakers in terms of accurate and detailed reproduction of the source music material.

"What are the Advantages of Corner Horns?"

A corner horn is designed to be used in a corner of a room or outside structure such as an outdoor stage backstop to significantly reduce the size of the loudspeaker bass bin for reproducing the lowest audible frequencies. While corner horns are not new, they are not often seen in today's audiophile circles.

Many misconceptions about corner horn acoustic performance and their proper setup exist:

  1. They provide dramatically lower bass distortion, in particular, modulation distortion, than non-corner-loaded loudspeakers. Bass modulation distortion has been found to be quite audible.
  2. They provide much greater low frequency dynamic range without resultant woofer compression or other forms of distortion, which limits achievable sound reproduction fidelity of other types of speakers
  3. They have the potential to achieve full range controlled directivity in-room if designed/produced carefully

"What are the Disadvantages of Corner Horns?"

  1. They require good room corners to fully achieve their low frequency response, or a large footprint in order to accommodate bass bin extensions to achieve their lowest octave of low frequency performance
  2. They are physically large and heavy speakers if they are to reproduce all needed low frequencies (e.g., piano, organ, string bass, etc.)
  3. They require amplifiers of high quality for the critical "first watt" of input power to achieve full potential
  4. They require careful placement of near-field objects and/or acoustic near-field treatments in room in order achieve their full imaging potential

"What is Different About Corner-Horn Imaging?"

Corner-horn imaging performance is a strong function of the room they're in, i.e.,

  1. The room's absolute and relative dimensions, its shape (including the ceiling), and the uniformity and relative smoothness of the walls next to the corner horns, i.e., the front and side walls near the speakers out to a distance of at least 4 feet (120 cm)
  2. The placement of the speakers within the room boundary (e.g., for a Klipschorn, the tailpiece-to-corner fit to seal the two mouths of the bass bins, or the length of the corner extensions from the bass bin on the front and side walls, and avoidance any intrusions into the room by bricks and other architectural details (yes, brick fireplaces and mantles can significantly affect imaging...) or canted low ceilings.
  3. The absence of near-field furniture or equipment that reflect acoustic energy, and
  4. The judicious use of acoustic treatments (...it usually doesn't take very much, but it usually takes some).
  5. The quality of the "first watt" of amplifier power driving them

post-16963-13819359279012.jpg


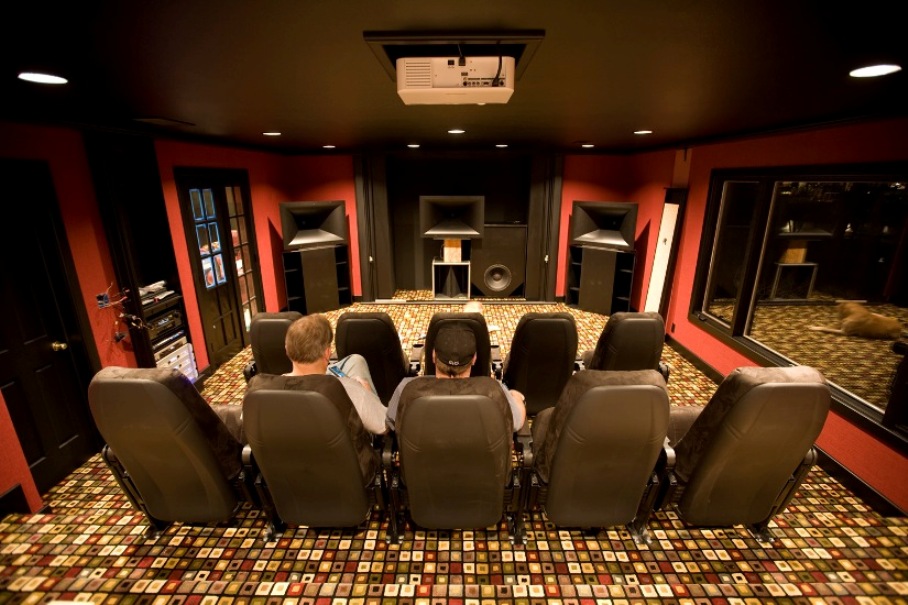
"How Do I Set Up Corner Horns to Increase Their Stereo Imaging Performance?"

One commonly heard complaint from corner horn users is that their speakers seem to have trouble achieving the same imaging performance as free-standing speakers. Loudspeakers of any type except dipole-radiators profit greatly in increased bass performance and much lower bass IMD of their speakers if they are placed in the corners of the room, toed-in to the listening position.

When many owners are polled about where they place their speakers in-room, invariably many answer "along a wall" or "a few feet from the front and side walls". Why would this occur? Paul Klipsch stated:

"The conclusion is pretty obvious. Whether you are using Klipschorn loudspeakers or speakers of some other make or type, you will get best stereo geometry and best tonality with corner placement of the flanking speakers (whether you use a center speaker or not) and the corner placement should be with the flanking speakers toed-in at 45 degrees." (Taken from Dope from Hope, Vol. 15, No.2)
There is something involving room acoustics and corner horns that is critically important to achieving excellent corner-horn imaging. The psychoacoustic effect that comes into play in this is a special case of the Precedence Effect of listeners called the Haas Effect, and the issue is early reflections of high mid-bass and midrange frequencies (i.e., about 250-4000 Hz) off the walls of the room closest to corner-horn midrange and high mid-bass horns.

From the co-inventor of the Klipsch Jubilee, Roy Delgado:

"Imaging and creating it by having two varying acoustic signals is an interesting undertaking. I have found that a smooth, unobtrusive boundary between the two speakers works very well with well-behaved and consistent polar patterns [of speakers]. The other thing that I have noticed that works well is no boundaries--like playing the speakers outside. Both do a very good to excellent job of accomplishing the imaging goal, but the caveat is that no boundaries forgives non-consistent polar patterns while a smooth boundary is a strict enforcer of consistent polar patterns. Pretty cool how that happens."
These early reflections should be controlled (i.e., a "Zero Reflection Zone" by P. D'Antonio) in order to achieve much greater imaging performance with speakers in the corners of their rooms.

What is the easiest way to control these early side and front wall reflections? Have a smooth boundary between the speakers (i.e., nothing between the speakers) and smooth front and side walls.

If this is not possible for your room and setup, the next easiest fix is to employ absorption panels. Many companies make fuzzy panels and acoustically absorbing tiles that can easily be placed along side walls and front walls of the your listening room. How much is needed? It turns out from the Haas Effect that controlling early reflections should be considered for 10-20 milliseconds of delayed reflections from side and front walls. This translates into about 11 to 22 feet (3.4-6.8 meters) of total path length at room temperature. However, the first 2-4 ms of early reflections are critical to control, translating to about 2-4 feet (0.6-1.2 m) of significantly reduced reflections. I use about 2 feet (0.6 meters) of absorption at the side-wall exit area of my corner-horn midrange horns.

Depending on your room geometry and listening position in relation to the corner horn placement (i.e., the included angle of the speakers relative to the listener--typically 90+ degrees included angle), the width of the midrange horn acoustic coverage laterally ( typically 60-100 degrees included angle), and assuming that your corner horn midrange horn controls its polar response down to its lower crossover frequency, the area that you should cover with absorption panels could be on the order of 2-10 feet along the front and side walls. I find that 2 feet of absorption along side walls works very well for Klipsch K-402 horns (i.e. Jubilee), and ~7 feet across the front wall, measured from the exit of each midrange horn's mouth.

Another approach is to place diffuser panels along the same near field areas but note that the use of diffusers in the Haas-effect areas will likely not achieve the same level of corner-horn imaging as the use of absorbers. The advantage of using diffusers is the relative liveness or deadness in smaller listening rooms.

If your listening position is more than 11 to 22 feet (3.4-6.8 meters) away, you probably have little work to do. However if you are like me and sit within 10 feet (3 meters) of your corner horns, you will find that the effect of using absorbent panels along the walls very much increases your stereo imaging performance.

"But What About the Equipment/Racks, Architectural Details, and Speaker(s) Between by Corner Horns?"

Again, the most straightforward way to deal with this is to simply remove all objects between the speakers, leaving a smooth wall. If this is not achievable, the alternatives are the same as above. I use absorption tiles on the side and top of my center loudspeaker, on the masonry, and a quilt-based cloth fabrics on other protruding objects like the mantlepiece to control early reflections.

"But What About the Television Between My Speakers?"

This one is easy--place a temporary quilt, comforter, or acoustic absorption tiles in front of the screen when you listen in music only (i.e., no video) mode.

"But What About the Floor Next to My Speakers?"

Something as simple as a thin area carpet around each corner horn or even wall-to-wall carpet will suffice. This carpet does not need to be very thick or fuzzy to be effective.

"But What About the Ceiling?"

If your ceiling is relatively high, you probably don't have a problem. If it is lower than about 9 feet, and especially if you own Klipschorns or other horn-loaded loudspeaker having collapsing polar midrange horns, you should put absorbent material around the top/bottom mouth of the midrange horn or place diffusers/absorbers on the ceiling around your speaker's midrange horn mouth (especially if you sit relatively close to your corner horns). More on this subject later.

"What If the Amount of Absorption Recommended Above Just About Covers My (Small) Listening Room?"

Then you are probably one of those unfortunate corner-horn owners that would greatly benefit by placing your speakers in the corners of a larger room: in particular, Klipschorns require a large room to perform at their best . If perhaps you are using something like Klipsch Jubilees, then you can use them in a smaller room. More on the subject of midrange horns, below.

"Is All This Really Necessary?"

If you are trying to increase your corner-horn imaging performance: the answer is "yes" if you sit within 11 feet (3.4 meters) of your speakers. If you sit further back, then you will probably have far fewer imaging issues.

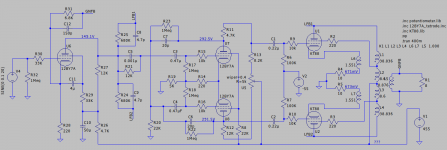
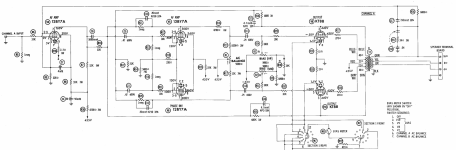
"What about Amplifiers and Corner-Horn Imaging Performance?"

In order to understand the effects of different type of amplifiers on corner-horn performance, you need to understand the effects of "early reflections", discussed, above, and the treatments available to recover your stereo imaging performance in rooms with cluttered areas between the speakers and non-smooth front and side walls. Once you understand the psychoacoustic effects on imaging of corner-horn speaker midrange horns/drivers, then a productive discussion on amplifier effects can occur.

"What Are the Issues Related to Amplifiers and Corner Horns?"

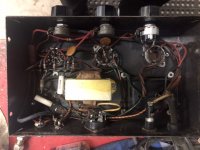
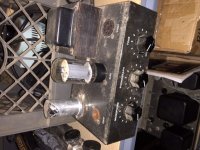
Amplifiers that exhibit high output impedance have the effect of providing a "reverb effect" in-room, especially if the room is small and relatively live acoustically. What kind of amplifiers have relatively high output impedance? Tube/valve-type amplifiers.

"Why is This an Issue...What is Happening?"

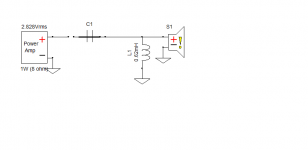
The reverb effect is due to strong room reflections back to the horns/drivers themselves, which are much more efficient than direct-radiator speakers at converting electrical energy into acoustic energy - and back again (...i.e., they are acting like microphones). Klipschorns, for example, convert about 10% or more of their input electrical energy into acoustic energy (according to Paul Klipsch's own calculations and measurements), while cone-type speakers typically are only 0.1% efficient or less. Planar speakers, like electrostatic and Magneplanar-like speakers, are even less efficient.

By the way, the same reverb effect happens with headphones in that sound reflections from the ear's closed-end tube reflect back to the driver, then back into the electrical domain by headphone driver-amplifier coupling. Special thanks to Bob Carver on identifying this phenomenon.

"So Why are We Talking About the Efficiency of Corner Horns and Imaging with Some Tube Amplifiers?"

Because the horns/drivers themselves are 100x more efficient at converting acoustic reflected energy back into electric energy to your amplifier's output terminals than direct radiator loudspeakers are, some of the room's reflected acoustic energy goes right back to the amplifier's output terminals.

"So What's the Issue with Amplifiers and Horn-Loaded Loudspeakers?"

Nothing, as long as the amplifier has low output impedance, a.k.a., high damping factor, like virtually all SS amplifiers and most higher-forward-gain tube amplifiers with feedback--such as multistage push-pull designs.

But if your amplifier has relatively high output impedance, that is, amplifiers with zero feedback, SET-type tube amplifiers, and particularly output-transformerless (OTL) types, what happens is that the amplifier output stage "feels" the reflected acoustic energy as an added load and the amplifier attempts to push back against midrange and bass bin driver diaphragms, albeit this effect is delayed in time from the original signal due to the reflected energy delays in-room. The net result is a reverb effect that is sensitive to SPL coming back to your corner horns from the room.

"So What's Wrong With That?"

Well, for starters, it's artificial and you can't turn it off unless switching to a lower output impedance amplifier, or switch to a much larger listening room with high ceilings. Paul Klipsch talked about measuring speakers with a "rubber yardstick" when you start to depart from a live music reproduction standard. [See also the article "Euphonic Distortion: Naughty but Nice".] That conversation is apropos here. If accurate reproduction is the standard by which Klipsch designed and built his speakers, then amplifiers with high-output-impedance used with very efficient corner horns in corners, where the reflected acoustic waves tend to have the highest amplitude and tends to pile up, will lead to distortion - non-harmonic distortion - the worst kind.

"So Why Do So Many Corner-Horn Owners Use Tube Electronics That Have High Output Impedance?"

I believe you can answer that question yourself now. Another way to achieve the same effect is to place a reverb unit in front of your amplifier input terminals - at least you can turn it off when you get tired of it.

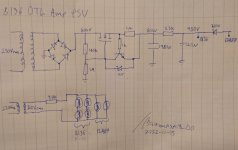
"So What Other Issues Are There With SET Tube-Type Amplifiers?"

Low power SET-type tube amplifiers usually have too little amplifier power headroom--even for 105 dB/W-M corner horns thus leading to fast-transient soft clipping that some tube enthusiasts apparently like. Paul Klipsch's "rubber yardstick" comments are apropos here, too: it's preferable to not have any clipping effects at all if we are to retain an accurate sound reproduction yardstick. Also, SET amplifiers exhibit a much larger amount of harmonic distortion, that is, even harmonics. It is preferable to not have these harmonics added to our stereo's output since the magnitude of harmonic distortion is an indicator of the magnitude of amplitude modulation distortion (AMD) being generated, which is non-harmonic and very detrimental to the quality of sound reproduction.

An externally hosted image should be here but it was not working when we last tested it.
[/URL]

"Soft Clipping" of Tube Amplifiers that Masks Their Clipping Distortion but Introduces Harmonic Distortion

"So Why Do Class 'A' Tube-Type Amplifiers Sound So Good With Corner Horns?"

Multistage amplifiers, the type that is commonly used in SS amplifier designs (it's easy to get large amounts of amplifier gain) have more of something known as higher order harmonic distortion (which is synonymous with higher order harmonics) than do single stage or dual-stage amplifiers using little or no feedback.

Also the use of feedback to control these multiple cascaded amplifier stages tend to convert otherwise low-order harmonic distortions into higher order harmonics unless relatively large amounts of feedback are used.

But using large amounts of feedback negates the use of multistage amplifiers because it reduces the overall gain of the amplifiers in series. So typical SS push-pull, or even some class A amplifiers typically have much more higher-order harmonic distortion than do single- and dual-stage amplifiers running with no feedback.

Attachments

  • Khorn false corner.jpg
    Khorn false corner.jpg
    71.1 KB · Views: 370

Bottlehead 150V output transsformer winding

Hi I am currently working on bottleheaed headphone amp, but I am at the other side of the world, australia, shipping kills the cost in buying kit from U.S of A to the of last of A.
Therefore I could only resort in salavage parts from donation shop (slavo, vinnes), thrift shop and second electronic stores.

After study a bit more on the schematic and looking at other builders guide
https://www.headphonesty.com/2019/0...ck-headphone-amplifier-a-comprehensive-guide/

I saw that althogh their transformer secondary winding have dual 150V output but they just used 150V output for B+,and one 6.3V output for heating plate, corresponding to the scheamtic.

So I was wondering is there a Da vinci drawings trap that tricks other people no to copy their work (i.e you are suppose to have a parallel 150v winding connected) or just safely get a transformer that could provide 115v to 150v with rating of 10VA+ and another transformer for heating plate.

Also most of the transformer does have have 150v but only 115 to 120V,so how much performance degradtion will it casued if 120v is used instead.

Unusually sensitive hearing to presence frequency range?

Hello everyone! I've had this "quirk" for as long as I have memory, and I've always been extremely sensitive to the mid-treble and presence frequency range. My speakers and headphone measure good, but they all sound shrill to my ears especially when I raise the volume. I don't mean that kind of loud that blows your eardrums out, just the "sorta loud" most people usually listen music to.

I sort of hear a "ringing" sound like the one of a high-Q peaking filter at around 2,5kHz. This can't be the speakers or the room as I hear this on almost every system including headphones. The same systems also sound "fine" to other people.
I also have a problem going to concerts without earplugs. When things start to get too loud for me I sort of hear a "saturation" sound like the one from when you overdrive the amplifier, but it goes away as soon as I put the earplugs in so I know it's not the amplification. Again, I had friends with me who told me that they could hear just fine.

Usually, I counter this EQing out that range (from 2kHz to about 3.5kHz) by about -5 or -6dB which I realize is a lot! At that point I can raise the volume even more, so I'm not just compensating by making the signal quieter.

Besides that, my earing is good. I can hear to almost 19kHz which should be normal for a 22 year old. I don't suffer from tinnitus and a specialist checked my earing and said I'm fine!

Does anyone have such a sensitive earing as mine? Do you have any ideas about what could be the cause of it?

For sale Orfeusz 206

I have for sale a quite uncommon sound processor, called Orfeusz 206 by WAF Audio.

This processor is designed to make interactive spatial audio on loudspeakers. What this means is you plug in your sources, then with the mean of a joystick or a MIDI controller (or the mouse) you can control the incidence of the sources and create sound trajectories.
More info on the web: www.waf-audio.com.

Note: the processor can also make crossovers and parametric EQ, useful for prototyping your next loudspeaker diy project.

The processor is 3 years old, in a good condition, and I don't have much use for it now. It's located in Sydney Australia.
I'd like to have for it AUD 600, but will consider any genuine offer.

chaparK

McGohan MG-8 Mod suggestions?

Hi all,
I have a McGohan M8 single ended tube amp that I would like suggestions for recommended modifications to make it sound great as a guitar amplifier. Of course it’s a pretty simple circuit, not too far off from a tweed fender champ.

I have enclosed some photos of the amp and a schematic.

A couple of specific questions:
1. Should I eliminate the phono input?
2. If so could I use the phono volume pot for something else?
3. I plan to replace the filter caps and the connecting electrolytic caps, should I look at replacing anything else?
4. Should I consider changing the output tube from a 6l6 to a 6v6?

Thanks in advance for any assistance you can offer. I’m excited about this fun little project.

Justin

Attachments

  • McGohan M8 schematic.jpg
    McGohan M8 schematic.jpg
    771.7 KB · Views: 263
  • 7FEE7CA2-1B0C-47A6-BCC9-89E6759EDDBD.jpeg
    7FEE7CA2-1B0C-47A6-BCC9-89E6759EDDBD.jpeg
    99 KB · Views: 230
  • B899156B-07D0-4BFB-96C5-777A3D32940C.jpeg
    B899156B-07D0-4BFB-96C5-777A3D32940C.jpeg
    74.7 KB · Views: 198
  • 410EA44D-1B46-455C-903D-12F684F9B3D8.jpeg
    410EA44D-1B46-455C-903D-12F684F9B3D8.jpeg
    119.3 KB · Views: 229

Xsim and SineCap XO

In order to better understand what the individual parts do in an XO, I have started playing a little with Xsim. It gives really good insight even just with a dummy driver.

I tryed with a SineCap filter for a tweeter, i.e. a coil in parallel with the tweeter, without a capacitor in series.

I have made this simple filter where C1 is "short". But there is no response in Xsim. The frequence is just af line at default 70 dB. Xsim can't do that or am I doing something wrong.

1669125010361.png

Attachments

  • 1669124929869.png
    1669124929869.png
    2.8 KB · Views: 68

A/D/S 2000.1 mono amp

Good day bros, another amp that I have been working for some time an ADS 2000.1 mon amp, Initial problem was going to protect mode. I managed to repair by replacing gate resistors , FETs and drive chip on the power supply section. Now it powers up on blue light and with good rail voltages and no longer goes to protect mode. But the main issue was, blowing the output FETs at high side only whenever I replace a new one. Without FETS installed normally I don't see the gate drive signal on the high side but I get a good gate drive signal on the low side, with this I assumed that all output signals are fine but when I install new FETS the high side fets are getting shorted once I turn on the amp. Is it possible that the Drive chip IR2184S is not giving the correct high side gate signal even if it has a good low side gate drive signal? Note that shorted highside FETS are on the other bank only. Other banks are fine.

Thoughts on speaker cabinet covering

This warnex stuff inst particularly durable when cabs get knocked. What other options are there for keeping speakers in decent condition? I had wondered about using some neoprene sheets (some come sticky back) which can be surprisingly cheap and perhaps some plastic or other hard material for the corners and edges.
I bought a roll of neoprene strip to act as a spacer for grilles. The stuff seems pretty tough and durable, although it's a bit stinky (for a while at least). Thoughts?

How parallel and series wirings affect T/S parameters

I was researching how wiring multiple drivers in series or parallel affect TS parameters. I decided to capture everything in a table and decided to share here in case this is useful to others. Explanations can be found following the table. I will also include tables for the 4-driver parallel-series case and for Dual-voice-coil driver wirings.

SINGLE DRIVERTWO DRIVERS IN PARALLELTWO DRIVERS IN SERIES
FsFsFs
ReRe/22*Re
QesQesQes
QmsQmsQms
QtsQtsQts
Vas2*Vas2*Vas
Sd2*Sd2*Sd
XmaxXmaxXmax
Mms2*Mms2*Mms
Mmd2*Mmd2*Mmd
BLBL2*BL
LeLe/22*Le
CmsCms/2Cms/2
Rms2*Rms2*Rms
n0 (efficiency)2*n0 (which is +3db)2*n0 (which is +3db)
EBPEBPEBP
SPL, 1w@1m+3dB+3dB
SPL, 2.83v@1m+6dB0dB

Explanations:

Fs:
Wiring drivers together has no effect on the resonant frequency.

Fs = 1/sqrt(2π*Cms*Mms)

With two drivers, the moving mass doubles, but the compliance halves, so these factors cancel.

Re:
Just like any resistor: wired in parallel, equivalent resistance halves; wired in series, equivalent resistance doubles.

Qes:
(Ignoring any external damping factor)
Qes = 2πFs*Mms*Re/((Bl)^2)

In series: The mass doubles, Re doubles, Bl doubles and Fs remains the same. Because Bl is squared in the denominator, these factors cancel.

In parallel: The mass doubles, Re halves and Bl and Fs remain the same. These factors cancel.

Qms:
Qms = 2πFs*Mms/Rms


With two drivers, the moving mass doubles, but so do the mechanical losses (e.g. friction). These factors cancel.

Qts:
Since Qes and Qts remain unchanged, so does Qts.

Qts = 1/(1/Qms + 1/Qes)

Vas:
Intuitively, with two drivers, the volume of air having the same compliance as the driver’s suspension doubles. You need twice as much air to push back against two driver suspensions compared to just one.

Vas = 𝜌c^2*Sd^2*Cms

With two drivers, Sd doubles, but Cms halves. Because Sd is squared, this results in a net factor of 2.

Sd:
The total moving surface area is the sum of each driver’s moving surface area.

Xmax:
Xmax does not change, since each driver's Xmax is still the limiting factor.

Mms & Mmd
The total moving mass is the sum of each driver’s moving mass. (Same for air load)

BL
The magnetic flux density B = Wb/m^2 does not change. There is twice as much magnet flux (due to the additional magnets), but also twice as much cross-sectional area.

In series: the length of wire L in the magnetic field effectively doubles. The voice coils can be thought of as being arranged end-to-end in a magnetic field that is twice as long.
In parallel: the length of wire L in the magnetic field is considered unchanged. The voice coils can be thought of as being arranged overlapping in space (with the same starting point). Honestly, this is a bit unintuitive to me, but the formulas agree.

BL = sqrt(2πFs*Mms*Re/Qes)

With two drivers in series, Mms doubles, Re doubles, and Fs and Qes remain the same. So this grows by a factor of sqrt(4) = 2.

With two drivers in parallel, Mms doubles, Re halves, and Fs and Qes remain the same. So these factors cancel.

Le
Just like any inductors, in series the equivalent voice coil inductance doubles, in parallel it halves.

Cms
With two drivers, the effective compliance is halved. If 1 Newton moves a single cone 1 meter, then moving two cones 1 meter each would require 2 Newtons.

Cms = Vas/(𝜌c^2*Sd^2)

With two drivers, both Vas and Sd double. Because Sd is squared in the denominator, the total factor is 0.5.

Rms
With two drivers, the mechanical resistance (e.g. friction) doubles.

n0
Reference efficiency is defined as:

n0 = 𝜌(BL)^2*Sd^2/(2π*Mms^2*Re)

In series: BL doubles, Sd doubles, Mms doubles and Re Doubles. So the total factor is 4*4/(4*2) = 2. In dB, that is 10*log(2) = 3.01

In parallel: Sd doubles, Mms doubles and Re halves. So the total factor is 4/(4*½) = 2. Again, in dB that is 10*log(2) = 3.01

EBP
EBP = Fs/Qes

With two drivers, both Fs and Qes remain unchanged.

SPL, 1w@1m
(Assuming phase coherence)

dB(1w@1m) = 112.02 + 10log(n0)

With two drivers, n0 doubles, so dB(1w@1m) increases by 3dB.

SPL, 2.83v@1m
(Assuming phase coherence)

dB(2.83v@1m) = dB(1w@1m) + 10log(8/Re)

With two drivers in series: dB(1w@1m) is +3dB, and Re doubles, so 10log(8/Re) is -3dB.

With two drivers in parallel: dB(1w@1m) is +3dB, and Re halves, so 10log(8/Re) is +3dB.

Sennheiser K6 and ME66 - How to disassemble

Good morning!

I have an older Sennheiser K6 with the ME66 shotgun capsule. I had to remove green rust over the last months because contact was not great but now I seem to have other dirty components inside since I get weird crackling and static noises.

Technicians won't help since the cost of work would be above buying another one. I understand that.

Having repaired and built number of microphones, I would love to give it a try. However, I can't seem to find the way to take both parts appart.

Could someone point me to a good source? I've been looking on the net for quite a while with no success.

Regards

Ideas on live PA setup with shouty MCs

In a few weeks my system is going out which to my horror I have discovered will be in a UK Garage room which means shouting MCs all night. There is also some kind of live PA which at the moment I have no idea of their requirements, whether they are just plugging into the mixer input or also singing down the mic or what. I will find out in due course, but I'm deliberating what to do with them.

I'm guessing the normal approach is for them to plug into the mic input on the pioneer mixer (DJM900) and run it through the PA. What concerns me is I then have no control over their level, at all. The wireless mic we will be using has no compressor built in as far as I can tell (A brief look). I do have a compressor on the input to my active crossover but typically that is triggered by the kick / bass it is unlikely to fire easily with just the shouty MC which could send a lot of nasty loud rubbish to the mids.

The options as I see it are.

1) Accept this and tell the MCs in advance to be respectful otherwise they are unplugged / off.
2) Use the 3rd input on my active crossover and put the mic into that. I can then control the level and put a compressor on that input independently.
3) Purchase a digital mixer (I was thinking of doing this anyway, just maybe not so soon) and putting the mic into that and then into the DJM mixer. Digital mixer has compressors etc and I can tame shouting adjust levels etc easily and in real time.
4) Put my regular DJ monitors (pair of EV ELX12P) alongside the PA and put the mic into those, so the PA doesnt have to cope with them at all. Rely on their inbuilt limiters to protect them.

Pros / cons to the above

Re: 1) No control and potential conflict with grumpy MCs
Re: 2) I don't even know if this would work, whether I can use the 3rd input as a mic input since it effectively means no pre amp. I guess it depends on the mic output.
Re: 3) Immediate cost and grappling with something new, not tried and tested at this point, and hoping it doesn't fail
Re: 4) Not much control again only on the back of the speakers which isnt ideal. But it shouldn't do any damage and leaves my PA to do its thing whilst not mushing up the midrange. I'm not sure if they will go loud enough. There is no way to also route the sound through the DJ monitors. I have to take another set of DJ monitors as well to use in place of them (bigger and heavier, amps more wires etc)

1 sounds like too much potential for fail. 4 was suggested my someone else and it makes some sense but I'm not convinced as I can not really try this out before the night and also the logistics of carting about even more amps and speakers. I'm thinking option 2 or 3. Option 3 makes the most sense despite new equipment anxiety. I guess I could also prepare option 2 in the event option 3 fails and I need a backup plan on the night.

Any suggestions or other ideas?

Open loop gain measurements of NE5534 / NE5532 / LM318 from various manufacturers

Open loop gain and CMRR meas. of NE5534 / NE5532 / LM318 from various manufacturers

NE5534N Philips
SE5534AN ONsemiconductor
NE5534P TI
NE5534AP TI (old, 80s)
NJM5534D JRC
NE5532P TI
NJM5532D JRC
LM318N National Semiconductor
LM318D TI
LT318A

Open loop gain measurements of NE5534 / NE5532 / LM318 from various manufacturers

buzz noise from paraphase circuit

I have a pair of IPC AM-1027 theater monoblock amps that I am converting to be plug and play for domestic use. They are 6L6 PP using 6SL7 paraphase phase-splitter cap coupled to cathode followers in fixed bias mode. B+ about 375Vdc bias current 50mA each tube. All the voltage points are in the ballpark. I simplified the circuit so I bypassed the input transformer. Pretty straight forward circuit and I prefer to keep the stock circuit and no intention of modifying or "improving" it, just restore the amps in non-invasive way. Leaky coupling caps have been replaced and filter caps in B+ and negative bias supply also replaced. The only thing changed is the bias series resistor's value so the power tubes bias correctly. Both phases' level is the same so they are balanced in PP.

The amps have no hum and, with music, sounding good. But there's a buzz noise that's loud enough to be distracting. BOTH amps have the same noise issue. I checked most resistors and they are all within specs. When I removed the input tube, no noise, no hum, no buzz, so very likely the input 6SL7 is culprit. Changing tubes, same problem. Grounding the input grid, same problem. Here's the curious part, when I ground the grid of the inverter tube, the noise is gone, dead silent. Of course I lose half of the amp. Apparently the noise came from the signal feeding the second grid. I worked on amps using paraphase circuits before and never had this buzz problem before. I fixed another same pair for a friend about couple years ago with no issue but they are gone so I can't use them for troubleshooting or reference. There must be something that I'm not catching this time.

Below is a simplified schematic for troubleshooting. Currently the amps are wired as shown in the schematic. Thank you for any suggestion and help in advance.

An externally hosted image should be here but it was not working when we last tested it.

KSS150A Location of short solder and when to clean it.

Just purchased a cheap KSS150A optical unit from China to play with my Sony CD player that was dying. I understand these are sent with a short to prevent static electricity damage and the unit did not come with any instructions so hopefully someone can point it out correctly from the enclosed picture. I assume it is the solder joint at the top right of the picture. Also I was wondering if it is a good idea to install the unit before removing it or to remove before mounting. Thanks for any help.
_1010634.jpeg

how many semis does it take?

Highly impressed by these systems this year and I just wanted to share.


L-Acoustics, Meyer Sound and Ultrasound thank you so much for your expertise and attention to detail, absolute professionals.


Here are a couple of videos worth sharing, the scope of these systems is mind blowing.


L-Acoustics

Hollywood Bowl Sound & Calibration Case Study (L-Acoustics Tools) - YouTube


Ultrasound
UltraSound and Dead & Company Tour Prep - YouTube

My Take on the original ZEN - An attempt to improve things.

The ZEN amplifier by Nelson Pass is no doubt a real milestone in the amplifier world.
It is dead simple but good.
But it has got 3 issues:
1. Low input impedance.
2. Low gain.
Both of these issues are fixed by using Bride Of Zen, BOZ.
3. Somewhat high THD distortion.
Now this is no issue for Mr Pass - he is not bothered,
because his amplifiers sounds good no matter what.

My Take on the original Zen also fixes those 3 issues.
The price to pay is the addition of one input transistor.

I will later post a full circuit of my Zen style amplifier.
To begin with have a look at the simplified schematic.

Attachments

  • My Take on ZEN - Simplified.jpg
    My Take on ZEN - Simplified.jpg
    21.4 KB · Views: 823
  • Like
Reactions: codyt

Tweeter better than Polk rdo-198 for around 60$

Looking to see if anyone is familiar with Polk rdo-198 tweeter..a replacement for sl-3000 tweeter they made a while back.

Specs and graphs are in link below.

https://forum.polkaudio.com/discuss...f-5-tweeters-sda-tweeter-replacement-guide/p1

Are there any tweeters in sub 60$ range that are either 6 or 8ohm that will be better than rdo-198

I prefer silk or soft some tweeter

What's the opinion of people who listened to these tweeters. I thought sl2500 or rdo 198 sounded pretty good.

Protea 3.24 digital out hack

Hi y'all!

My P.A. drive setup comprises a DEQ2496 and an Ashly protea 3.24CL. I usually patch the DEQ at the output of the board, link the DEQ outputs to the Ashly's inputs, and send the Ashly's outputs to my PA's amps.

I would like to bypass the useless D/A and A\D pair between the DEQ and the Ashly by running a digital link between the two. The DEQ has digital outs, that's easy, but the Ashly has no digital I/O whatsoever... Would anyone be electronically intimate enough with the 3.24 to give me clues and pointers?

I found it's pretty hard to find technical info about the Protea: never ever seen a service manual or schematic anywhere for it.

thanks!

P3A overshoot and ringing on square wave ideas?

So just like @east electronics I've been messing around with some P3A's and I had one lying around for some 10 years or so, then I finished it recently but there is one odd problem. When I test it with a square wave of anything between 100hz and above I get a output that is a very spiky overshoot which is as vertical as you can get and then a slow ringing ramp up, on every cycle. I attached a hand drawn approximation of what my analog scope shows.

I have everything as in the schematic from Rod's page, 220pF WIMA PP then 100pF WIMA PP for dampening at the drivers. In the output is the original 10 ohm series with 100nF high frequency filter .
I also have WIMA 100nF as bypass at each rail close to output transistors.
I had a 100uF parallel with the 100nF , took those out no change.
I also tested both with 8ohm resistor dummy load and just scope probes alone and again no difference.

At first I thought it might be too long PSU rail wires etc, but taking adding the 100uF electrolytics on board changed nothing.


One last idea I have currently is to disconnect feedback and see whether the problem is at the output or it comes from the input because with feedback attached the input also shows a minimized output waveform as it comes through the feedback loop.


Can you guys suggest any ideas?

Attachments

  • scope pic.png
    scope pic.png
    1.7 KB · Views: 134

Hiraga Super 30w Kubota Modules + Heatsinks

Hi, I'm to old for this hobby and have decided to sell up what I have.

A while ago I started but never finished a Hiraga Super 30w amp. I got as far as building 2 complete modules then I had to stop due to health issues.

So what you see in the photos are 2 Hiraga Super 30w Kubota modules with 2 CAP MX modules.

The input transistors are gain matched 2sa872a and 2sc1775a pairs.
The main driver transistors are high speed 2sa875 and 2sc2275.
The output transistors are gain matched Mjl1302a and Mjl3281a.
The capacitance multiplier output transistors are also Mjl1302a and Mjl3281a.

I have limited the bandwidth to 500khz to ensure stability and they sound fantastic with +-32v power supplies.

The heatsinks in mm, are 266w x 200h x 74d and were previously used in a class B amp that's why there's a few 3mm holes in them.

The white pcb's are loud speaker protectors that use a design I found on this site, can't recall which one though?

I'm also including the unpopulated heatsinks as I don't have any use for them.

Get in touch if your interested.

Also due to the weight of the heatsinks, packaging may be an issue?
photo1.jpg
photo2.jpg
photo3.jpg
photo4.jpg
photo5.jpg
photo6.jpg
photo7.jpg
photo8.jpg
photo9.jpg
photo10.jpg
photo11.jpg

Speaker cable sleeve and connectors.

Background:

I have never heard a speaker cable make a difference. I have never installed "fancy" cables in my systems for this reason. I believe my main system while not uber high end should be resolving enough that I should be able to hear a difference. I currently use 12 gauge zip cord from my amplifiers to wall jacks (all banana plugs) through the walls and patch cables to my speakers. My plan is to replace the total run from the amplifiers to the speakers with a single pair of speaker cables which I build myself (I am too cheap to buy something I don't believe in).

My System: (for testing

Sony UBP-X800M2 Blu-Ray Player, Interconnect HDMI
Marantz AV7704 Sound processor (running 2 channel) Interconnect XLR
Emotiva XPA-1 Gen 1 mono blocks
Magnepan 2.7 QR speakers

DIY speaker cables;

Each speaker cable will be built using 4 individual plenum rated. solid core, 23 awg (combined gauge 11 awg), CAT 6 network cable braided. Each cable is 16' long after braiding the net cable length is ~15'. All of the solid colors are joined to make a single conductor and all of the stripe colors are joined to make the other conductor. I will solder the bare copper at the ends and shrink wrap.

Questions;

What reasonably priced connectors should I use? I would prefer banana connectors on the speaker ends as the Maggies "need" this. The XPA-1s will take most anything. I was thinking about expanding banana plugs for both.

For aesthetics I would like to wrap the cables in a braided/mesh sleeve. Is there a material I should use? cotton, nylon, etc Or material I should stay away from?

10" woofer suggestions - Heathkit ASX-1383

Hello all, sorry if this is in the wrong section. When I was a kid my dad had a pair of Heathkit ASX-1383. Amazing speakers. Been on the hunt to find them. A few weeks ago I finally found a pair, in rough shape.

The woofers are not original and are crappy. The mids work but the surrounds need replaced, and the tweeters are getting absolutely nothing. I found a manual on that auction site and have been reading up, but I've never done a repair before and am having trouble figuring out what to get. I have new tweeters on the way and found mid surrounds, but the woofers are baffling to me.

They are Heathkit part 401-199. After doing some research, I believe they were made by Carbonneau, but I'm not sure.

Here are the specs:
10"
cone 7.5"
magnet weight 32oz
Material Ferrite
voice coil 1.75"
enclosure Sealed B2 alignment at 45hz
usable response up to 2kHz

amp power 10-200w
phase response +- 45 degrees 100hz to 10kHz
crossover 750 Hz, 6db/octave
enclosure 1.8 cubic
8 ohm nom., 5.5 minimum

Anybody have any recommendations on what to get? Thanks in advance!

QnD - high-efficiency speaker build

45815759614_5aa465317c_o.gif


Some while ago, I got my hands on a pair of vintage Beyma elements (10G150) with a claimed sensitivity of 99db which would be fun to build something with.
On the shelf, I have a compression driver (Faital Pro HF104) that might pair ok with a 10” driver. However, the Faital wants to be crossed over at 1,7 kHz which might be a bit higher than optimal as there might be a mismatch between polar patterns and the woofer might have started to beam at the cross-over frequency. Well, it’s not high-end, it is me having fun with what I’ve got lying around.

45815758734_d4a7168707_o.jpg


The woofer has a short X-max so it is probably intended for the midrange. I want it to be able to play low enough (in frequency) to work without a sub in a home environment so I am aiming no lower than -3db at 60Hz.

The box will be a mass-loaded transmission line (MLTL), or rather a bass reflex cabinet where the internal resonances are taken into account. What I've done is position the woofer in height to suppress internal resonances in the vertical direction and position the positions of the ports vertically in relation to the ports internal resonance to suppress that too. It shows quite well in the simulations using MJKs worksheets. I can’t really remember the exact position of the ports but the two simulations below show the difference in the predicted response due to the placement of the ports in the vertical direction.

Here are two simulations. The first (if I remember correctly) is with a slot port at the bottom. The resonances from the ports are disturbing the overall SPL from 300-1000 hz.

44722276990_b08a474b89_o.gif
46539597901_a6f7ef5fe3_o.gif


By moving the ports slightly higher and finding the right spot by trial and error, one can find a position which is more favourable and suppresses internal port resonances. Thus one does not need to rely completely on damping material to smoothen the response. Damping material also affects the bass output, which can be compensated with a larger box but this is my choice for this little project.

44722277070_cfa5db2577_o.gif

45815756334_8ff8a73a2b_o.gif


Here are some build pictures:

First a serious drawing...

45815757194_35a1fef7f7_c.jpg


45815757754_4cfbfb9da7_o.jpg


46539596641_b88bf7aaab_o.jpg


45815757694_4c6b13a6c7_o.jpg


45815757284_17300c7717_o.jpg


46487526652_645e42c853_o.jpg


45815757424_9914b92057_o.jpg


45815757244_e5307c14a3_o.gif


45815757114_35330965bf_o.jpg

Attachments

  • 44722276990_b08a474b89_o.gif
    44722276990_b08a474b89_o.gif
    6.8 KB · Views: 83
  • 45815757754_4cfbfb9da7_o.jpg
    45815757754_4cfbfb9da7_o.jpg
    82 KB · Views: 84
  • 45815757694_4c6b13a6c7_o.jpg
    45815757694_4c6b13a6c7_o.jpg
    80.9 KB · Views: 72
  • 46539596641_b88bf7aaab_o.jpg
    46539596641_b88bf7aaab_o.jpg
    76.6 KB · Views: 88
  • 45815757694_4c6b13a6c7_o.jpg
    45815757694_4c6b13a6c7_o.jpg
    80.9 KB · Views: 81

Better Voltage Regulator or Resistors?

I am looking for an very reliable solution to bring down my power supply voltage from 34 to 30v. I bought some of these on amazon and one already died and the second is just stuck at 32v. The load is not very high, less than one amp (see the Burning Amp 3 input stage, which I think is about 50-60mA). It needs to be bipolar. While I did buy some bigger regulator kits on eBay with heatsinks and such, why couldn't I use a voltage divider? If I use low enough resistance, like a 1 ohm and an 8 ohm, it should work without affecting the power supply's ability to provide current when needed right? This is for the class A input stage of the BA-3 so it should be pretty constant anyway. The output stage is perfectly happy running at 34v but I want to protect the Toshiba JFets as much as possible.

PPP 6550C A to Z direct coupled

i built for a friend this double PP of 6550 100+100Watts rms

the particularity is that all the connections between the tubes are made in direct coupling and/or by inter-stage transformer.

on this amp I do not use transistors but conventional resistor biasing, and all stages are direct coupled

it's very rare these days I don't know of any commercial amp with this feature

in the good old days it was used for class AB2 professional amps of several hundred or even thousands of watts

input on transformer 1:0.5/0.5 high impedance 40K/20+20Kohm

first stage amplification E80CC audiogold cathode resistor non-polarized cathode capacitor 47uF 100V

followed by a buffered 6SN7 cathode follower i forget small neon lamp grid cathode
but HT switch allow tubes heat up

then a 6SNTWGT Sylvania brown base in differential inter-stage transformer driver 1/1:1/1

finely tuned with symmetry fine tuning.

in the secondary a last 6SN7 Foton in buffer and bias management to drive the double PP of 6550C svetlana.

each 6550C is fitted with a 10H 7W wire wound cathode resistor

res screen G2 1K 7W wound wire ultralinear assembly

res grid 1 2K2 ohm 2W wound wire

each phase individual bias settings

all these stages in direct connection no caps without feedback (feedback)
IMG_20220215_182854.jpg100_0868.JPG100_0868 jpg.jpgIMG_20220224_194617.jpg

Tall whizzer cone vs curved shallow wizzer cone to mate with an 8 inch midrange cone with fabric surround

Im just trying to wonder that what shape of wizzer cone is preferred with a 8 inch paper midrange cone with fabric surround to mate with. Technically i need a wizzer cone which goes relatively slightly lower in treble frequency to match to the 8 inch midrange cone.

I agree the fact that different whizzer cones will have different frequency extensions.

But can anyone tell me that shallower or steeper whizzer cone required in the above case?

12AT7 internal mismatch in dual triode

Been playing with the SSE amplifier and I am noticing a 20% difference between the dual triodes on many of my 12AT7's especially the newer made ones. Bought a pair of Psvane 12AT'7's to play with and one was satisfactory and the other unusable unless one want half the power on one channel. I was measuring the voltage drop across the tubes to see the differences then testing to see what the power output at clipping was and that is what I found. I have a couple I bought used from Tube Depot that have a big difference between the two triodes as well. Not as much as the new Psvane but a significant difference. Chances are one will not notice this in a tube that is not too extreme but it is there. I knew there was a normal 20% difference between any production run of a tube but did not realize this applies to dual triodes in one envelope as well. One could bias the two sides differently to equalize the outputs but then it means if one changes the pre tube it would have to be done again which is not a big problem for a diy'er but not acceptable for a retail amp. What I am doing is purchasing a number of 12AT7's and picking the one best matched to use in my amplifier. I have noticed that the Gold Lion gold pin tube advertises balanced sections but at a premium price. Has anyone else noticed this?

QUAD 50e speaker wiring

Hello all.
I have a pair of 55e .They came to me with u/s written on side so could have fault.

I have tried them out an both output sound ok but the large reisistor R32 gets hot.
It got to 95c in about 2 mins so I shut it off.
I wasn't sure if the way I connected the speaker was a cause.
I just connected it across pins 1 and 2.
Do I need to connect it like the diagram?
thanks

Attachments

  • Screenshot-220.png
    Screenshot-220.png
    205.5 KB · Views: 485

Audionote Ongaku AC filament on 211se How quiet?

Hi I was surprised when I looked at the Ongaku schematic to see the output is on AC. The Ongaku is known for is inky black soundstage and holographic imaging. Has anyone had experience with ac on 211se full power both chinese and nos tubes? Does the Ongaku suppress hum in the circuit? I tried 845 @450 and it was too noisy. Thanks for the help

Minimum clearance for down firing sub?

This question has been raised but not fully answered. I admit to being a scrap merchant. I acquired a faulty Tannoy FX 5.1 subwoofer for free. https://www.tannoy.com/product.html?modelCode=P0BYJ I sold the faulty plate-amp for £25. I got £28 for the driver, £16 for the feet. I was about to throw the carcass out when I realised I had another 8" driver in the tool-shed. I have some rubber feet but they are only 13mm. Do I need more ground clearance?

Failed LTSpice Simulation of HK Citation II

Hi,

I have some difficulty with LTSpice simulation of HK Citation II. The only difference from the original is an output CFB transformer (real unit with real DCR of windings). Simulated amp oscillates even at low input signal level. Polarity of secondary connection (to GND / global feedback) is correct, reversing it causes huge spikes. Suppressor grid of 12BY7 pentode is connected to cathode in schematic, yet LTSpice models made as tetrodes with that connection already in place. 12BY7 models are by Ayumi (used), and another by Steve/Stepnie Bench (unused). Tried second, sim doesn't work either. All files in attachment.

Made similar simulations in the past, they were surprisingly close to real units when they were built and measured, even THD values.

I can't understand purpose of 4uF C7 (on original manufacturer's schematic), which is connected between grid and screen ("-" of that cap IMHO should go to the ground), but don't think its a bug in drawing.

Thanks in advance for any help.

Attachments

  • Screenshot at 2022-11-15 17-28-37.png
    Screenshot at 2022-11-15 17-28-37.png
    30.3 KB · Views: 168
  • Screenshot at 2022-11-15 17-28-09.png
    Screenshot at 2022-11-15 17-28-09.png
    37.8 KB · Views: 158
  • cit2_schematic.png
    cit2_schematic.png
    329 KB · Views: 168
  • Amp_Cit2.zip
    Amp_Cit2.zip
    657.8 KB · Views: 87

Distortion on Nakamichi cassette deck 1.5

My Nakamichi Cassette Deck 1.5 has a distortion on the left channel. Bass is crackling. It occurs on both playback and record. Please find the service manual on attached. On the electrical adjustment section, I don’t understand it much. Please help me find the adjustment point.

Attachments

Hifiberry OS - did some one use it

Hifiberry OS - did some one use it

why we have another one - there are 6-12 OSSes for the berry and hifi.

New HiFiBerryOS release | HiFiBerry

New HiFiBerryOS release

A year ago we started to build our own distribution. Why? Because we missed something from existing distributions. HiFiBerryOS is designed to use minimal resources and configure your HiFiBerry sound card automatically. So, you only have to write the image to an SD card and boot from it. No configuration is needed! There is also no web interface. While you can login to the system via SSH, this isn’t needed. The services are active automatically and you can use these to stream music from your PC, mobile phone, Logitech media server or Spotify.

With the new release, we upgraded the software, but also completely changed the system design to make it more robust. This took us a lot longer than expected, but finally, the new version is here.

The following services are supported out-of-the-box:

Airplay 1
Bluetooth
Squeezelite
Spotify

Also included is an mpd instance. However, this isn’t used yet. We plan to use it in the future to provide a list of web radios.

HiFiBerryOS also includes our DSPToolkit. You can use it to program your HiFiBerry DAC+ DSP or Beocreate amplifier.

As the system is a custom build for specific hardware, it is only available for the Raspberry Pi 3 at the moment (A+, B, B+). However, we plan to release a version for the Pi4 and even the Pi Zero soon. We did a lot of testing, but there might still be small bugs. It would help us a lot to hear your feedback. Just have a look, test it and post your feedback in our forum.

Broken amplifier help? (Onix OA20/2)

Hello! I just bought an Onix OA20/2, and I am having some issues. Switching between various inputs heeds various results. Hissing, buzzing, static, imbalances, no output from one or both speakers, it's ugly. Working on circuitry related problems is something I'm almost completely new to, so I was dumbfounded when the issue first came to my attention. It's been recommended that I replace the silver contacts on the input selector, which I'm inclined to do, but I'm faced with the problem that I don't know what that means. There are a couple of black cylindrical pieces which are both corroded, so my guess is that that may be contributing to the amp's dysfunctional state. Any advice is appreciated, thanks!
Projects by fanatics, for fanatics
Get answers and advice for everyone wanting to learn the art of audio.
Join the Community
507,534
Members
7,875,930
Messages

Filter

Forum Statistics

Threads
405,670
Messages
7,875,930
Members
507,534
Latest member
Fireball2020