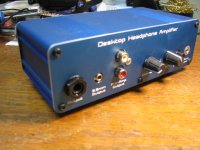
agdr's ODA headphone amp and O2 booster sales thread
This post is being split off from this thread in Headphones:
http://www.diyaudio.com/forums/head...version-o2-desktop-amp-oda-3.html#post3516924
I'm doing a run of 10 boards and using two for test. The remainder are up for grabs.") Just PM me to be put on the list. No money collected until I have the boards back, built one up and verified there are no problems and am ready to ship.
Just PM me to be put on the list. No money collected until I have the boards back, built one up and verified there are no problems and am ready to ship.
The details are in the post in the link, around $15.20 per 4 layer board plus shipping that either has tracking or delivery confirm. I'm taking any restrictions off how many boards per person. If all goes well on this run I may do a larger one later on.
I'll post status in this thread. Should take me a couple of weeks to get the extra 2 layers added, a week or two for fab, a few days for DHL to ship and a week or two for build and test.
This post is being split off from this thread in Headphones:
http://www.diyaudio.com/forums/head...version-o2-desktop-amp-oda-3.html#post3516924
I'm doing a run of 10 boards and using two for test. The remainder are up for grabs.
Just PM me to be put on the list. No money collected until I have the boards back, built one up and verified there are no problems and am ready to ship. The details are in the post in the link, around $15.20 per 4 layer board plus shipping that either has tracking or delivery confirm. I'm taking any restrictions off how many boards per person. If all goes well on this run I may do a larger one later on.
I'll post status in this thread. Should take me a couple of weeks to get the extra 2 layers added, a week or two for fab, a few days for DHL to ship and a week or two for build and test.
Last edited:
One board for stereo setup, correct?
My headphones are AKG Q701. Will this headphone amp be excellent with them?
If all yes then I'll take one board
That is right, just one board for stereo.
This amp should work very well for the Q701's. I have a pair of Shure SRH940's that have approximately the same impedance (44R vs. your 62R) and sensitivity (100dB vs. 105), and they work great. I also have a pair of AKG K550's, but those have a much higher sensitivity, 115dB/V, which only requires about 80mV of output swing. The Shures are in the ballpark with yours, with around 1.8Vrms of swing for full volume.
One of this amp's big things is vastly more current capability than a lot of amps, with those 3 paralleled dual chips (6 op amps in parallel) on each channel, for a total of about 320mA or so of current capability per channel to drive really low impedance, low sensitivity cans.
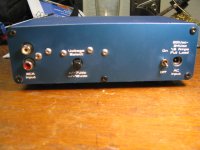
And on the other hand it has a high/low voltage switch on the power supply, so that in the other +/-16Vdc rail position it can power hard-to-drive cans in the other direction, high (600R) impedance low sensitivity models. In your case you would use the low voltage +/-7Vdc power supply setting. It is just a switch on the back.
The 4 position gain switch and optional bass boost may be useful, too, looking at the Q701 frequency response curve here:
AKG Q701 Quincy Jones headphones / HeadRoom Audio
And this is probably one of the few headphone amps out there with a dual-stage power supply that has LT317/337s as pre-regulators feeding LT1963A/LT3015 low noise LDO final regulators. That was sort of a byproduct of the LT1963A having a max input of 20Vdc and my wanting the amp to be able to use easy-to-find 24Vac transformers, but the net result is a tremendously low level of power supply ripple.
I'll put you down for a board. It is OK to change your mind at any time, just let me know, since it will be a few weeks. I'm mainly getting these boards to test adding a 3rd and 4th layer to some 2 layer Gerbers I already posted. I have to get a minimum of 10 boards, so I just decided to sell the extras. The boards are getting ordered regardless.
Last edited:
The PC boards for this project are ready to ship to those who expressed interest. I'm going to cover the cost of US shipping - 1st class mail with delivery confirmation - so a total of $15 a board. These are just spare boards from a PC board fab run, so feel free to buy fewer boards than you indicated or cancel outright - no problem. I've got a waiting list of friends at this point for any extras.
Just send me a PM with your DIY audio name and your shipping address. I'll send you my paypal address. When the board(s) ship I'll PM you the postal service tracking number.
This thread in the headphones forum has the latest Bill Of Materials (BOM)
http://www.diyaudio.com/forums/head...version-o2-desktop-amp-oda-4.html#post3558167
and I will post an updated set of build instructions there this weekend.
I'm still in the process of having a set of front and back panels fabbed, received, and verified. When I get that finalized I will also post those files for Front Panel Express and Proto Panel, along with the measurements to just drill the panels that come with the B4-080 box yourself. Proto Panel is still running their 1/2 price special this month, which looks like (haven't sent them out yet) will clock in at $10-$12 per panel (front and back) plus shipping. Please be aware that a rear panel is required on this project since the voltage regulators heat sink to it. In the build instructions I have building up and testing the power supply section as the first thing to do. If you don't have a rear panel yet I'm including a procedure to temporarily bolt a small heat sink onto the pre-regulators to allow it to run 10 seconds or so for testing purposes to verify the output voltages.
As promised I'm also making a donation to DIY audio right now.
Happy soldering!
I've got a waiting list of friends at this point for any extras.Just send me a PM with your DIY audio name and your shipping address. I'll send you my paypal address. When the board(s) ship I'll PM you the postal service tracking number.
This thread in the headphones forum has the latest Bill Of Materials (BOM)
http://www.diyaudio.com/forums/head...version-o2-desktop-amp-oda-4.html#post3558167
and I will post an updated set of build instructions there this weekend.
I'm still in the process of having a set of front and back panels fabbed, received, and verified. When I get that finalized I will also post those files for Front Panel Express and Proto Panel, along with the measurements to just drill the panels that come with the B4-080 box yourself. Proto Panel is still running their 1/2 price special this month, which looks like (haven't sent them out yet) will clock in at $10-$12 per panel (front and back) plus shipping. Please be aware that a rear panel is required on this project since the voltage regulators heat sink to it. In the build instructions I have building up and testing the power supply section as the first thing to do. If you don't have a rear panel yet I'm including a procedure to temporarily bolt a small heat sink onto the pre-regulators to allow it to run 10 seconds or so for testing purposes to verify the output voltages.
As promised I'm also making a donation to DIY audio right now.
Happy soldering!
Last edited:
What will be the price difference to ship to Canada, Montreal?
Thanks
Do
I'll find out - please PM me with your shipping address.
board has been received!
Good to hear! Now the fun part, you get to build it.
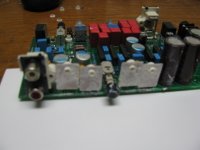
The first part is easy, if you are following the build instructions, the AC input power supply section. Big & easy-to-solder parts and no back panel need for this part (no voltage regulators yet). Even the two SMD resistors on the bottom are huge, 2512 sized. Then you can test just this part with your DMM as per the instructions.
I've added voltage warnings/reminders in the latest version of the build instructions. You will wind up with around +36Vdc on one rail input and -36Vdc on the other, so important not to get in contact with live parts on the top or bottom of the PCB while it is on and out of the case! And be sure to discharge those 4 large filter capacitors once it is off and the power cord is unplugged if you are going to be working on it again soon.
Please let me know if anything on the board or in the build instructions isn't clear or could be improved as you go through the build.
Last edited:
Hardware parts kit now available for this headphone amp
I have a hardware parts kit available for this DIY amp now. The build thread is here:
http://www.diyaudio.com/forums/headphone-systems/229934-version-o2-desktop-amp-oda.html
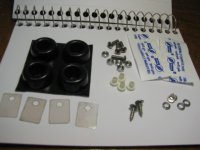
The kit consists of the parts needed to mount the 4 voltage regulators including heat sink grease, the two hold down screws for the RCA jacks, and adhesive rubber feet for the case. Total price is $10 USD plus shipping via paypal. PM me if interested!
Note that the part numbers for the basic TO-220 mounting kit at Mouser is in the BOM, along with part numbers for the feet. This kit is just a little fancier with stainless steel parts, truss head screws for the RCA hold down (bigger and flatter head), and extra-long TO-220 washers.
I'm including 5 lock washers and 5 nuts instead of 4 since at least one tends to go flying across the room and land in the carpet during assembly, in my experience.
The kit contains:
* 4 3mm x 0.5mm x 10mm 18-8 stainless steel socket head (2mm metric allen wrench) bolts. BoltDepot #7220
* 5 3mm x 0.5mm 18-8 stainless steel hex nuts. BoltDepot #4773
* 5 3mm 18-8 stainless steel lock washers. BoltDepot #4810
* 2 Phillips truss head #4 x 3/8" screws, 18-8 stainless steel. BoltDepot #4032
* 4 extra long TO-220 nylon insulators.
* 4 mica TO-220 insulators
* 2 packages of thermal silicon + zinc oxide heat sink grease
* 4 adhesive rubber feet. Philmore #10-602.
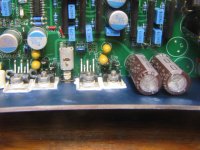
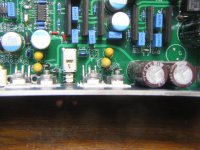
The correct order to assemble the TO-220 hardware is heat sink grease on both sides of the mica washer first, then apply to the 4 voltage regulators. Then insert the 4 nylon insulators. Then place the rear panel over the regulators and get the nylon insulators inserted into the 4 holes in the panel. The pre-regulator metal tabs are thinner than the LT final regulators so the nylon insulators will extend about 0.25mm past the panel. That is OK.
The socket head bolts go in from the outside of the panel, so the head is visible on the outside. Insert one bolt into a nylon insulator making sure the insulator stays in place, then slide a lockwasher over the threads on the other side, then thread on a nut. Don't tighten the nut down firmly yet.
Then do the same with the other 3 voltage regulators. When all 4 nuts are hand tight go ahead and snug them down. A 2mm allen wrench is needed for the socket head bolt and needle nose pliers to hold the nut. Then as a final step measure the resistance with an ohmmeter from the exposed metal edge of the panel to the tab of each of the 4 voltage regulators. It should be an open circuit or millions of ohms. It doesn't matter if you get a low reading to the bolt itself, just the tab needs to be insulated.
One truss head screw goes into the mounting hole on the rear RCA jack. Once the whole PCB is slid into the case, and the front panel on, the other truss head screw does the same for the front RCA jack.
The adhesive feet just stick to the bottom of the case. Holes could be drilled in the case bottom and #8 screws used with the feet, but that isn't included here. I've found the adhesive works quite well.
Photo #2052 shows the contents of the kit. #2048 is the difference between a standard TO-220 nylon insulator and the extra long insulators in this kit. The standard insulators (as comes with the Mouser TO-220 mounting kit) will work fine, but require a little more care when lining up with the panel hole. #2038 shows the initial step of applying the heat-sink-greased mica insulators to the 4 voltage regulators. Make sure all 4 micas are lined up vertically. The remaining photos show the final assembly with the bolts. Note that since the two pre-regulators have thinner tabs the bolts extend a bit further past the nuts.
I have a hardware parts kit available for this DIY amp now. The build thread is here:
http://www.diyaudio.com/forums/headphone-systems/229934-version-o2-desktop-amp-oda.html
The kit consists of the parts needed to mount the 4 voltage regulators including heat sink grease, the two hold down screws for the RCA jacks, and adhesive rubber feet for the case. Total price is $10 USD plus shipping via paypal. PM me if interested!
Note that the part numbers for the basic TO-220 mounting kit at Mouser is in the BOM, along with part numbers for the feet. This kit is just a little fancier with stainless steel parts, truss head screws for the RCA hold down (bigger and flatter head), and extra-long TO-220 washers.
I'm including 5 lock washers and 5 nuts instead of 4 since at least one tends to go flying across the room and land in the carpet during assembly, in my experience.
The kit contains:
* 4 3mm x 0.5mm x 10mm 18-8 stainless steel socket head (2mm metric allen wrench) bolts. BoltDepot #7220
* 5 3mm x 0.5mm 18-8 stainless steel hex nuts. BoltDepot #4773
* 5 3mm 18-8 stainless steel lock washers. BoltDepot #4810
* 2 Phillips truss head #4 x 3/8" screws, 18-8 stainless steel. BoltDepot #4032
* 4 extra long TO-220 nylon insulators.
* 4 mica TO-220 insulators
* 2 packages of thermal silicon + zinc oxide heat sink grease
* 4 adhesive rubber feet. Philmore #10-602.
The correct order to assemble the TO-220 hardware is heat sink grease on both sides of the mica washer first, then apply to the 4 voltage regulators. Then insert the 4 nylon insulators. Then place the rear panel over the regulators and get the nylon insulators inserted into the 4 holes in the panel. The pre-regulator metal tabs are thinner than the LT final regulators so the nylon insulators will extend about 0.25mm past the panel. That is OK.
The socket head bolts go in from the outside of the panel, so the head is visible on the outside. Insert one bolt into a nylon insulator making sure the insulator stays in place, then slide a lockwasher over the threads on the other side, then thread on a nut. Don't tighten the nut down firmly yet.
Then do the same with the other 3 voltage regulators. When all 4 nuts are hand tight go ahead and snug them down. A 2mm allen wrench is needed for the socket head bolt and needle nose pliers to hold the nut. Then as a final step measure the resistance with an ohmmeter from the exposed metal edge of the panel to the tab of each of the 4 voltage regulators. It should be an open circuit or millions of ohms. It doesn't matter if you get a low reading to the bolt itself, just the tab needs to be insulated.
One truss head screw goes into the mounting hole on the rear RCA jack. Once the whole PCB is slid into the case, and the front panel on, the other truss head screw does the same for the front RCA jack.
The adhesive feet just stick to the bottom of the case. Holes could be drilled in the case bottom and #8 screws used with the feet, but that isn't included here. I've found the adhesive works quite well.
Photo #2052 shows the contents of the kit. #2048 is the difference between a standard TO-220 nylon insulator and the extra long insulators in this kit. The standard insulators (as comes with the Mouser TO-220 mounting kit) will work fine, but require a little more care when lining up with the panel hole. #2038 shows the initial step of applying the heat-sink-greased mica insulators to the 4 voltage regulators. Make sure all 4 micas are lined up vertically. The remaining photos show the final assembly with the bolts. Note that since the two pre-regulators have thinner tabs the bolts extend a bit further past the nuts.
Attachments
-
 IMG_2038.JPG110 KB · Views: 493
 -
 IMG_2046.JPG204.1 KB · Views: 488
 -
 IMG_2045.JPG203.3 KB · Views: 488
 -
 IMG_2048.JPG67.9 KB · Views: 476
 -
 IMG_2052.JPG115.9 KB · Views: 476
 -
 IMG_2057.JPG173.5 KB · Views: 130
 -
 IMG_2056.JPG169.5 KB · Views: 128
 -
 IMG_2055.JPG144.9 KB · Views: 117
 -
 IMG_2054.JPG154.2 KB · Views: 127
Last edited:
O2 headamp booster PCB's V2.0 are ready to ship
I'm finally ready to ship out the V2.0 booster boards for RocketScientist / NwAvGuy's O2 headphone amplifier. The folks who have previously expressed interest are in the "orders" folder at the Google Drive link below. They have first dibs on the 14 boards available if still interested. Any not claimed by next Wednesday the 29th will be made available then. Please send me a PM with your shipping address if still interested. I'll PM back a paypal email address.
The at-cost price is $7 for each board and $3 for a set of connection pins that go between the booster board and the U3 & U4 IC sockets on the O2's PC board. Shipping is $4.00 (postage plus rigid mailer) for the continental 48 states in the US. Outside of that, anywhere in the world, please send me a PM with your address and I'll get a shipping quote from the post office. All prices are in US dollars.
So for one booster board, a set of pins and shipping, the total to paypal would be $7 + $3 + $4 = $14 US dollars. Same shipping price for any number of booster boards.
I'm not offering any parts, just the PCB board and connection pins. It is too easy to static zap an IC or loose an SMD part in a rug during the build and need a replacement, and I don't want to get into sending out individual components. The BOM has part numbers for Mouser and Digikey for everything. I'm making the pins available since they are the only part not available from Mouser (Digikey has them) and Digikey only sells them in strips of 64 pins.
There project details are in the DIY build thread here:
http://www.diyaudio.com/forums/headphone-systems/244473-o2-headamp-output-booster-pcb.html
scroll down to the last 6 posts or so in that thread for the latest. The build instructions, layout, schematic, BOM, and other good stuff are consolidated at a Google Drive link here:
https://drive.google.com/folderview?id=0B67cJELZW-i8Vmp5MDVLNzJxTGc&usp=sharing (go to the 11_15_2013 folder for V2.0)
To summarize, the board replaces the O2's NJM4556A output chips each with an OPA140 + LME49600 pair (or optionally a OPA827 + LME49600 or many other ICs, as listed in the build instructions). The net result is the O2 headamp's output DC offset dropping from the O2's typical 3mV DC per channel to around 30uV DC and the peak output current (musical peaks) being able to draw up to around 200mA per channel vs. the existing 140mA. The output parallel 1R reistors in the O2 can be left in, or eliminated (shorted across) entirely for nearly zero ohm output impedance. The datasheet THD numbers for the booster board chips (not tested with a dScope or AP, just datasheet) should be somewhere around 6x and 8x better than the NJM4556A, which means more of the low THD number of the gains stage NJM2068 chip can make it through to the headphones.
The O2 booster board makes all electrical connections to RocketScientist / NwAvGuy's O2 headamp through the pins going to the O2's U3 and U4 jacks, except one ground wire which has to be soldered from the board to the middle battery terminal (or the output jack ground, as explained in the build instructions). The board rather amazingly fits just fine in the standard B2-080 O2 case, into the top slot. The booster board uses all surface mount parts that sit between the top of the board and the top of the B2-080 case. If you have an ODAC in your O2 in place of the batteries the booster board should still fit just fine.
The board also contains a couple of optional modifications. One has LEDs on each power supply rail after the O2 mosfets. The other allows mounting of an upside down 1/4" Neutrik jack if using the taller B3-080 case.
I had some concerns initially after testing the board over the 200mV or so turn-on and turn-off thump the O2 amplifier generates, due to the way RocketScientist has designed his mosfet-switching power management circuit. But after some more pondering decided it isn't a problem except for possibly a few ultra-sensitive IEMs. For exmple, as I've posted in the build thread, my fairly sensitive AKG-K550s run normal volume levels at 40mV(rms) or so, but are rated for 200mW maximum power. That equates to 2.5Vdc, about 12 times the peak thump voltage.
Please be aware that I made an error with the optional O2 power management latch circuit on the PC board, as I posted in the build thread. It needed to hook into the power rails before the O2 mosfets. So don't populate those parts, as listed on the BOM and in the build instructions. That section was optional and has no effect of any kind on the amplifer or LED sections.
I also have a V3.0 board out to fabrication right now that will include a headphone relay but loose the optional 1/4 jack. That board probably won't be back and tested for a 6-8 weeks through, and may have errors when I test it which would add another month or two for a re-fab.
Enjoy!
Last edited:
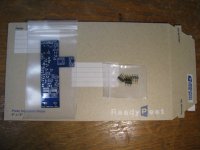
Here is a photo of what gets shipped for the O2 booster board.
I've just received a couple of more shipping quotes. $8 total (shipping $6.50 and mailer $1.50) to Canada and places in Europe. I'm using a rigid mailer to try to keep the postal folks from snapping the board in half along the way. That apparently raises the shipping cost a bit since they can't run it through sorting machines.
I've just received a couple of more shipping quotes. $8 total (shipping $6.50 and mailer $1.50) to Canada and places in Europe. I'm using a rigid mailer to try to keep the postal folks from snapping the board in half along the way. That apparently raises the shipping cost a bit since they can't run it through sorting machines.
Attachments
Well... the mysteries of the post office here. I just shipped a board and pins to Canada and got a different postal clerk, who said the package can be shipped as "non-machinable (rigid) letter" for just $1.30 USD. The two clerks discussed and apparently $1.30 is the correct number. The $6.50 was for a "small parcel" rate. I just refunded the difference on that shipment.
So the new shipping cost for Canda would be $1.30 postage + $1.50 for the rigid mailer, total of $2.80. The grand total to Paypal then for one O2 booster board, one set of connection pins, and the $2.80 shipping to Canada would be $12.80 US dollars.
I just shipped a board and pins to Canada and got a different postal clerk, who said the package can be shipped as "non-machinable (rigid) letter" for just $1.30 USD. The two clerks discussed and apparently $1.30 is the correct number. The $6.50 was for a "small parcel" rate. I just refunded the difference on that shipment. So the new shipping cost for Canda would be $1.30 postage + $1.50 for the rigid mailer, total of $2.80. The grand total to Paypal then for one O2 booster board, one set of connection pins, and the $2.80 shipping to Canada would be $12.80 US dollars.
Assembled V2.0 booster boards available
It looks like there will be some extras of the V2.0 O2 booster boards left (without a headphone relay, but can have the 1/4" jack). I've had several people ask me about fully assembled boards because they don't want to do the DIY surface mount soldering.
Since there are just a handful of parts on the board I've decided that I'll go ahead and sell an assembled and tested board for $95 US dollars, plus shipping (postage, box, antistatic packing, postal insurance) to your location which may be around $12 USD for Canada and Europe (PM me an address and I'll get a quote).
There may be a delay of a day to two in getting the board out if I have to order parts and/or time available to assemble it. I get next-afternoon delivery from Mouser during weekdays.
The board will be plug-and-play into the O2's U3 and U4 sockets, except for the one ground wire (which will be attached to the board) that you have to solder the other end to the O2 board.
You can choose between the various options on the build:
* Your choice of op amp. The $95 is with OPA140s installed. For OPA827s or other chips send me a PM.
* The $95 is with no LEDs installed. For LEDs and the 2 series resistors add $5.
* The $95 is without the 1/4" Neutrik jack installed and the series 0R resistors. To add the jack and resistors add $5. NOTE: remember that the 1/4" jack mounts under the board and will only fit if you are using the taller B3-080 case. It will not fit in the standard O2 B2-080 case.
* The $95 is without the two bandwidth increasing resistors for the LME49600's installed. $5 more to install those, but from the DIY thread remember those increase the current draw by 7mA per LME49600 chip and really don't add anything to the audio. The 110 mHz BW without the resistors is more than adequate for audio.
Each board will come with measured test results for the DC output offset voltage on each channel.
If interested, just send me a PM!
Last edited:
O2 booster PC boards V3.0
A few of the V3.0 O2 headphone amplifier booster boards are available at cost. I paid $80 for 10, so $8 each. The connection pins are still $3 (as with the V2.0 boards).
The post office confusion continues. Apparently I should have been sending the (v2.0) boards out with a customs declaration for the $6.50 for Canada and parts of Europe. Turns out the $1.30 only applies for letters and photos without a declclaration. So back to $6.50 for Canada and parts of Europe, but PM me your mailing address and I'll find out for sure.
So for one board the total would be $8 + $3 + $1.50 + shipping, all US dollars. Please PM me if interested! I'll PM my paypal address.
The offer to buy a fully assembled one still goes, if a board is available, but $119 for the basic V 3.0 due to extra parts and time required to solder. Same comments as above for the assembled V2.0 for adding LEDs, op amps other than OPA140s, and the BW resistors. Also I'm going to have to extend the ship time to 5 business days to get time to do the soldering.
A few of the V3.0 O2 headphone amplifier booster boards are available at cost. I paid $80 for 10, so $8 each. The connection pins are still $3 (as with the V2.0 boards).
The post office confusion continues.
Apparently I should have been sending the (v2.0) boards out with a customs declaration for the $6.50 for Canada and parts of Europe. Turns out the $1.30 only applies for letters and photos without a declclaration. So back to $6.50 for Canada and parts of Europe, but PM me your mailing address and I'll find out for sure.So for one board the total would be $8 + $3 + $1.50 + shipping, all US dollars. Please PM me if interested! I'll PM my paypal address.
The offer to buy a fully assembled one still goes, if a board is available, but $119 for the basic V 3.0 due to extra parts and time required to solder. Same comments as above for the assembled V2.0 for adding LEDs, op amps other than OPA140s, and the BW resistors. Also I'm going to have to extend the ship time to 5 business days to get time to do the soldering.
Last edited:
Parts kit available for people outside of the USA and Canada
I'm going to make a parts kit available for V3.0 of the O2 booster board for folks outside of the USA and Canada to help out with the Mouser shipping cost issue. Inside of the US and Canada you still have to go directly to Mouser or Digikey - just due to the time involved in packing kits and everything being at-cost.
There is a catch though. To solve the problem of parts accidentally being lost in the rug (I've done it a dozen times myself), static zapped semiconductors, or bad parts from Mouser, I'm including one extra of everything but the larger and more robust LME49600s, the relay, and the 47uF tantalum capacitors. Appolgies up front, but that is the only way I will sell a kit is with the extras since I don't want to do any international re-shipping for individual parts.
The parts are too large to fit in the flat mailers I'm using for the boards, so they will have to go in a US postal service "International Small Box" which appears to be $22 including the tax for most contries. That would include shipping the board, so the only things to add for a board are the board, $8 for version 3.0, and the connection pins for $3.
The parts kit includes the LEDs for that modification, plus the OPA140 op amps. I have prices of the other op amps listed, just substitue for the OPA140s.
I have the parts kit contents posted now on the project Google Drive link under the 1_18_2014 V3.0 folder:
https://drive.google.com/folderview?id=0B67cJELZW-i8Vmp5MDVLNzJxTGc&usp=sharing (O2 booster PCB Parts Kit V3.0.xlsx)
Essentially is is just the BOM using Mouser's part prices, with 1 part added for everything but those 3 items above.
The total then would be around $82.74 + $8 board + 3 pins = $93.74. I'm not sure if that will be a savings over Mouser's international shipping or not, given the extra parts. But at least you wind up with some extra parts for the money.
Last edited:
B3-080 pins available + shipping update + paypal fee
I now have longer O2 booster board connection pins for the taller B3-080 O2 headphone amplifier case available. They are the Digikey ED6764-ND pins (strip of 64 from Digikey) if anyone wants to just buy some directly. Digikey prices them at double the shorter pins for the B2-080 case. A set of 16 pins would be $6. The shorter B2-080 case pins are still $3, of course. I've updated the V3.0 BOM to show the two lengths of connection pins.
These pins would also work on the V2.0 board with the B3-080 case as well as the V3.0 board. With the V2.0 board these pins are what you would need if you are using that 1/4" jack mounted under the board (in the B3-080 case). I still have V2.0 boards if anyone wants to buy one to mount a 1/4" jack. Remember that the V2.0 boards don't have the anti-thump relay though but they can be used stand-alone just for the 1/4" jack.
Also an update on international shipping. It turns out shippnig the parts in a padded envelope is a cheaper service type from the post office here than the small box. Since the costs vary from country to country what I'm doing now is charing $12 for international shipping, then refunding the difference back via paypal from whatever the actual postage turns out to be. Some examples - so far a package with both the board and parts kit to one part of the eastern bloc area was $4.50, one to the UK was $9.50, and one to asia was $6.55. Kind of all over the place in cost, but so far seems to be under $12.
I had forgotten about paypal fees, so I'm also adding $3.50 for O2 booster the parts kit to cover the fee if you send it as "merchandise" where I pay the fee. If you send it gift then you pay the fee directly. As far as I know it is the same $3.50 or so either way.
Make sure you look at the recent posts in the O2 booster board thread on the headphone forum. I've come up with a simple modification to the V3.0 board (with the headphone relay) that takes the O2 headphone amps's turn-off thump down from 90% reduced to 100% reduced - totally gone - and peak-reading millivolt photos I've posted over there prove it (as does my ears!). If you ground the O2 + booster board source inputs (pull out the input cable), turn the volume all the way up, and then turn the O2 on and off (wait the 5 seconds for the relay to turn on) you hear absolutely nothing now. No thumps!
I now have longer O2 booster board connection pins for the taller B3-080 O2 headphone amplifier case available. They are the Digikey ED6764-ND pins (strip of 64 from Digikey) if anyone wants to just buy some directly. Digikey prices them at double the shorter pins for the B2-080 case. A set of 16 pins would be $6. The shorter B2-080 case pins are still $3, of course. I've updated the V3.0 BOM to show the two lengths of connection pins.
These pins would also work on the V2.0 board with the B3-080 case as well as the V3.0 board. With the V2.0 board these pins are what you would need if you are using that 1/4" jack mounted under the board (in the B3-080 case). I still have V2.0 boards if anyone wants to buy one to mount a 1/4" jack. Remember that the V2.0 boards don't have the anti-thump relay though but they can be used stand-alone just for the 1/4" jack.
Also an update on international shipping. It turns out shippnig the parts in a padded envelope is a cheaper service type from the post office here than the small box. Since the costs vary from country to country what I'm doing now is charing $12 for international shipping, then refunding the difference back via paypal from whatever the actual postage turns out to be. Some examples - so far a package with both the board and parts kit to one part of the eastern bloc area was $4.50, one to the UK was $9.50, and one to asia was $6.55. Kind of all over the place in cost, but so far seems to be under $12.
I had forgotten about paypal fees, so I'm also adding $3.50 for O2 booster the parts kit to cover the fee if you send it as "merchandise" where I pay the fee. If you send it gift then you pay the fee directly. As far as I know it is the same $3.50 or so either way.
Make sure you look at the recent posts in the O2 booster board thread on the headphone forum. I've come up with a simple modification to the V3.0 board (with the headphone relay) that takes the O2 headphone amps's turn-off thump down from 90% reduced to 100% reduced - totally gone - and peak-reading millivolt photos I've posted over there prove it (as does my ears!).
If you ground the O2 + booster board source inputs (pull out the input cable), turn the volume all the way up, and then turn the O2 on and off (wait the 5 seconds for the relay to turn on) you hear absolutely nothing now. No thumps!
Last edited:
ODA V2.0 at-cost price list and order information
Here is the at-cost price list for the V2.0 O2 Desktop Headphone Amplifier boards, now that they are back and tested. The list below is in a PDF form. Let me know if anyone has trouble opening or reading the list. Remember to hit the "+" in the Adobe reader to make it bigger if needed.
The folks on the order list below get first crack at the boards. If anyone cancels the folks on the next board list get them. There is no commitement on those lists - feel free to cancel any or all the boards.
The ODA PC board has an ENIG (gold) finish this time. It will come with the twelve 0.5R 1/8W output resistors since neither Mouser or Digikey stocks those. It will also come with wire for the jumpers.
The parts I'm offering in the list are those that Mouser doesn't have and you would have to order from Digikey, or in the case of the LT1963A that Digikey doesn't even have right now. So far these are the 1K pot and the two LDO regulators.
I'm also offering a set of stainless steel M3 metric button head screws for mounting the voltage regulators, plus a set of rubber stick-on feet for the case.
The B4-080 project cases (part number B4-080BL for blue or B4-080BK for black) you can order in different colors from Allied electronics or Newark here in the US, or Farnell overseas. It looks like Box Enclosures, the manufacturer, may also allow direct ordering which may be handy for some hard to find colors like gold. The cases come with blank front and back panels that could be drilled.
For the front panels go to Front Panel Express or cam-expert.com (or anywhere else that accepts fpe files). Both can use the FPE CAD files I'll be posting for the front and back panels. cam-expert is a bit cheaper than FPE, although I see that sometimes FPE offers a 20% off coupon number on their twitter site that would make the two about the same. I'm still in the process of researching panel manufacturers but right now these are the two who can get the job done. As mentioned in the project write-up Proto Panel, which I used in the past, has stopped making front panels.
The paypal address to send the money is in the price list below. Didn't want to post it to keep bots from harveting it. The packing box is $2 added to all orders and there is a paypal fee to add. For postage I'm doing what I wound up doing with the O2 booster board, charging $6 US or $12 international then refunding the difference between that and the actual via paypal. I've found that I keep getting different answers on postage from the US post office here. Just better to refund whatever the actual difference turns out to be.
Also, very important: be sure to include your DIY audio name and your full shipping address in the notes section on the paypal.
If anyone find any other parts in the BOM to be out of stock at Mouser, please let me know! There were out of stock on the 3.5mm input jack until just yesterday.
Here is the at-cost price list for the V2.0 O2 Desktop Headphone Amplifier boards, now that they are back and tested. The list below is in a PDF form. Let me know if anyone has trouble opening or reading the list. Remember to hit the "+" in the Adobe reader to make it bigger if needed.
The folks on the order list below get first crack at the boards. If anyone cancels the folks on the next board list get them. There is no commitement on those lists - feel free to cancel any or all the boards.
The ODA PC board has an ENIG (gold) finish this time. It will come with the twelve 0.5R 1/8W output resistors since neither Mouser or Digikey stocks those. It will also come with wire for the jumpers.
The parts I'm offering in the list are those that Mouser doesn't have and you would have to order from Digikey, or in the case of the LT1963A that Digikey doesn't even have right now. So far these are the 1K pot and the two LDO regulators.
I'm also offering a set of stainless steel M3 metric button head screws for mounting the voltage regulators, plus a set of rubber stick-on feet for the case.
The B4-080 project cases (part number B4-080BL for blue or B4-080BK for black) you can order in different colors from Allied electronics or Newark here in the US, or Farnell overseas. It looks like Box Enclosures, the manufacturer, may also allow direct ordering which may be handy for some hard to find colors like gold. The cases come with blank front and back panels that could be drilled.
For the front panels go to Front Panel Express or cam-expert.com (or anywhere else that accepts fpe files). Both can use the FPE CAD files I'll be posting for the front and back panels. cam-expert is a bit cheaper than FPE, although I see that sometimes FPE offers a 20% off coupon number on their twitter site that would make the two about the same. I'm still in the process of researching panel manufacturers but right now these are the two who can get the job done. As mentioned in the project write-up Proto Panel, which I used in the past, has stopped making front panels.
The paypal address to send the money is in the price list below. Didn't want to post it to keep bots from harveting it.
The packing box is $2 added to all orders and there is a paypal fee to add. For postage I'm doing what I wound up doing with the O2 booster board, charging $6 US or $12 international then refunding the difference between that and the actual via paypal. I've found that I keep getting different answers on postage from the US post office here. Just better to refund whatever the actual difference turns out to be.Also, very important: be sure to include your DIY audio name and your full shipping address in the notes section on the paypal.
If anyone find any other parts in the BOM to be out of stock at Mouser, please let me know! There were out of stock on the 3.5mm input jack until just yesterday.
Attachments
Last edited:
I'm adding a couple of columns to the "orders" file for the ODA V2.0 boards & parts out on the Google Drive link (in the "orders" folder) for "paid date" and "shipped date". Just so everyone can have confirmation their payment was received and order shipped.
https://drive.google.com/folderview?id=0B67cJELZW-i8VmhVNk5PODNtZnc&usp=sharing
I've spotted a typo in the price list I posted above, but it doesn't affect the prices. That should be an LT3015 regulator, not LT3013, of course. I've fixed that and posted the revised price list out in that same "orders" folder at the Google Drive link.
- Status
- This old topic is closed. If you want to reopen this topic, contact a moderator using the "Report Post" button.
- Home
- Vendor's Bazaar
- Parallel NJM4556AL two stage amp