After building my first pair of speakers, I was very happy. Since I had put a fair amount of thought into the enclosure design, they produced a respectable amount of bass for their size. However, I always knew that I would want a subwoofer at some point. So, one day I started playing with ideas and testing out various subwoofers in WinISD. My main criteria was flat response down to 20Hz (no less than -1dB). The primary constraint was that no side could exceed 24". This was both for purposes of practicality, and due to the fact that MDF only comes in 24" increments. There was no way I would build a) a subwoofer of 48" in any dimension, or cut 32" out of a 48" piece & throw it away (wasteful!).
The box was constructed from:
- 1" MDF (walls)
- 0.5" MDF (shelf bracing)
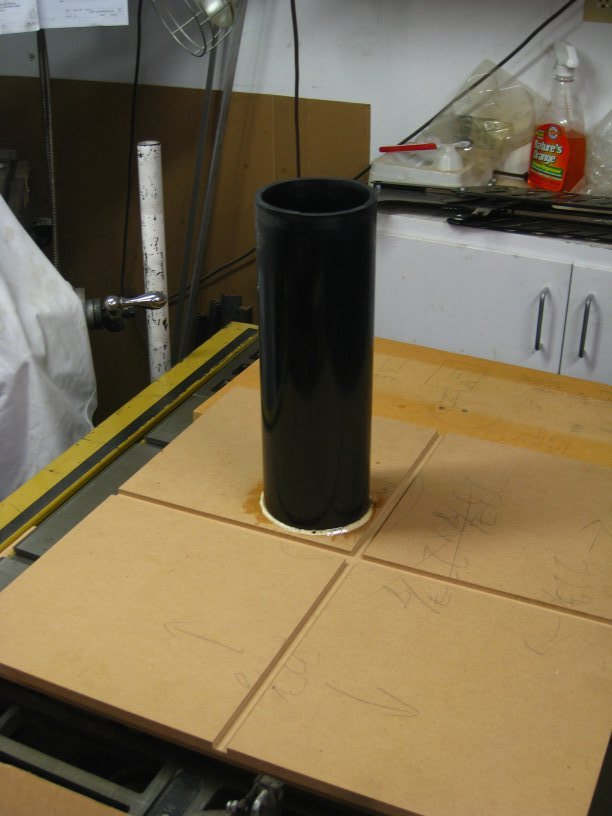
- 4" ID ABS drainage pipe
- 0.75" MDF (port flare)
- Damplifier butyl rubber / aluminum foil deadening (walls)
- 0.125" closed cell foam sheets (walls)
- 1.5" open-celled acoustic foam (walls)
- Solid red oak (legs)
- Solid red oak & veneered plywood (base)
- All MDF joints Gorilla glued & screwed
- Various hardware to attach base & driver
Since I wanted flat response down to 20Hz, that basically ruled out a sealed box. While ported enclosures have less desirable group delay properties, and you need to be careful about running signals below the tuning frequency, they can deliver what I want. I selected a subwoofer with above-average excursion, you know, just in case I ever watch a movie with an earthquake scene! I seriously doubt that I will be running much of anything below the tuning frequency (19Hz) except a test signal. The driver I opted for was the Tang-Band WQ1858.
I would also like to mention that I purchased Vance Dickason's Loudspeaker Design Cookbook V7 around the time I finished this project. The timing was strange, I know. Anyway, I read it through entirely, and it had a great deal of knowledge. Some people criticize it for being a giant advertisement for LEAP, and it felt like that for half of one chapter. Otherwise, it was a great book! It confirmed some things I had observed during the design process, and pointed out a few that I should have considered more (but after verifying, turned out that I was lucky).
So, the subwoofer would be used with the 2-way's I built. It is now all driven by:
- M-Audio Fast Track Pro as a DAC from my laptop
- Behringer DCX2496 Digital Crossover (3-way)
- 3 x Behringer A500 Amplifier
Anyway, enough blabbing! Let's get some eye candy up.
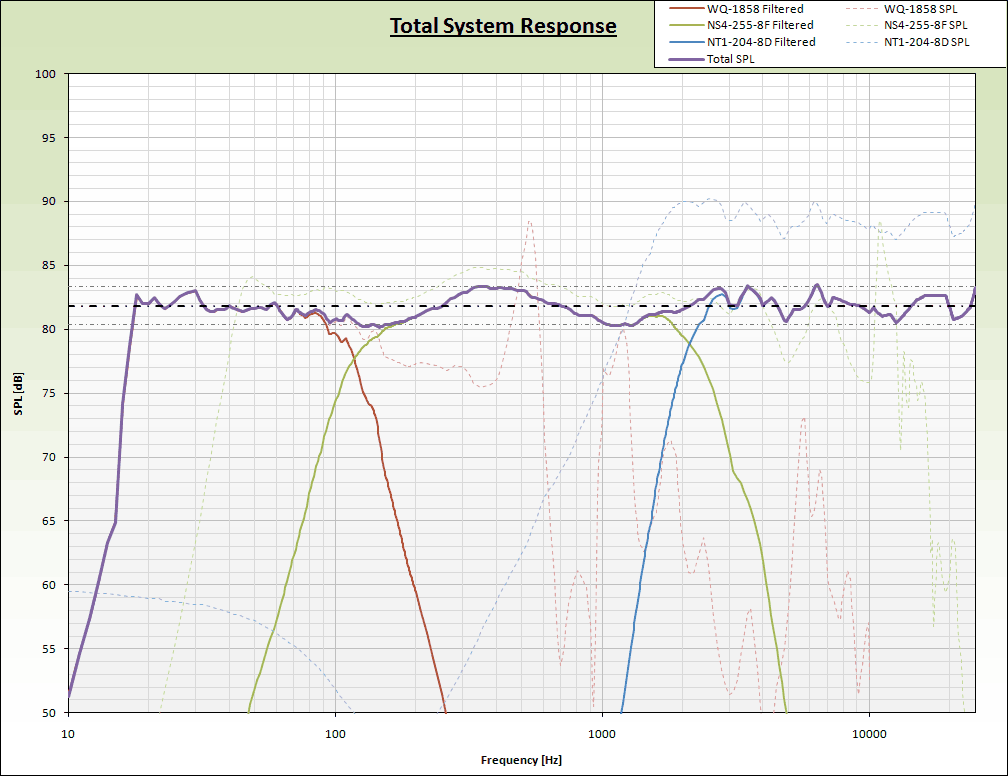
First-off, here was the predicted "ideal" response of the sound system. Red is the sub, green the mid & blue the tweeter (the latter two from the first link in here).
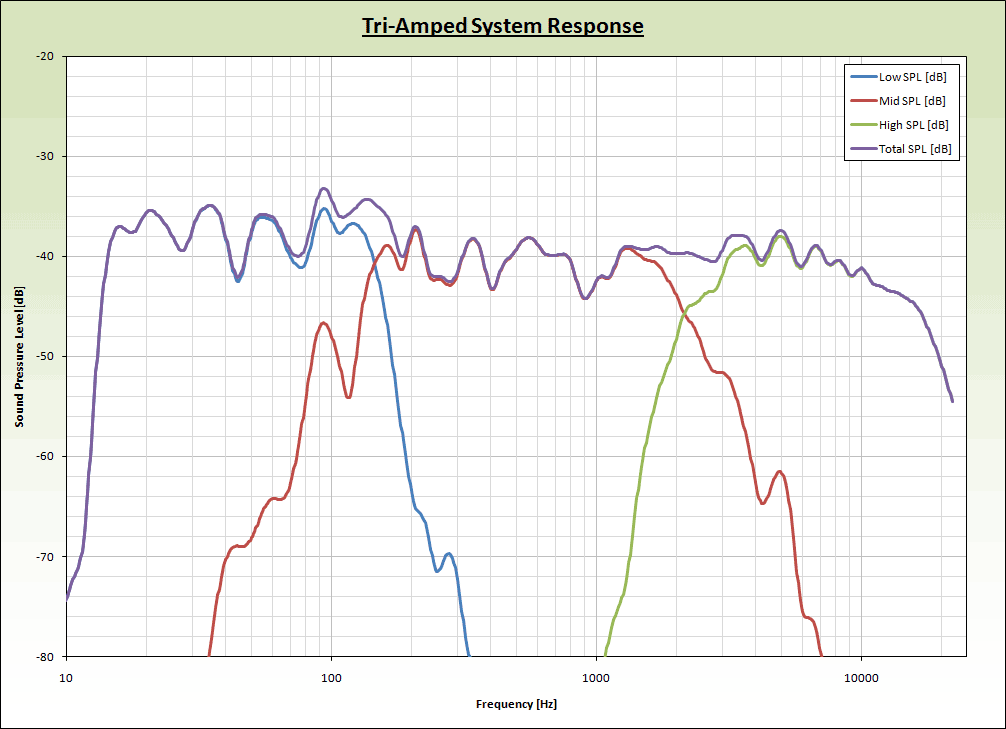
I also picked up a Behringer ECM8000 measurement mic. Since I have the M-Audio box I was all set to go! The box also lets me get the guitar amp & FX gear out of the room, which raises the GAF (not WAF quite yet). The response is pretty dependent on where you measure from, so this is just one sweep taken from HOLMImpulse. I prefer a little more bass, so I leave it ~2dB above the other stuff (the DCX2496 makes tuning painfully easy).
While designing it, I made an Excel sheet to account for the internal volume. Once I had things mostly figured out, I modeled it in CAD & used that to compute the actual internal volume. The Excel sheet was fine for getting within ~3% though!
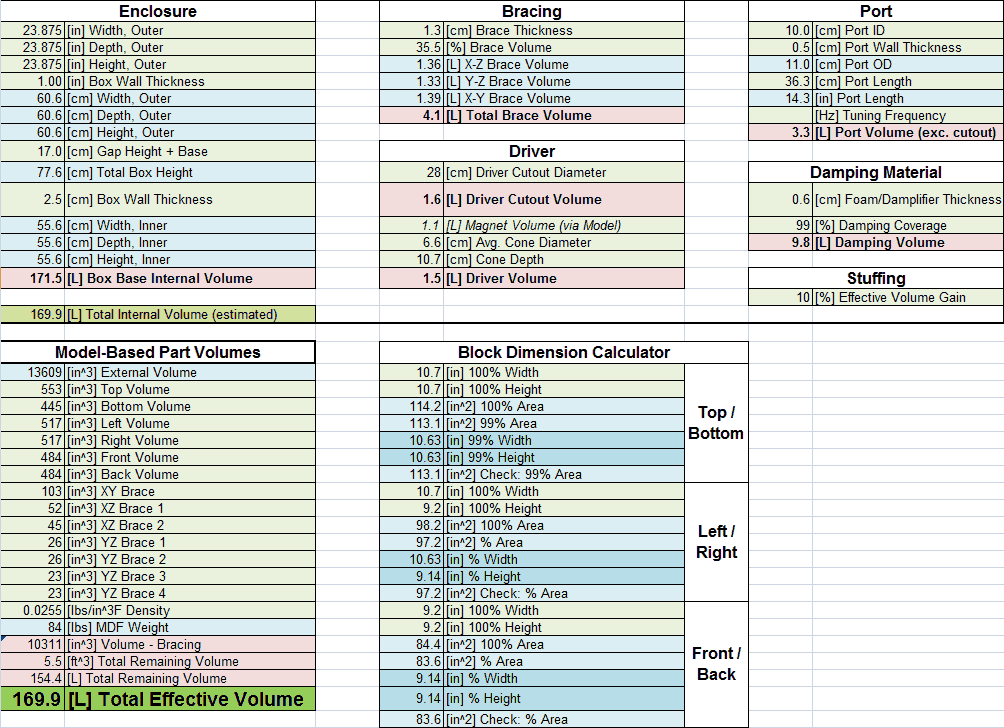
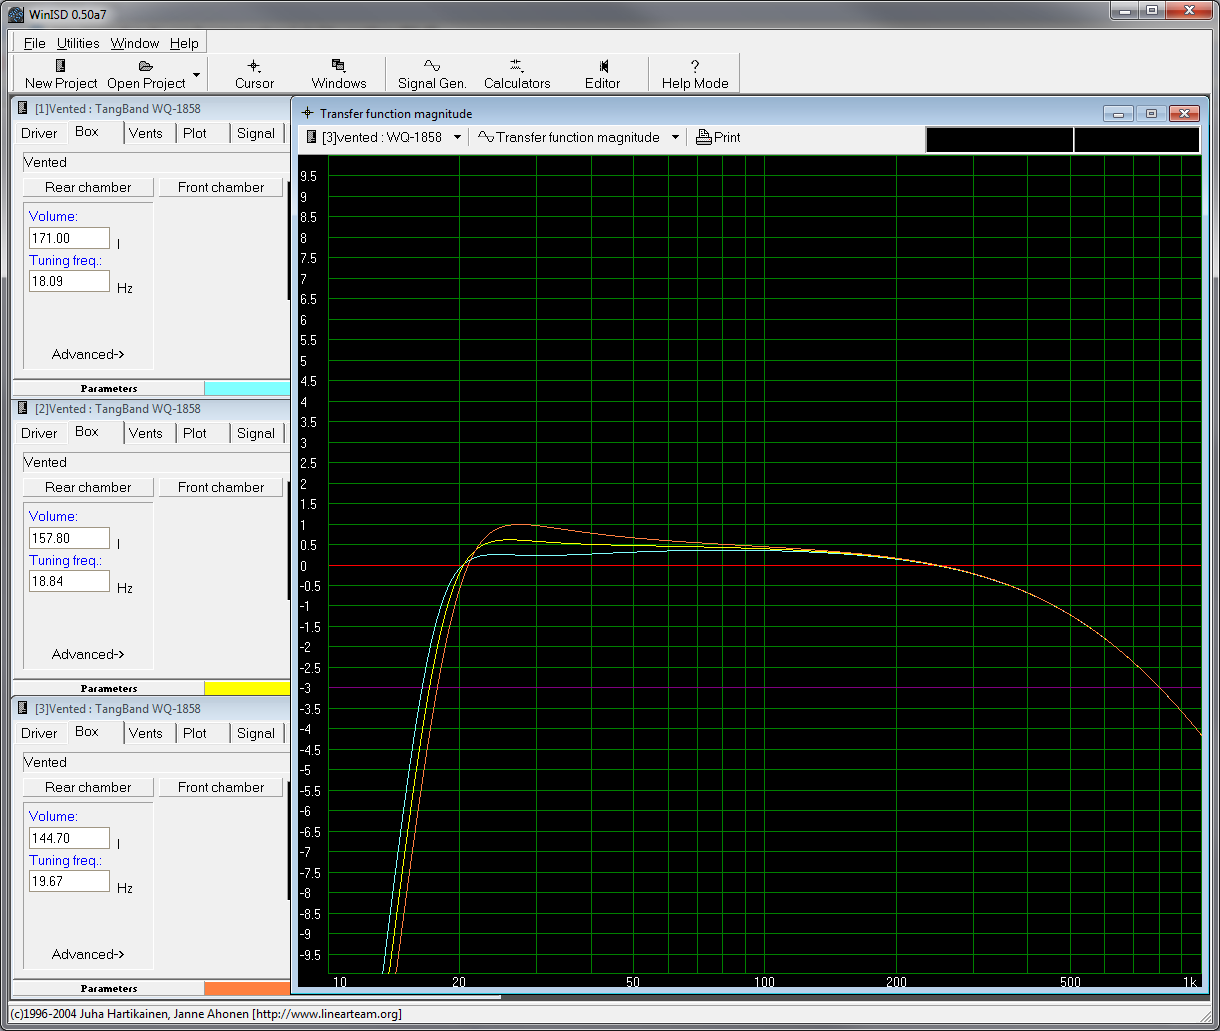
Initially I thought about stuffing the box, but most things I read indicated that stuffing ported boxes is not ideal, and that there is not really an effective volume gain. Well, I tried a few combinations in WinISD to see what would happen with NO volume gain, 10% & 20% gain. The changes weren't terribly substantial, so I figured it would not be a big deal if I added/removed it later on.
The initial design utilized a bent port, facing down with the driver.
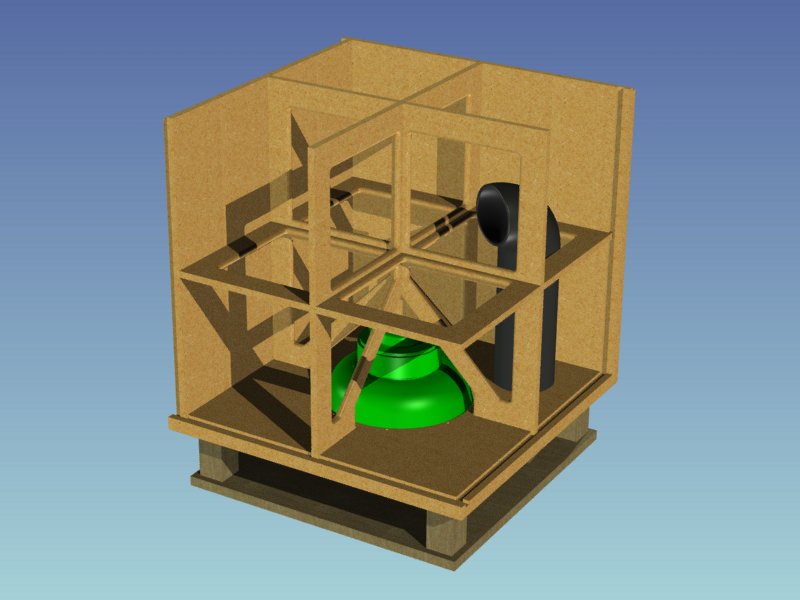

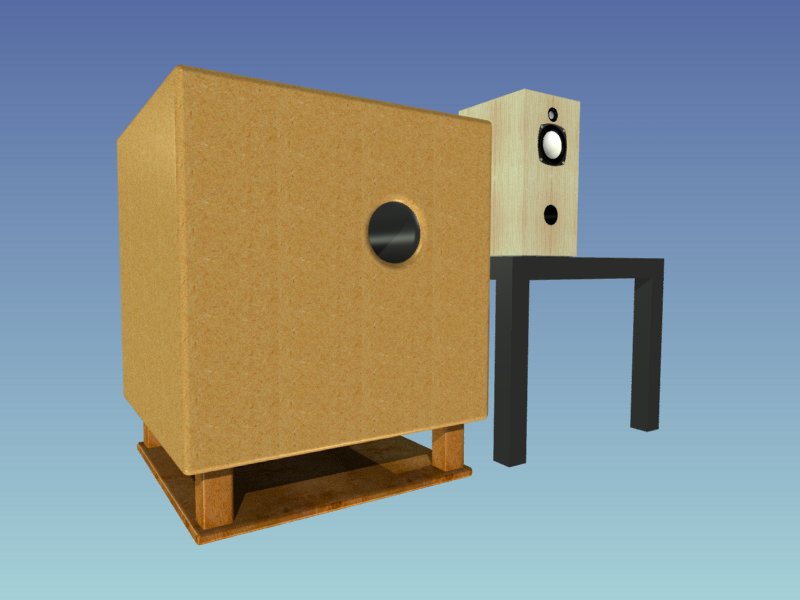
I found that this wouldn't fit well at all with the bracing, so I just used a straight port. This more closely resembles the final design. The port flare was made form a scrap of 0.75" MDF.

The box was constructed from:
- 1" MDF (walls)
- 0.5" MDF (shelf bracing)
- 4" ID ABS drainage pipe
- 0.75" MDF (port flare)
- Damplifier butyl rubber / aluminum foil deadening (walls)
- 0.125" closed cell foam sheets (walls)
- 1.5" open-celled acoustic foam (walls)
- Solid red oak (legs)
- Solid red oak & veneered plywood (base)
- All MDF joints Gorilla glued & screwed
- Various hardware to attach base & driver
Since I wanted flat response down to 20Hz, that basically ruled out a sealed box. While ported enclosures have less desirable group delay properties, and you need to be careful about running signals below the tuning frequency, they can deliver what I want. I selected a subwoofer with above-average excursion, you know, just in case I ever watch a movie with an earthquake scene! I seriously doubt that I will be running much of anything below the tuning frequency (19Hz) except a test signal. The driver I opted for was the Tang-Band WQ1858.
I would also like to mention that I purchased Vance Dickason's Loudspeaker Design Cookbook V7 around the time I finished this project. The timing was strange, I know. Anyway, I read it through entirely, and it had a great deal of knowledge. Some people criticize it for being a giant advertisement for LEAP, and it felt like that for half of one chapter. Otherwise, it was a great book! It confirmed some things I had observed during the design process, and pointed out a few that I should have considered more (but after verifying, turned out that I was lucky).
So, the subwoofer would be used with the 2-way's I built. It is now all driven by:
- M-Audio Fast Track Pro as a DAC from my laptop
- Behringer DCX2496 Digital Crossover (3-way)
- 3 x Behringer A500 Amplifier
Anyway, enough blabbing! Let's get some eye candy up.
First-off, here was the predicted "ideal" response of the sound system. Red is the sub, green the mid & blue the tweeter (the latter two from the first link in here).
I also picked up a Behringer ECM8000 measurement mic. Since I have the M-Audio box I was all set to go! The box also lets me get the guitar amp & FX gear out of the room, which raises the GAF (not WAF quite yet). The response is pretty dependent on where you measure from, so this is just one sweep taken from HOLMImpulse. I prefer a little more bass, so I leave it ~2dB above the other stuff (the DCX2496 makes tuning painfully easy).
While designing it, I made an Excel sheet to account for the internal volume. Once I had things mostly figured out, I modeled it in CAD & used that to compute the actual internal volume. The Excel sheet was fine for getting within ~3% though!
Initially I thought about stuffing the box, but most things I read indicated that stuffing ported boxes is not ideal, and that there is not really an effective volume gain. Well, I tried a few combinations in WinISD to see what would happen with NO volume gain, 10% & 20% gain. The changes weren't terribly substantial, so I figured it would not be a big deal if I added/removed it later on.
The initial design utilized a bent port, facing down with the driver.
I found that this wouldn't fit well at all with the bracing, so I just used a straight port. This more closely resembles the final design. The port flare was made form a scrap of 0.75" MDF.
Last edited:
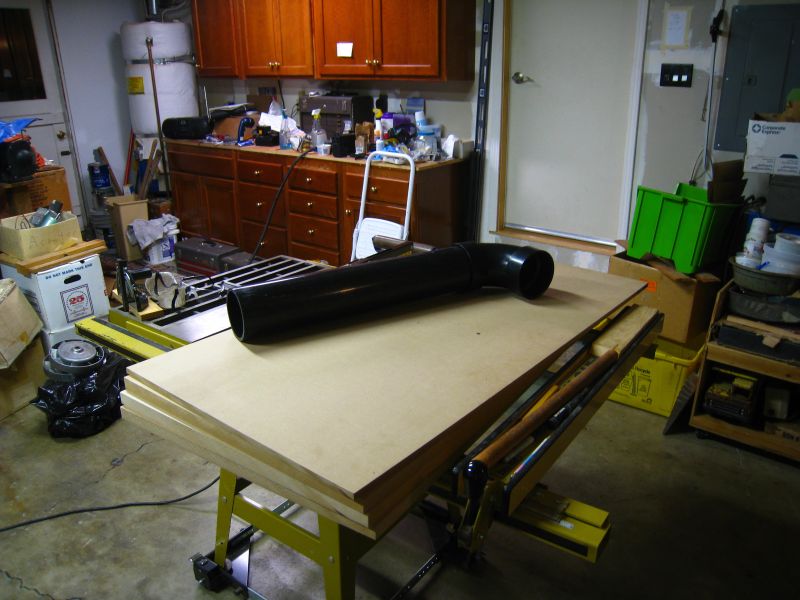
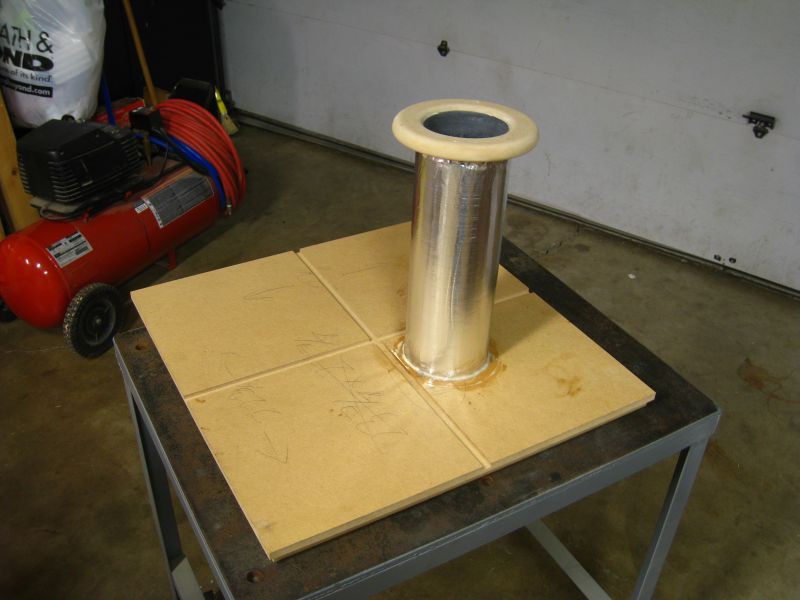
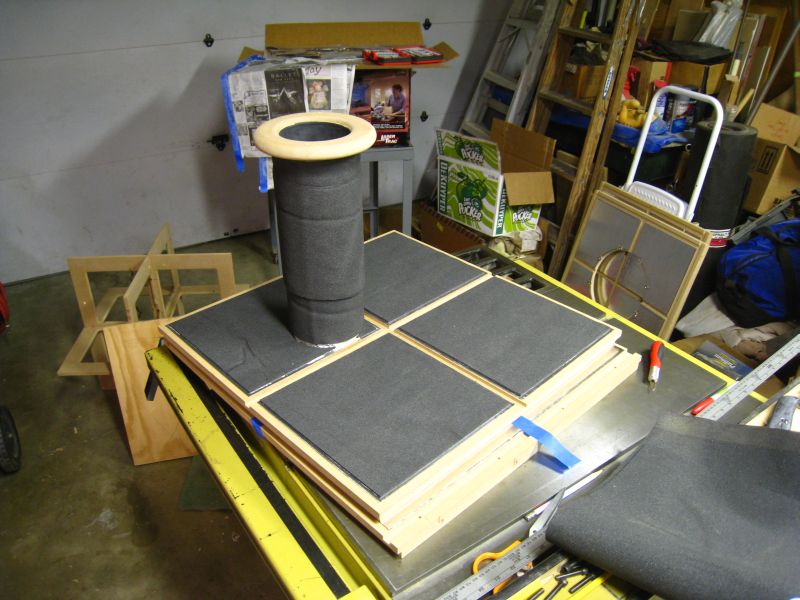
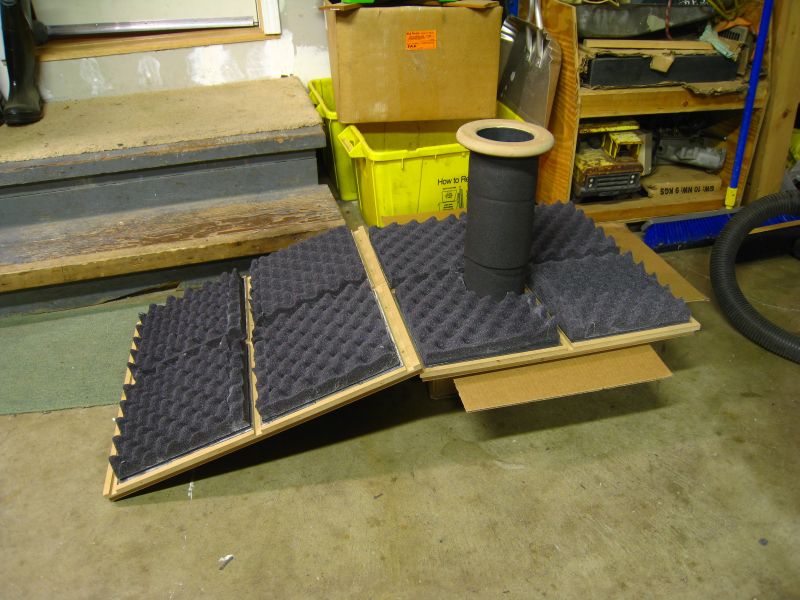
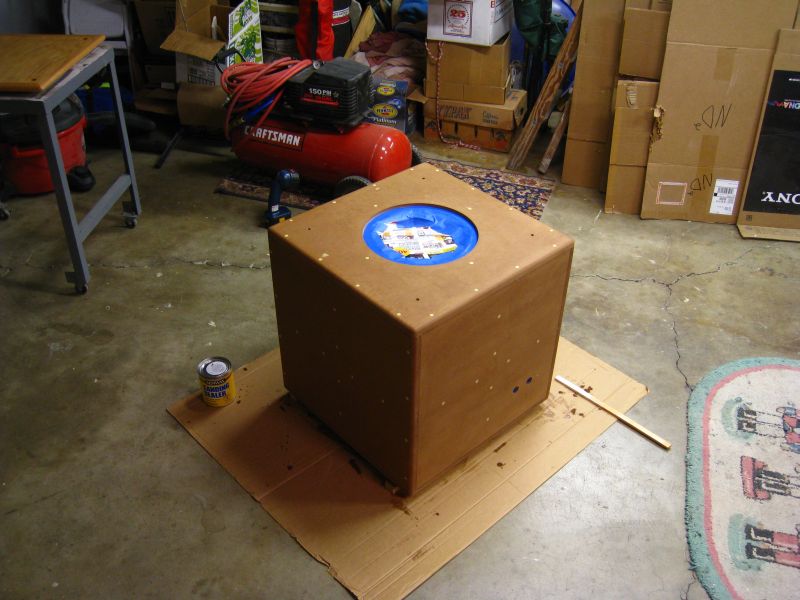
Here were some of the raw materials.
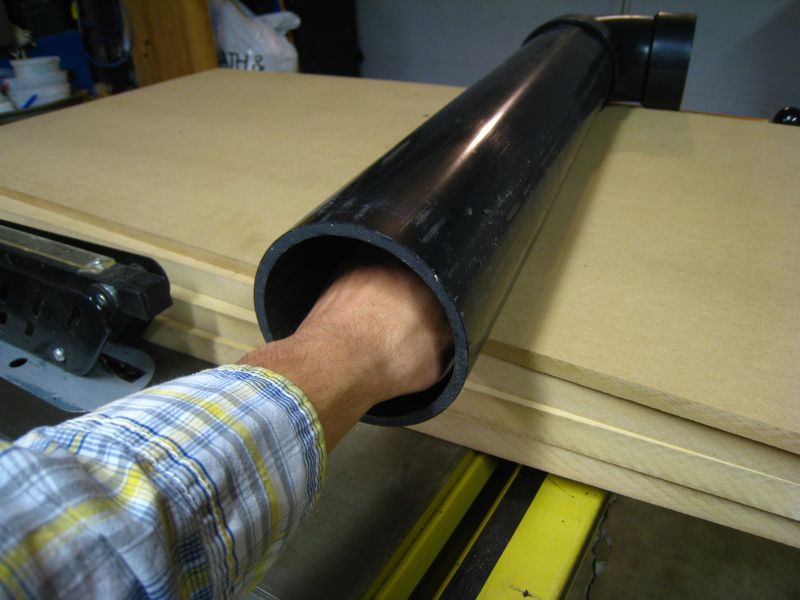
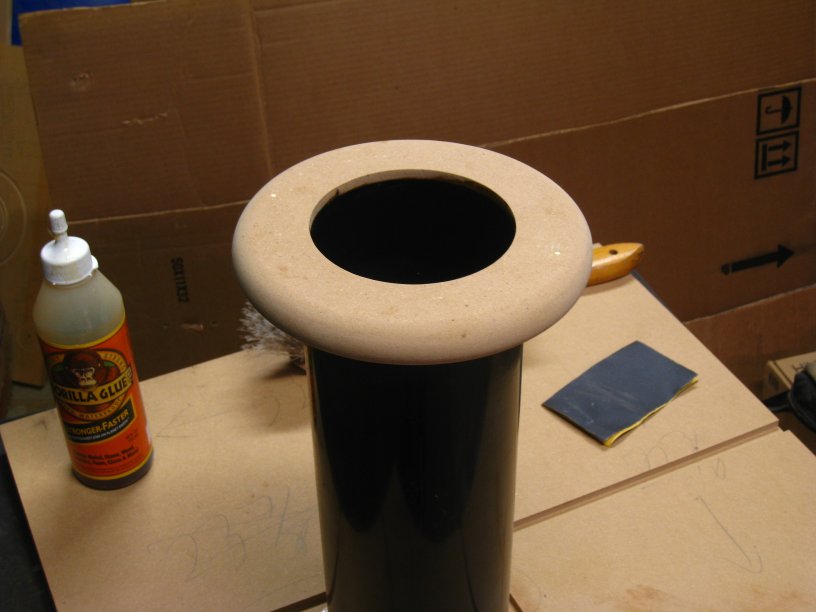
Is the port large enough? (actually, according to Vance D’s book a 4” port is the bare minimum for a 12” sub, although the only way I got port noise was running a lot of power under 20Hz….I was not too concerned).
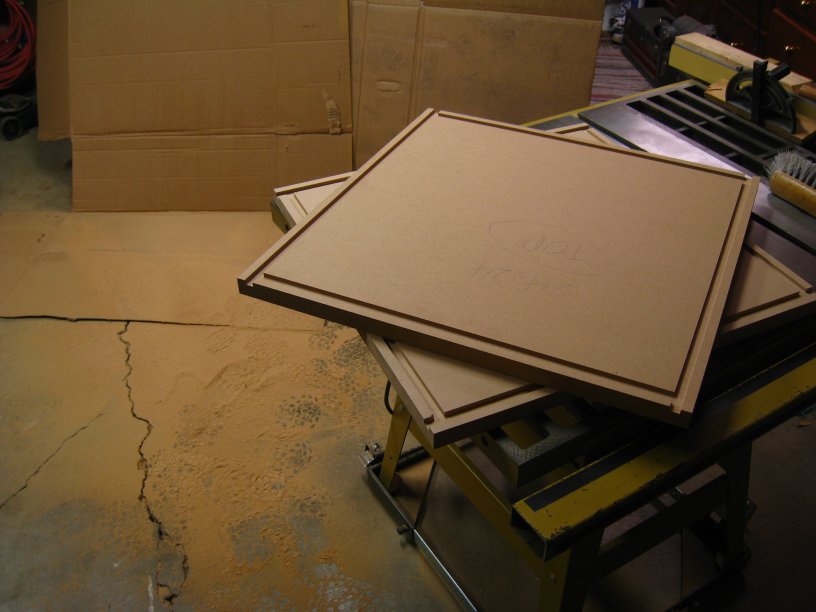
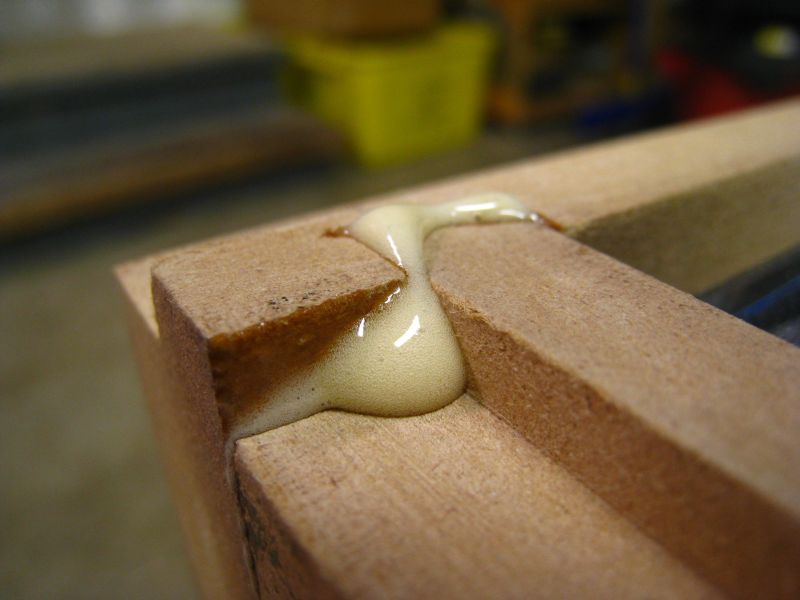
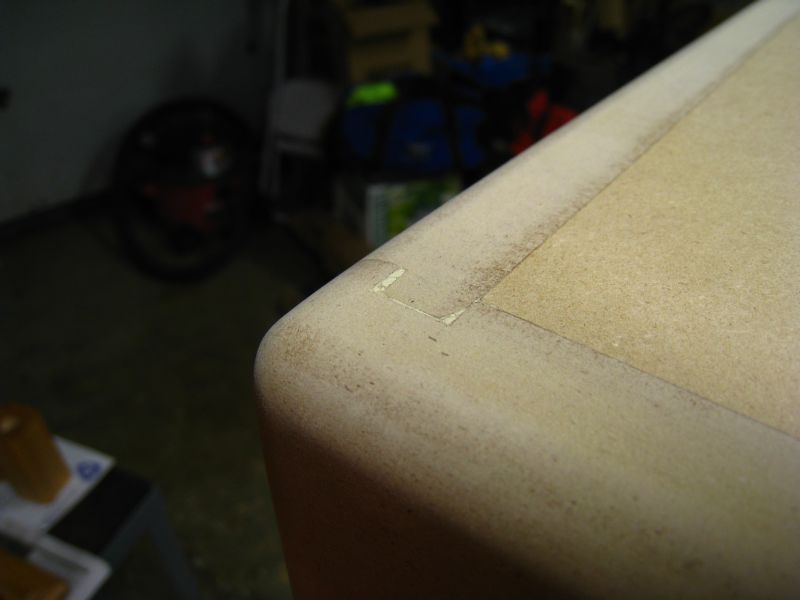
I trimmed the pieces to size (the sub ended up being a 23.875” cube, not 24”…don’t forget that a “24”” piece of wood has a tolerance!). The box was jointed with rabbit grooves. Here was a neat shot of my sawdust-containment system lol.
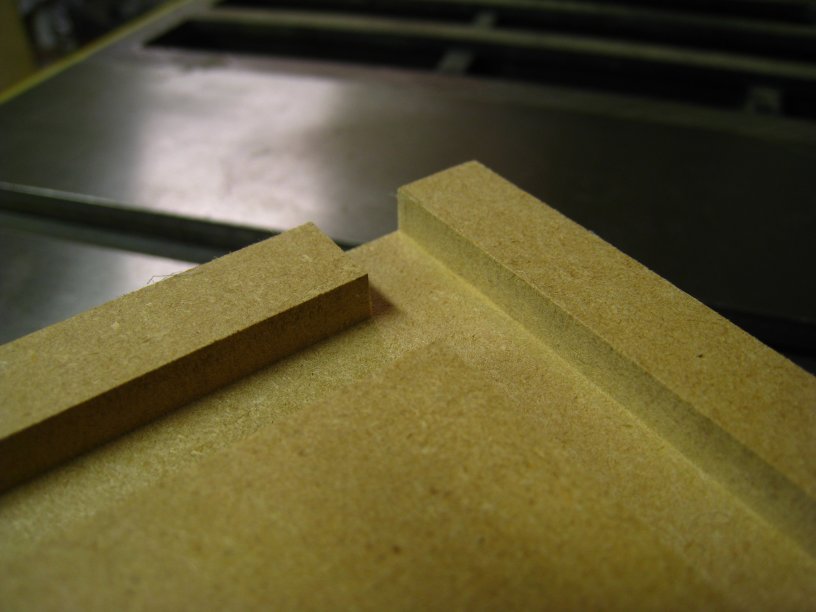
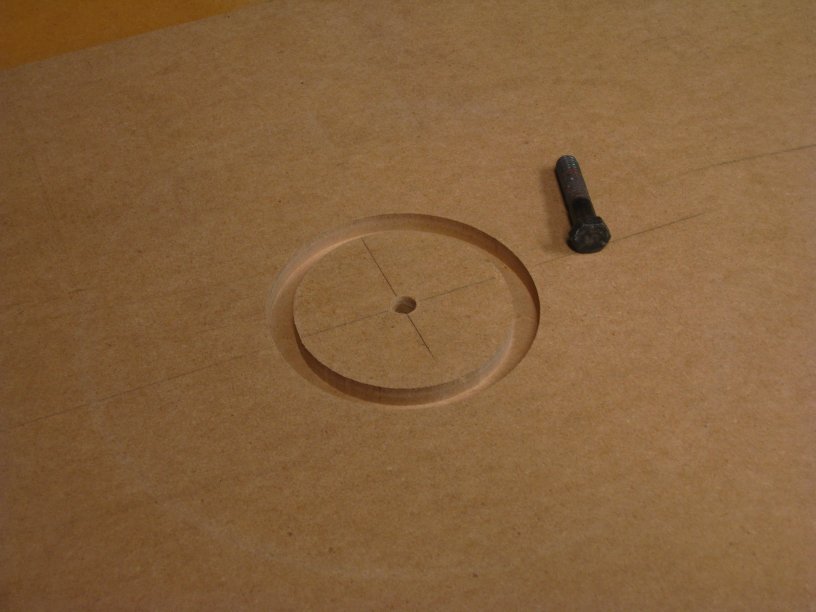
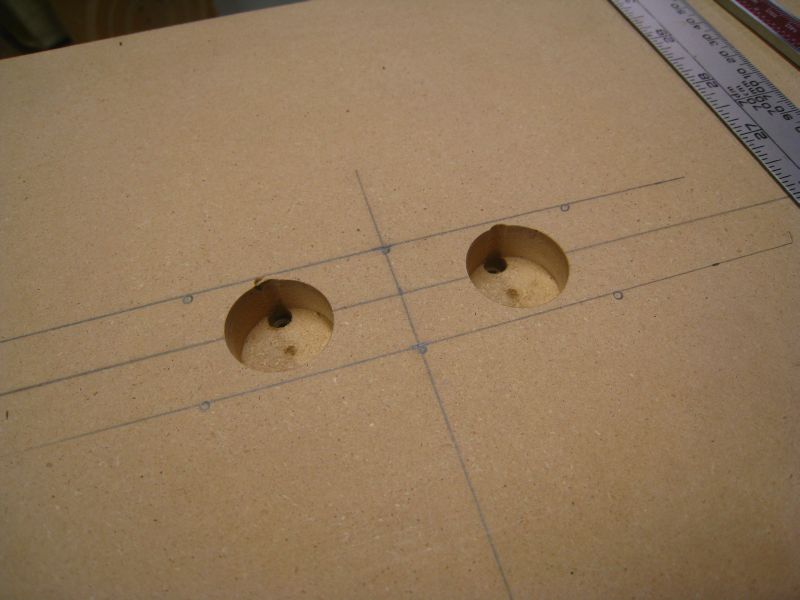
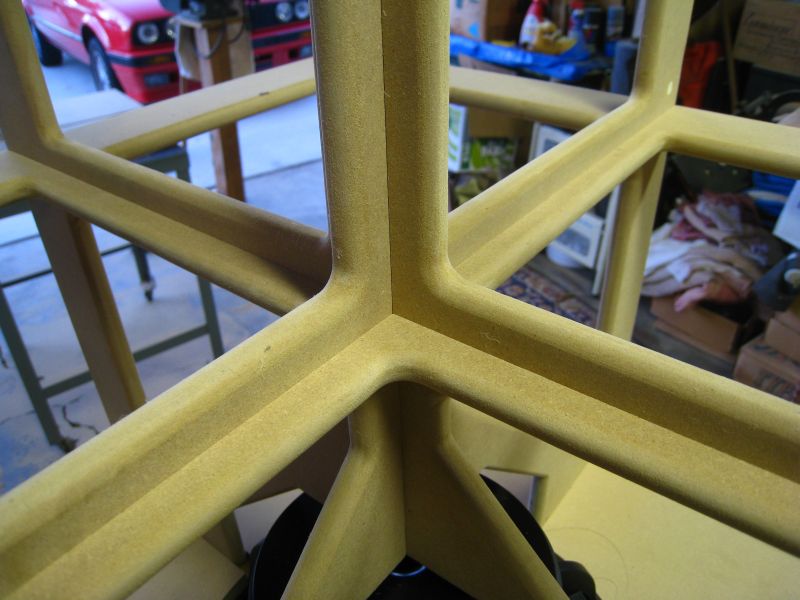
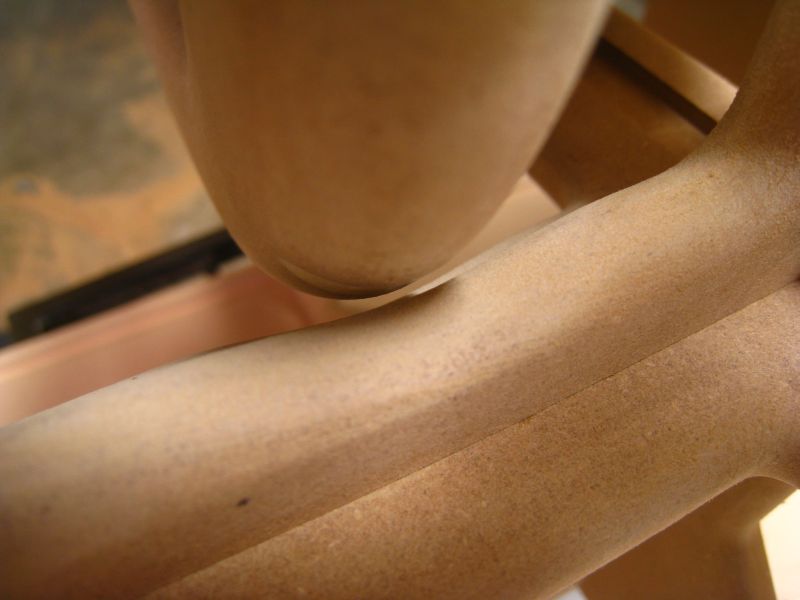
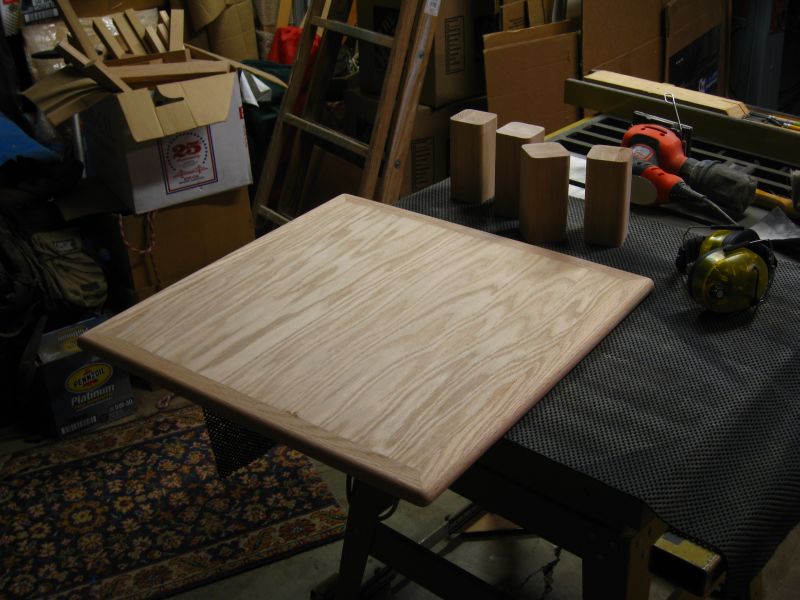
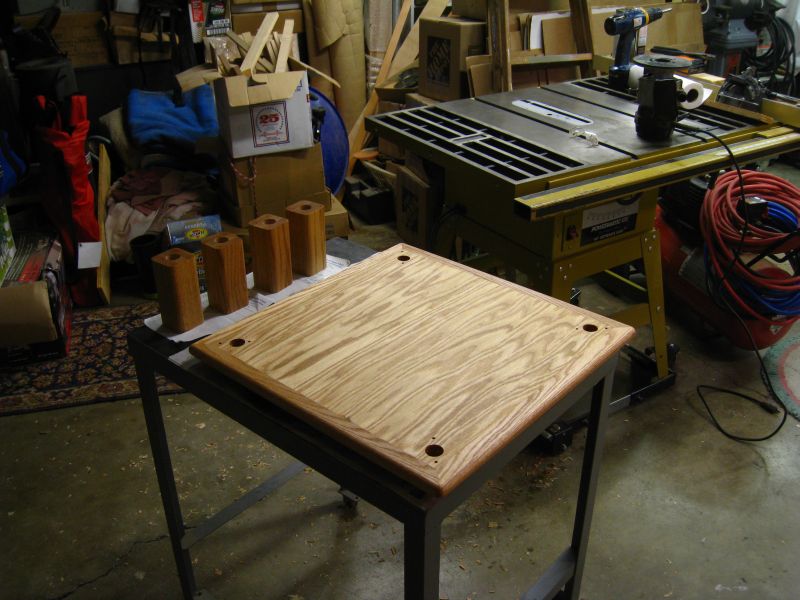
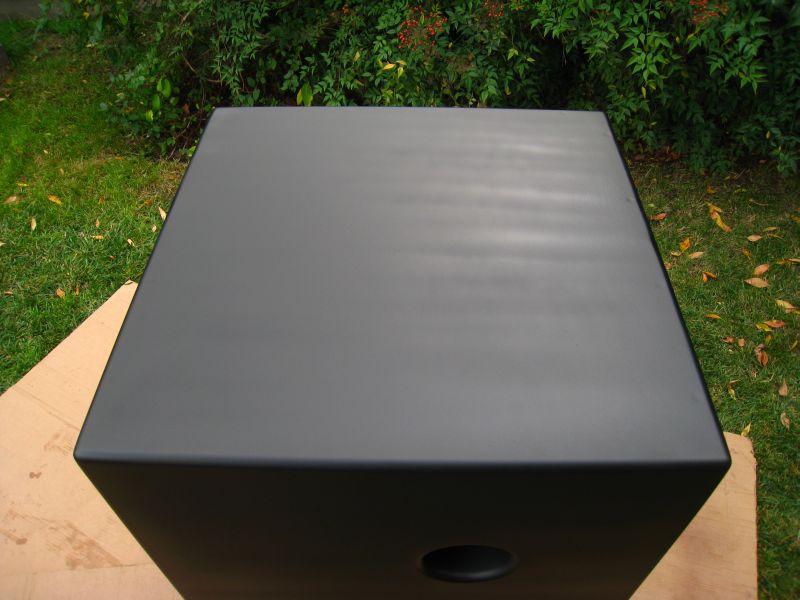
Here was the top of the sub. I also have to toss in a gratuitous super-macro shot. You know, it wouldn’t be a proper write-up without at least one!
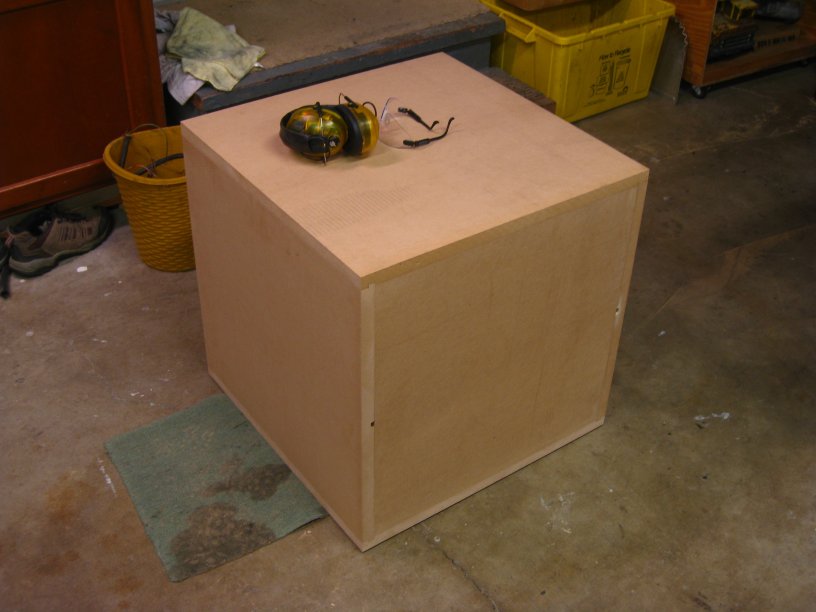
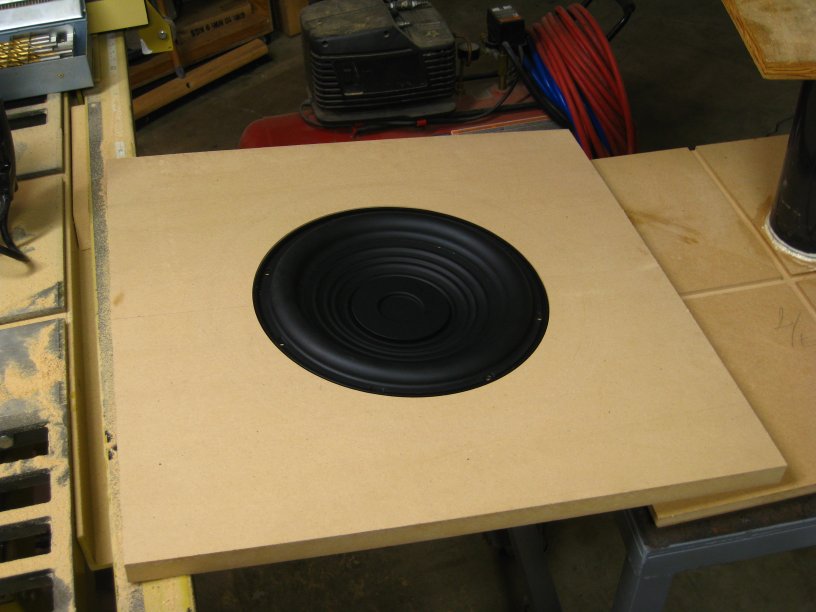
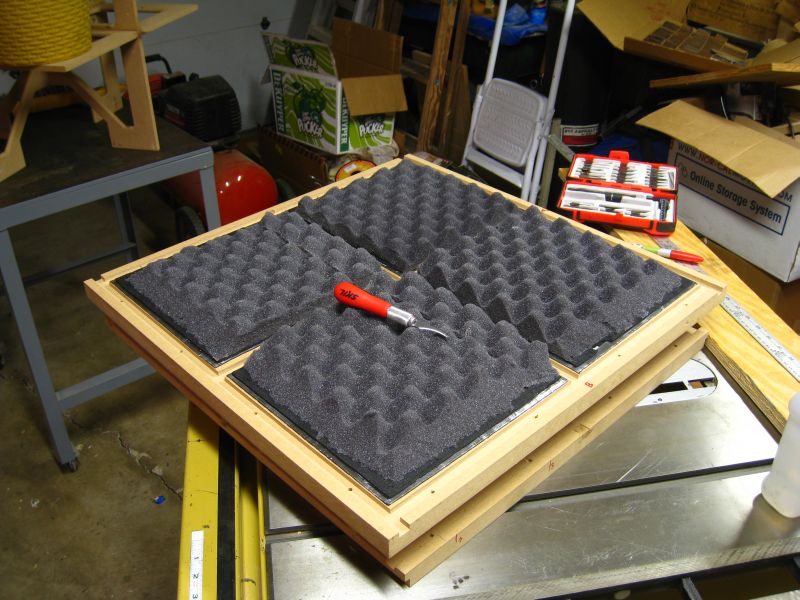
Naturally, before doing too much else you must test fit things. A little sanding always helps things along, too.

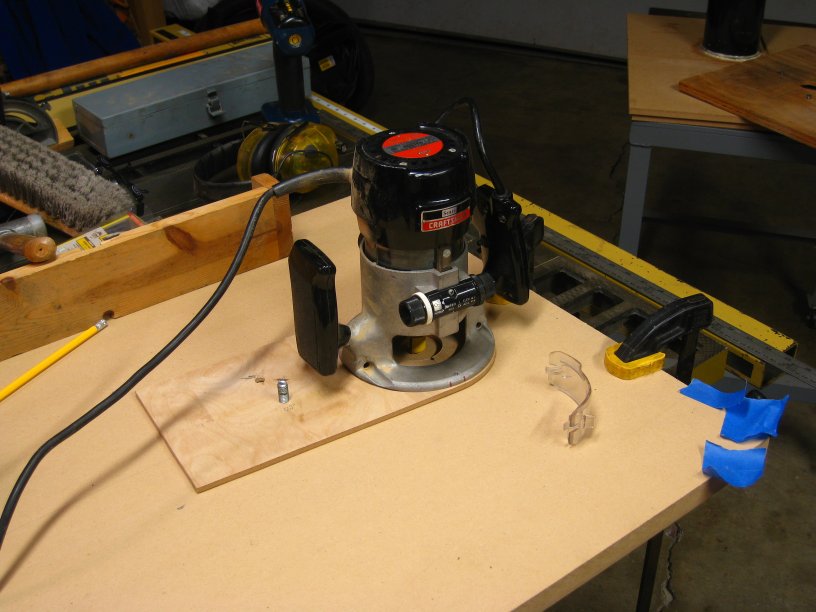
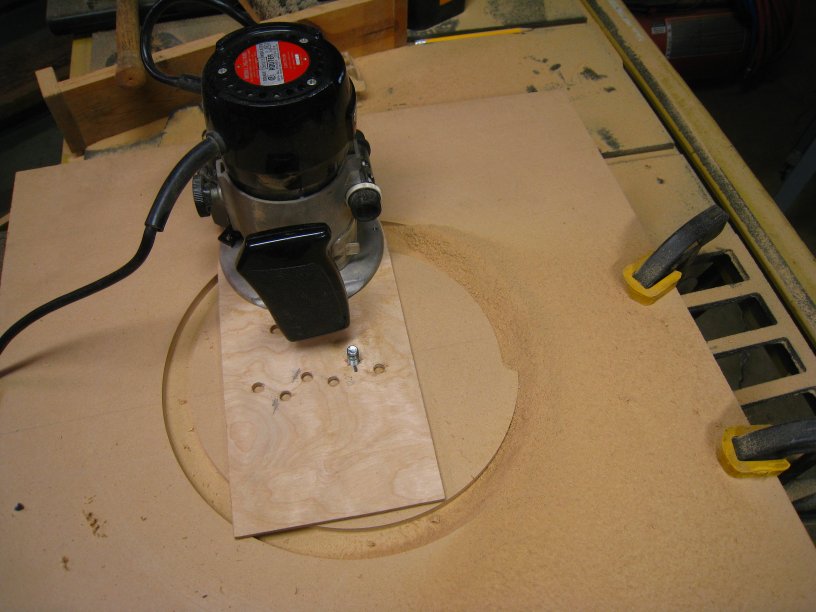
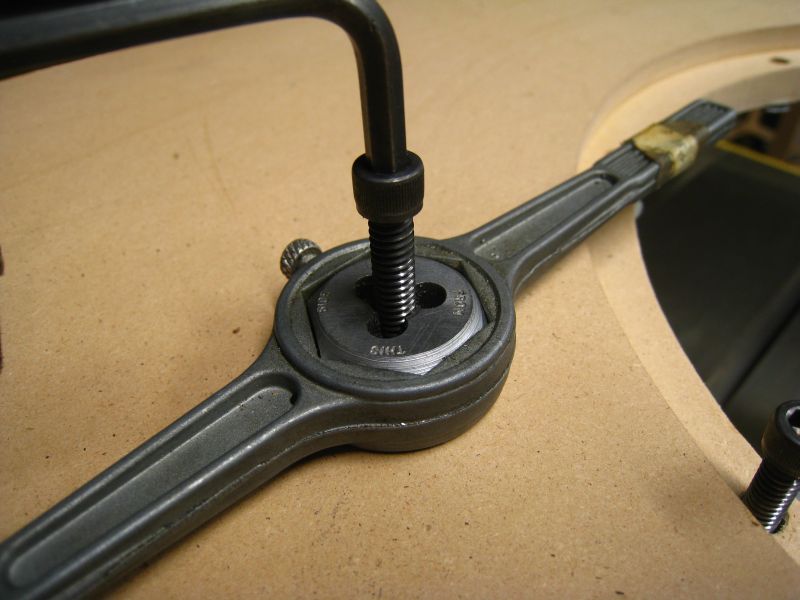
This project had a number of circular cuts. I made a base for the router out of some 0.25” wood scraps & used this bolt as the pivot point. This was the start of the port hole (recessed, not all the way through). A little sanding got it fitting in very snugly. Gorilla glue was added to seal the deal.
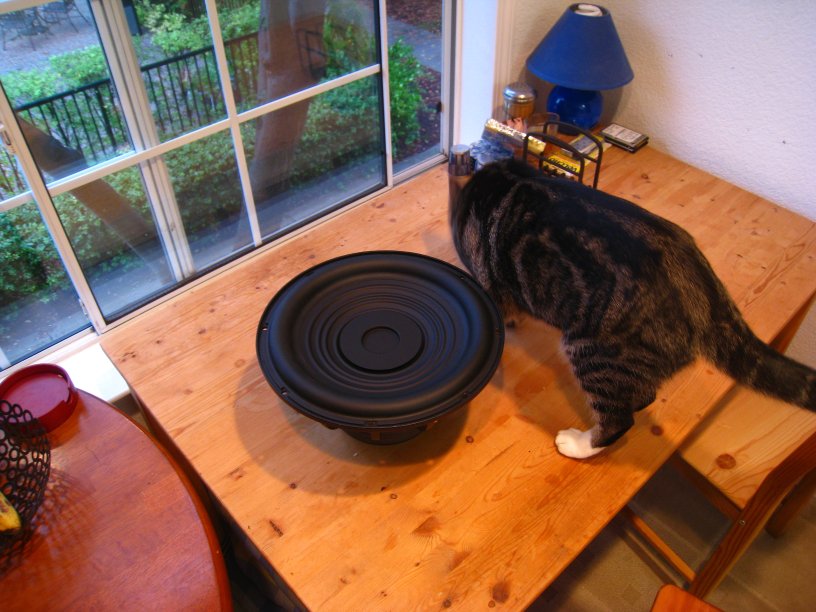
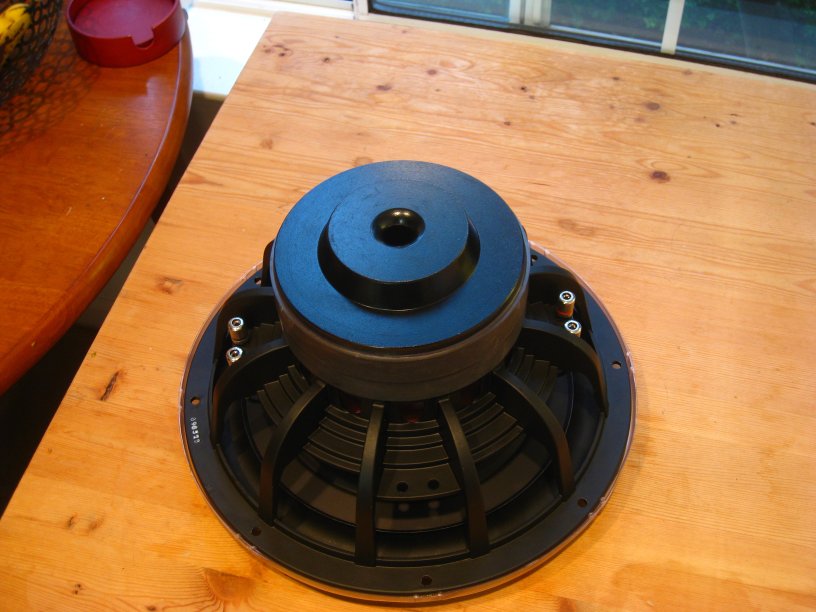
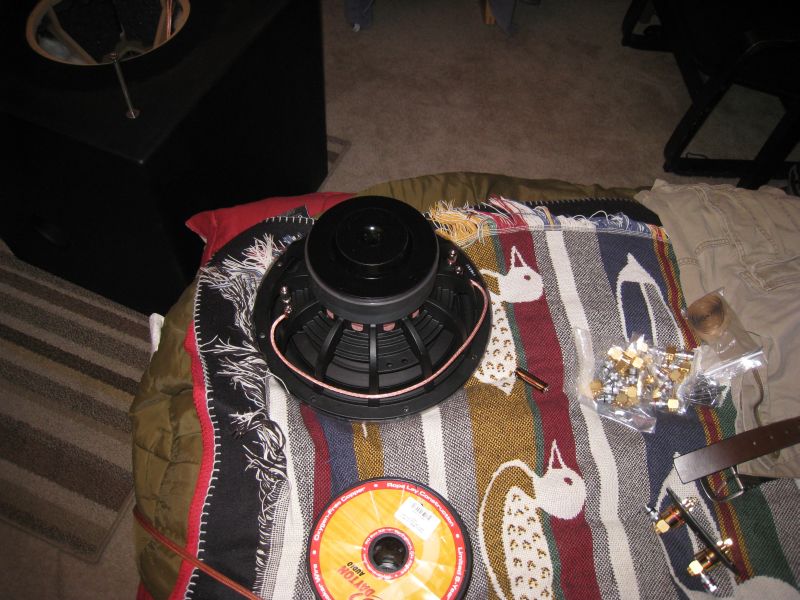
I also received the driver around this time. It weighs in at 2 grown housecats.
Is the port large enough? (actually, according to Vance D’s book a 4” port is the bare minimum for a 12” sub, although the only way I got port noise was running a lot of power under 20Hz….I was not too concerned).
I trimmed the pieces to size (the sub ended up being a 23.875” cube, not 24”…don’t forget that a “24”” piece of wood has a tolerance!). The box was jointed with rabbit grooves. Here was a neat shot of my sawdust-containment system lol.
Here was the top of the sub. I also have to toss in a gratuitous super-macro shot. You know, it wouldn’t be a proper write-up without at least one!
Naturally, before doing too much else you must test fit things. A little sanding always helps things along, too.
This project had a number of circular cuts. I made a base for the router out of some 0.25” wood scraps & used this bolt as the pivot point. This was the start of the port hole (recessed, not all the way through). A little sanding got it fitting in very snugly. Gorilla glue was added to seal the deal.
I also received the driver around this time. It weighs in at 2 grown housecats.
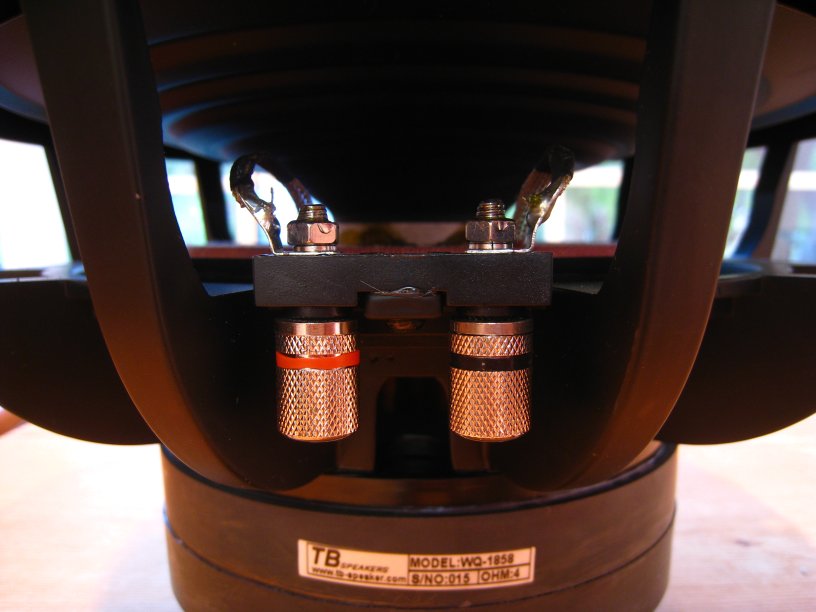
I was very pleased with the unit. The frame was cast aluminum and felt very sturdy. The connectors were also convenient.
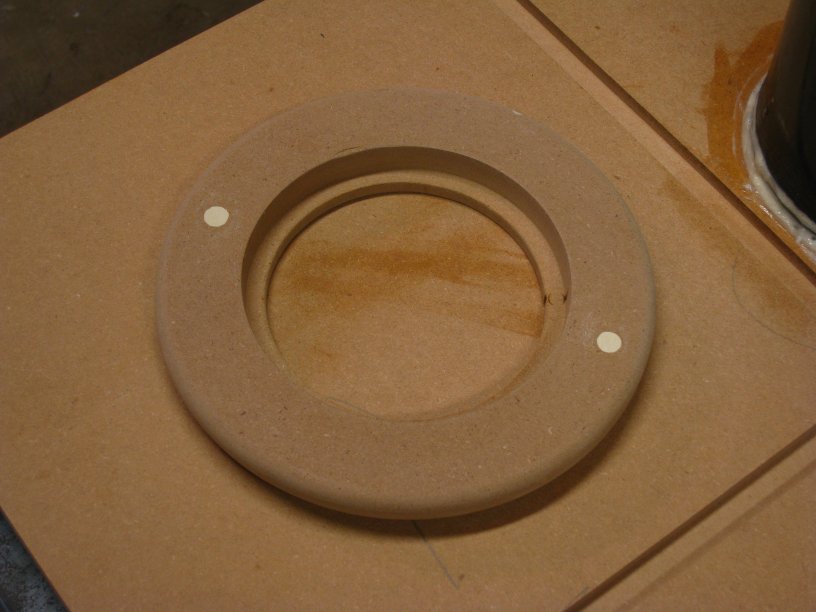
The port flare was a fun bit of work. It took 2 tries to get it right. The 2 puttied holes are from screwing it down so I could use the router & a round-over bit on the outside. Once the glue cured, I rounded the inside as well. I then puttied the MDF-ABS interface to make it smooth.

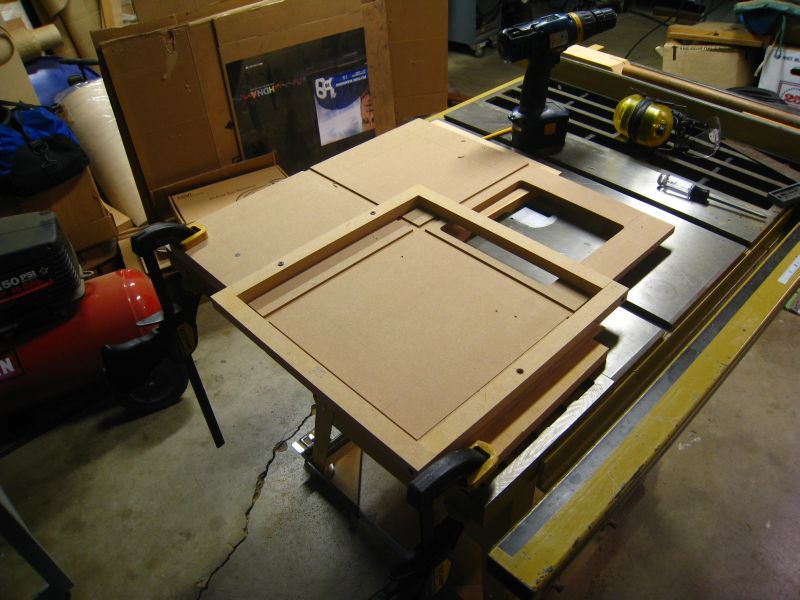
For those who might be curious, here is how I rigged the router to do the holes. The router is too old to find a circle cutting kit for it, and who pay for one anyway!
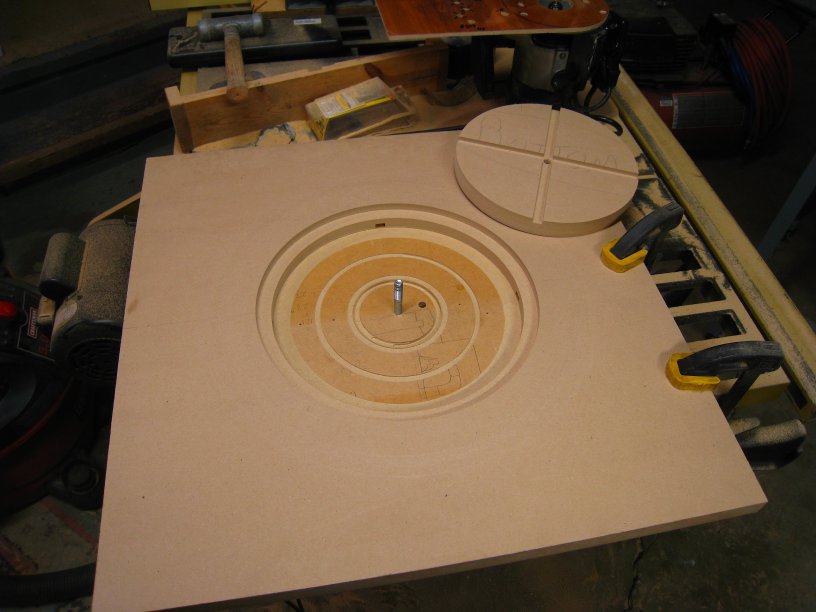
The port flare was a fun bit of work. It took 2 tries to get it right. The 2 puttied holes are from screwing it down so I could use the router & a round-over bit on the outside. Once the glue cured, I rounded the inside as well. I then puttied the MDF-ABS interface to make it smooth.
For those who might be curious, here is how I rigged the router to do the holes. The router is too old to find a circle cutting kit for it, and who pay for one anyway!
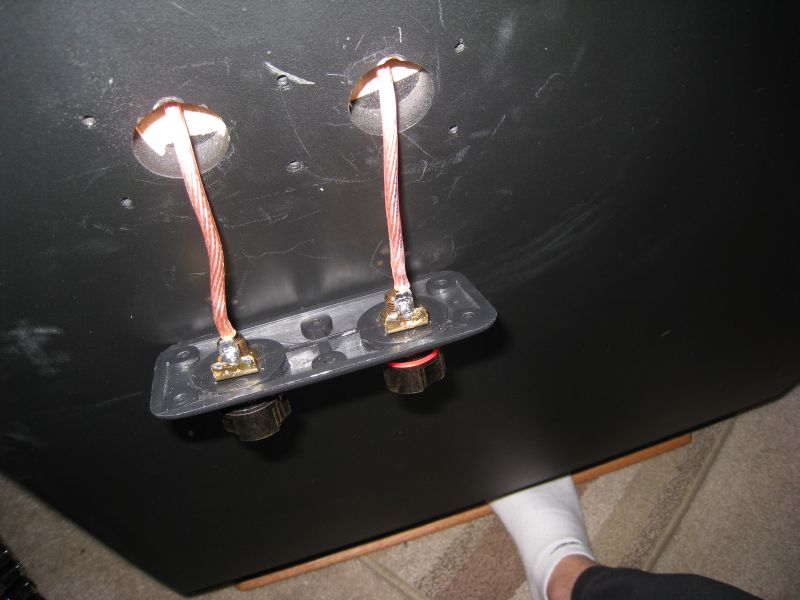
Here is the Damplifier applied to the port. It made a substantial difference in the feel of the port. It went from sounding like a flimsy hollow tube to a dead concrete conduit when knocked on. I also made the arrangements for the terminal block on the rear panel.
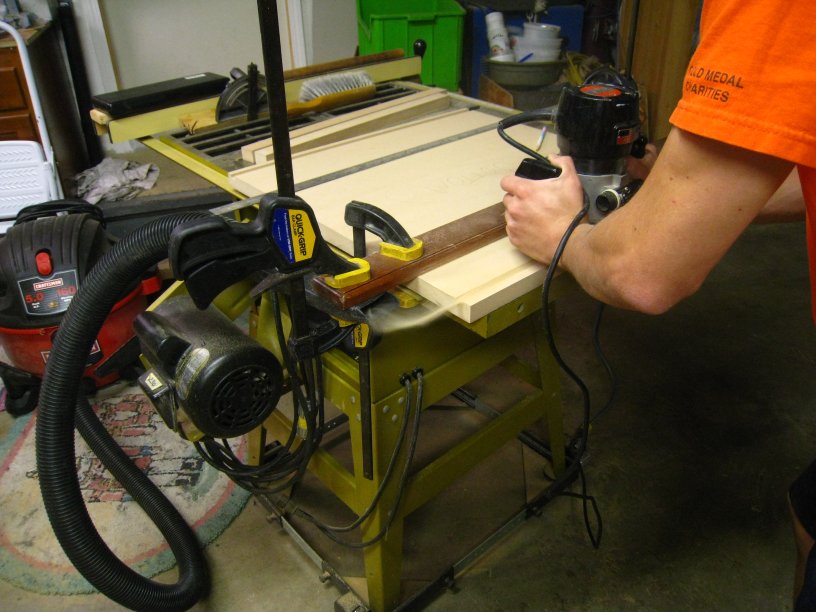
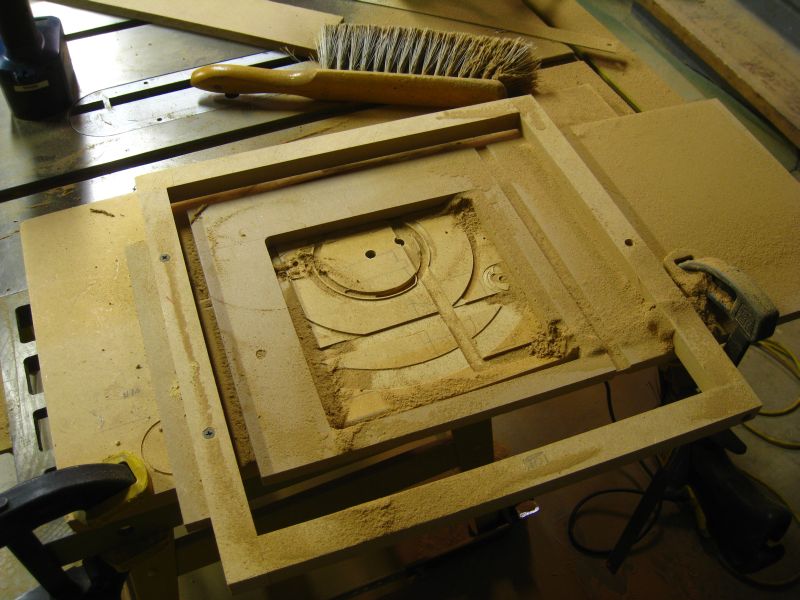
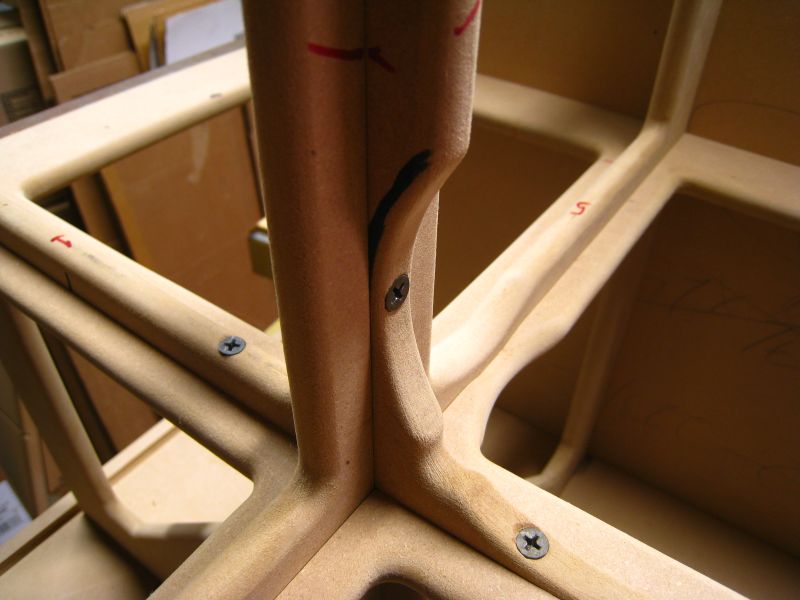
The biggest pain in the whole thing (excluding painting) was the shelf bracing. It took a little trial & error to figure out the best way to clamp it all. The best solution was to drill holes & screw it down to a larger wooden base plate, which was then clamped to the table. Wooden guides were made & screwed to the work pieces. It made no difference, surely, but I puttied all the holes haha. This was one instance where I gave in & stopped fighting the obsessive-compulsive urges.
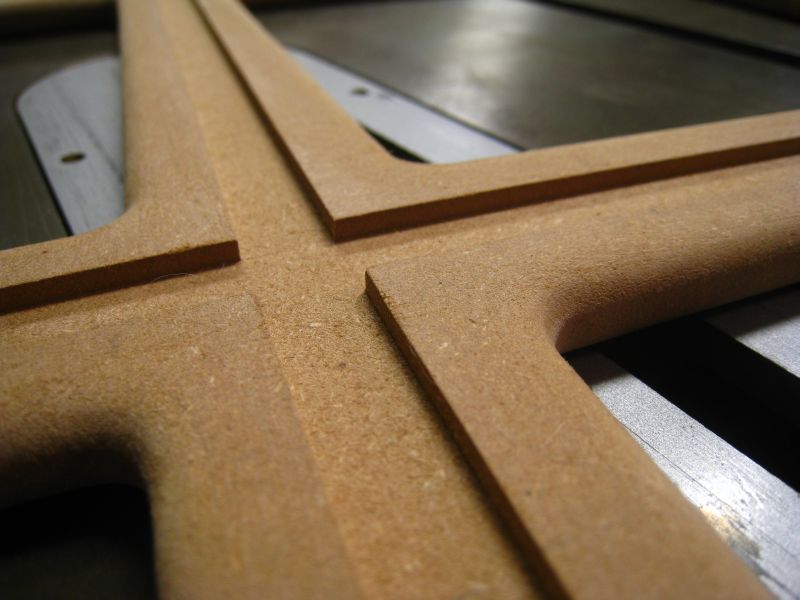
All edges of the bracing had 0.25” roundovers routed in.
Did I mention that the router makes a horrendous mess?
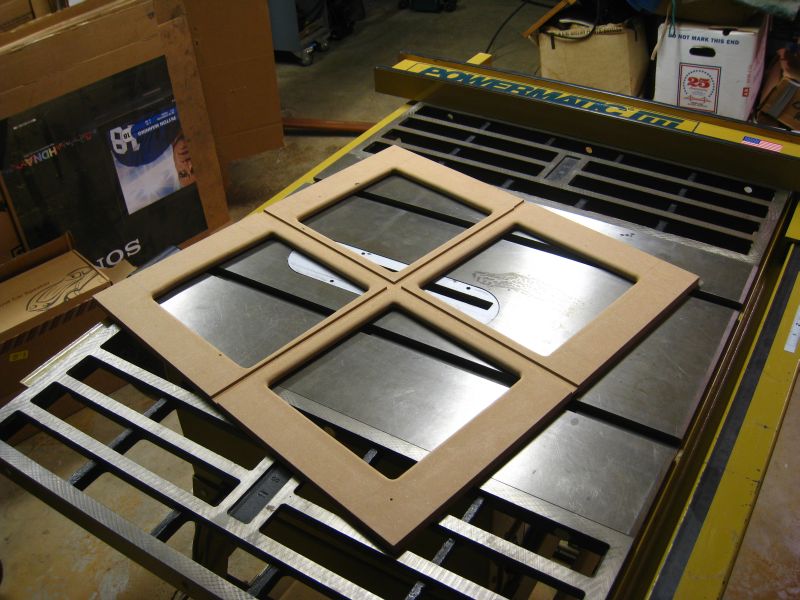
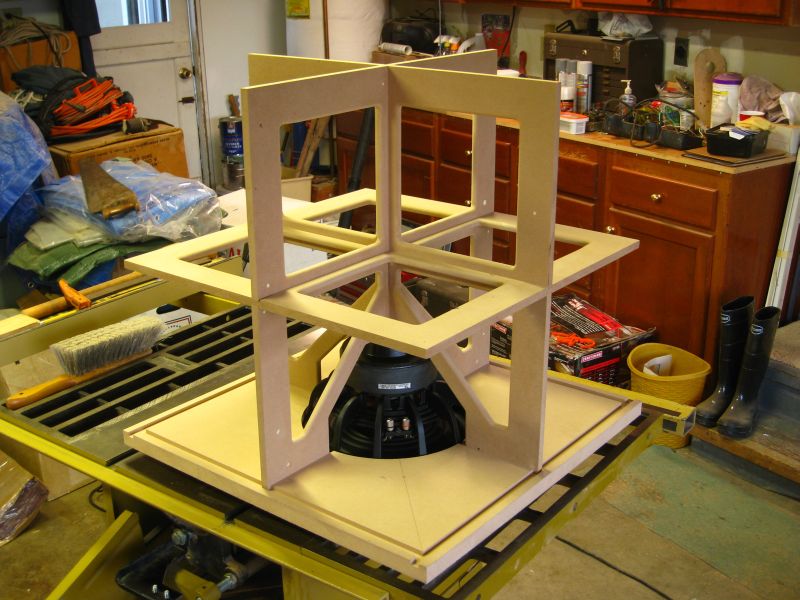
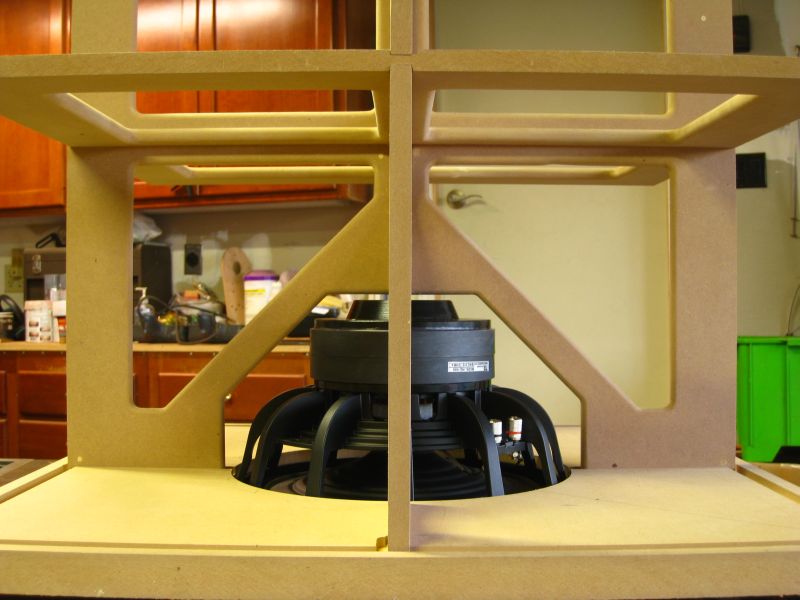
I practiced the cuts for the bottom bracing that needed to fit around the driver. At this point I didn’t want to make any mistakes, and practice always helps.
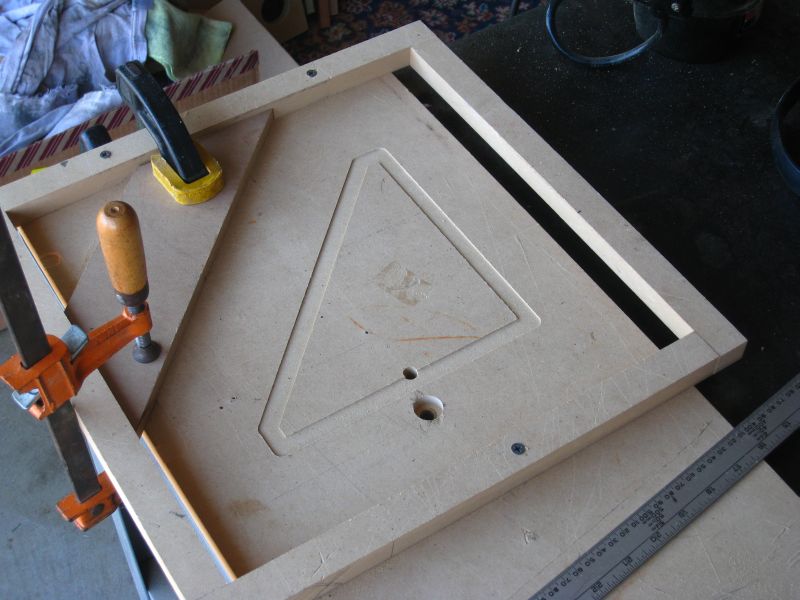
Half of the cuts are done!
I was really sweating by now…the last of the cuts were about to be done, and I had that feeling that I was about to be punished for not making any mistakes earlier. Luckily, it all worked out. I guess that every once in a while, you get to do a project without any major “oops” moments.
The biggest pain in the whole thing (excluding painting) was the shelf bracing. It took a little trial & error to figure out the best way to clamp it all. The best solution was to drill holes & screw it down to a larger wooden base plate, which was then clamped to the table. Wooden guides were made & screwed to the work pieces. It made no difference, surely, but I puttied all the holes haha. This was one instance where I gave in & stopped fighting the obsessive-compulsive urges.
All edges of the bracing had 0.25” roundovers routed in.
Did I mention that the router makes a horrendous mess?
I practiced the cuts for the bottom bracing that needed to fit around the driver. At this point I didn’t want to make any mistakes, and practice always helps.
Half of the cuts are done!
I was really sweating by now…the last of the cuts were about to be done, and I had that feeling that I was about to be punished for not making any mistakes earlier. Luckily, it all worked out. I guess that every once in a while, you get to do a project without any major “oops” moments.
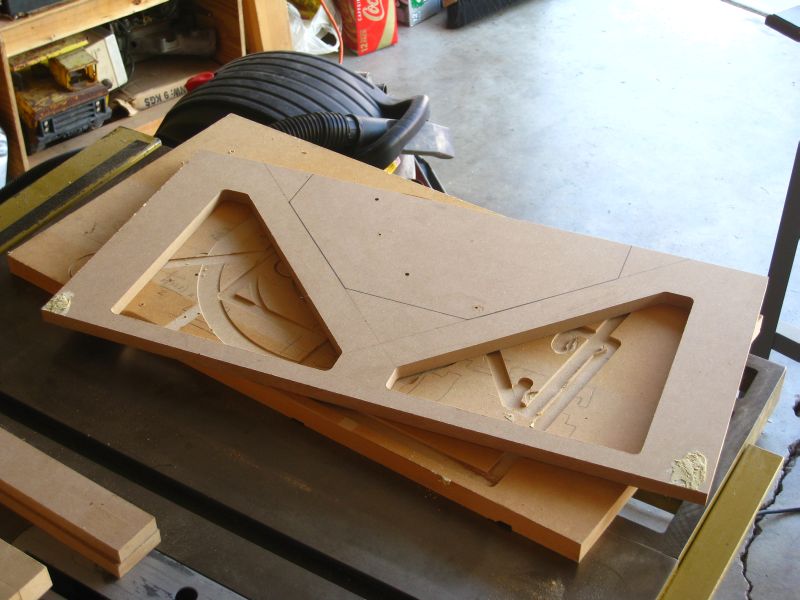
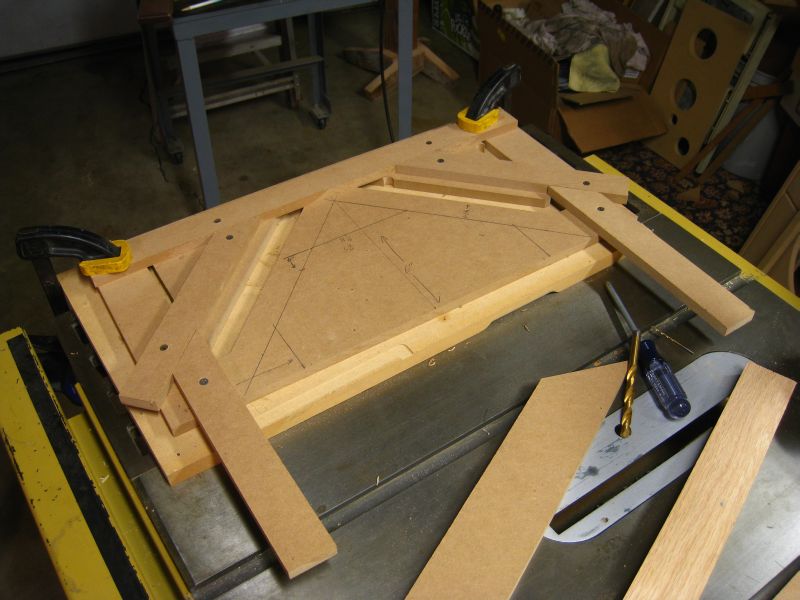
So, the cutting was done with! Yay! Now the task of test fitting & trimming everything dry could start. All I have to say is that there is no such thing as too many clamps.
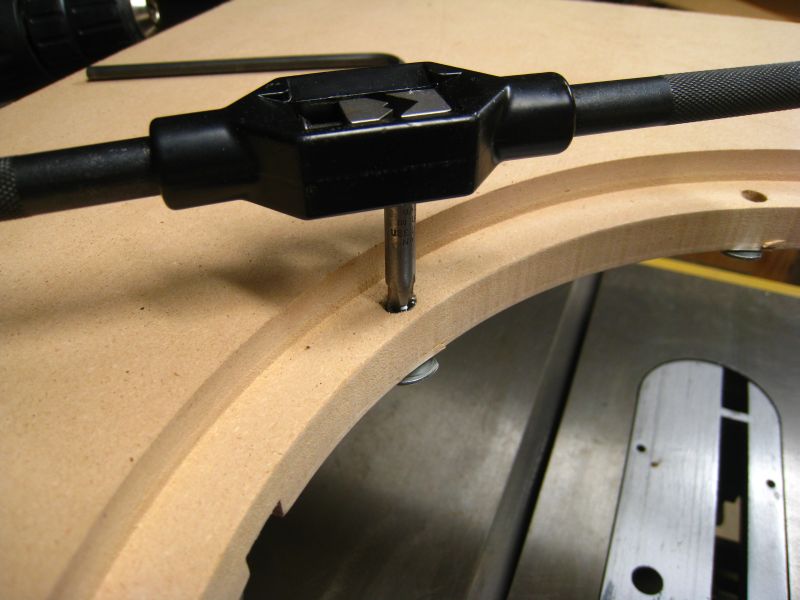
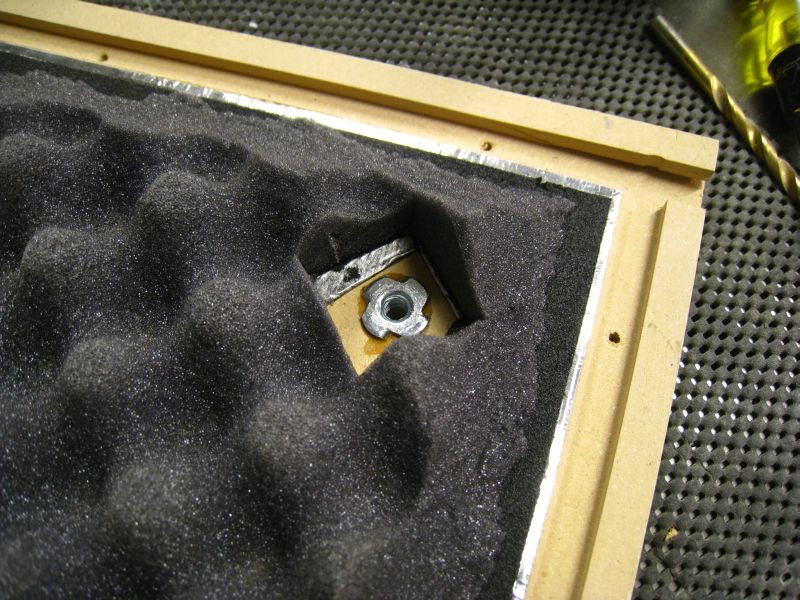
Since I was already committed to overbuilding this thing, I chased out the T-nuts & fasteners to make them all fit nicely. One advantage of having worked on my own cars for a long time is owning all sorts of tools, including full tap & die sets. They definitely come in handy when you want to clean up threads on rusty suspension parts (or just get out old thread locker).
Once I got all the bracing to fit together smoothly and align well with the walls, I clamped & screwed them. Somehow I had neglected to account for the port flare properly (this was almost an “oops” moment), so I carefully used the router to nibble material off. I then rounded the edges over & sanded like crazy.

At this point it was time to start adding dampening to the walls. Damplifier is my weapon of choice (mainly because it is zero-mess and odorless).

Of course, my trusty sidekick was keeping me company (the cat). My girlfriend stopped by to see the progress as well.

Since I was already committed to overbuilding this thing, I chased out the T-nuts & fasteners to make them all fit nicely. One advantage of having worked on my own cars for a long time is owning all sorts of tools, including full tap & die sets. They definitely come in handy when you want to clean up threads on rusty suspension parts (or just get out old thread locker).
Once I got all the bracing to fit together smoothly and align well with the walls, I clamped & screwed them. Somehow I had neglected to account for the port flare properly (this was almost an “oops” moment), so I carefully used the router to nibble material off. I then rounded the edges over & sanded like crazy.
At this point it was time to start adding dampening to the walls. Damplifier is my weapon of choice (mainly because it is zero-mess and odorless).
Of course, my trusty sidekick was keeping me company (the cat). My girlfriend stopped by to see the progress as well.
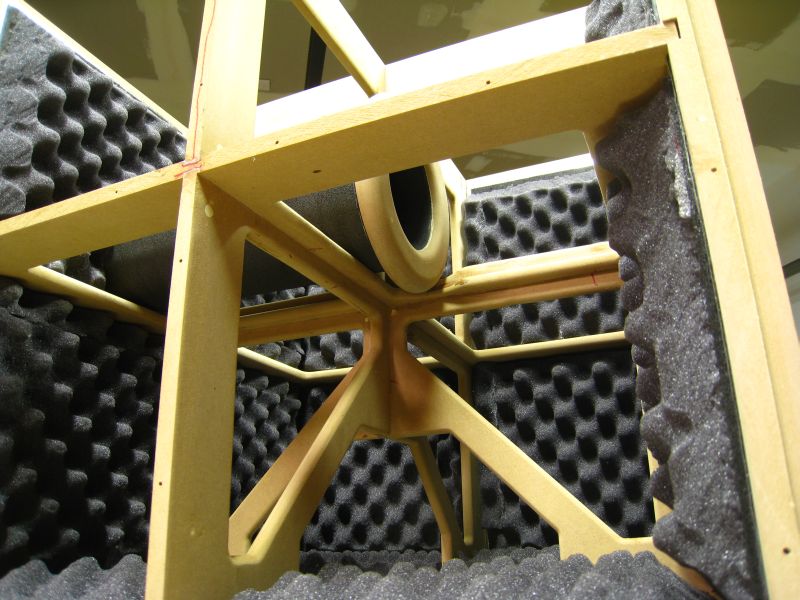
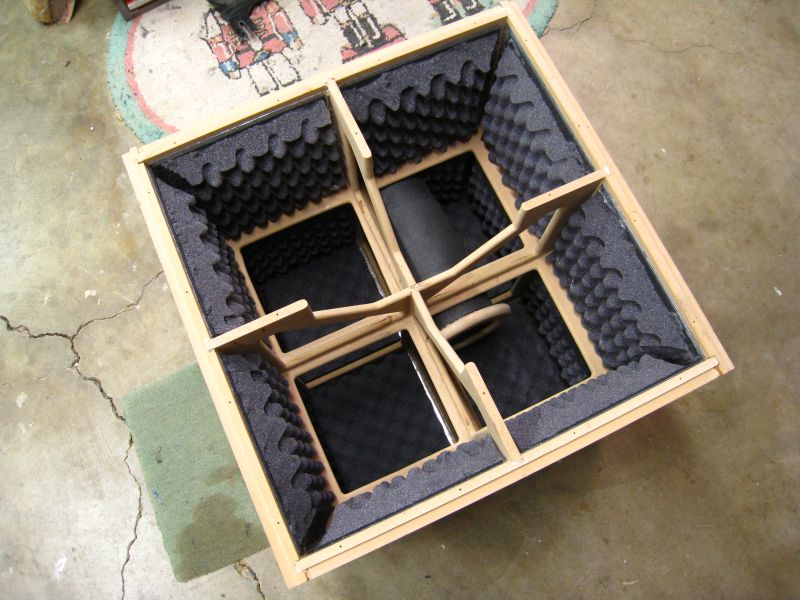
Now I started adding foam. I doubled up on the port so that it would sandwich snugly into the notches in the bracing, thus reducing the chance of buzzing / vibration.
I free-hand trimmed the edges to ~45 degrees to that the walls would actually fit together. When everything was dry-fitted, I clamped all sides together & pre-drilled the screw holes. I wanted to be able to glue, assemble & screw as quickly as possible.
The bottom was not installed until after everything else had cured. I needed to start on the oak base, and wanted to test fit it with the bottom before assembling the box. Drilling holes and making corrections with the base on the box would lead to a box full of sawdust. The base was made from veneered plywood & edged with solid red oak to hide the ply. Plywood is much more dimensionally stable with varying humidity than solid wood, which why I always use this method on large plane surfaces.
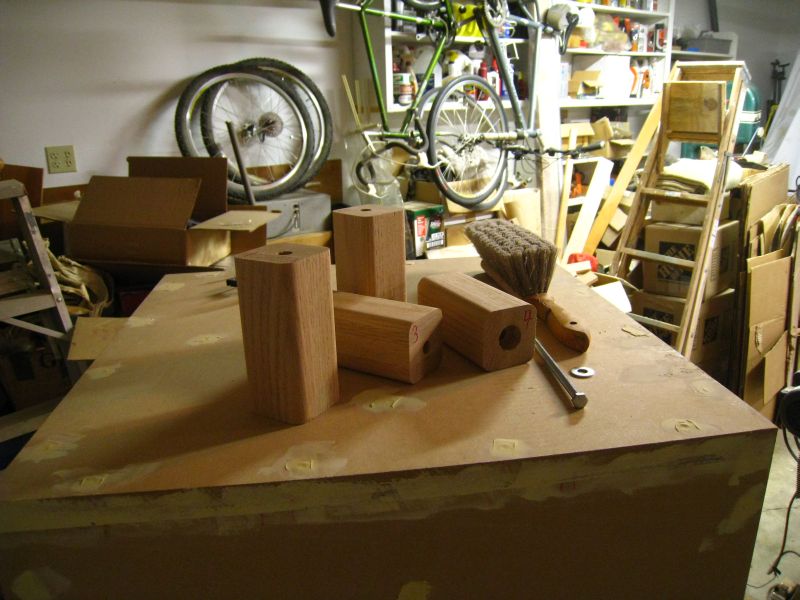
Here are the legs. They are attached to the base via 3/8-18 hex cap screws & T-nuts.
I applied some “Natural” colored Danish Oil to finish them.
I free-hand trimmed the edges to ~45 degrees to that the walls would actually fit together. When everything was dry-fitted, I clamped all sides together & pre-drilled the screw holes. I wanted to be able to glue, assemble & screw as quickly as possible.
The bottom was not installed until after everything else had cured. I needed to start on the oak base, and wanted to test fit it with the bottom before assembling the box. Drilling holes and making corrections with the base on the box would lead to a box full of sawdust. The base was made from veneered plywood & edged with solid red oak to hide the ply. Plywood is much more dimensionally stable with varying humidity than solid wood, which why I always use this method on large plane surfaces.
Here are the legs. They are attached to the base via 3/8-18 hex cap screws & T-nuts.
I applied some “Natural” colored Danish Oil to finish them.
Last edited:
Now that the box was fully assembled, I could start the finishing process on that as well. All screws were countersunk & puttied. It took 3 applications of putty & sanding to get them flush (it shrinks as it cures, leaving a depression, so you have to apply more later).
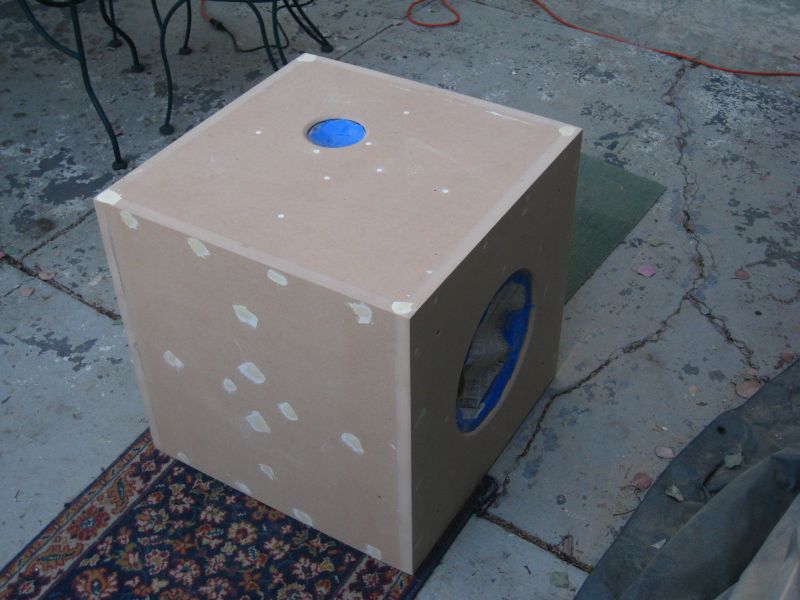
Prior to rounding the edges over (0.5” radius), I used some 60 grit sandpaper with a vibratory sander. This quickly took care of the minor alignment issues on the edges. After rounding the edges, I hit it all with 400 grit paper.
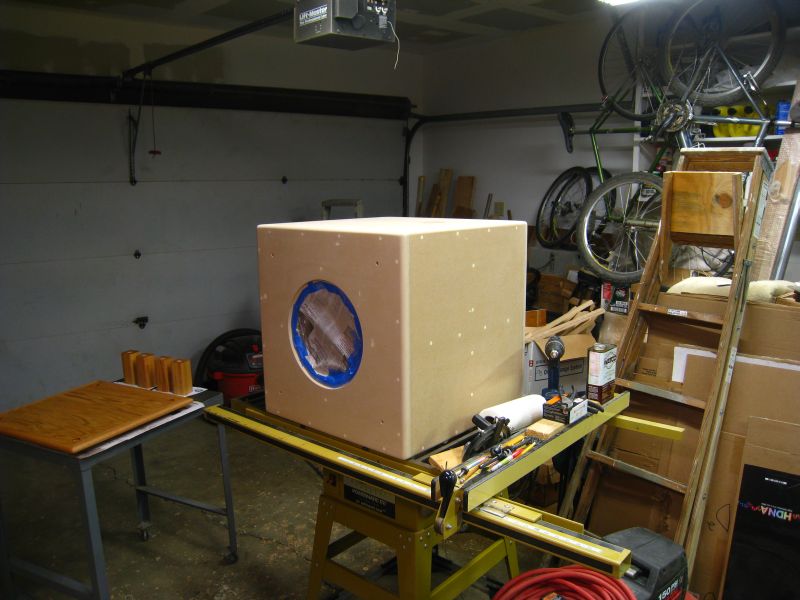
Next, I applied 3 coats of sanding sealer. MDF, especially if it has been sanded, will drink paint / sealer like your alcoholic cousin at a wedding with an open bar. Sealing the MDF is crucial before painting it. The first two coats were applied with a brush. The third came via a HVLP spray gun.
Once the sealer was cured, I carefully sanded it with some 400 grit paper. Some drips had formed around the port, so that took some careful work to correct. Paint is such a pain, particularly if the results are supposed to look good. Anyway, I moved on to the final coat. This was just your basic Rustoleum enamel, flat black. The HVLP gun was a little tricky to get dialed in since this stuff was very thick and needed serious thinning.
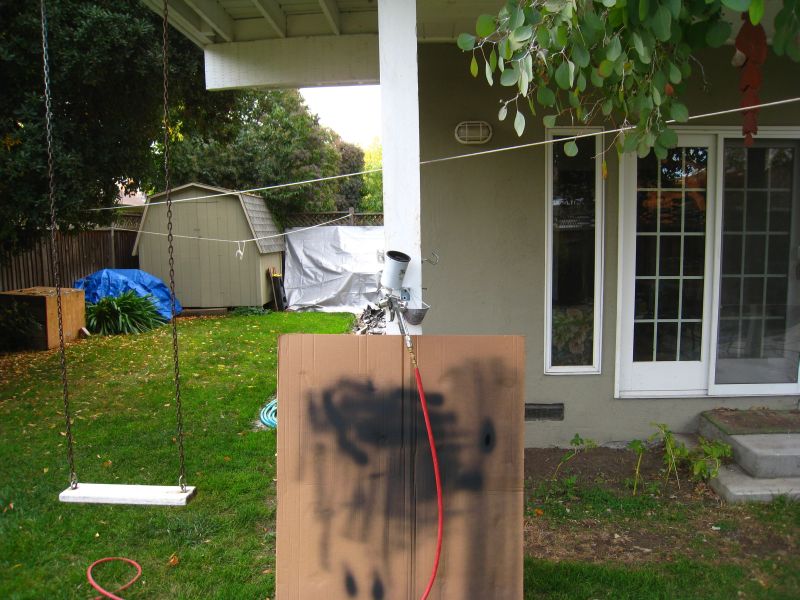
Initially, I thinned it with acetone. This did not work out so well. Acetone evaporates very quickly. In fact, it dries fast enough that each pass of the gun was unloading wet paint onto mostly dried paint. The results weren’t great.
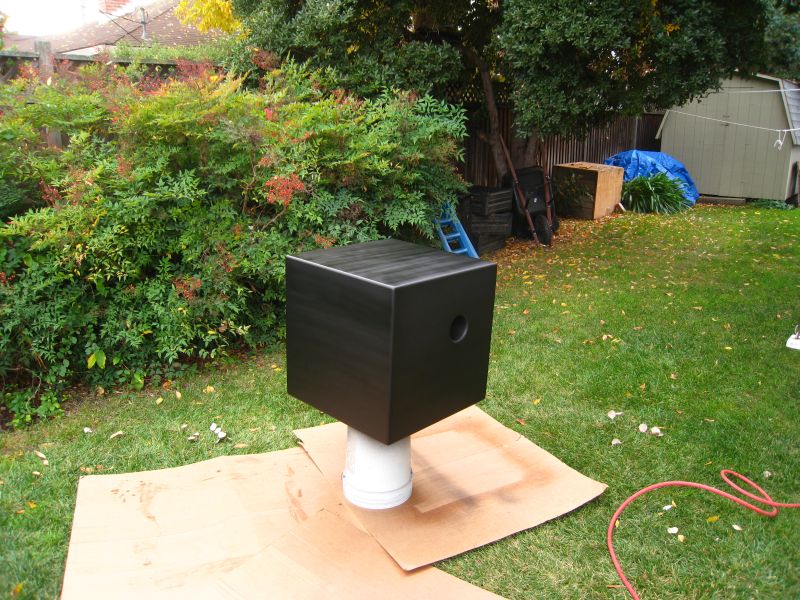
The next cup of paint was thinned with low-odor mineral spirits. This stuff takes much longer to evaporate, so each pass of the gun blended much more evenly. The banding almost completely disappeared after the paint dried, and was only really noticeable under fluorescent light at extreme angles.
Once it cured for about a week, I moved it inside. All that remained was to assemble it. Initially, I tried stuffing. Upon removing the stuffing, the sub suddenly sounded much clearer. Stuffing it made it have a muffled quality to it (although I really cannot say how much of this is real & how much is psychological). I never measured the response with the stuffing.
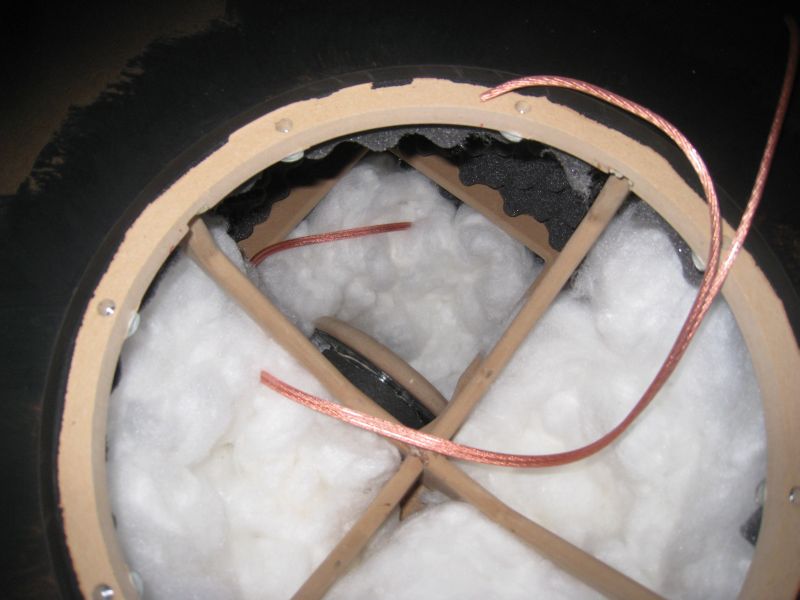
All wiring is generic Dayton Audio 12ga stuff from Parts Express. Take a guess at which group I fall into in DIYAudio’s biggest thread.
Prior to rounding the edges over (0.5” radius), I used some 60 grit sandpaper with a vibratory sander. This quickly took care of the minor alignment issues on the edges. After rounding the edges, I hit it all with 400 grit paper.
Next, I applied 3 coats of sanding sealer. MDF, especially if it has been sanded, will drink paint / sealer like your alcoholic cousin at a wedding with an open bar. Sealing the MDF is crucial before painting it. The first two coats were applied with a brush. The third came via a HVLP spray gun.
Once the sealer was cured, I carefully sanded it with some 400 grit paper. Some drips had formed around the port, so that took some careful work to correct. Paint is such a pain, particularly if the results are supposed to look good. Anyway, I moved on to the final coat. This was just your basic Rustoleum enamel, flat black. The HVLP gun was a little tricky to get dialed in since this stuff was very thick and needed serious thinning.
Initially, I thinned it with acetone. This did not work out so well. Acetone evaporates very quickly. In fact, it dries fast enough that each pass of the gun was unloading wet paint onto mostly dried paint. The results weren’t great.
The next cup of paint was thinned with low-odor mineral spirits. This stuff takes much longer to evaporate, so each pass of the gun blended much more evenly. The banding almost completely disappeared after the paint dried, and was only really noticeable under fluorescent light at extreme angles.
Once it cured for about a week, I moved it inside. All that remained was to assemble it. Initially, I tried stuffing. Upon removing the stuffing, the sub suddenly sounded much clearer. Stuffing it made it have a muffled quality to it (although I really cannot say how much of this is real & how much is psychological). I never measured the response with the stuffing.
All wiring is generic Dayton Audio 12ga stuff from Parts Express. Take a guess at which group I fall into in DIYAudio’s biggest thread.
I talked my roommate into helping me move the subwoofer from my parents’ house to our apartment (I have no garage/shop, so I make a mess at their house). This is where I finished up the assembly.
Shortly after finishing the sub, I received the audio gear.
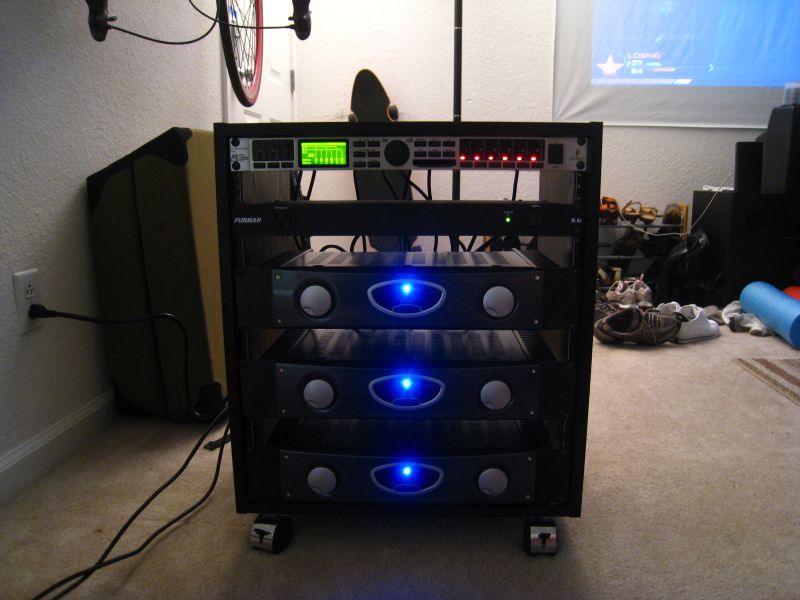
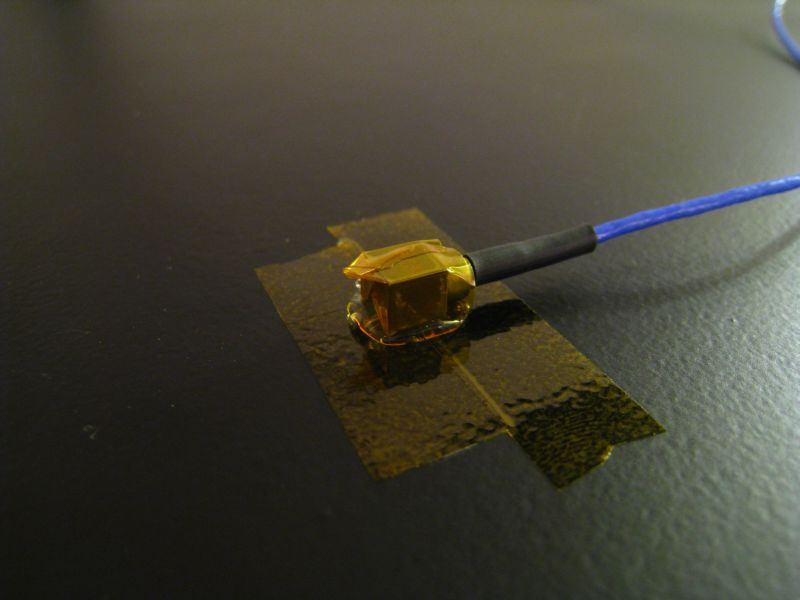
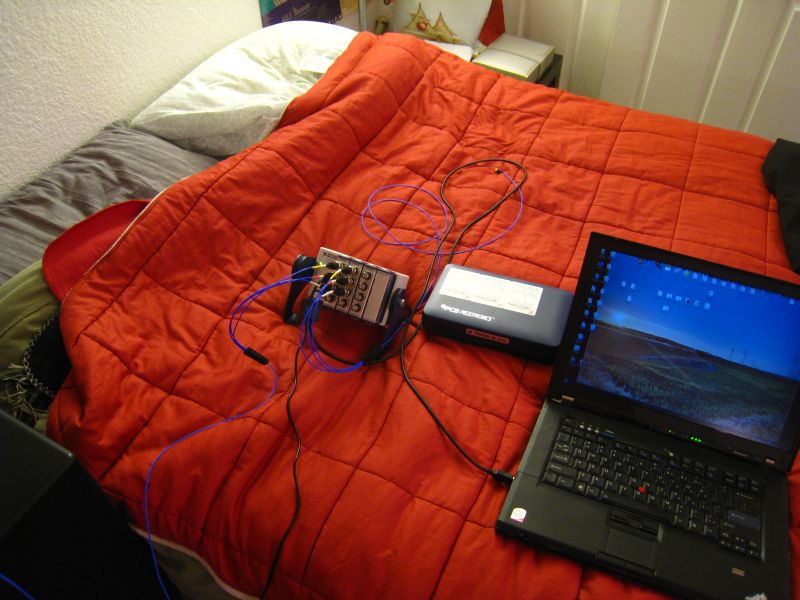
Since I work as a mechanical engineer, I have access to some fun test equipment. I ended up taking our portable DSA & accelerometers home to see just how much I could shake things! The resonant frequency of the floor is about 27Hz, and I can pull 0.3Grms on the floor running ~150W into the sub.

So, there you have it! This concludes the story of my first subwoofer build. I sort of adhere to the “go big or go home” mantra. Typical “American” thinking, I know. In some cases though, it can be a lot of fun!
Shortly after finishing the sub, I received the audio gear.
Since I work as a mechanical engineer, I have access to some fun test equipment. I ended up taking our portable DSA & accelerometers home to see just how much I could shake things! The resonant frequency of the floor is about 27Hz, and I can pull 0.3Grms on the floor running ~150W into the sub.
So, there you have it! This concludes the story of my first subwoofer build. I sort of adhere to the “go big or go home” mantra. Typical “American” thinking, I know. In some cases though, it can be a lot of fun!
Very nice build, and very detailed write-up. Me likey!
Have yourself a celebratory beer (Disclaimer: unless of course the 91 in your username refers to yourself and not your e30. klankymen in no way condones underage drinking in the free and tolerant land of unlimited possibilities and drinking at 21)
But seriously great work. How big is your room? It looks quite small. Would be interesting to know as I'm planning on putting a biggish sub into a 16 square meter room myself. How are the room modes?
Have yourself a celebratory beer
(Disclaimer: unless of course the 91 in your username refers to yourself and not your e30. klankymen in no way condones underage drinking in the free and tolerant land of unlimited possibilities and drinking at 21)But seriously great work. How big is your room? It looks quite small. Would be interesting to know as I'm planning on putting a biggish sub into a 16 square meter room myself. How are the room modes?
Very nice build, and very detailed write-up. Me likey!
Have yourself a celebratory beer
But seriously great work. How big is your room? It looks quite small. Would be interesting to know as I'm planning on putting a biggish sub into a 16 square meter room myself. How are the room modes?
You must be a fan of older German metal. 91 refers to the car (a big M42 fan here, actually).
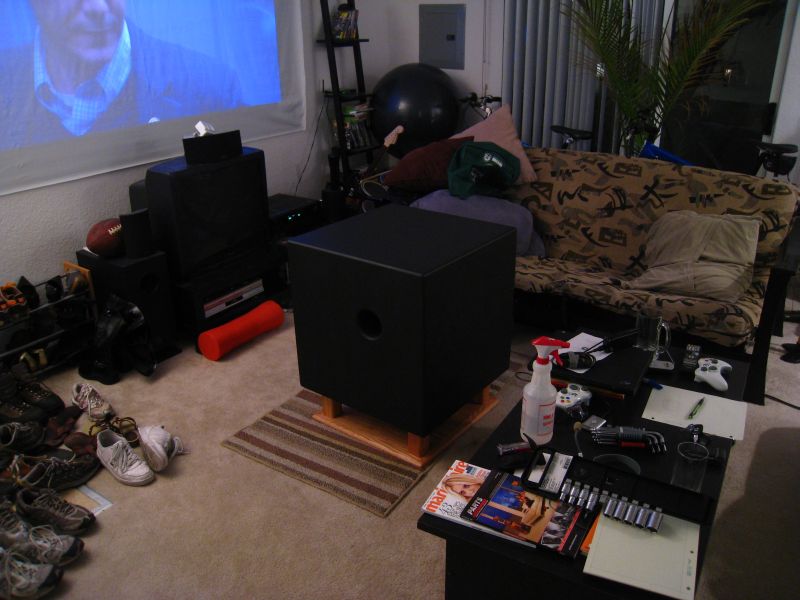
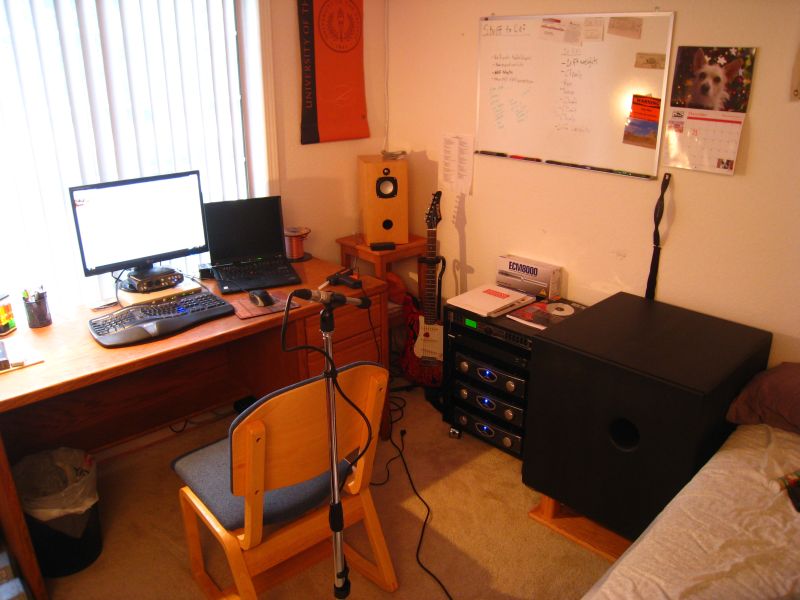
The room is 12'x15'x8' (3.7m x 4.6m x 2.4m). It is DEFINITELY small. I do not like having the sub where it is relative to the speakers and where I sit. Bass is not supposed to be directional, but when you sit right next to the sub it certainly is! Ideally, I would put it between the 2 speakers, but there is a desk in the way. I am seriously considering moving it to the corner and having the right 2-way sit on it. I am not sure how boomy the sub might be in the corner, but I can always try it out.
Modes...definitely. Some of them are the mechanical resonant frequencies of the structure, and some are standing acoustic waves. I only notice when doing sine sweeps. Music seems fine. You can hear some differences walking around. Corners & just outside the doorway are boomy. The center of the room is a tad weak. Just off-center sounds the best to me. Someday when I have a house, I am building an anechoic chamber. My company has a structurally isolated 8mx8mx8m full anechoic chamber at their headquarters, and I have been taking notes on how it is made lol.
Sadly, I won't get a chance to have an ideal listening setup until I get a house. Presently I am living in an apartment as cheaply as possible with roommates and saving $ like crazy for a down payment on one. Renting has serious perks (allows me to make my commute into a 10 minute bike ride no matter where I work), but I crave a garage / workshop, and a room I can dedicate to audio. There's no way I am renting a multiple bedroom apartment and paying a lot more just to position speakers better! I like audio, but not enough to pay an extra $700/month!
Last edited:
You must be a fan of older German metal. 91 refers to the car (a big M42 fan here, actually).
Well, I do live in the 'B' of 'BMW'. 😀
The room is 12'x15'x8' (3.7m x 4.6m x 2.4m). It is DEFINITELY small. I do not like having the sub where it is relative to the speakers and where I sit. Bass is not supposed to be directional, but when you sit right next to the sub it certainly is! Ideally, I would put it between the 2 speakers, but there is a desk in the way. I am seriously considering moving it to the corner and having the right 2-way sit on it. I am not sure how boomy the sub might be in the corner, but I can always try it out.
A friend of mine had similar mains to you and me, and built a 12" sealed sub in a 3x4 meter room, and he says the room modes are absolutely horrible and he prefers to run the system without the sub. He has since got some 8" monitor speakers as not to have the subwoofer. He also went on to say if he gets a sub again, the only arrangement he will go for is DBA
Sadly, I won't get a chance to have an ideal listening setup until I get a house. Presently I am living in an apartment as cheaply as possible with roommates and saving $ like crazy for a down payment on one. Renting has serious perks (allows me to make my commute into a 10 minute bike ride no matter where I work), but I crave a garage / workshop, and a room I can dedicate to audio. There's no way I am renting a multiple bedroom apartment and paying a lot more just to position speakers better! I like audio, but not enough to pay an extra $700/month!
I feel your pain. I'm living in the most expensive city in Germany, on a students budget, so I can't really afford a big place (or a bimmer for that matter, but public transport is good, and city traffic is horrible). The advantage is that the place I'm living in right now is a concrete highrise, which is absolutely dead to sound - ie I can turn stuff up loud at 4AM without my neighbours caring (though let's see how that looks with a big 12" pumping more air).
In any case, this thread is a nice inspiration, though a 60cm cube is a bit larger than my limit, which is a 50cm cube (don't worry, I do understand imperial just fine, I just refuse to use it - ze Tscherman engineering standards musst be upheld! 😛 )

I suppose I lucked out in this room since there aren't any horrendous modal issues. I JUST moved the sub into the corner this evening. Bass no longer sounds directional, BUT now it is boomy & overwhelming. I will get the measurement microphone out & run some sweeps. Hopefully I can just turn the gain down on the DCX2496.
I WISH the apartment was made from concrete. The walls in this joint are paper thin. The day I moved the sub in, I actually introduced myself to the people below. They were informed of my liking for audio, and that they should not hesitate to inform me if it is too loud. So far, no complaints although I did get their toddler to scream "earthquake" when doing low frequency sweeps.
You mentioned being a student...what are you a student of?
How much do clean E30's sell for over there? A good clean, strong-running one here is usually at least $4000. I have been driving an E30 for the last 9 years (2 different 318iS cars). I still dream of importing one of the E30 touring models and dropping in a built M42. The current one has some parts from Germany...a guy on the BMW forums is in the US military stationed there, and can pull parts at wreckers & ship them at domestic rates. I got some Euro-spec ellipsoid headlights for almost nothing!
Well, I do live in the 'B' of 'BMW'. 😀
A friend of mine had similar mains to you and me, and built a 12" sealed sub in a 3x4 meter room, and he says the room modes are absolutely horrible and he prefers to run the system without the sub. He has since got some 8" monitor speakers as not to have the subwoofer. He also went on to say if he gets a sub again, the only arrangement he will go for is DBA
I feel your pain. I'm living in the most expensive city in Germany, on a students budget, so I can't really afford a big place (or a bimmer for that matter, but public transport is good, and city traffic is horrible). The advantage is that the place I'm living in right now is a concrete highrise, which is absolutely dead to sound - ie I can turn stuff up loud at 4AM without my neighbours caring (though let's see how that looks with a big 12" pumping more air).
In any case, this thread is a nice inspiration, though a 60cm cube is a bit larger than my limit, which is a 50cm cube (don't worry, I do understand imperial just fine, I just refuse to use it - ze Tscherman engineering standards musst be upheld! 😛 )
I suppose I lucked out in this room since there aren't any horrendous modal issues. I JUST moved the sub into the corner this evening. Bass no longer sounds directional, BUT now it is boomy & overwhelming. I will get the measurement microphone out & run some sweeps. Hopefully I can just turn the gain down on the DCX2496.
Quite curious to see that, though I don't expect it to be too good (not because of your sub, just because of room issues - they're a big deal at that frequency). You're fortunate to have access to all that equipment, can be quite useful. I think I'm going to get myself a rat shack spl meter, but I'm pretty darn broke at the moment - I need a new job.
I WISH the apartment was made from concrete. The walls in this joint are paper thin. The day I moved the sub in, I actually introduced myself to the people below. They were informed of my liking for audio, and that they should not hesitate to inform me if it is too loud. So far, no complaints although I did get their toddler to scream "earthquake" when doing low frequency sweeps.
Well, having lived in America for three years, and visiting there a lot, I know how crappy most walls are. The brick walls typical in houses over here are nice for filtering out most somewhat higher frequencies, and my ugly 70s concrete bunker is even better, but the doors are still the weak point.
You mentioned being a student...what are you a student of?
How much do clean E30's sell for over there? A good clean, strong-running one here is usually at least $4000. I have been driving an E30 for the last 9 years (2 different 318iS cars). I still dream of importing one of the E30 touring models and dropping in a built M42. The current one has some parts from Germany...a guy on the BMW forums is in the US military stationed there, and can pull parts at wreckers & ship them at domestic rates. I got some Euro-spec ellipsoid headlights for almost nothing!
I'm studying Electrical Engineering here. A good clean E30 is really hard to come by, most of them have been either riced out or have become beaters. And cars are significantly more expensive than in the states in general, so 4000 bucks is a good bearing for a nice one. However you can get plenty of beaters for under a grand (of euros) that are still in an alright shape. Why import? Was the touring not sold in the states? Americans don't seem to like wagons (preferring SUVs instead for some reason).
Back to your sub though - any reason for deciding to paint it? I'd have thought you'd have veneered it to match your speakers - your woodworking stills certainly appear to be up to pace to do it. Was it a price issue?
Yeah, we'll see what the response curves look like. The DCX24966 also has EQ abilities, so I might be able to find the band causing the trouble & attenuate just that.Quite curious to see that, though I don't expect it to be too good (not because of your sub, just because of room issues - they're a big deal at that frequency). You're fortunate to have access to all that equipment, can be quite useful. I think I'm going to get myself a rat shack spl meter, but I'm pretty darn broke at the moment - I need a new job.
I feel your pain in the "broke student" department. I was there for a good 5 years while studying mechanical engineering. Every penny I made was spent on the car though so I could attend auto-cross events.
Yup, construction here is poop. Well, actually from an energy conservation / insulation view point, it is probably better, but for things like audio it is poop. There's a lot of seismic activity in my area, so a properly done concrete building costs a lot more than wood & sheetrock. Some day I am just going to hand-build my own damn house. It'll be a while though, I am still a few years shy of being 30 and I just finished off my student loans.Well, having lived in America for three years, and visiting there a lot, I know how crappy most walls are. The brick walls typical in houses over here are nice for filtering out most somewhat higher frequencies, and my ugly 70s concrete bunker is even better, but the doors are still the weak point.
E30 wagons weren't available in the US. None of the "cool" cars come here. My best bet is Canada though, they got some. It is unfortunate that Germany has lots of riced out E30's...it's just wrong on those cars.I'm studying Electrical Engineering here. A good clean E30 is really hard to come by, most of them have been either riced out or have become beaters. And cars are significantly more expensive than in the states in general, so 4000 bucks is a good bearing for a nice one. However you can get plenty of beaters for under a grand (of euros) that are still in an alright shape. Why import? Was the touring not sold in the states? Americans don't seem to like wagons (preferring SUVs instead for some reason).
I wanted it to be more low-key looking. Another thing I wanted was rounded edges/corners. Stuff like that is way too hard to veneer. Veneer for something this size would be like $200 too. So, it was a mix of price, effort and time. I wanted my free time back so that I could go climbing & backpacking again.Back to your sub though - any reason for deciding to paint it? I'd have thought you'd have veneered it to match your speakers - your woodworking stills certainly appear to be up to pace to do it. Was it a price issue?
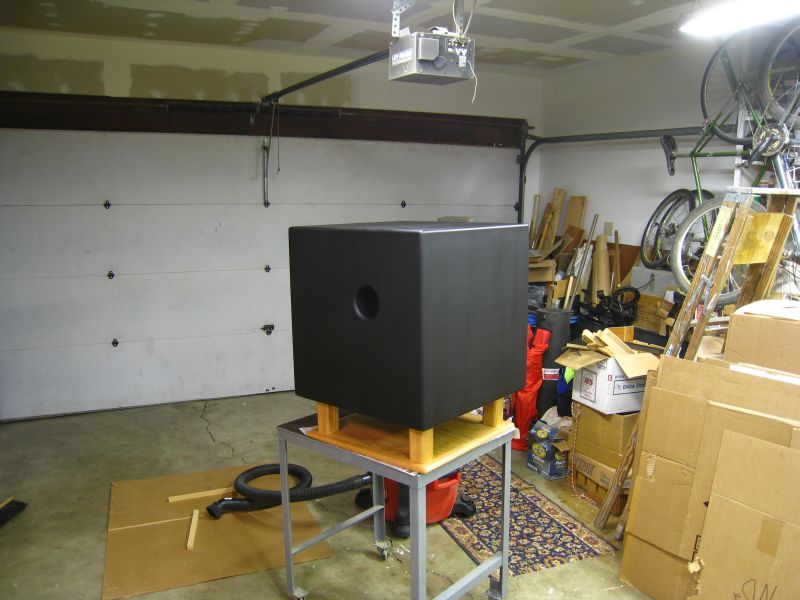
Well, it has been a good 8 months, and I moved the sub into the living room of my apartment. Aside from being broken in now, it also sounds much better in the larger room. The bass is deeper & clearer...much less boominess in the listening position.
I also installed some speaker spikes to see if that would help reduce floor vibrations at all. They might have done something, who knows. At least it probably isn't bouncing up & down on the carpet anymore!
I also installed some speaker spikes to see if that would help reduce floor vibrations at all. They might have done something, who knows. At least it probably isn't bouncing up & down on the carpet anymore!
- Status
- Not open for further replies.
- Home
- Loudspeakers
- Subwoofers
- First Subwoofer Done (Over the Top) - Pics from Start to Finish [56k Unfriendly]