G'Day Everyone,
In a previous post I was asking about experiences with subwoofers to accompany Lynn Olson's Ariel speakers. On that thread someone was asking about my experience with them, so I thought I would start a new thread to answer that question, and hopefully it may be of interest to some of you...
Building the Ariel was not as difficult as I imagined at first. The way I approached the building was to take the time to make a router template for the sides. By using a template you guarantee that both sides have identical rebates for the internal baffling. Even though I have a table saw, I had the board factory cut all the baffling to width (for accuracy). The plans called for beech or birch ply. I had difficulty sourcing this in Australia, so I used marine ply (very expensive!). I built my speakers using a kit from North Creek http://www.northcreekmusic.com/ArielFAQ.html I used the value kit, and mounted the crossover components in the upper portion of the speaker box, behind the transmission lines, with a removable back plate. I will try to attach an image of the plans, as amended by me. A friend of mine borrowed the templates and has built his using an external active crossover. He is pleased wit the result, but I have yet to listen to his pair to compare (he lives in Melbourne, I am just out of Sydney).
I finished the basic cabinets last year, and I am l am pleased with the results. These speakers really shine with vocals/jazz music. With hard rock and large orchestral works the sound is at least as good as my old speakers, but there is not the order of magnitude of improvement that I experienced wit the vocal/jazz/chamber music.
The most difficult part of the construction is what I am doing now: covering them with veneer. I decided to cover them with jarrah veneer using the PVA glue/hot iron technique. I may have done something wrong, but it was a disaster! The veneer blistered and bubbled and looked a mess! I am almost through with the tedious task of slicing the bubbles open, injecting glue underneath and re-clamping. I will post some pics of the finished speakers when they are done.
Here is a link that you have probably seen, but was somewhat useful: http://indigo.ie/~walton/ariel1.html . He does a good job, but I was left wondering, after spending mega dollars on crossover components and valve amp components, spending a few quid on a router would have saved him a whole lot of heartache!
I have driven the speakers with two amps, and old Adcom 555 and an inverted gainclone. I am building a four channel gainclone based on BrianGT’s boards, but have yet to check them out with the Ariels. My aim is to build a tube amp next year, but have yet to decide on topology/tubes. I am in the process of building an active crossover based on the boards by Rod Elliott http://sound.westhost.com/project09.htm
Please note, I have modified the plans that are posted below, they have not been checked or endorsed by the designer Lynn Olson.
Attachments
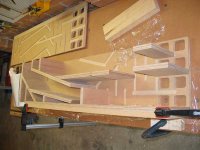
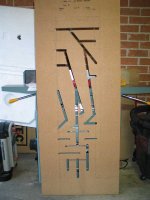
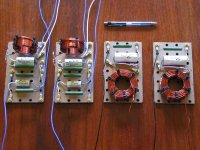
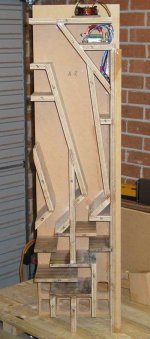
I dont think that the changed plans came out too well in the previous post. this is a better view of the changed portion. The change is that I have used the value kit from North Creek and mounted the crossover in the upper portion of the speaker cabinet. Crossovers can be accessed with a removable rear panel.
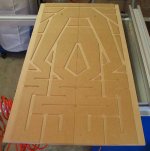
The speaker cabinets were glued using West System two part epoxy with flocking to fill any unintentional gaps. I made the router template directly from the plans and used that to route the sides. I simply flipped the template over to make the opposite cabinet side. For the construction I first glued the back to one side and then, using the opposite side as a jig, glued a couple of the baffle pieces at a time. I used regular plastic food wrap over the top of the baffle pieces before attaching the opposite side before clamping up so that I could release the side after the glue had set. Using the epoxy gave plenty of working time for getting things right before clamping.
Will post the final pics in a few weeks when the finishing is complete.
Chris
Attachments

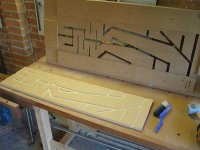
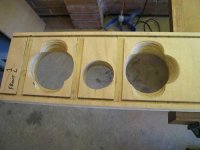
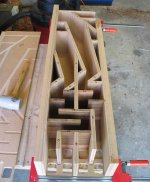
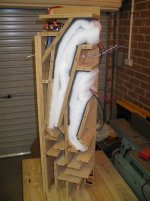
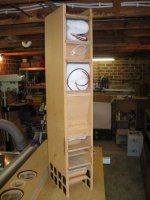
This shot shows the stuffing and felt pads in place before the opposite side panel is glued in place. You can see the upper portion of the rear panel is missing. This is the removeable portion so that I can access the crossovers if needed after completion...
Attachments
")
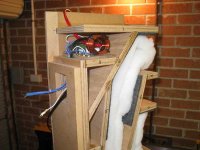
Dry fit of front panel prior to glue up. The dark marks around the speaker cutouts is just some stain I used so that if the speaker driver does not fit perfectly there will not be any light coloured MDF showing through. Cutouts were made using Jasper circle jig...
Attachments
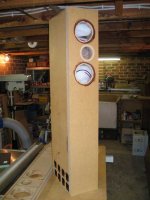
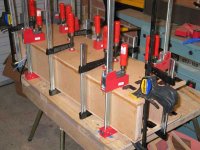
Front panel glued on. I rounded the corners by making a small template out of a scrap of ply, cutting the rough shape with a table saw and then finishing with a hand plane and random orbit sander, checking against my template as I went. Oh, in this shot you can see what they are replacing (how embarrassing, I was much younger when I bought those, please forgive me...). Ply on the top is just some scrap I had lying around. Top will be 19mm solid jarrah (with 1/4" ply will make 1" top).
Attachments

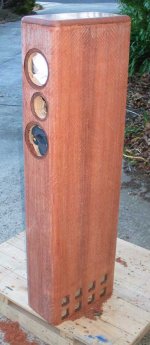
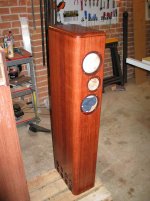
This is the stage I am at now. Veneer is yet to be scraped and sanded. I intend finishing with sanding sealer covered by a satin urathane, fished with fine buffing oil. Veneer is jarrah, with solid jarrah top. I am building 1 1/2" solid jarrah base as per plans. The most difficult part of the project has been the veneering. I was attracted to this project due to the impressive reviews, and I was also interested in the challenge of the woodworking involved.
Will post final pics in a few weeks when the finishing is complete.
Cheers,
Chris
Will post final pics in a few weeks when the finishing is complete.
Cheers,
Chris
Attachments


Nice work!
I'm also just finishing up a Northcreek Ariel kit, although mine has mutated quite a bit. They have turned into back-horns, rather than the labrynth/T-line thing Lynn designed. As a result, I've had to muck with the crossovers. Which is hard, because I built them according to the Northcreek instructions, all swage/soldered together. If anyone's building a Northcreek kit, I'd suggest being sure you like the crossover circuit before using that construction method.
That template is a good idea. I'm not quite sure how you use it. I'm imagining guiding the router so the bit follows the cut-out, and trying not to chew up the template as you use it. Can you describe how you do it? /jd
- Home
- Loudspeakers
- Multi-Way
- Ariel construction