Great work ChrisH and an excellent example of patience and dedication.
One question - how much do the cabinets weigh at this stage? Are you having any trouble handling their size & weight?
www.geocities.com/gattiweb/delta2
One question - how much do the cabinets weigh at this stage? Are you having any trouble handling their size & weight?
www.geocities.com/gattiweb/delta2
I think that making the template was the best decision I made with regard to the construction. A little patience here pays big dividends! I just drew the plans out full scale onto a piece of mdf and used the router with a straight guide to cut the template. To use the template I just used a top bearing bit, that is a straight cutting bit with a bearing at the top of the bit (also callued a flush trim bit). This way the bearing engages the template but does not cut it. Just make sure that you make the template thick enough so that it accomodates the depth of the bit (if the template is too thin you may have a problem with the bit cutting too deep). With the template I made some battons on the edges so that the speaker side piece would fit without moving around at all. To make the opposide side of the cabinet, simply flip the jig over. This way the cabinet sides are exact mirror images and everything should go together.
I had all of the internal bracing pieces cut to width at the factory, so all I had to do was cut them to length on my mitre saw. This also helped with the accuracy. After putting mine together, a friend used my template and had his speakers to a working stage in about a week!
As for the weight, not quite sure... Yes they are a little difficult to move around, but not impossible. I am building bases for them, will post picture when complete (with weight details).
Would love to see some photos of your speakers Joeld!
Thanks for the interest,
Chris
chrish said:Just a progress report...
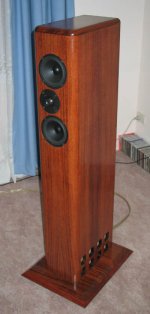
Finished sanding back veneer, picture shows one coat of sanding sealer. Will add another coat tomorrow, then a few coats of satin urathane, finished off with fine buffing oil.
Crish, very nice work - I can understand that that template would help immensly, well done!
I'm interested in this sanding sealer that you've used. Is this just like a levelling compound to give you a smooth surface or is it something else? I've always had an issue with providing a completely smooth surface before apply the final coats of clear. Particularly at routed edges of timber. From the picture it appears to apply a smooth surface to the texture of the veneer?
I'm also interested in how you got the front edges curved, I have read your instructions for using a template but did you use this with the router? How did you use the template?
Cheers
Rod
Rod,
The sanding sealer I used was simply Wattle brand sanding sealer. The reason I am using it is that my friend who built the other set of Ariels with my template is a much more experienced woodworker, and he recommended that I finish with:
1. Sanding sealer
2. Satin urethane
3. Fine buffing oil
The sanding sealer comes out of the can a caramel/brown/milky colour, but looks OK on the wood. I believe it seals the grain before final finishing. Helps to reduce the great colour difference between end grain cuts and rip cuts once varnished. The top of the cabinet is solid jarrah, with the grain running from front to back, so the front of that piece is end grain. You will notice that there is not much difference in shade of the wood between the front and side. Yes, it does appear to help provide a smooth undercoat for final finishing, but it will not hide poor surface prep. I sanded to 400 grit before application. Will be using Feast Watson brand Satincoat urethane and Feast Watson Fine Buffing Oil.
For the curved front, the plans call for a 1.25” radius on one side and 1” radius on the other. I am sure that you will appreciate that these router bits would have been very expensive, so I simply drew the radii on the base of the cabinet and took of the majority of the waste with the table saw. I then simply made a small template out of some scrap with the radii. I then used a hand plane to manually shape the curves and held the template up against the workpiece occasionally to check my progress. When I had the correct shape I smoothed it out with the random orbit sander. The top of the cabinet has a 0.75” radius, so for that I simply used a router bit.
Gazza, yes, that is 40kg each")
Cheers,
Chris
The sanding sealer I used was simply Wattle brand sanding sealer. The reason I am using it is that my friend who built the other set of Ariels with my template is a much more experienced woodworker, and he recommended that I finish with:
1. Sanding sealer
2. Satin urethane
3. Fine buffing oil
The sanding sealer comes out of the can a caramel/brown/milky colour, but looks OK on the wood. I believe it seals the grain before final finishing. Helps to reduce the great colour difference between end grain cuts and rip cuts once varnished. The top of the cabinet is solid jarrah, with the grain running from front to back, so the front of that piece is end grain. You will notice that there is not much difference in shade of the wood between the front and side. Yes, it does appear to help provide a smooth undercoat for final finishing, but it will not hide poor surface prep. I sanded to 400 grit before application. Will be using Feast Watson brand Satincoat urethane and Feast Watson Fine Buffing Oil.
For the curved front, the plans call for a 1.25” radius on one side and 1” radius on the other. I am sure that you will appreciate that these router bits would have been very expensive, so I simply drew the radii on the base of the cabinet and took of the majority of the waste with the table saw. I then simply made a small template out of some scrap with the radii. I then used a hand plane to manually shape the curves and held the template up against the workpiece occasionally to check my progress. When I had the correct shape I smoothed it out with the random orbit sander. The top of the cabinet has a 0.75” radius, so for that I simply used a router bit.
Gazza, yes, that is 40kg each
Cheers,
Chris
chrish
Congratulations for splendid job and many thanks for share your construction pics.
I got a friend who have no access to Diyforum yet building V5R version and first listennings resulted lack of bass.
You could help us telling more about stuffing method, polyfill wheight, drivers breaking time and room position of cabinets.
I suspect drivers need more breaking time and more stuffing tryouts. Sorry for poor english
In advance thanks for comments and assistance.
JC
chrish said:Rod,
The sanding sealer I used was simply Wattle brand sanding sealer. The reason I am using it is that my friend who built the other set of Ariels with my template is a much more experienced woodworker, and he recommended that I finish with:
1. Sanding sealer
2. Satin urethane
3. Fine buffing oil
Chris, thanks for the advice. I think I'll use your approach on the sealer on the thor kits I plan to build over christmas.
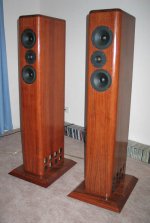
Well, it has taken more time than I had imagined… Just after the last post I made, I was informed by my landlord that he was selling the house I was living in and that I would have to move! Took me a couple of months to get my workshop set up again, but the good news is that I have finally finished my speakers. I have finished them as I had stated in my previous posts, but put on a final coat of wax finish. I am happy with the results.
As for final impressions? The plans called for a solid MDF top. I figured that since I was going to veneer the speakers, trying to veneer the top would be difficult due to having curved faces joining the top, the sides and the front. I thought the easy solution would be a solid wood top. As the top portions of the enclosure were separated from the transmission lines, I theorised it would make little difference acoustically. When I glued the ¼ inch ply to the top it sounded like a drum when you tapped it! I thought that gluing ¾ inch solid hardwood to it should quiet it down. I was wrong. When the speakers were finished I noticed that when playing music, the top of the cabinets were not acoustically dead. Hmmm, what to do? As I had made a removable back section for the crossover components (not sure if this contributed to the problem), I figured I might try to fill the compartments with dry sand. Well, this did the trick! To fill the compartments took about 6kg of sand for each speaker. The result is a much clearer/cleaner sound. Final listening impressions? I am very happy with the final result. Since adding the speaker base and filling the upper compartments with sand the speakers are very well behaved. Some have noticed a lack of base with these speakers. There definitely is not the same amount of base as the speakers they are replacing (Bose 901), but the base is much more well behaved. I do not feel that there is anything “lacking” when listening to music. I do intend, however, to build the matching stereo sub woofers described by Lynn Olson (for movies, and for the fun of building them). Hope that this thread has been of some interest or help to those considering this project.
Chris
Attachments
Hello chrish
Perhaps you didn´t find my last post requiring about Ariel stuffing method.
Could you please comment amount, type, density and in line placement? Any word may give us a clue...
Our Ariel VR5 is in tunning mode yet, so not finnished, with one bolted side
Thanks in advance for comments and assistance
JC
Hello JC Fardo,
Sorry for not answering your question... As for the stuffing, I just purchased the North Creek value kit for the Ariel. They included the stuffing and the heavy felt damping materiel. It is listed on the contents of the kit as "dacron stuffing". See North kit contents here: http://www.northcreekmusic.com/ArielContents.html . It looks like like the stuff they put in pillows. The heavy damping was 1/2 inch felt. It was applied to the transmission line as detailed in the Ariel 5S plans, it is not shown on version 6 of the plans. Stuffing was just loosely placed at the top of the transmission lines as shown in my posts numbers 11 and 12.
Hope this is of some help,
Chris
Hello chrish
Thanks for reply.
By your pics I see that we used pretty less material in the line.
We also noticed that Ariels play uncontroled in some way when playing large orchestral CD. The associated electronics are a 30W homebrew tube amp parallell push-pull and tube pre.
How did yours play with Adcom 555?
JC
Chris
Someone just pointed me to your thread because of you excellent woodwork, beautiful job! Anyway, had a thought regarding the lighter bass you are getting. Try spikes, get some longer steel spikes (parsexpress.com, etc.) and be sure they penetrate your carpet down to the wood. This will make a big difference in the sound your getting. If you've already done this, ignore this post. Just thought I'd throw this out there.
Cheers!
Chris,
Do you still have the templates you constructed? Could I borrow them?
I'll be moving back to Sydney very soon, and will likely sell my Klipschorns and all my other horn stuff, because I'll be sharing a house and won't have the room. I still have a set of Ariel drivers NIB and would like to build some to use as a (large) bedroom system.
One1speed, thank you for your tip, but yes I do already have spikes. I have tested the response with a tone generator that goes down to about 50hz and the speakers dont appear to have any problem going that low. I am in the process of building a four channel gainclone amp with an active crossover at 80hz to feed stereo sub woofers. Unfortunately the sub project will probably take a few months as the project requires four Scan-Speak 25W/8565-1 drivers, and these are around $320 each here in Australia.
Brett, check your private messages...
Thanks for the tips and the interest,
Chris
Brett, check your private messages...
Thanks for the tips and the interest,
Chris
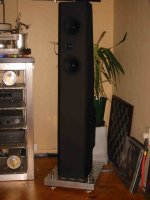
Thanks
Thanks Chris
i thank you for your insite it helped me a lot in building my Ariels
check out the link http://www.diyaudio.com/forums/showthread.php?s=&threadid=62205
Thanks Chris
i thank you for your insite it helped me a lot in building my Ariels
check out the link http://www.diyaudio.com/forums/showthread.php?s=&threadid=62205
Attachments
- Home
- Loudspeakers
- Multi-Way
- Ariel construction