Disabled Account
Joined 2003
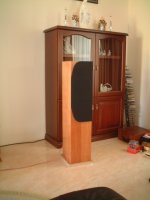
Hello all,
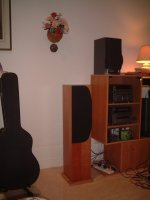
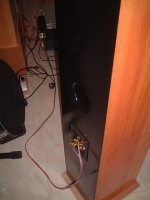
Haven't veneered the plinth yet... but just couldn't wait to show her off.
What I liked most about the original ProAc Response 2.5 were it's modest dimensions, equisite veneers, and D-tapered grills. Of course the sound was surprisingly good for a 2 way, but my own clones would also have to have a furniture fit and finish.
But I'd never built a loudspeaker before. So this turned out to be a 3 month labour of love undertaken over my summer (university) break.
I used page 2 of the 1996 Stereophile review as a reference for my own grill design.
What do think?
PS. More construction pictures can be found at my website. I like to call it the TroelAc 2.95 because it uses Troel's XO design for the D2905/9500 tweeter.
Attachments
c'est très bon, except for the plinth!
You've good the looks nailed, what about the sound?
Cheers,
Bas
Edit after I posted: Mmmm..just finished...ok...then there is not a sensible thing that can be said about the sound? Unless you ran the drive units in before mounting them in the box?
You've good the looks nailed, what about the sound?
Cheers,
Bas
Edit after I posted: Mmmm..just finished...ok...then there is not a sensible thing that can be said about the sound? Unless you ran the drive units in before mounting them in the box?
Disabled Account
Joined 2003
I was shocked that it sounded great without any further modifications. (I was very careful about wall damping and lining and followed the DIY website's directions exactly) I'd agree with Troels description of them-
"Coherence... transparency... but robust midrange...close to getting it all from this modest 2 way...quite amazing"
Certainly the treble is still sweet, but not raspy. Plucked strings are less amazing than the original, but pianos and violins are more realistic.
Woofer were run in (free-air) for about 100 hrs prior to installation. Tweeters however were not.
I'm very lucky to live close to Al. M's place, and will soon be able to compare with his original DIY ProAc. I know how acoustic instruments are supposed to sound, but am not so good at describing it in hi-fi terms. I hope he'll have a few words to wirte about the sound.
Disabled Account
Joined 2003
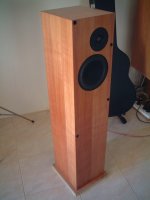
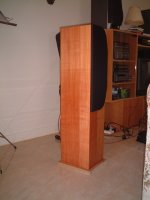
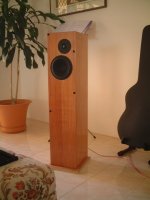
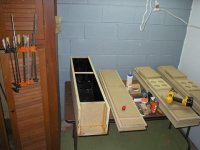
Some more pics
Here's some more pictures.
Neutral, laid back. Sometimes you even miss the excitement and crispiness of the original 2.5.
But I haven't found one piece of music that's intolerable or even "average" sounding. This speaker will never be fatigueing, but has enough detail to keep you interested.
I think it was Darryl Nixon that said that Troel turned the ProAc Response 2.5 from a "Wow, listen to that!" to a more of a
"Sit back and have listen to this..."
Attachments
Disabled Account
Joined 2003
Disabled Account
Joined 2003
Someone please stop me... I'm getting addicted to posting pictures- admins- I hope i'm not breaking any rules...
The problem with veneer splitting is not obvious unless during close inspection. However, because adjacent veneer leaves run in opposite direction, some lighting conditons will clearly reveal this.
I tried sanding it, but next time I will make sure my veneer grains run in the same direction.
2nd last pic... I promise!
Attachments
Disabled Account
Joined 2003
I flared the port, but did not change it's dimensions.
The difference is probably minimal in terms of port tuning and of no significance in reducing turbulence (it was a non-issue in the first instance)
I did it for 2 reasons- a) much more secure way than just running PVC straight through MDF b) it looks much nicer.
Idea by Wayne Jaeschke
That's it! Off to listen to them. If anyone's interested, I can post a final picture once I've finished the plinth. Actually, even if no-one's interested, I'll still post.
Attachments
Disabled Account
Joined 2003
MITMechE,
the veneer is Tasmanian Myrtle, sometimes called Australian Cherry or Myrtle Beech. It starts out pink and I wanted to redden it to become a darkish mahogany colour like this:
http://www.tastimber.tas.gov.au/species/myrtle_01.asp
but it turned out this cherry colour.
I tried staining it but my piece looked stained, if you know what i mean. So I just used Danish oil (Rustin's) and a good quality paste wax (Liberon)
I hate you !!!
Tktran, Very nice.
Well at this rate I think its going to take me 3 mo. to finish mine too. Still waiting for x-over and drivers, should be in by next Wed. I hate looking at your nice pritty completed ones as mine are just sitting naked on the bench. for the lookin......Im ging the 8535/8513 route on this set and have another set of cabs for the 8535/9500 combo.
Ps: finished cab #2 last night, and got all dampining installed, now I just get to sit and look at the this way for another week !!!
Heres mine in all their glory................
Attachments
Dahos,
Don't feel too bad, yours are better than mine. Mine is still a 4X8 MDF board, and plan to cut it tomorrow, and order the parts next week. I plan to use 8535/8513, what version of Xover do you plan to use? Can I know the dimension of your future 2.5? good luck....
Thanks
-james
Don't feel too bad, yours are better than mine. Mine is still a 4X8 MDF board, and plan to cut it tomorrow, and order the parts next week. I plan to use 8535/8513, what version of Xover do you plan to use? Can I know the dimension of your future 2.5? good luck....
Thanks
-james
Disabled Account
Joined 2003
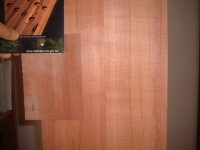
A few people have asked about the veneering and finishing techniques-
I must thank fellow Diyaudio'er Pete Mazz for his idiot-proof veneering guide. It is an excellent method. I haven't tried other techniques, but I have heard horror stories about DIY veneering.
My speakers are not as good as fine furniture, but given this is my first attempt I am very pleased. Use of thicker and wider veneer leaves will most likely alleviate the slight problems of splitting or bubbling. (Friends and family don't notice unless I point them out)
For finishing the timber I use a good danish oil, such as Rustin's, followed by a good quality fine paste wax to bring out the depth and shine. I used Liberon.
Here is the picture of the original veneered baffle, alongside a typical sample of Tasmanian Myrtle. It's good for showing the slight gap that developed during the veneering process.
As you can see, the Danish oil and wax worked well to hide the split.
Attachments
J, Yes the crossover will be mounted in the bottom notch of the cabenit. I used Jacs' mod with Troels' notch filter as a starting point, this is listed on AI.M DIY2.5 geocitys web site. Although the notch filter is an option I figured Id try it. The crossovers and drivers showed up yesterday and I have them running in as we speak and just picked up the internal wire this afternoon (audioquest 4 in1). I hope to have the mock up done tonight or tomarrow.
The crossover for the 8535/9500 combo will be the one listed on the JPO site. Download Troels Clone paper (44 pages) the write up on the 9500 seems very clear cut......
PS: Id like to thank the guys @ Meniscus Audio here in Michigan for getting these things together for me......very nice job............now its tweek time............
PSS: A q for you TK, did you apply the veneer before or after rabbiting the driver holes......
Later
D..
Disabled Account
Joined 2003
Disabled Account
Joined 2003
Grills
[originally from Madisound, reposted here for convenience]
To do this I started off with a 2 solid pieces planks of 12mm MDF (thinner may work too but I wouldn't go less than 9mm) and screw/nail them together at several key points near the midline to hold them together (allows you to work with both at the same time, and ensure identical L/R or mirror matched L/R) Next jigsaw or route out the (external) shape you want, then follow this shape on inside the using a the router straight edge guide. You'll have to go freehand or use a jigsaw as you take to the curves; extra care required to ensure a consistent width of the grills.
As you finish this the 2 pieces of MDF should separate (your screws were on the internal surface). A bit of wastage but makes any-shaped grills identical.
You may want to use roundover bits for the grills; I went over-board and rounded all 4 edges.
Attachments
Disabled Account
Joined 2003
- Status
- This old topic is closed. If you want to reopen this topic, contact a moderator using the "Report Post" button.
- Home
- Loudspeakers
- Multi-Way
- My DIY Proac Response 2.5 pics