OK, when I registered & introduced myself, there was a request to report on my results. So as to not contaminate the genuine Metronome thread I will begin another.
Background:
When I was a teenager I built an amp and a couple pairs of speakers. The incentive to build vs. buy was strictly economic. I could buy a really cheap system or build one myself and have something significantly better. Then came a time when I could buy stuff that was way better than anything I could make myself. Among the gear I bought was a pair of RTR280DR speakers that I still love. However…the house we are in now is just not accommodating to these hefty beasts (which each contain four 10" woofers and six tweeters.) SO, with some regret, I put the RTRs on indefinite loan to my daughter and son-in-law (who have a nice, large home in desperate need of sonic goodness) and picked up a pair of Polk Rti6's and a PSW10 sub. I lived with them for a while, but felt audibly deprived (as compared to the RTRs.)
A two year search for something as sonically pleasing as the RTRs, but of a smaller dimension lead to the conclusion that I would like a pair of Totem Hawks or Forests. I did actually prefer the sound of Magnapan MG 1.6's, but they wouldn't fit in any better than the RTRs. So, I was ready to go for the Totems. BUT…we needed a new roof on the house, then there was a series of dental bills. Sigh… No expensive speakers for a while.
As I continued to browse speaker reviews on the web, I noticed single, full range driver systems getting positive comments (mostly.) And many of those comments mention qualities which I am looking for, like the open, boxless sound that I heard in the maggies. And then I saw a review of the Merril Zigmahornets on Six Moons Audio. Buy the drivers and plans; build them yourself. And I said to myself (like Bob the Builder that my grandsons watch,) "Can I build it? YES I can!"
Thus I revisit my teen years, with the difference that I can now build (with plans and advice) speakers of (hopefully) superior sonic character.
I will describe the process and hope that you experts will comment on how I (and other newbies) can do better on future projects.
Moving Forward:
I emailed for info on the Merril drivers and plans, but got no response. Further searching on the internet turned up some interesting information, including the DIYaudio.com site. Here are plans for suitable enclosures for specific, highly regarded drivers. I read M.J. King's papers on speaker theory, but don't have MathCAD anymore & don't really want to go there. I want plans for a fully defined system; one known to work and work well. I considered various designs and drivers, and decided that the Metronome with the Fostex FE108 driver was the within the range of my (limited) abilities, will fit into our home, offers a reasonable chance of success, and my wife is happy about the project. Her comments about the Metronome include "cute" and "pretty". There is also a measure of relief that I'm not asking to spend $3K.
Next I downloaded the drawings for the Metronome. (A big Thank You to Steve for creating the design and to Dave for making the drawings!) Then I made full size drawings to work out all the details. I'm a slightly obsessive detail person & need to "get everything straight in my head" before I can begin a project.
I ordered the drivers from Madisound and sundry items from Parts Express. Then off to the lumberyard for plywood, glue, stain, etc.
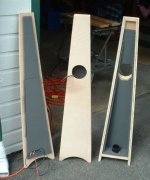
Preparing to Cut Wood:
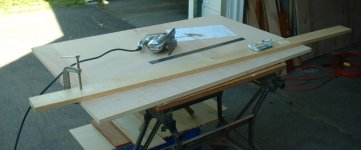
I'm reasonably handy, but woodworking isn't a hobby of mine. I have a table saw, circular saw, jig saw, drills, Dremmel tool, and various hand tools. I took some scrap plywood and began making a 'test piece' before cutting into the nice (pricey) birch ply. I couldn't see how to do the odd angle cuts on the table saw. So I figured I'll use a pair of clamps and a good, straight piece 1"x4" x6' board as a 'fence' and run the circular saw against the fence. Oh, dear…the blade of the circular saw isn't parallel with it's 'foot'.
OK, it's the jig saw. Working very slowly and carefully, I can get a straight cut. But not good enough for me to do mitered corners. It's got to be butt joints. It should look OK if I veneer the exposed edges of the plywood--and I just happen to have some birch veneer left over from our kitchen remodeling. For those who may not be aware of it: flexible veneers with self adhesive backing are now available; sort of like contact paper, only real wood. I haven't seen anything like carbide tipped jig saw blades (and the steel ones get dull quickly,) so besides buying the narrow jig saw blades for cutting the arches, driver holes, and port holes, I picked up lots of 10 TPI blades for the long, straight cuts
I emailed for info on the Merril drivers and plans, but got no response. Further searching on the internet turned up some interesting information, including the DIYaudio.com site. Here are plans for suitable enclosures for specific, highly regarded drivers. I read M.J. King's papers on speaker theory, but don't have MathCAD anymore & don't really want to go there. I want plans for a fully defined system; one known to work and work well. I considered various designs and drivers, and decided that the Metronome with the Fostex FE108 driver was the within the range of my (limited) abilities, will fit into our home, offers a reasonable chance of success, and my wife is happy about the project. Her comments about the Metronome include "cute" and "pretty". There is also a measure of relief that I'm not asking to spend $3K.
Next I downloaded the drawings for the Metronome. (A big Thank You to Steve for creating the design and to Dave for making the drawings!) Then I made full size drawings to work out all the details. I'm a slightly obsessive detail person & need to "get everything straight in my head" before I can begin a project.
I ordered the drivers from Madisound and sundry items from Parts Express. Then off to the lumberyard for plywood, glue, stain, etc.
Preparing to Cut Wood:
I'm reasonably handy, but woodworking isn't a hobby of mine. I have a table saw, circular saw, jig saw, drills, Dremmel tool, and various hand tools. I took some scrap plywood and began making a 'test piece' before cutting into the nice (pricey) birch ply. I couldn't see how to do the odd angle cuts on the table saw. So I figured I'll use a pair of clamps and a good, straight piece 1"x4" x6' board as a 'fence' and run the circular saw against the fence. Oh, dear…the blade of the circular saw isn't parallel with it's 'foot'.
OK, it's the jig saw. Working very slowly and carefully, I can get a straight cut. But not good enough for me to do mitered corners. It's got to be butt joints. It should look OK if I veneer the exposed edges of the plywood--and I just happen to have some birch veneer left over from our kitchen remodeling. For those who may not be aware of it: flexible veneers with self adhesive backing are now available; sort of like contact paper, only real wood. I haven't seen anything like carbide tipped jig saw blades (and the steel ones get dull quickly,) so besides buying the narrow jig saw blades for cutting the arches, driver holes, and port holes, I picked up lots of 10 TPI blades for the long, straight cuts
On Cutting Wood:
I began by drawing cut lines on the plywood. Then I put foam plugs in my ears; I take great pains to preserve my hearing when working with tools or in noisy environments! The jig saw goes very slowly, so I cut a piece, then rest. The cutting process took about four days. (Did I mention that I work exceeding slowly?)
Since I used butt joints, I covered the edges of the front and back pieces with birch veneer so the 'ply' wouldn't show.
The top and bottom pieces I cut on the table saw. I set the blade angle to 86.5 degrees to get the taper on the edges for a good fit. On these little pieces, I cut, then checked for fit. When they weren't close enough to suit me, I cut them again or made small adjustments. (Another day's work.) Then I cut the arches on the bottoms of each side, holes for the drivers, and holes for the port tubes. The interior of the driver hole got a 30 degree bevel to allow the driver to "breathe".
Attachments
Maybe it is too late, but some advice on the angled cuts. I'm not a woodworker either but I've been obsessing over how to build these things right and I've come to a few conclusions.
First, since you have a table saw, it is your best bet to get straight cuts. Build a jig with the angle set into it. If you are not going to use a table saw, build a jig with a guide edge built into it, with a cleat at the bottom. Then make one cut, and flip the wood to make the other cut. This way you get the exact same angle on both sides.
To get perfectly straight and square edges, use a router with a pattern or trim bit and a straight edge after you make the saw cut.
And here is the thing about the Metronome. The butt joints are not at 90 degree angles. If you cut everything perfectly square, they wouldn't join up flush. The difference is slight, but if you are NOT getting square edges, take advantage of them so that the angle is oriented the correct way. You would need laser cuts to get everything perfect. I have a spreadsheet with all the angles calculated out to 2 or 4 places.
Good to see another Metronome gestating ")
That jigsaw reminds me of one i got from my dad that i have in my antique electric tools collection ... is that the same one you used to build with in your teens... i have a couple oldies but goodies (unfortunately i just had to bury one of my favorite drills of all time
dave
That jigsaw reminds me of one i got from my dad that i have in my antique electric tools collection ... is that the same one you used to build with in your teens... i have a couple oldies but goodies (unfortunately i just had to bury one of my favorite drills of all time
dave
Hi Jim,
Great to see another Metronnome under construction.
You guys make my efforts look pretty lame.
I'm still using the prototypes I built nearly two years ago and really ought to build some "proper" ones
I used nothing but a handsaw, a plane and much cursing to build mine.
Dave: Maybe you ought to get Norm Abram to build a pair on his New Yankee Workshop and give us all a few pointers
Steve.
Dave,
Believe it or not, that is the same old Sears jig saw I used many years (decades) ago. One of the tools I picked up when we cleaned out my parents house when they were both gone. My defective Black & Decker circular saw is one I bought years later. Maybe I should have bargined w/ my brother for our Dad's old circular saw!
Cheers. Jim
Assembling:
I started by applying finish to the interior surfaces. I have read that speakers perform better if ALL surfaces are finished. I have no hard data one way or the other, but what the heck? Why not? I sealed the interior, but didn't stain it, figuring wood color shouldn't significantly affect timbre (sound color.)
I don't have those nice, big wood working clamps, so I had to tack the face to the sides with wire nails (like little finish nails) to hold while the glue set.
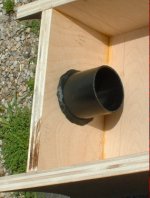
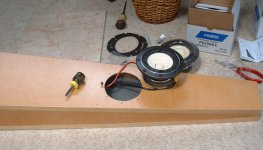
Next, I cut the port tubes (from Parts Express) to length and put them into the bottom plate. They fit quite tightly, but just to be sure they sealed well, I put a soft, rubbery, tacky material (Parts Express speaker gasket) around them on the inside. (See photo.) Then I glued the top and bottom pieces in place.
I installed the binding posts (Parts Express p/n 091-1245) on the back of the speakers. I originally wanted to put them underneath by the port, but there wasn't sufficient clearance to use banana plugs there. I took the advice of another person on this forum and used crimp on quick connects rather than soldering wires to the speaker terminals and binding posts. And while it seemed a bit of overkill to me, I did use 12 gauge wire from the binding posts to the speakers. (Don't want those electrons to feel constrained!)
I lined the interior with Parts Express Sonic Barrier 0.5 inch thick Acoustic Foam (p/n 260-520) which has an adhesive backing. No fiber stuffing.
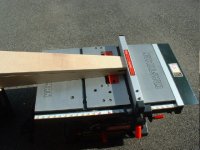
I glued and nailed the backs on. I had not 'trimmed' the top of the front, back and sides to length yet. I waited until they were glued up, then laid the enclosure face down on the table saw. I carefully adjusted the cut line, and with the blade at an 86.5 degree angle, powered up the saw and SLOWLY raised the blade to get a nice, smooth backward sloping top cut. (See photo.) I suspect this is in violation of safety procedures for table saw use, but it seemed like a good way to get the top cut just right. I applied birch veneer to the top, just as I had with the edges of the front and back pieces.
I applied a light oak stain and polyurethane finish to the exterior and puttied the nail holes. Note that I painted the undersides black.
I started by applying finish to the interior surfaces. I have read that speakers perform better if ALL surfaces are finished. I have no hard data one way or the other, but what the heck? Why not? I sealed the interior, but didn't stain it, figuring wood color shouldn't significantly affect timbre (sound color.)
I don't have those nice, big wood working clamps, so I had to tack the face to the sides with wire nails (like little finish nails) to hold while the glue set.
Next, I cut the port tubes (from Parts Express) to length and put them into the bottom plate. They fit quite tightly, but just to be sure they sealed well, I put a soft, rubbery, tacky material (Parts Express speaker gasket) around them on the inside. (See photo.) Then I glued the top and bottom pieces in place.
I installed the binding posts (Parts Express p/n 091-1245) on the back of the speakers. I originally wanted to put them underneath by the port, but there wasn't sufficient clearance to use banana plugs there. I took the advice of another person on this forum and used crimp on quick connects rather than soldering wires to the speaker terminals and binding posts. And while it seemed a bit of overkill to me, I did use 12 gauge wire from the binding posts to the speakers. (Don't want those electrons to feel constrained!)
I lined the interior with Parts Express Sonic Barrier 0.5 inch thick Acoustic Foam (p/n 260-520) which has an adhesive backing. No fiber stuffing.
I glued and nailed the backs on. I had not 'trimmed' the top of the front, back and sides to length yet. I waited until they were glued up, then laid the enclosure face down on the table saw. I carefully adjusted the cut line, and with the blade at an 86.5 degree angle, powered up the saw and SLOWLY raised the blade to get a nice, smooth backward sloping top cut. (See photo.) I suspect this is in violation of safety procedures for table saw use, but it seemed like a good way to get the top cut just right. I applied birch veneer to the top, just as I had with the edges of the front and back pieces.
I applied a light oak stain and polyurethane finish to the exterior and puttied the nail holes. Note that I painted the undersides black.
Attachments
Steve Cresswell said:Dave: Maybe you ought to get Norm Abram to build a pair on his New Yankee Workshop and give us all a few pointers
Who is Norm Abram?
dave
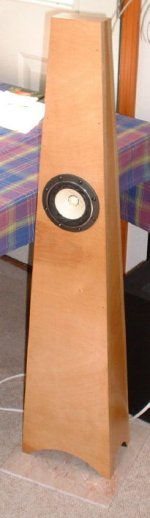
Installing the Drivers:
I placed the drivers in their mounting holes and marked the spots for each of the screws. Note that it's a rather tight fit to get the drivers in! I then removed the drivers, drilled pilot holes for the screws, and ran the screws in and out so that they would go in smoothly & easily (minimizing the risk of damaging the driver cone or surround during installation.) Then I placed the gasket on the driver, attached the wires, and carefully slid the driver into place. Put the screws in, and I was done!
Cheers, Jim
Attachments
Closing Thoughts:
Total time for construction: about 2.5 weeks. (Pitifully slow as compared the experts on this forum who can knockout a pair of speakers in a weekend.)
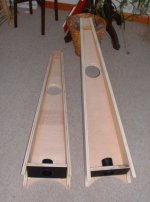
My Metronomes look OK, but if I make another pair, I will just veneer everything. That way the butt joints won't show at all. My wife thinks their cute & just fine, but to me they look more home-made than I would like.
I placed them on rose colored marble tiles to provide a hard surface under the port tube (for bass response.) Since they are so easy to tip over, I will use either poster adhesive (Blue-Tak, Fun-Tak, whatever you want to call it) or 3M removable adhesive strips (used to mount wall hooks) to hold the speakers a bit more firmly to the marble bases. I am also keeping the clear plastic covers that came on the Fostex drivers so that I can cover those dangerously exposed drivers when folks come to visit us (particularly our young grandchildren.)
Cheers, Jim
Total time for construction: about 2.5 weeks. (Pitifully slow as compared the experts on this forum who can knockout a pair of speakers in a weekend.)
My Metronomes look OK, but if I make another pair, I will just veneer everything. That way the butt joints won't show at all. My wife thinks their cute & just fine, but to me they look more home-made than I would like.
I placed them on rose colored marble tiles to provide a hard surface under the port tube (for bass response.) Since they are so easy to tip over, I will use either poster adhesive (Blue-Tak, Fun-Tak, whatever you want to call it) or 3M removable adhesive strips (used to mount wall hooks) to hold the speakers a bit more firmly to the marble bases. I am also keeping the clear plastic covers that came on the Fostex drivers so that I can cover those dangerously exposed drivers when folks come to visit us (particularly our young grandchildren.)
Cheers, Jim
Attachments
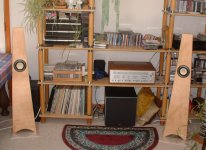
First Sound:
Hooked them up to my venerable Yamaha CR-1000 receiver. How did they sound? Well….awful! They are (charitably speaking) tinny and harsh. I fervently hope that all the reports I have read are true: that the drivers will start to open-up at 200 hrs and come into their own at 400 hrs.
I am, however, stunned by their bass! It doesn't go real deep, but the double bass on Nickel Creek's Ode to a Butterfly sounds pretty good. Much better than I had expected. I tried the new Telarc release of Britten's A Young Person's Guide--the bass drum sounds over-blown on my other systems, but w/ the Metronomes it's a bit shy of what I would like to hear. When I put on Temple Caves from Mickey Hart's Planet Drum, the deep bass wasn't there, but the bass disappears gracefully as the frequency goes down--no misbehavior there. If they perform as well as I hope, then I will build a subwoofer to go with them. (The Polk sub in the photo above goes w/ the Rti6 set-up.)
I am not sure about the baffle step correction issue. If the highs need to be "tamed" I might use the CR-1000's flexible tone controls, or perhaps the 6 db per octave high frequency filter set at either 6 KHz or 12 KHz.
Attachments
planet10 said:
Who is Norm Abram?
dave
He's the guy from
"This Old House" on WGBH Boston. He presents the show with another guy who I forget the name of.
He has a workshop in New England I think from where he does a show called "New Yankee Workshop" He is a master craftsman making furniture etc . The guy is a woodworking genius.
We get the show over here on Discovery RealTime.
Steve.
Hi Jim,
Those look great!
Regarding the sound.
When I first built mine, the sound from those little Fostex drivers was quite frankly
hideous. Screechy, sharp and with some weird kind of buzz saw distortion
behind male vocals. In a word, horrible!
Two days later they were different speakers; very good indeed.
The biggest change for the better happens during the first couple of days
After that they start to mellow out over the next two weeks to become
stunning little drivers.
It is a sound well worth waiting for. I promise you.
Once the drivers have broken in it is also well worth considering
the fitting of a pair of Dave's wooden phase plugs.
Once you steady your nerves, they are easy to fit
and add the final touch to a pair of great sounding drivers.
Steve.
Zacster,
I'm above Schenectady, probably 3 hrs. from the outskirts NYC.
Steve,
If only I had a spare $1,000,000 laying around to build a workshop like Norm Abrams! Then I could make really nice looking speakers!
As is, I'll have to settle for merely OK looking but solid functionally.
I should have mentioned before: I knew going in that I wouldn't be able to make anything cosmetically as nice as I would like. But I used what I hope are quality materials and parts, so that if the project doesn't live up to my hopes (sonically,) it won't be becuase I tried to do it on the cheap.
Cheers, Jim
If the Fostex drivers were fresh from the box, I think you can count on minimum of several hundred hours before they fully settle in.
Even so, tinny and hard midrange has certainly not been my experience with FE108EZ. Soft extension on the top end maybe, but the smooth midrange is certainly one of my favorite qualities of the Sigmas.
IIRC the Yamaha CR1000 may have had a lower power Class A operation switch - several of the integrated amps of that vintage did, including the CA1000 that was the putative sibling to the CR. (I owned both "back in the day" ) Try that, and bypass all tone and filter functions first. In fact, (I can't remember for sure - it was 30 yrs ago) but if the receiver has a power amp input, and you have a CD player with variable output control, you might want to play with that as well.
If not, try to borrow a low powered tube amp? These drivers absolutely love DHT's such as 2A3, or even SE pentodes such as EL84, and are more revealing than some FR drivers that hide the flaws of upstream components, whether SS or tubed.
- Status
- This old topic is closed. If you want to reopen this topic, contact a moderator using the "Report Post" button.
- Home
- Loudspeakers
- Full Range
- My Metronome Experience