I've noticed that my Maida regulators drift with temperature -- LB47 has a compensated circuit using the LM329 -- here's how to implement -- first the schematic:
Here's a single layer version free for the pickin'
An externally hosted image should be here but it was not working when we last tested it.
Here's a single layer version free for the pickin'
An externally hosted image should be here but it was not working when we last tested it.
An externally hosted image should be here but it was not working when we last tested it.
wirewiggler said:Jack,
Can you send me the file on this, I will try to make one by hand.
Thanks
Bill
PM me your email address. I changed the voltage setting resistor to consist of 2 units -- it's less expensive to use a pair of 3W devices and spread the heat.
okapi said:Hi Jack,
can i ask what you need the high voltage for?
thanks.
Tube preamp.
okapi said:this is the data sheet for the Maida regulator from national (1980).
The Value of C1 should be 1uF, not 100F -- this is a recurrent problem with Multisim -- but when I translated Multisim to Ultiboard I changed the value to 100nF -- should be 1uF -- thank for pointing out the error. A 1uF pp also has a bigger footprint.
The pass transistors which Maida used are now unobtanium. The TIP50's are rated 500V and are more than sufficient for the task.
jackinnj said:
The Value of C1 should be 1uF, not 100F -- this is a recurrent problem with Multisim -- but when I translated Multisim to Ultiboard I changed the value to 100nF -- should be 1uF -- thank for pointing out the error. A 1uF pp also has a bigger footprint.
The pass transistors which Maida used are now unobtanium. The TIP50's are rated 500V and are more than sufficient for the task.
unfortunately, i can't take any credit for finding an error. I was just posting the application note so that beginners like myself, who can't figure out a circuit without an explanation, could make also make use of your helpful post.
i believe you have also built the jung super reg, how does the noise level of the Maida with the lm329 compare?
okapi said:
unfortunately, i can't take any credit for finding an error. I was just posting the application note so that beginners like myself, who can't figure out a circuit without an explanation, could make also make use of your helpful post.
i believe you have also built the jung super reg, how does the noise level of the Maida with the lm329 compare?
Janneman, I believe, did the definitive work on the Jung super-reg. I use a smt version of the Jung/Didden in my rework of the Crown IC-150 with wonderful results.
Somewhere in the universe of diyaudio is a comparison of the Last-PAS regulator and my LR8N3 (supertex) regulator. I used a storage-scope, bandwidth limited, to integrate noise over time. I haven't put the temp compensated Maida through these paces.
The LastPAS can be a little wonky with respect to temperature and I found that the current range of HV zeners are more prone to failure than their Pb cousins.
The LastPas is a really quiet, really low impedance supply.
thanks for your replies. Because of this thread i have discovered 3 additional voltage regulators. I was foolish to think i had almost maxed what there was to know about "standard" linear power supplies for audio.
on a side note, i hope the new version of diyaudio moves the power supply forum to its proper place - the home page.
on a side note, i hope the new version of diyaudio moves the power supply forum to its proper place - the home page.
jackinnj said:
The Value of C1 should be 1uF, not 100F -- this is a recurrent problem with Multisim -- but when I translated Multisim to Ultiboard I changed the value to 100nF -- should be 1uF -- thank for pointing out the error. A 1uF pp also has a bigger footprint.
Jack, have you run these boards yet?
I cannot seem to find any 1uF PP that will fit. For example, Wima MKP4 has a 1uF/630V that has a LS of 27.5mm. Even if you switch to polyester, MKS 4 in the same voltage rating, 27.5mm is the best you can do.
Also, on the 5W R6, can you slightly enlarge that footprint, to either fit a 24mm body resistor (for example, Kiwame 5W) or preferably the 12W Mills MRA12 non-inductive, which body measures 1.188" +/- 0.062" in length by 0.312" +/- 0.031" in diameter. The leads measure 1.500" in length minimum by 0.040" in diameter.
I think you'll have to make the board a bit larger to accommodate these larger devices.
luvdunhill said:Also, on the 5W R6
oops, I see you've changed this to be two resistors.
")
The Panasonic 1uF/630VDC caps are 10.5mm wide, the Wima's from the data sheet appear to be 13.0
An externally hosted image should be here but it was not working when we last tested it.
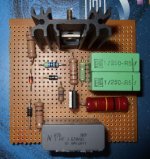
wirewiggler said:Darn 2 sided, this was going to be my first attempt at photo etching a board.
May just have to make with proto board.
Just burn the top-side and hard-wire the bottom.
I purposefully put the radial component connections on the bottom copper so that they could be hard-wired. With the new CNC PCB Mill I will have to figure out how to plate through-holes, but in the absence of such knowledge radial components will be connected this way.
jackinnj said:
With the new CNC PCB Mill I will have to figure out how to plate through-holes, but in the absence of such knowledge radial components will be connected this way.
would you mind posting some pics of your mill?
what software are you running?
- Status
- This old topic is closed. If you want to reopen this topic, contact a moderator using the "Report Post" button.
- Home
- Amplifiers
- Power Supplies
- Temperature compensated MAIDA