Hello there Diyaudio,
My name is Silas, and I am a long time lurker around these parts. After much reading, contemplating, budgeting and more reading I started stocking up on parts for a F6 build this December. I managed to finish the build this weekend and am currently listening to the sweet goodness while typing this. Let me tell you, if you were in doubt about building one, don’t be. It’s an amazing amplifier, and between the listening experience and the success of doing a DIY project on such a scale, it is well worth the effort for any budding DIY’er!
Which brings me to why I decided to make a post about this particular build. First of all, I would like to thank the diyaudio forums and community for providing such a unique and extensive resource for new (and I assume also experienced) builders. I think it illustrates my point quite well that, while researching and building this amp, I gradually wound up always starting google searches with “diyaudio” whenever I needed answers to a question or detail I was unclear on (and there were many).
Now, despite not having been in any contact with users of this forum, I still feel I should thank specifically 6L6 for his detailed and well documented build guides. They were both a guide but also served initially to convince me that this was a project that would be realistic to undertake, despite very limited experienced building anything (not counting the F6, I have built only a pmillet “butte” and a lehmann linear). I also feel Andrew and Zen Mod deserve thanks, after all, the majority of answers I found for my questions on these boards either came them directly, or could be traced to something they had answered!
As for the second reason for my writing here, I felt that a way I might pay some back to the community for all the help I received (through other peoples questions, granted) could be to specify some key points about this kind of build that took me a while (as a newbie) to figure out.
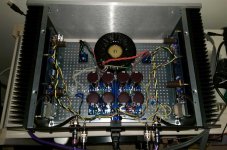
Ok, now for the build – here’s a picture, sorry it’s not great, but I hope most of the important bits are visible for those interested. If you are familiar with 6L6’s guide, you will probably notice that I based my layout as close as I could to his. I did not have an L bracket for the transformer, but luckily it just fit next to the PSU board!
Points of note for newbies like myself:
- All AC wiring involving 230V should be fixed mechanically. I used blue shielded crimps for fast connectors. These did not fit the pins on the fuse that connect to the switch on the IEC socket, so I hooked the wire on the holes, soldered and covered with heatshrink (I cannot remember where, but I read that soldering is OK if you can hook the wire securely).
- When connecting AC 230V to the primaries of the transformer, connect put two CL-60s in series with on the live wire to limit inrush current.
- The transformer I used (Toroidy 400VA) had an earth (0) wire – as I understood it, this is from the shielding between the primary and secondary windings. I connected this to the star ground (right side, red crimp connector). Please correct me if this is wrong!
- If you buy toroidy transformers, note that they don’t supply the M6 screw to fasten it. A 50mm one will fit nicely.
- The large pads are a pain to solder (especially on the PSU board), I set my iron to 330 deg, heated the pad and deposited a ring of solder before putting in and soldering the component.
- If the LED on one of the F6 boards doesn’t light up when you power it, check that you have the LED orientation correct by touching the pins of a spare LED (always buy extra!) to the pins of the one connected to the board in the opposite orientation.
- The back panel parts kit does not contain enough standoffs for the channel boards AND the psu board, so I used M3 screws with 3 bolts. This brings the board to a height that’s slightly higher than the standoffs.
- If you’re new to crimping, buy lots of the crimp connectors – I bought 30 of the fast connectors and used all of them learning to get a good crimp J
- On first boot with the channel boards connected, the voltage across the 0.47ohm resistor can take a while to build up, so be patient if you see 0V and everything else checks out.
- When you bias, short the inputs. I didn’t have any load on the outputs, but as I understand it that is a possibility (e.g. a dummy load).
Now, I also have a question for other builders regarding the bias. After ensuring everything worked and letting the amp heat up for around 30 mins I dialed a bias of 0.52 and with zero (or as close to as possible) offset. I then let it stand for a while with nothing connected to the output and watched the bias. It remained reasonable stable, climbing a bit after about and hour (10-20 mV). I dialed it back down and tried with speakers. Even with cheapo test speakers it sounded lovely already. The next day I let it play all day while keeping an eye on the bias and offsets. I noticed towards the end of the day that it had reached a bias of around 0.57 V, with around 20 mV in offset, so I dialed it back down to around 0.52-0.53 and zeroed offsets again. I will keep watching it the next few days, but I am unsure what I should expect in terms of bias stability – how long should I expect the electronics to take before they become bias stable? Or is this already a sign of problems? So far I haven’t measured above 46 degrees on the heatsink, so I guess im still in the safe zone, but I prefer to play it safe and avoid smoke.
In conclusion, this amp is wonderful to listen to, and reasonable simple to build and set up, so if you are unsure whether to try it I would say go for it. Just take it slow, and read a lot before starting J A big thanks to the diyaudio community and of course Nelson Pass for making this possible at all!!
S
My name is Silas, and I am a long time lurker around these parts. After much reading, contemplating, budgeting and more reading I started stocking up on parts for a F6 build this December. I managed to finish the build this weekend and am currently listening to the sweet goodness while typing this. Let me tell you, if you were in doubt about building one, don’t be. It’s an amazing amplifier, and between the listening experience and the success of doing a DIY project on such a scale, it is well worth the effort for any budding DIY’er!
Which brings me to why I decided to make a post about this particular build. First of all, I would like to thank the diyaudio forums and community for providing such a unique and extensive resource for new (and I assume also experienced) builders. I think it illustrates my point quite well that, while researching and building this amp, I gradually wound up always starting google searches with “diyaudio” whenever I needed answers to a question or detail I was unclear on (and there were many).
Now, despite not having been in any contact with users of this forum, I still feel I should thank specifically 6L6 for his detailed and well documented build guides. They were both a guide but also served initially to convince me that this was a project that would be realistic to undertake, despite very limited experienced building anything (not counting the F6, I have built only a pmillet “butte” and a lehmann linear). I also feel Andrew and Zen Mod deserve thanks, after all, the majority of answers I found for my questions on these boards either came them directly, or could be traced to something they had answered!
As for the second reason for my writing here, I felt that a way I might pay some back to the community for all the help I received (through other peoples questions, granted) could be to specify some key points about this kind of build that took me a while (as a newbie) to figure out.
Ok, now for the build – here’s a picture, sorry it’s not great, but I hope most of the important bits are visible for those interested. If you are familiar with 6L6’s guide, you will probably notice that I based my layout as close as I could to his. I did not have an L bracket for the transformer, but luckily it just fit next to the PSU board!
An externally hosted image should be here but it was not working when we last tested it.
Points of note for newbies like myself:
- All AC wiring involving 230V should be fixed mechanically. I used blue shielded crimps for fast connectors. These did not fit the pins on the fuse that connect to the switch on the IEC socket, so I hooked the wire on the holes, soldered and covered with heatshrink (I cannot remember where, but I read that soldering is OK if you can hook the wire securely).
- When connecting AC 230V to the primaries of the transformer, connect put two CL-60s in series with on the live wire to limit inrush current.
- The transformer I used (Toroidy 400VA) had an earth (0) wire – as I understood it, this is from the shielding between the primary and secondary windings. I connected this to the star ground (right side, red crimp connector). Please correct me if this is wrong!
- If you buy toroidy transformers, note that they don’t supply the M6 screw to fasten it. A 50mm one will fit nicely.
- The large pads are a pain to solder (especially on the PSU board), I set my iron to 330 deg, heated the pad and deposited a ring of solder before putting in and soldering the component.
- If the LED on one of the F6 boards doesn’t light up when you power it, check that you have the LED orientation correct by touching the pins of a spare LED (always buy extra!) to the pins of the one connected to the board in the opposite orientation.
- The back panel parts kit does not contain enough standoffs for the channel boards AND the psu board, so I used M3 screws with 3 bolts. This brings the board to a height that’s slightly higher than the standoffs.
- If you’re new to crimping, buy lots of the crimp connectors – I bought 30 of the fast connectors and used all of them learning to get a good crimp J
- On first boot with the channel boards connected, the voltage across the 0.47ohm resistor can take a while to build up, so be patient if you see 0V and everything else checks out.
- When you bias, short the inputs. I didn’t have any load on the outputs, but as I understand it that is a possibility (e.g. a dummy load).
Now, I also have a question for other builders regarding the bias. After ensuring everything worked and letting the amp heat up for around 30 mins I dialed a bias of 0.52 and with zero (or as close to as possible) offset. I then let it stand for a while with nothing connected to the output and watched the bias. It remained reasonable stable, climbing a bit after about and hour (10-20 mV). I dialed it back down and tried with speakers. Even with cheapo test speakers it sounded lovely already. The next day I let it play all day while keeping an eye on the bias and offsets. I noticed towards the end of the day that it had reached a bias of around 0.57 V, with around 20 mV in offset, so I dialed it back down to around 0.52-0.53 and zeroed offsets again. I will keep watching it the next few days, but I am unsure what I should expect in terms of bias stability – how long should I expect the electronics to take before they become bias stable? Or is this already a sign of problems? So far I haven’t measured above 46 degrees on the heatsink, so I guess im still in the safe zone, but I prefer to play it safe and avoid smoke.
In conclusion, this amp is wonderful to listen to, and reasonable simple to build and set up, so if you are unsure whether to try it I would say go for it. Just take it slow, and read a lot before starting J A big thanks to the diyaudio community and of course Nelson Pass for making this possible at all!!
S
final Iq and DC offset setting will be stable for good , if you made them in temp equilibrium conditions , with top lid on .
as you already know , that's iterative process , but easy and trouble free , especially if complemented with some background music and cup of fave coffee/tee
for my liking , that is wrong type of connection of mains NTC (NTC legs easily damaged with screw rotation), and laid like that , their body dangerously close to metal bottom plate ; I prefer them placed vertically and soldered to hefty enough pcb traces
another solution , involving screws , can be only terminal block with screws and washers
Attachments
Last edited:
")
Zen Mod - points noted, i now switched around the orientation of the CL-60 closest to the mosfet so its on the opposite side of the block, bent both upwards and away from the PCB and baseplate, and gave both NTCs and capacitor an extra layer of shrink wrap. By good fortune, the terminal block i bought from mouser has washers between the screw and pins/wires. I have triple checked now that no exposed metal is outside the housing.
Anand - thanks! i am sure i will feel the itch quite soon! I am contemplating a speaker build next...
ColinA - another tribute to Zen Mod, i used 6.8V zeners with 3.3k diodes.
VictoriaGuy - I wanted to comment on your thread asking for suggestions for builds when i saw it yesterday, but it was very late so i needed to get to bed. Having built no other amplifier (only a few headphone ones) i can recommend the F6 for reasons of simplicity and the quality of guides (6L6).
Thanks, Silas.VictoriaGuy - I wanted to comment on your thread asking for suggestions for builds when i saw it yesterday, but it was very late so i needed to get to bed. Having built no other amplifier (only a few headphone ones) i can recommend the F6 for reasons of simplicity and the quality of guides (6L6).
I'm thinking about doing an F6 on perf board; just have to make a few decisions about power supply, etc. before I start.
- Status
- This old topic is closed. If you want to reopen this topic, contact a moderator using the "Report Post" button.
- Home
- Amplifiers
- Pass Labs
- F6 build from a newbie, with some (hopefully) helpful pointers for fellow newbies