That sounds good then, hopefully I will be able to test it quite soon.
A small update. The baffle is glued in place and so is the lower baffle section (the top being the real hardwood, yet to be ordered). Both parts trimmed flush and sanded with the electric sander, which needs a new velcro sanding sheet. The lower front section also has the roundover applied, which is 12.7mm radius.
Next is to ensure any little pits on that plywwod are filled (it was a poor choice to use such material on the outside in retrospect) as well as any other joins, some are already done. Then I will be applying the MDF sealer and once that is dry, sanding over with a fine grit paper (a process to be repeated a few times most likely). Should leave a smooth and flat 'satin' type finish ready for the black vinyl to be applied to.
A small update. The baffle is glued in place and so is the lower baffle section (the top being the real hardwood, yet to be ordered). Both parts trimmed flush and sanded with the electric sander, which needs a new velcro sanding sheet. The lower front section also has the roundover applied, which is 12.7mm radius.
An externally hosted image should be here but it was not working when we last tested it.
An externally hosted image should be here but it was not working when we last tested it.
Next is to ensure any little pits on that plywwod are filled (it was a poor choice to use such material on the outside in retrospect) as well as any other joins, some are already done. Then I will be applying the MDF sealer and once that is dry, sanding over with a fine grit paper (a process to be repeated a few times most likely). Should leave a smooth and flat 'satin' type finish ready for the black vinyl to be applied to.
Ok, time for an update ")
The black vinyl finish has been applied all over. It isn't as nice as a quality spray finish, but on the other hand it cost less than £10 for the whole box worth of covering and it took me just a few hours to apply!
Applied a few mm at a time slowly wrapping round the box, trimmed with a sharp exacto knife and steel rule followed by fine hand trimming (taking off hair like strips at this point). The vinyl is trimmed flush, what you see around the open space where the wooden inset will fit is black permanent ink drawn on, to ensure no light area shows through.
The joins on the top of the box show through, I don't know why as I couldn't feel them, but luckily the top section will sit on here. Joins on the edges do not show fortunately.
I only need the wooden inset panel and then it's just a case of mounting the feet and driver to complete one cabinet! The other cabinet requires the baffle and all finishing though.
The black vinyl finish has been applied all over. It isn't as nice as a quality spray finish, but on the other hand it cost less than £10 for the whole box worth of covering and it took me just a few hours to apply!
Applied a few mm at a time slowly wrapping round the box, trimmed with a sharp exacto knife and steel rule followed by fine hand trimming (taking off hair like strips at this point). The vinyl is trimmed flush, what you see around the open space where the wooden inset will fit is black permanent ink drawn on, to ensure no light area shows through.
The joins on the top of the box show through, I don't know why as I couldn't feel them, but luckily the top section will sit on here. Joins on the edges do not show fortunately.
An externally hosted image should be here but it was not working when we last tested it.
An externally hosted image should be here but it was not working when we last tested it.
I only need the wooden inset panel and then it's just a case of mounting the feet and driver to complete one cabinet! The other cabinet requires the baffle and all finishing though.
In about a week I intend to have the second cab to this stage. I've fitted the baffle and lower baffle, flush trimmed and applied the roundover; just the long process of sanding and sealing to do
However, I'm totally stumped on the real wood insert (no pun intended). I can't get a definite answer about how much of a problem the wood expansion could be, it can range from absolutely nothing visible, to cracking down the middle it seems.
http://www.lungster.com/l/speakers/woodfaq/woodfaq.shtml
As such, I have still not ordered the real wood. It appears 'butchers block' board would be more stable but I can't find it readily available here and it's not my aesthetic preference really. I had planned to use solid 19mm Maple board stained to a deeper colour but it's expensive to chance on.
Most annoying as the cabinets will be functionally ready soon and I won't be able to complete them and get them set up until this is resolved
However, I'm totally stumped on the real wood insert (no pun intended
). I can't get a definite answer about how much of a problem the wood expansion could be, it can range from absolutely nothing visible, to cracking down the middle it seems. http://www.lungster.com/l/speakers/woodfaq/woodfaq.shtml
As such, I have still not ordered the real wood. It appears 'butchers block' board would be more stable but I can't find it readily available here and it's not my aesthetic preference really. I had planned to use solid 19mm Maple board stained to a deeper colour but it's expensive to chance on.
Most annoying as the cabinets will be functionally ready soon and I won't be able to complete them and get them set up until this is resolved
Overdue an update!
Ok, so I've got the other cabinet finished with the vinyl covering as I intended. It's the better of the two overall, the one where I've had the experience of building the first to help me.
I had to get on and the real wood issue wasn't getting resolved. What I've done is made the baffles from LBL (laminated bamboo lumber), a material reccomended especially for baffles. Not for it's cosmetic appearance, but because I had always planned to use real wooden fronts and MDF wouldn't really be strong enough (nor will it hold a screw well enough) to be used as an alternative.
I'm impressed with this material, much more solid than MDF, tools neatly, glues well, holds a screw like hardwood but supposedly there is no shifting like in hardwood. If it were cheaper and more readily available I think it'd overtake the likes of MDF in construction, though a composite of both probably has the best performance (as I'm using here!). The only source in the UK was these cutting boards:
http://www.amazon.co.uk/gp/product/...&pf_rd_t=101&pf_rd_p=467198433&pf_rd_i=468294
Just big enough!
I will be covering the baffles with a faux black leather. It'll contrast with the gloss vinyl, but not in such a bold way. Here's a rough mock-up (how many times has this changed!?):
Now onto the photos!
Hopefully have these finished quite soon, watch this space
Ok, so I've got the other cabinet finished with the vinyl covering as I intended. It's the better of the two overall, the one where I've had the experience of building the first to help me.
I had to get on and the real wood issue wasn't getting resolved. What I've done is made the baffles from LBL (laminated bamboo lumber), a material reccomended especially for baffles. Not for it's cosmetic appearance, but because I had always planned to use real wooden fronts and MDF wouldn't really be strong enough (nor will it hold a screw well enough) to be used as an alternative.
I'm impressed with this material, much more solid than MDF, tools neatly, glues well, holds a screw like hardwood but supposedly there is no shifting like in hardwood. If it were cheaper and more readily available I think it'd overtake the likes of MDF in construction, though a composite of both probably has the best performance (as I'm using here!). The only source in the UK was these cutting boards:
http://www.amazon.co.uk/gp/product/...&pf_rd_t=101&pf_rd_p=467198433&pf_rd_i=468294
Just big enough!
I will be covering the baffles with a faux black leather. It'll contrast with the gloss vinyl, but not in such a bold way. Here's a rough mock-up (how many times has this changed!?):
An externally hosted image should be here but it was not working when we last tested it.
Now onto the photos!
An externally hosted image should be here but it was not working when we last tested it.
An externally hosted image should be here but it was not working when we last tested it.
Hopefully have these finished quite soon, watch this space
They are comming on very wellOverdue an update!
Ok, so I've got the other cabinet finished with the vinyl covering as I intended. It's the better of the two overall, the one where I've had the experience of building the first to help me.
, keep up the good work. BTW when you've finished yours don't forget to pop round and finish mine for me Hey, good to see you on here again! 
Last time I saw yours they were looking very nicely finished! There are quite a few imperfections on mine, joins showing and whatnot, which haven't shown too well on the photos, but yours looked very flat. I think you too have yet to complete the top sections though? You must make a thread on here for them!
I now have the faux leather covering so I'm preparing the baffles for it. Using MDF sealer to make them as smooth as possible, hopefully, so it'll stick firmly
Finished!
Final update on these as they are now completed!
Installing the feet was a more complicated task than I'd hoped as it is near impossible to drill a perfectly right-angled pilot hole for the mounting screw, and the screw head sits very tightly into the machined aluminium. Ended up using cereal box cardboard and paper shims underneath to push them to a straight fit. No problem though, it's not visible and the screws hold remarkebly well. No spikes are installed yet, they are something of a hazard if moving the speaker . Estimated 22-25kg each, quite modest but very awkward to get hold of.
They look a bit bare without a name badge or something, but with the top sections on they should look a bit more complete.
Onto the pics! (I evidently have some dead pixels in my camera sensor.):

Final update on these as they are now completed!
Installing the feet was a more complicated task than I'd hoped as it is near impossible to drill a perfectly right-angled pilot hole for the mounting screw, and the screw head sits very tightly into the machined aluminium. Ended up using cereal box cardboard and paper shims underneath to push them to a straight fit
. No problem though, it's not visible and the screws hold remarkebly well. No spikes are installed yet, they are something of a hazard if moving the speaker . Estimated 22-25kg each, quite modest but very awkward to get hold of. They look a bit bare without a name badge or something, but with the top sections on they should look a bit more complete.
Onto the pics! (I evidently have some dead pixels in my camera sensor.):
An externally hosted image should be here but it was not working when we last tested it.
An externally hosted image should be here but it was not working when we last tested it.
An externally hosted image should be here but it was not working when we last tested it.
An externally hosted image should be here but it was not working when we last tested it.
An externally hosted image should be here but it was not working when we last tested it.
Last edited:
I had to get on and the real wood issue wasn't getting resolved. What I've done is made the baffles from LBL (laminated bamboo lumber), a material reccomended especially for baffles. Not for it's cosmetic appearance, but because I had always planned to use real wooden fronts and MDF wouldn't really be strong enough (nor will it hold a screw well enough) to be used as an alternative.
I'm impressed with this material, much more solid than MDF, tools neatly, glues well, holds a screw like hardwood but supposedly there is no shifting like in hardwood. If it were cheaper and more readily available I think it'd overtake the likes of MDF in construction, though a composite of both probably has the best performance (as I'm using here!).
Well done! I should probably pay more attention, but I hadn't read that LBL was recommended for baffles, although I can see why. Can you point me to more discussions about that? I like the 'composite' look of it, and perhaps yours could be sanded down and stained black, Dr EM?
I'm still lurking.Hey, good to see you on here again!
Last time I saw yours they were looking very nicely finished! There are quite a few imperfections on mine, joins showing and whatnot, which haven't shown too well on the photos, but yours looked very flat. I think you too have yet to complete the top sections though? You must make a thread on here for them!
I now have the faux leather covering so I'm preparing the baffles for it. Using MDF sealer to make them as smooth as possible, hopefully, so it'll stick firmly
The top section on mine is about 80% done, list to do is: vener edges, cut a couple of holes, glue front baffle and mount it all together. If the weather is good this weekend I'll crack on. Hows your top section working out?
At this distance your finish looks good, especially given how difficult a black gloss finish is.
Thanks! I was discussing it over here:
HTGuide Forum - Ardent Speaker Camp
I knew I needed something with properties similar to hardwood for this baffle, but with the shrinkage/expansion issues this seemed like a stable alternative. Sounds solid on a knock test, especially now that it's bonded to MDF, a material with quite different properties. Also holds a screw very nicely, no need for inserts with this.
It might take a stain, I have some scraps left over I could test this on but don't know if I have any suitable stain. I'm happy enough with the faux leather vinyl I'm using for myself but if anyone's interested to see it stained
I'm still lurking.
The top section on mine is about 80% done, list to do is: vener edges, cut a couple of holes, glue front baffle and mount it all together. If the weather is good this weekend I'll crack on. Hows your top section working out?
At this distance your finish looks good, especially given how difficult a black gloss finish is.
You posted as I was replying to Tosh
Sounds good, not too much more to do on yours then! Would be interested to see it
I guess I don't have that much to do either really. I have the big laminated MDF blocks more or less ready, just need the baffles made (including an intricate cutout
) and veneering. Doesn't sound too bad like that, but I think it'll take a little while really. Yeah, as a first impression it looks alright. If you inspect it, it isn't great. I don't reccomend rough plywood be used under the gloss vinyl!
Ok, I have them set up in position and running in stereo with crude top sections for the time being.
I'd say at the moment the sound is a bit distant, it comes into 'focus' at pretty high levels but isn't that spectacular at more moderate levels. I'm thinking there's a slight lack of lower midrange, however the bass is plentiful. Best thing to do might be to raise the woofer level and lower the baffle step correction? Also probably a little too much treble, so it should be as simple as attenuating the tweeter more on the active XO.
The stereo is quite strong but perhaps the imaging isn't so effective. I don't quite get that 'voice floating in front of you effect' that I got with the HM100Z0 midranges. However, one speaker is near a side wall and with the dome's wide dispersion this is likely to have more effect than on a 4" cone. I may add some foam to/near that wall to help with this.
Finally, with the pair in place it results in one speaker being near a corner and I'm now getting a room resonance at a certain frequency. Since I'm using an active XO, it seems it'd be as simple as measuring the response at the listening position and applying an active notch filter to counter the effect on the left channel only (I know that the right has a very neutral bass response on it's own). It'll be around 60-70Hz so the notch should be far enough away from the 820Hz crossover frequency to not make a mess of the phase, so aside from the probably large capacitor required for such a low frequency notch this idea seems practical?
Overall doing more right than wrong, but there's certainly a way to go yet
Ok, I have them set up in position and running in stereo with crude top sections for the time being.
I'd say at the moment the sound is a bit distant, it comes into 'focus' at pretty high levels but isn't that spectacular at more moderate levels. I'm thinking there's a slight lack of lower midrange, however the bass is plentiful. Best thing to do might be to raise the woofer level and lower the baffle step correction? Also probably a little too much treble, so it should be as simple as attenuating the tweeter more on the active XO.
The stereo is quite strong but perhaps the imaging isn't so effective. I don't quite get that 'voice floating in front of you effect' that I got with the HM100Z0 midranges. However, one speaker is near a side wall and with the dome's wide dispersion this is likely to have more effect than on a 4" cone. I may add some foam to/near that wall to help with this.
Finally, with the pair in place it results in one speaker being near a corner and I'm now getting a room resonance at a certain frequency. Since I'm using an active XO, it seems it'd be as simple as measuring the response at the listening position and applying an active notch filter to counter the effect on the left channel only (I know that the right has a very neutral bass response on it's own). It'll be around 60-70Hz so the notch should be far enough away from the 820Hz crossover frequency to not make a mess of the phase, so aside from the probably large capacitor required for such a low frequency notch this idea seems practical?
Overall doing more right than wrong, but there's certainly a way to go yet
Are you going to stick with an active crossover?
If so, the Behringer DCX2496 would be the ticket. Then you can do everything before the power amp.
The DCX2496 has a built in parametric EQ as well as 3-way crossover and time delay for phase adjustment all rolled into one box.
Thanks for your comments Oscar!
Yes, I am sticking with active and have 3 quality poweramps in duty for this (2xSymasym, 1xP101)
I'll be going analogue using Rod Elliots PCBs which I have (along with some notch filter PCBs which I'll have to source). For now everything is breadboarded and using TL074s! The DCX2496 does sound like a brilliant unit for getting things right but it's quite expensive. Good value for sure, but still a fair whack.
I made the changes I spoke of in the last post, overall it's sounding better now. I did the bass notch filter too on the left channel. This required a large 69uF capacitor which is currently 47uF NP electro bypassed with 22uF poly (what I had available). It has improved the situation but when checking for it's centre frequency (was 58Hz) it appears I have quite a large suckout from 80-140HZ, presumably room related. Possibly because of this, but also possibly just actual cabinet colouration, it sounds like the lower midrange is slightly prominent, giving some emphasis on mid-range male vocals which I don't like.
I will be playing with what little acoustic foam I have left over to see how much improvement I can make in the room (if any). I expect minimal improvement from having the real top sections assembled solidly and with isolation feet. I may play with phase correction actively in case the prominence in the lower midrange is caused by an error in the crossover from the woofer to midrange, naurally the woofer's acoustic centre is further back. I think it's something more tangible though like a cabinet resonance or room related issue.
Onwards and upwards!
Thanks for your comments Oscar!
Yes, I am sticking with active and have 3 quality poweramps in duty for this (2xSymasym, 1xP101)
I'll be going analogue using Rod Elliots PCBs which I have (along with some notch filter PCBs which I'll have to source). For now everything is breadboarded and using TL074s! The DCX2496 does sound like a brilliant unit for getting things right but it's quite expensive. Good value for sure, but still a fair whack.
I made the changes I spoke of in the last post, overall it's sounding better now. I did the bass notch filter too on the left channel. This required a large 69uF capacitor which is currently 47uF NP electro bypassed with 22uF poly (what I had available). It has improved the situation but when checking for it's centre frequency (was 58Hz) it appears I have quite a large suckout from 80-140HZ, presumably room related. Possibly because of this, but also possibly just actual cabinet colouration, it sounds like the lower midrange is slightly prominent, giving some emphasis on mid-range male vocals which I don't like.
I will be playing with what little acoustic foam I have left over to see how much improvement I can make in the room (if any). I expect minimal improvement from having the real top sections assembled solidly and with isolation feet. I may play with phase correction actively in case the prominence in the lower midrange is caused by an error in the crossover from the woofer to midrange, naurally the woofer's acoustic centre is further back. I think it's something more tangible though like a cabinet resonance or room related issue.
Onwards and upwards!
This sounds like the wrong approach. The DCX2496 is a bit costly ($260 USD, less used), but I think it is a good idea to DIY, too. So, rolling your own active crossover is a good learning experience.
That said, the worst thing you can do is make a passive notch filter. Why undo what going active brings to the table? I would make that filter and put it after the active crossover and before the power amp.
Doing it this way makes it a lot easier to experiment, component costs are much cheaper, better phase control, and you maintain the direct connection between amp and woofer driver.
Last edited:
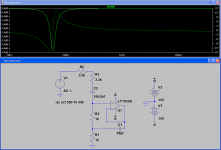
Sorry, mentioning that large capacitor probably made it sound like I was using a passive notch filter. Is is in fact an active gyrator based notch filter, but to create a relatively high-Q notch with this at low frequencies requires a large capacitor. Perhaps a twin-T or something would be more applicable? The circuit is attached. I agree doing this passively, especially on only 1 channel, would be a poor choice!
The only passive component is a 4.5uF capacitor in the tweeter lead, a sensible precaution as it is a planar driver. In this case, I have defined it to form the 4th pole of an LR filter slope by using an 18dB BW active filter alongside. The flat impedence of the planar driver made this easy
I am still experimenting with active filter stages on the breadboard and check the electrical responses in HOLMimpulse and/or with a scope
Attachments
Sorry, mentioning that large capacitor probably made it sound like I was using a passive notch filter. Is is in fact an active gyrator based notch filter, but to create a relatively high-Q notch with this at low frequencies requires a large capacitor. Perhaps a twin-T or something would be more applicable? The circuit is attached. I agree doing this passively, especially on only 1 channel, would be a poor choice!
The only passive component is a 4.5uF capacitor in the tweeter lead, a sensible precaution as it is a planar driver. In this case, I have defined it to form the 4th pole of an LR filter slope by using an 18dB BW active filter alongside. The flat impedence of the planar driver made this easy
I am still experimenting with active filter stages on the breadboard and check the electrical responses in HOLMimpulse and/or with a scope
I understand now. Looks like you are on the right track.
- Status
- This old topic is closed. If you want to reopen this topic, contact a moderator using the "Report Post" button.
- Home
- Loudspeakers
- Multi-Way
- Bass enclosure for 3 way