I am about to complete my Shiva 143 L Subwoofer, and need some advice on the finish.
I finished my first project (Shamrock Audio SE-1's) by purchasing a few cans of spray lacquer and spraying directly on to the Cherry veneer. (I used the deft brand)
(pics: http://www.lunenfeld.com/speakers.asp
While the result was OK, I was told that the best way to apply lacquer is with an HVLP sprayer.
After some brief research I have found that a professional rig is too expensive for me since I would only spray a few projects per year. It looks like a pro rig requires at least a $300 compressor, a $100 gun and a few dollars more for accessories.
I have found a 'junior' HVLP kit from Rockler.com that contains the gun, hoses and compressor in one self contained unit for $99.
http://www.rockler.com/findit.cfm?page=10469
My questions are thus:
1) does the HVLP finish look that much better than using a spray can?
2) if it does, is the Rockler 'junior' unit going to be good enough or do I need to have the full, 'professional' unit to get good results?
If it matters, I have covered the Shiva cabinet in maple veneer.
Thanks for all your help!")
I finished my first project (Shamrock Audio SE-1's) by purchasing a few cans of spray lacquer and spraying directly on to the Cherry veneer. (I used the deft brand)
(pics: http://www.lunenfeld.com/speakers.asp
While the result was OK, I was told that the best way to apply lacquer is with an HVLP sprayer.
After some brief research I have found that a professional rig is too expensive for me since I would only spray a few projects per year. It looks like a pro rig requires at least a $300 compressor, a $100 gun and a few dollars more for accessories.
I have found a 'junior' HVLP kit from Rockler.com that contains the gun, hoses and compressor in one self contained unit for $99.
http://www.rockler.com/findit.cfm?page=10469
My questions are thus:
1) does the HVLP finish look that much better than using a spray can?
2) if it does, is the Rockler 'junior' unit going to be good enough or do I need to have the full, 'professional' unit to get good results?
If it matters, I have covered the Shiva cabinet in maple veneer.
Thanks for all your help!
HVLP
Although I dont have experience with the Rockler unit, I do think you will get better results with it than spray cans. I have a small rig made by Lemmer, and my current project is being done using automotive base/clearcoat to achieve a near mirror finish black on MDF.
Your project looks very nice so probably do not need to tell you that the most important factor in any finish is the prep work. No application method will cover even the smallest scratches or imperfections.
Have you tried rubbing out the Deft finish? Sometimes this will produce a very nice smooth finish even if there are flaws in it.
Not to dissuade you from what you want to do, but I get a mirror finish with laquer from a can. I usually spray 2 or 3 coats at a time and then hand sand them down with 400 to 600 grit paper. I do this 5 or 6 times, and by the last time I have a surface as smooth as glass which is flat until I spray it with a glossy clear coat. I admit this is a lot of work, but even if you get the big rig you will have to take some time to get good with it. Even at that, your still in for a lot of sanding and prep just like Patrat said.
I have a porter cable HVLP gun and I love it. Finishing has gone from a chore which always turned out to be dissapointing to a fun activity which looks great!
The PC gun is gravity feed (read: plastic tank on top of the gun), and works really well. It can run off even smallish compressors (my friend has a pancake unit and he also has the same model gun).
You really want a compressor anyway, you can brad nail your enclosures together and inflate your car tires etc.
The PC gun costs about $90 and is sold in Lowes as well as at woodworker's supply:
http://woodworker.com/cgi-bin/FULLPRES.exe?PARTNUM=109-754
Sheldon
Allow me ask a couple of questions back... First, what didn't you like about your first set of speakers' finish? What did you like about them? And finally, how much work did you put into it and how many coats?
They look really good in the picture, so you've got a good start! What I would say regarding purchasing spray units, you really want to get the best you can afford. If you buy cheap now, you'll just end up replacing it with better later, and after adding the cost of the two up, you'll see how much you could have saved. So, let us know what you don't like about the last finish, and how you applied it, and maybe we can point out a couple of things for you to try, and get a better finish without having to buy the gun now. (That way you can save up and buy a compressor and gun, and be much happier!)
They look really good in the picture, so you've got a good start! What I would say regarding purchasing spray units, you really want to get the best you can afford. If you buy cheap now, you'll just end up replacing it with better later, and after adding the cost of the two up, you'll see how much you could have saved. So, let us know what you don't like about the last finish, and how you applied it, and maybe we can point out a couple of things for you to try, and get a better finish without having to buy the gun now. (That way you can save up and buy a compressor and gun, and be much happier!)
Hi everyone, thanks for all the responses!
Schaef,
I was actually pretty proud of my first project until I happened to have a professional furniture finisher come by the house to fix a table top that was damaged. He immediately spotted my DIY speakers, and upon closer inspection said something to the effect of, "Oh, I see you used lacquer from a can." He said that due to the narrow openning of spray cans, not enough of the lacquer solids can ever get to the wood, but that an HVLP rig gets much more actual lacquer to the piece and gets it there more evenly.
I had applied 5 coats of the spray can lacquer about an hour apart. I lightly sanded with 400 grit paper between coats until a fine white powder apeared. I then took the 'powder' off with tack cloth and repeated.
Here is what I don't like: even after 5 coats, I could not get a good shine going eventhough I was using high gloss lacquer. While the finish looks OK (and looked great to me since it was my first DIY project), it is kind of dull and matte looking. On very close inspection, the gloss is also kind of uneven, and frankly looks amatureish.
The pictures of the project on my website look glossier than reality due to the reflection of the camera flash.
A big part of the way that I 'sell' my DIY projects to my wife is that she really appreciates the aesthetics of speakers. And the only way she tolerates my hobby is if I give 100% to the finish of the piece. Who am I to say no to that!
My goal: get the best possible finish without breaking the bank. If I can achieve excellent results with a spray can and extra work, great! (Thanks passfan, if you think so could you give me more advice on how to achieve results?).
But if I really need the HVLP rig, where does the line cross between value and quality? For example, if I get a seperate compressor is a cheaper 'pancake' model worth getting?
Patrat,
What do you mean 'rubbing out' the Deft finish. Can you elaborate?
My current project is to lacquer the maple veneer on 3 sides of my shiva sub. Each panel is 22.5" square.
I know this is a lot to ask, and thanks to everyone for their thoughtful and helpful advice.
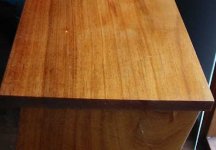
pic of the sub in question
Here is a picture of the current project, before final assembly and the application of the maple veneer.
(I remembered to remove my son BEFORE glueing on the top. )
Another, slightly related question:
I cut the legs out of solid maple. Should the legs be lacquered too? Or just the maple sides?
Here is a picture of the current project, before final assembly and the application of the maple veneer.
(I remembered to remove my son BEFORE glueing on the top.
)Another, slightly related question:
I cut the legs out of solid maple. Should the legs be lacquered too? Or just the maple sides?
An externally hosted image should be here but it was not working when we last tested it.
Alphageek
It sounds like you want a high gloss finish on your veneer. You can do this without any spraygun at all with a bit more work. A rubbed oil finish can be used to give a beautiful finish, but maybe not quite so shiney as a lacquer. To me it looks better on natural timber surface because it doesn't look "plastic coated" like a gloss finish. I have used what is called "scandinavian oil", which uses polyurethane oils to get a great finish without any spraying. If you want more details on how to do this let me know. I can also post a photo of what it looks like if you are interested.
Mick
brushing lacquer
I've had good results using a brushing lacquer (Deft).
One can lay on lacquer quite thickly with a brush, and with a good brushing lacquer or a normal lacquer with the appropriate additives (retarder it is called, I think) you have plenty of time to apply it and brushmarks aren't a problem.
I just finished a pair of ProAc clones with lacquer, starting with spray cans but ending with a quart of brushing lacquer.
Rubbing out is necessary to achieve the finish you want. This refers to using rubbing compounds (automotive, or pumice/rotenstone, with a lubricant like parafin oil) after a final sanding with 800+ grit (again, wet sanding). Any good book on wood finishing will describe this process, and it is quite simple if laborious.
While HVLP would be quicker, I believe you can do very well brushing.
After all of the coats of paint and lacquer (rubbed down between each) I rubbed on some T-Cut (auto stuff). That really brought out the mirror finish.
Might be worth a try alphaGeek.
Must admit though, with my latest speaker I'm going for a "Jaguar dashboard" type of mirror finish on a walnut veneer and, this time, I giving the job to pros.
Steve
Might be worth a try alphaGeek.
Must admit though, with my latest speaker I'm going for a "Jaguar dashboard" type of mirror finish on a walnut veneer and, this time, I giving the job to pros.
Steve
Try a local rental shop and ask if they've got an HVLP system for rent.
To build a good finish with lacquer, you want to use a lacquer based sanding sealer for the frirst few coats. The sanding sealer will fill the tiny pores of the veneer and let the final finish coats go on flat.
Pete
To build a good finish with lacquer, you want to use a lacquer based sanding sealer for the frirst few coats. The sanding sealer will fill the tiny pores of the veneer and let the final finish coats go on flat.
Pete
Kanga and 7V,
Could you elaborate on what 'rubbed' means? Any details or instructions would be great. And yes, I would love to see what the rubbed treatment looks like.
Pete,
Is the sanding sealer something you buy at the paint store/home depot? Does it go on with the sprayer? Does it have color? Is this something that should always be used with lacquer or just with glossy finishes? Thanks!
rubbed finish
Many good suggestions here, depending on what you are trying to acheive and how much work you want to put in it.
A very simple and almost foolproof method is to use "Danish Oil" (same as Kanga suggests) per the instructions, and let it dry thoroughly for a few days. Next, get some furniture paste wax and 600 grit sandpaper. Make a pad of sandpaper and use a fair amount of paste wax as a lubricant, thoroughly rub every inch of the project. Dont worry about sanding through the finish, you wont. When you have rubbed it all down, wipe off the wax with a soft cloth and look for any spots that were missed. The finish will be medium gloss and very smooth. YOu can try this same method on the Deft.
A true rubbed out finish is more of what pjb describes, it is very labor-intensive but it will produce one of the best possible finishes.
alphaGeek said:Kanga and 7V,
Could you elaborate on what 'rubbed' means? Any details or instructions would be great. And yes, I would love to see what the rubbed treatment looks like.
Basically I was using car spraying tehnology.
I started by spraying primer onto the MDF surface and, when it was dry, sanding with 1200 grade production paper (wet & dry paper) using a block.
I then repeated with black enamel car spray, again using a spray-can. I used several layers, sanding with 1200 grade production paper on a block between each layer. The last layers were sanded with the production paper used wet.
Then, I applied the T-Cut with a cloth and then polished it off with another cloth (exactly as per a car).
Finally, I wax polished.
It was a lot of work but the piano gloss achieved was pretty good. Also, this method works for a black piano finish but wouldn't work on wood veneer.
For a reasonable picture of the effect, click here: Piano gloss finish using car paint spray
Steve
7V said:For a reasonable picture of the effect, click here: Piano gloss finish using car paint spray
Actually, looking again at the picture, the effect in real life looks much better, more shiny and reflective than the photo indicates.
Have you ever tried wiping varnishes? I get pretty good results with Minwax, and there's no equipment costs.
An externally hosted image should be here but it was not working when we last tested it.
An externally hosted image should be here but it was not working when we last tested it.
A top class finish is normally rubbed by using wet and dry paper up to 1 or 2000 grit and different grades of cutting compounds, A cheap angle polisher with a sponge buffing head is more or less essential for this.
Here is a pair I did with a blonde French polish using this technique
Stew
Here is a pair I did with a blonde French polish using this technique
An externally hosted image should be here but it was not working when we last tested it.
Stew
Depending on how many speakers you want to build and your budget, and your sense of asthetics, you have another option. you could take your enclosures to an auto body shop and have them shoot paint on your boxes. I saw a couple pairs of speakers that Dannie Richie had done that way and they were beautiful. If memory serves me right, they cost about $150 to shoot.
He had a piano black set which were like mirrors, and a set of silver which were equally flawless.
Sheldon
He had a piano black set which were like mirrors, and a set of silver which were equally flawless.
Sheldon
Here's a couple of photos of a CD rack I built out of blackwood (native Australian timber) that was finished in "scandinavian oil" which is similar to danish oil. The first photo is a general shot, while the second shows you a close up at a low angle of incidence to the surface. This shows you that the surface is not high gloss. If it were you would see a reflection of the scene behind. Its very hard to take good photos that show you the quality of a finished surface, and unfortunately these may not show you what you are looking for.
The oil is applied with a cloth or brush, and then sanded while wet with 600 grit wet and dry abrasive paper. This creates a slurry of the timber and the oil. Then you get a cotton cloth and rub the slurry hard into the surface of the timber. This has the effect of polishing the surface and also pushing the slurry into the pores of the timber. Once the surface is dry you buff it with a dry cloth. You do this about 2 or 3 times, and then the final coat is just the oil applied with a soft cloth and buffed when dry.
The only problem that I could see with this technique is that in the rubbing process it may be difficult to avoid peeling/breaking away the edge of the veneer that overlaps the surface you are rubbing.
I'm just about to embark on the finishing stage on my project, but I haven't yet decided what kind of finish to use. Maybe I'll try some test pieces.
Mick
Attachments
- Status
- This old topic is closed. If you want to reopen this topic, contact a moderator using the "Report Post" button.
- Home
- Loudspeakers
- Multi-Way
- Need advice on cabinet finishing (lacquer)