Pass DIY Addict
Joined 2000
Paid Member
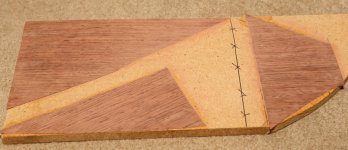
Here are some images of my work so far. My first effort with a small piece of veneer didn't go so well - I ended up with a wide set of ripples. This made me panic a bit and wonder if I made the right choice with 10mil paper backing for my veneer. The 20mil is often called "wrinkle free" veneer. I just figured I was doing something wrong...
So, I took a few of the scraps and tried again, starting with the smallest pieces first. This worked better, but I wasn't sure why. Perhaps I had used less glue, perhaps I had let it dry a little more before I applied the iron. Also, these pieces were just applied to flat wood. My speakers have a small lip caused by the front baffle that I cut larger than needed so I could flush trim after the veneer was installed. So, with some success on smaller pieces, I made a larger piece of wood and added a lip to it so it would more closely approximate the speaker that I'm working on.
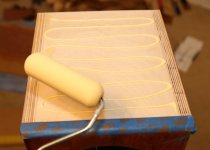
I used a foam roller brush that seemed to work well- it leaves an egg shell pattern behind. I put two coats of glue on the wood, letting the first coat dry first, one coat on the veneer, and let both surfaces dry more thoroughly before applying heat. This seemed to work well.
Chris, as you mentioned, the roller comes with its own plastic bag that fits over the roller end, so I put this on and put the whole thing in a ziplock bag. It has stayed good for over a week now. Should give me enough time to finish the whole project.
So, I took a few of the scraps and tried again, starting with the smallest pieces first. This worked better, but I wasn't sure why. Perhaps I had used less glue, perhaps I had let it dry a little more before I applied the iron. Also, these pieces were just applied to flat wood. My speakers have a small lip caused by the front baffle that I cut larger than needed so I could flush trim after the veneer was installed. So, with some success on smaller pieces, I made a larger piece of wood and added a lip to it so it would more closely approximate the speaker that I'm working on.
I used a foam roller brush that seemed to work well- it leaves an egg shell pattern behind. I put two coats of glue on the wood, letting the first coat dry first, one coat on the veneer, and let both surfaces dry more thoroughly before applying heat. This seemed to work well.
Chris, as you mentioned, the roller comes with its own plastic bag that fits over the roller end, so I put this on and put the whole thing in a ziplock bag. It has stayed good for over a week now. Should give me enough time to finish the whole project.
Attachments

Pass DIY Addict
Joined 2000
Paid Member
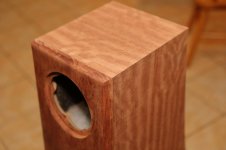
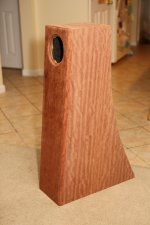
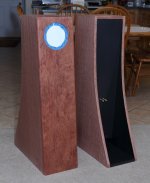
So here are a few images of the completed speaker. Getting the veneer to mate nicely at the seams is a bit of a trick. I presume it would have been a bit cleaner with a brand new flush trim bit, but my bit chewed away the wood and most of the paper, leaving a very thin layer of paper pushed down along the adjacent edge. I also made a bit of a mis-calculation as I tried to flush trim the back of the top plate, forgetting about the 5 degree tilt, so the bit chewed right through the veneer exposing a bit of the paper backer. Oh well, at least my goofs are on the back of the speaker where they will be hidden away. The second speaker is glued and clamped right now and will get veneer in the next day or two. I am really pleased with the match between the color of the veneer and the hardwood. The seam between the two is not perfect if you look closely, but looks nice when you back up just a bit. This is an interesting learning process for sure!
I was not able to match the side veneer to the top veneer - I was trying to keep a larger chunk of left over veneer for a possible center channel build. The third image is also a bit dusty on the back, I had just finished the rough sanding to smooth the edges. Next is sanding with 220, 230, 400 and maybe 600 before I start with the finish.
I was not able to match the side veneer to the top veneer - I was trying to keep a larger chunk of left over veneer for a possible center channel build. The third image is also a bit dusty on the back, I had just finished the rough sanding to smooth the edges. Next is sanding with 220, 230, 400 and maybe 600 before I start with the finish.
Attachments
Last edited:
Planning for a wrap-around / continuous grain pattern on a shape like these is certainly fun, and wasteful of material, but it is what it is.
I don't directly apply the glue to the panels or veneer pieces, but use a small paint tray to load up the roller.
I trim the veneer by sanding through the top layer of overlap with 150G PSA paper on a hard block on the long grain, and trimming with 2" bench chisel or plane blade. In the cross grain direction, I find a careful downward rotational slicing with the chisel followed with the 150G block is less risky than a router trim. If paper backed,this will expose a thin line on the edges, but once finished that's not often an issue.
But of course, we all develop our own methods after a few projects, and whatever works for you
Looking good, and should pop nicely with some finish.
Last edited:
Pass DIY Addict
Joined 2000
Paid Member
It is surprising how challenging this cabinet is to build. Even after running *ALL* of the "internal" panels (baffle, internal divider, rear panel for both speakers) through the *EXACT* same table saw set up and verifying the precision of the cuts afterward, there were variations in board width that needed to addressed before the second side panel could be glued up. I guess I had uneven pressure from the clamps that squeezed out more glue in some spots and less glue in other spots. I guess the rule for clamps is the same as publications for tenure: you always need "n+1" where "n" is the number you currently have. That sanding drum and my drill have been very useful for making small adjustments to the panels here and there!
Chris also mentioned using a card scraper. I had never heard of this before I started reading the wood working forums, so I purchased one and tried to use it. The card I got did not come with an edge on it, so I'm not sure if I am not putting a proper edge on it with my burnisher (I could feel a raised lip and it felt sharp to me), or I'm not holding/using it properly to scrape the wood surface. Either way, I need more practice or need to find someone local to show me how it's done in person. Watching YouTube videos isn't doing it for me in this case...
Also just realized the white balance of those images with the veneer is terrible - I forgot to adjust before I posted them.
Last edited:
hey, after a couple of dozen pairs of the FH shaped enclosures, you'll be a pro - I'm waiting to get there myself
at the end of the day, they'll sound musical enough that you'll relax back in your cozy chair with an age appropriate beverage, and the last thing on your mind will be the flaws that only you know about
at the end of the day, they'll sound musical enough that you'll relax back in your cozy chair with an age appropriate beverage, and the last thing on your mind will be the flaws that only you know about
Pass DIY Addict
Joined 2000
Paid Member
Pass DIY Addict
Joined 2000
Paid Member
Here are some updated images of my progress. The veneer is completed on both cabinets and turned out fairly well. Like everything else, there is plenty to learn from a project like this.
I probably over-complicated the design of this speaker by laminating a hardwood slab to the front baffle. This means I had to make it a bit over sized so it could be trimmed after the veneer was added and that I had to create a finished cut along the long edge of my veneer before I attached it to the cabinet. Strange as it sounds, cutting a 35 inch perfectly straight line through veneer is a rather challenging task. Making multiple passes works better than a single pass with the razor knife and I found cutting from the front produced a cleaner edge than cutting from the back. After the veneer was mounted, I flush trimmed the baffle, which left me with a rather large tear-out on the side It took a few rounds of glue and pressing saw dust into the hole in order to fill it sufficiently well. The hole was about 1/2" long 1/4" wide and nearly 1/8" deep The patch turned out pretty good (see first attached image), but took several iterations to get it there.
After sanding down the veneer, I realized that I probably should have spent more time sanding the surface of the baltic birch plywood as it looks like a few of the ridges show through the veneer a bit. I didn't consider this possibility and am hoping that the finish will help hide some of this.
So here they are before any finish is applied to the cabinets. I managed to avoid the trouble with flush-trimming the rear of the top panel by taping an extra thickness of veneer to the back. I also applied some painters tape around the sides so the flush trim bit wouldn't leave a mark around the perimeter where the bearing rides on the side.
I probably over-complicated the design of this speaker by laminating a hardwood slab to the front baffle. This means I had to make it a bit over sized so it could be trimmed after the veneer was added and that I had to create a finished cut along the long edge of my veneer before I attached it to the cabinet. Strange as it sounds, cutting a 35 inch perfectly straight line through veneer is a rather challenging task. Making multiple passes works better than a single pass with the razor knife and I found cutting from the front produced a cleaner edge than cutting from the back. After the veneer was mounted, I flush trimmed the baffle, which left me with a rather large tear-out on the side
It took a few rounds of glue and pressing saw dust into the hole in order to fill it sufficiently well. The hole was about 1/2" long 1/4" wide and nearly 1/8" deep The patch turned out pretty good (see first attached image), but took several iterations to get it there.After sanding down the veneer, I realized that I probably should have spent more time sanding the surface of the baltic birch plywood as it looks like a few of the ridges show through the veneer a bit. I didn't consider this possibility and am hoping that the finish will help hide some of this.
So here they are before any finish is applied to the cabinets. I managed to avoid the trouble with flush-trimming the rear of the top panel by taping an extra thickness of veneer to the back. I also applied some painters tape around the sides so the flush trim bit wouldn't leave a mark around the perimeter where the bearing rides on the side.
Attachments
Pass DIY Addict
Joined 2000
Paid Member
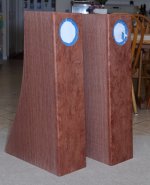
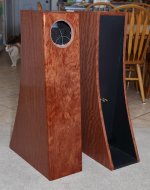
And here they are with two coats of finish on them. The finish is Formby's Tung Oil Finish Low Gloss - not sure if I want them this shiny or not for the final coat. I'll have to play around with how the finish is applied.
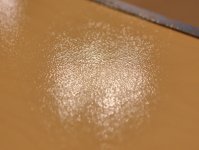
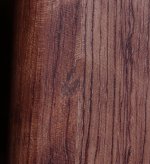
I really LOVE how the highlights and figure in Bubinga shifts as you move around and catch the light from different angles. It's really an eye-catching effect.
I really LOVE how the highlights and figure in Bubinga shifts as you move around and catch the light from different angles. It's really an eye-catching effect.
Attachments
Last edited:
Pass DIY Addict
Joined 2000
Paid Member
Thanks for the encouraging words - like all projects, it turns out to be a bit more work than you think at the beginning. Then, there always seems to be the need for extra time fixing things that shouldn't have gone wrong in the first place...
One technique I found very useful after the veneer was applied was to use a small hand-held flashlight parallel to the veneer surface and shine it across the grain to identify the less-than-flat spots. I suppose this is what the woodworkers call a raking light. I'm not sure if these small troughs and valleys were on the veneer from the start (because of how it was manufactured) or the result of my glue/iron technique, but the veneer surface was a bit less flat and smooth than I thought it would be after ironing it. So, the majority of the work was with a piece of already-used 80-100 grit paper and a sanding block. Once the surface passed my flashlight test, sanding with 220, 320, and 400 grit paper was quick and easy. I played around with some of my scraps to see just how much sanding I could get away with before chewing through the wood to reveal the paper backer and was surprised to see just how thick the wood layer was.
Now I'm working on the part that tries my patience: waiting for the finish to dry thoroughly before smoothing it out and applying the next layer. It's been rather humid lately, so things are taking longer than normal.
I did some more experiments with finishes and decided that I liked the Formby's finish the best. It worked out well that my wife chose the same finish that I did when I presented her with the samples.
Pass DIY Addict
Joined 2000
Paid Member
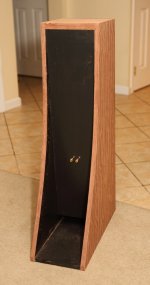
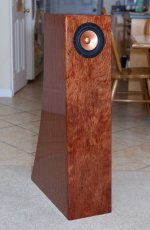
Here are two shots of the almost-completed speaker. The driver is just being held in place with two screws for the photo. I'm still working on adding layers to the finish. Not sure yet if I'll leave it with its more natural rubbed-on finish look, or if I'll take it down with a grey pad and then buff lightly with a polishing compound. It seems that the cool effect of chatoyance is more subdued with a more matte finish... decisions, decisions...
Attachments

Pass DIY Addict
Joined 2000
Paid Member
Thanks, it's turning out better than I thought it would when I started! I knew this wood was special, but you don't really get to appreciate it until the finish goes on. I'll bring them in the house this weekend for an audition - have to wait for the smell to die down a bit so the family stops making the funny faces when I haul them into the house.
Is the preferred wiring method for this driver to connect the wires to the "detachable" clips, or to attach to the permanently mounted tabs?
Is the preferred wiring method for this driver to connect the wires to the "detachable" clips, or to attach to the permanently mounted tabs?
I'll add my voice to the chorus of "well dones". Beautiful work!
Thanks for sharing the details of your build. I've learned quite a bit from this thread (thanks especially to chrisb for bringing my veneering into the 21st century), and it's inspired me to get started on my own pair. In fact I'm headed out to the local hardwood place this morning to pick up a couple of sheets of BB ply.
I'll have to say the Alpair 10.3s are incredible drivers. To help with the breaking in I used some leftover MDF to knock together a quickie pair of Golden Ratio MiniOnkens last weekend; the results left me absolutely speechless. If what Dave and chrisb tell me is true - that the FHXLs are better in almost every way - then I'm in for a real treat.
Enjoy your new creation!
Last edited:
Is the preferred wiring method for this driver to connect the wires to the "detachable" clips, or to attach to the permanently mounted tabs?
Our prefered method is to solder directly to the terminals on the driver. We use a pr of solid 24g wires pulled from CAT5 cable for internal wiring (and for amp to speaker).
dave
Pass DIY Addict
Joined 2000
Paid Member
Pass DIY Addict
Joined 2000
Paid Member
Wow! That's a pretty impressive driver/cabinet combination! These are playng in my living room system that has featured a pair of Atlantic Technology System 350THX speakers for the past twenty years. Soundstage is much wider, as is the sweet spot in the center. I am really surprised buy the amount of bass from these drivers. I turned off my sub and am running FHXLs full range, the rear of the cabinets are about 12" from the wall. I can't believe the amount of bass. The treble is a bit bright to me right noww, so I pushed the treble level down a bit in my pre. Overall, these drivers have less than 200 hours on them, so I expect I'll hear some changes over the next few weeks. I understand full breakin takes 500+ hours.
The cabinets have the full amount of stuffing in them right now (60g in the point, 80g right under the driver). What is the primary effect of reducing stuffing under the driver?
Edit: I've always thought the THX speakers were soft on top, so I've had the treble boosted for a while and forgot that I had changed the setting. Adjusting the treble down on the FHXL with 10.3 drivers actually resulted in a flat (+0dB) setting... With my present set up, my all of the electronics are in a different room, so settings aren't obvious unless I actually get up and go look at the front panel.
Last edited:
- Status
- This old topic is closed. If you want to reopen this topic, contact a moderator using the "Report Post" button.
- Home
- Loudspeakers
- Full Range
- Another FHXL Build