You're not wasting time! After the room treatment is done, drop by and come help me out (lol).
Someone told me once - "Do you want to get things done? Ask the buzy guy!"
Well, I feel like the buzy guy! I am sure you can relate as your TT`s also have been labour intensive...and life gets in the way - yet you are almost there now

A trip to the Netherlands to work on your project? Sounds like vacation to me
 Your TT`s are what kicked my project into gear so thank you!
 Greg B said:Dang, that's a pretty dramatic improvement in those waterfalls! I bet it's sounding pretty awesome at this point.
I was surprised myself, the effect was immediate and also noticed without sound playing - the room quiet down nicely and with a "studio ambiance" to it when I enter.
Yes - they are now IMHO sounding pretty awesome
xrk971 said:Yes, +1 on the awesomeness of the improvement. The room is more than half the equation for good sound. I think that might be why my experience with the Trynergy has been so eye opening
I expected a response from adding room treatment but the magnitude of it all was beyond what I was expecting
The arrays themselves gave me an improvement over the old DM604`s (line source vs point source give less unwanted 1st reflections) and the panels gave it another major boost. The panels I have made are absorption based - I now have serious thought of adding diffusors to the mix aswell to refine it further. perceval said:I'm sure you will keep on smiling while listening to your arrays for a long time nom! Very rewarding, isn't it?
I am all grins!
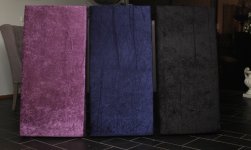
My side projects with acoustic panels is now coming to a close, finished the 12 panels yesterday night  So now they are ready to be placed around on the walls/ceiling
When that is done I need to direct some of my attention to the soffits which as in desperate need for closure.
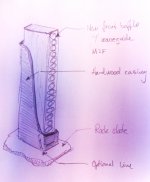
As far as the arrays goes - They need to be properly finished... They are operational but not finished I have considered a front baffle mounted over the current one, incorporate a wave guide perhaps but not sure how to go about it.
Also, consider adding a extra layer of hardwood to enhance estetiques and alter cabinet resonanse. See attached image for idea.
Cabinet color solid black, casing same or brown - absolutely not sure
What do you guys think?
So now they are ready to be placed around on the walls/ceiling When that is done I need to direct some of my attention to the soffits which as in desperate need for closure.
As far as the arrays goes - They need to be properly finished... They are operational but not finished
I have considered a front baffle mounted over the current one, incorporate a wave guide perhaps but not sure how to go about it.Also, consider adding a extra layer of hardwood to enhance estetiques and alter cabinet resonanse. See attached image for idea.
Cabinet color solid black, casing same or brown - absolutely not sure
What do you guys think?
Attachments
Nothing wrong with pimping the arrays a bit .
I like your sketch, but I wouldn't use that thicker piece sticking out on the bottom of the baffle. But you could still make it out of the hardwood for contrast, but make it flush with the baffle.
I'd also opt for a flexible substance/layer between the hardwood decoration and existing enclosure, sort of a CLD arrangement. For instance a glue that remains flexible after drying or maybe some MLV (mass loaded vinyl). I will use the MLV between (and behind) my 2 aluminium baffles that way.
Are you sure you want something in front of the speakers? Don't make it too thick if you do. Somewhere between 6 to 9 mm or so. You will run into the close spacing of the speakers that will limit the waveguide you can get.
I tried to make my baffle/waveguide design an extension of the speakers, and decided to go that way because it gave me a chance to keep the rear baffle thin (among other things). That thin back plate should help with the breathing on the back of the speakers.
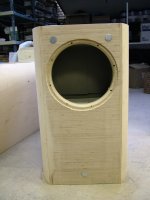
Is your wish to use it for functional reasons or beauty? Using a ~ 4 mm thick plate surrounding the speaker frames would also be an improvement I guess. Sort of like how I did my test box:

As far as colours go: get the missus involved in this (lol)
.I like your sketch, but I wouldn't use that thicker piece sticking out on the bottom of the baffle. But you could still make it out of the hardwood for contrast, but make it flush with the baffle.
I'd also opt for a flexible substance/layer between the hardwood decoration and existing enclosure, sort of a CLD arrangement. For instance a glue that remains flexible after drying or maybe some MLV (mass loaded vinyl). I will use the MLV between (and behind) my 2 aluminium baffles that way.
Are you sure you want something in front of the speakers? Don't make it too thick if you do. Somewhere between 6 to 9 mm or so. You will run into the close spacing of the speakers that will limit the waveguide you can get.
I tried to make my baffle/waveguide design an extension of the speakers, and decided to go that way because it gave me a chance to keep the rear baffle thin (among other things). That thin back plate should help with the breathing on the back of the speakers.
Is your wish to use it for functional reasons or beauty? Using a ~ 4 mm thick plate surrounding the speaker frames would also be an improvement I guess. Sort of like how I did my test box:
As far as colours go: get the missus involved in this (lol)
The front baffle main function is to eliminiate the raised edge of the driver basket and adding a waveguide (although CC will prevent 360deg waveguide) seemed trivial. Covering up the mounting flange of the driver basket is also a bonus as I hate the idea to remove the gasket/glue residue on 40 drivers
However a smooth transistion similar to yours might be desireable aswell.
Black it is for sure....maybe
However a smooth transistion similar to yours might be desireable aswell.
Black it is
for sure....maybeDid a 15min recording today with my Canon EOS M playing a various selection of music - quality wise this recording is much better than my previous ones - go to Halair Line Array and DL the 28MB mp3-file.
The clicking noise that can be heard during the silent parts is the camera AF that hunts, I forgot to put on one of the manual focus lenses prior to recording...my bad
FWIW
The clicking noise that can be heard during the silent parts is the camera AF that hunts, I forgot to put on one of the manual focus lenses prior to recording...my bad
FWIW
You know, one of the features of the arrays is the amazing L/R separation they provide. A stereo recording would really make them shine.
I believe you. An array of VIFAs must sound amazing. No wonder the original sells for $18,000 !!!
My father-in-law has been looking for some speakers lately. I think I will give him my 16-driver arrays and work on my 20 or 25-driver VIFAs arrays.
I have to build enclosures for my W8-1772s in the mean time for an in-between speaker set, and then focus on a VIFAs array design!
I second the idea of making your front baffle as thin as possible. Don't make huge waveguides for your arrays.
I'd say that is a pretty big improvement! Not bad! One thing you immediately notice is the coherence of the voices. It is so easy to follow the words.
A nice Tom Danley proposed test would be to play this recording on the lines and re-record. If you can do that 4 times and still have music you're on to something great!
At least it will reveal the possibly wrong parts of your speakers playing the recording back on the lines.
Big grins and chills/goose bumps on your end I assume?
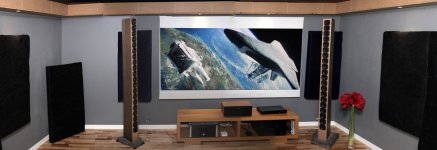
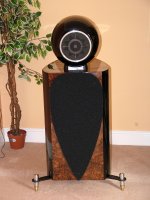
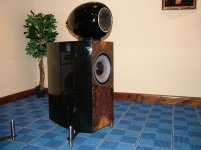
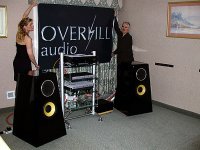
BTW - here they are in their full glory Quick and dirty photo merge...
Front wall is 16-1/2ft wide and the arrays are 6ft1" tall for size reference.
The arrays are toed in quite a bit and this works very well for stereo imaging in each of the four seats. The centre double seat is the sweet spot though :roll eyes
A few of the acoustic panels is showing - these did wonders to the overall SQ in the room.
@perceval - good luck with your array v2 endeavour, it will be worth while I am certain! And you are right, they are best experienced "live"! Btw if I am selling mine I´ll let them go for less than 18k
@wesayso - 4 play backs huh? Sounds like a challenge
Yes, the SQ is superb and by far the best setup I have ever listened to I watched a movie a couple of nights ago (Gravity) and the stereo image is spot on and despite being in space there is a lot of "air" to it - indeed most pleasing In a little while you will know what I mean
Quick and dirty photo merge...Front wall is 16-1/2ft wide and the arrays are 6ft1" tall for size reference.
The arrays are toed in quite a bit and this works very well for stereo imaging in each of the four seats. The centre double seat is the sweet spot though :roll eyes
A few of the acoustic panels is showing - these did wonders to the overall SQ in the room.
@perceval - good luck with your array v2 endeavour, it will be worth while I am certain! And you are right, they are best experienced "live"! Btw if I am selling mine I´ll let them go for less than 18k
@wesayso - 4 play backs huh? Sounds like a challenge
Yes, the SQ is superb and by far the best setup I have ever listened to
I watched a movie a couple of nights ago (Gravity) and the stereo image is spot on and despite being in space there is a lot of "air" to it - indeed most pleasing In a little while you will know what I mean Attachments
Acrylic works out lowest cost of all...
Hi all,
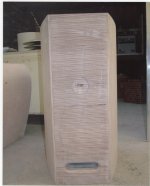
Having been lost in the rabbit hole of multi layer / multi material combination cabinets and tried, everything from highest grade marine birch ply, Velstone (Corian) various polymer and MDF grades my advice would be forget them all and use CNC'd Acrylic.
The cost of the finished cabinets will be lower than wood or alloy despite the much high cost per sheet as the labour savings are massive.
The acoustic properties are the best of anything I have tried.
The finish is gorgeous, easy to achieve and colour choice is huge.
Acrylic is totally immune from climate / moisture variables and using the one material throughout eliminates the variable temperature expansion / contraction coefficients of combining metal / wood / rubber / materials and adhesives.
Lastly it avoids the problem of drivers bolts working loose after wood compresses and or dries out and shrinks over time.
You can make a feature of the join lines by putting a small radius on the edges....Very cool and ultra high WAF!
Hope this helps and Merry Christmas!
Derek.
As far as colours go: get the missus involved in this (lol)
Hi all,
Having been lost in the rabbit hole of multi layer / multi material combination cabinets and tried, everything from highest grade marine birch ply, Velstone (Corian) various polymer and MDF grades my advice would be forget them all and use CNC'd Acrylic.
The cost of the finished cabinets will be lower than wood or alloy despite the much high cost per sheet as the labour savings are massive.
The acoustic properties are the best of anything I have tried.
The finish is gorgeous, easy to achieve and colour choice is huge.
Acrylic is totally immune from climate / moisture variables and using the one material throughout eliminates the variable temperature expansion / contraction coefficients of combining metal / wood / rubber / materials and adhesives.
Lastly it avoids the problem of drivers bolts working loose after wood compresses and or dries out and shrinks over time.
You can make a feature of the join lines by putting a small radius on the edges....Very cool and ultra high WAF!
Hope this helps and Merry Christmas!
Derek.
Attachments

last pics
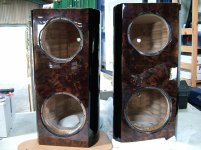
The different shapes all have the same problem that the edges eventually push through the veneer and become visible.....The only solution was to re-clad the entire cabinet stack in 3mm bendy ply and then veneer and or paint lacquer over that....
All the time, labour materials equipment and shipping from one specialist to another cost a fortune....Not commercially viable!
Once you have the 3D computer drawings you are done...Assembly of the Acrylic layers with the right glue is very easy as each piece has pilot holes for the locating dowels to key into.
If I was doing this again I would use Acrylic for sure.
Cheers
D.
Attachments

Last edited:

- Status
- This old topic is closed. If you want to reopen this topic, contact a moderator using the "Report Post" button.
- Home
- Loudspeakers
- Full Range
- Halair Column - my line array build (20 FR drivers)