Since Matt is running this with a 'puter based front end (which is becoming far more common), it'd probably be a lot easier to dial in some EQ to provide rough BSC compensation. Even though the little Topping amp has more than enough power (25WPC) for the FE126E, as Scott notes, it'll have very low output impedance which will not mitigate the Fostex's signature forward/dominant presentation, and I think it'd be a same to waste any power with passive speaker level components.
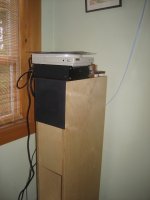
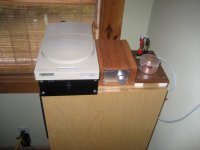
Also note that his enclosures are pictured situated at the end of a bed, with no rear or side wall boundaries that could otherwise provide some bass coupling that would reduce the need for compensation.
Also note that his enclosures are pictured situated at the end of a bed, with no rear or side wall boundaries that could otherwise provide some bass coupling that would reduce the need for compensation.
The TP21 does provide a good amount of bass for it's size, and as you say, more than enough power for the FE126En.
However, I am trying to find a way to arrange them positioned against the wall and am currently simply using the iTunes EQ to bring the bass to a level to better match the miss & highs. This does give a very satisfying sound as long as the bass is not brought up so high that it distorts.
However, I am trying to find a way to arrange them positioned against the wall and am currently simply using the iTunes EQ to bring the bass to a level to better match the miss & highs. This does give a very satisfying sound as long as the bass is not brought up so high that it distorts.
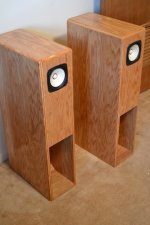
MattWW, beautiful build! Well done. Now all you need is a decent tube amp to power them!
..would love to power them with a tube amp, but as I am only 16 and had to save up a long time to build these, I don't think I will be in the near future!

But the little Topping will do just fine for the moment
Could you share the baffle step correction info with us?
Sure. I learned about it from this site; Loudspeaker Diffraction Loss and Baffle Step Compensation Circuits
I used a 1.2 mH inductor and 4.7 ohm resistor in mine. I really just guessed at the amount of attenuation I needed. I used comments from this project to base my guess on.
Fostex FX120 DIY Bass Reflex Bookshelf Speakers
I was looking at doing that project when I came upon the Madisound kit, and opted for that instead.
I built my BK-12s about a month ago. Is it possible that the "brassiness" people experience is due to a needed break in period? After about 100 hours of use, mine seemed to have calmed down. OR did my hearing adjust to the speakers?
I'm still fine tuning the room with speaker placement. My carpeted room is about to get hardwood floors. What changes and solutions could that bring?
I'm still fine tuning the room with speaker placement. My carpeted room is about to get hardwood floors. What changes and solutions could that bring?
I just bought a kit from Madisound. This is my first DIY attempt and as my woodworking skills extend to cutting my fingers off, I am a bit wary of noobie mistakes.
I have sanded all the edges and removed the fine fibres left by the CNC process. I have taken out a small home mortgage to purchase sufficient bar claps to do two speakers at once. Even given this doubling of build capacity, I estimate, at one day per piece, for this to take me the better part of two weeks to assemble.
Are there any pointers for the wood-illiterate?
You picked a good one to start with. I have to say that these were my first too, and I'm extremely pleased. Your skills are probably good enough to have great results. I built mine from the plans only with 3/4" oak plywood, and I'm new to the speaker lab and the woodshop.
What I've heard is that that the flat packs are precise and easy to work with.
What I've heard is that that the flat packs are precise and easy to work with.
Attachments
When assembling the builds I've made, an adjustable try square is indispensable. As you set up a glued side check it frequently. I'd suggest not going clamp crazy until you've handled a few pieces. Glue creep and losing your square corner can come as the glue settles in.
Experiment if you wish but I've found that letting gravity set the glue with a good hand squeeze will allow that try square to do it's work: when both sides touch the square and the edge is flush you've made a good start. As you go, there are other checks for the completed carcasse such as the diagonal measure: both diagonals will measure exactly the same if in square. An inexpensive wooden folding carpenter's rule will read better that a windup or 'rolling' tape measure. The reason is that the clip at the end may not be tight or a true measure.
Experiment if you wish but I've found that letting gravity set the glue with a good hand squeeze will allow that try square to do it's work: when both sides touch the square and the edge is flush you've made a good start. As you go, there are other checks for the completed carcasse such as the diagonal measure: both diagonals will measure exactly the same if in square. An inexpensive wooden folding carpenter's rule will read better that a windup or 'rolling' tape measure. The reason is that the clip at the end may not be tight or a true measure.
Ask them. Althou i suspect they don't have them, their contractor does.
Using CNC for these (except for maybe rebated baffle) seems a waste... all the panels could be cut-out on a big table saw in the time it would take to setup the CNC.
dave
I'd concur with Dave- the only part on these for which I'd wanna use a CNC would be the rebated driver cut-out. It'd take no more than 10 minutes to cut all the parts to rough size, and since 5 pieces should really get a bevel cut on at least one end (not all 45`) you'll need either a 5-axis CNC router (not lathe), or a good ole table saw and tenoning jig.
Fostex's pincushion design is rather more than 3 lines of code. While our CADCAM environment is rather arcane and the CNC code isn't readily accessible, I do have my own DXFs for both the BK12 and the Fostex driver, if those could be of any help.
Thanks for the thoughts. I must admit my nativity when it comes to these machines capacities. I do know it is not a 5 axis though. The only reason it seemed so useful was the (not correct term) tongue and groove style construction of the Madisound flatpacks that allows for pretty effortless assembly. I'll check with my cousin about the DXF files. Thanks again guys!
note that the Madisound kit does not rebate the Fostex driver for flush mounting (which many folks posit is not essential with their thin flange and "diffraction control" plastic insert ring), but they to chamfer the rear side of driver through hole, which should not really be considered optional when mounting any small FR driver on material thicker than ~12mm (1/2")
Refraction ring/Grill
Here is my solution.
I read that the paper cones that Fostex uses are prone (like many materials) to ultraviolet degradation. Since the driver face stands about an eighth of an inch proud of the speaker baffle, I made a speaker grill frame from door skin plywood with a cutout just the size of the driver face, covered it with a very light knit synthetic fabric (cost about a dollar and a half for a running foot). To retain the grill, I drilled four thru holes for 1/4 diameter X 1/8 inch thick rare earth magnets from Lee Valley. I also drilled and countersunk for #8 X 1/2 inch flathead wood screws on the speaker cabinet. To make sure the magnets lined up with the screws, I first drilled 1/8 inch holes in the grill frame to use for a template to mark the speaker cabinets.
I like fabric grilles for an entirely different reason (named Sue) - indeed a major factor in all my calculus of aesthetics. As to the Fostex paper cone material being prone to UV induced deterioration, it's been my experience that all synthetic polymer / plastic cones and certainly foam surround materials of yester-yore are at least as much if not more so. In other words, I'd probably be more concerned about the cumulative effects of UV on my epidermis and retinas than on the paper cones of speakers used indoors.
Note that with the same template alignment you already use, and careful setting of depth in holes drilled in the baffles, you can fluch mount the same magnets ( Lee Valley 1/4" rods) on the enclosures and bury under veneer ( or paint over) , for a elegant hidden, and auto-aligning installation - the grilles will literally jump the last 1/2" or so out of your hands and land in place. Of course when you use a pair of magnets in this fashion, you do need to pay attention to polarity of all 8
Magnets
Actually, I used four magnets per grill and four steel flat head screws in the speaker cabinet. The amount of force the magnets isn't all that powerful but enough that the grill doesn't fall of when touched. The magnets are glued in place with super glue. I also forgot to mention that the fabric came from Joe Ann's Fabrics, which is why it cost so little.
Actually, I used four magnets per grill and four steel flat head screws in the speaker cabinet. The amount of force the magnets isn't all that powerful but enough that the grill doesn't fall of when touched. The magnets are glued in place with super glue. I also forgot to mention that the fabric came from Joe Ann's Fabrics, which is why it cost so little.
- Home
- Loudspeakers
- Full Range
- Madisound BK12m