You need a clamp-on aluminum straight-edge. They look like this: All-In-One Low-Profile Contractor Clamps, New & Improved! - Rockler Woodworking ToolsIt has to be long enough to reach across the stock. Straight-edges are available in lengths up to at least 60 inches. Be sure to factor in the actual kerf line, don't just use the alignment guide on the saw.
Which saw? Any quality circular saw that's light enough for you to handle. I have a titanium Porter & Cable that works extremely well. It's a matter of feel.
Which saw? Any quality circular saw that's light enough for you to handle. I have a titanium Porter & Cable that works extremely well. It's a matter of feel.
Buy a good quality saw and a thin kerf carbide blade. Get a couple clamps and make a sawboard. To make the sawboard it helps, but isn't mandatory to have a straight edge.
Great Jigs: The Sawboard | Tom's Workbench
EDIT: What JTW shows works also.
Great Jigs: The Sawboard | Tom's Workbench
EDIT: What JTW shows works also.
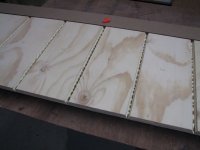
Take an 8" or wider piece of 10' x 3/4" clear pine available at most home improvement stores. Whatever width you need. The nicer and straighter the board you get, the less chance you will have of replacing it. Oak is nice. Buy or rip two smaller pieces about 1.5-2" wide and the same length. Create a track for the saw. Place the saw in the track, blade up. 6-8" from the end, start sawing by dropping the blade down and cutting throgh your track. Then rip a line following the track down ro the otjer end, leaving as much roomthere as inthe beginning of the cut. If you have chosrn your wood well, you now have a jig that will rip straight cuts with no chance of the back end of the saw drifting. Drift is thd main reason it is difficult to rip straight lines with a circular saw, regardless of blade or saw. Better blades help, but the jigcost same price and you can get cheaper bkades from then on.
So if I am reading you right, you have created a double sawboard with a slot for the blade but not cut through the to ends or you would have two sawboards. On the surface that sounds good but how do you align the slot with the intended cut line? Also, it seems that this might be a difficult build to have the close tolerance on the alignment of the track. It can't bind and it can't be loose either.
To get that straight edge?
Well, I have the second heaviest, nastiest, powerful worm drive circular saw on the planet. I then swap out the regular Irwin blade (the newer expensive ones are nice as you don't lose teeth as often -- only saw blade that I haven't lost a tooth yet) and use a nice Diablo blade with an amazingly thin kerf and lots of teeth for finishing; though the Diablo blades are more for construction, it is a far cheaper route than going with the Forrest or Freud blades (especially when the Diablos are on sale). I grab the very old 6-foot long metal ruler my uncle gave to me and a couple of low profile C-clamps (with added rubber pads). Then I set the blade height to just get through the thickness of the wood.
Then the best part. I drop the wood onto a couple of sheets of blue styrofoam insulation (I have lots of it from a friend who bought too much) and that is on the only flat part of the garage floor. Clamp down the ruler onto the wood, check with the saw blade, mark the cut with pencil, mark the ruler in case it moves, make doubley sure with an adjustable square, and we're good to go. Measure, layout, measure, and cut once. Nice and slow means less tearout and chipping.
Just in case, why worm drive? I had a "Craftsman Industrial" sidewinder for the longest time and when that started to burn out from a good 15 years of use, there was a RIGID wormdrive one on sale. When this one gets burned out, I'll buy whatever is strong and cheap. Great thing with wormdrive is that I can see the blade easily without craning my head over the body of the saw and dang, the motor never once has sounded like it was under load. Bad thing, it takes some time getting use to the weight.
Good lighting also helps.
So if I am reading you right, you have created a double sawboard with a slot for the blade but not cut through the to ends or you would have two sawboards. On the surface that sounds good but how do you align the slot with the intended cut line? Also, it seems that this might be a difficult build to have the close tolerance on the alignment of the track. It can't bind and it can't be loose either.
Thats correct. You can see your crows feet, marking line through the cut. I can assure you that using this technique, the cheapest saw and blade will cut like a worm drive and the finest frued blade. Thats an overstatement, but you get the point. Drift. The back end of a saw blade is going to follow the pathof least resistance. Even cutting plywood, it tends to drift to the open area. The nicer and toughr the substrate, the more likely it will happen.
Cool idea, buzzforb. I was going to try something like this
DIY Track Saw (comparable to Festool and Dewalt) - YouTube
but maybe like your design better, you could make a wider saw kerf to see the mark easier.
DIY Track Saw (comparable to Festool and Dewalt) - YouTube
but maybe like your design better, you could make a wider saw kerf to see the mark easier.
Using a circular saw, what tools do I need to cut perfectly straight for speaker boxes? Also, what circular saw do you recommend?
Where are you getting the wood? Most home improvement places like Lowes or Home depot will rip up 4 x 8 sheets for you at no charge. Helps getting it home. I usually do that for shelves.
For speakers, I would have them rip the sheets to the sizes needed but a little oversize, then use a table saw to do final cuts. Buy a used portable table saw, or get one on sale. I think it's a better investment than a circular saw for this sort of job, but it depends how big the speakers are, and how picky you are, long term plans in this area, etc.
I also use an aluminum metal edge clamped to the wood if I need to rip up a large plywood sheet.
Another option is to find a local woodworking club, and join it. They will usually have a facility with really nice tools for all members to use. Or you can find a member who will let you use his shop for good beer/single malt.
Once you use a decent cast iron table saw to do this, it's hard to go back.
I don't mind using a sawboard at all. If I am lazy, I still get a bit of a wander from time to time on a good table with a good fence. It's bad Cal is what it boils down to. I must be more careful when I am using the board and clamps 'cause I can't remember the last time I had anything but a perfect cut with the circular saw. The only thing you can't do is repeat the cut so it may be straight but no two pieces will be the same length like they are with a fence. I find that kinda important when doing these sorta cuts. ")
Attachments
Now we can talk about blade set. I once bough a blister packed blade that was clearly on the bottom of a pile that had been bounced around. The set was reduced on one side. It would not cut straight in a table saw with the fence to the right of the blade. It would with the fence set to the left.
So if you are using a circular hand saw and it keeps drifting away from the guide, return the blade as damaged. Then find a better place to buy blades!
So if you are using a circular hand saw and it keeps drifting away from the guide, return the blade as damaged. Then find a better place to buy blades!
All true and wonderful advice. I was suggesting mine as something that works in just about every situation. I must admit Cal's work is impressive. I just found a thread the other day with some speakers you made that looked to be about 10' tall. I would love to see the look on my wife's face.
That's my approach when I need to get things as closely matched as possible. For home projects the absolute tolerance usually isn't critical - plus or minus 1/16" or even 1/8" is good enough for things like a pair of speaker cabinets. It's generally more important to get dimensions that match as closely as practical.I cut oversize using a vintage Skilsaw, then do a final cut with a router. For a straightedge I often use the factory cut edge of a piece of MDF.
In other words, if I want a panel that's (say) 20" wide and it comes out 19-15/16", that's nothing to get upset about as long as ALL of the 20" panels are 19-15/16" wide. And then some of them may want to be {20" + (1 material thickness)}, or {20" - (1 material thickness)} wide. That's where a decent router with piloted flush-trim bits comes in. A good router bit will cut a cleaner edge than any circular saw blade I've ever owned.
As already mentioned, using a shop-built straightedge to guide the router (or Skilsaw) baseplate is the key to success. Rather than trying to rip such a straightedge on a home-shop table saw, I'd go looking for one of those long aluminum T-squares used by drywall hangers, clamp it in position, and guide along its edge. Even cheaper than that - several years ago I picked up some pieces of extruded aluminum channels and angles at a scrapyard. This material has very straight edges - you can butt two edges against each other and verify this. (A friend uses some lengths of unistrut, but I don't know how he avoids errors due to the rolled, rather than square, edges.) Using these techniques you still have to measure very carefully to get good parallelism between edges, but a shop-built adjustable-offset router base can help you solve that problem, too.
Need a panel that's wider or narrower by a material thickness? Don't measure - place a scrap piece of the material (assuming that its thickness is uniform from piece to piece) against the straightedge to shift the cut by exactly one material thickness, or to mark the new location for the straightedge.
Even this method can produce a stack of panels with slightly different dimensions. Declare one panel - generally the narrowest - to be the "gauge" dimension. Use the flush-trim router bit to make them all the same dimension. My unsubstantiated eye-ball estimate is that a decent router, spinning trim bits with low runout pilot bearings, can track the reference edge within about 0.010". Are you tired of rectangular boxes, and want to get artsy with the shapes of your projects? Once you have a reference pattern to work from, the router can copy any non-rectangular or irregular shape with internal corner radii down to 1/4" (3/16" if you can find a good 3/8" pilot bit).
Dale
I don't mind using a sawboard at all. If I am lazy, I still get a bit of a wander from time to time on a good table with a good fence. It's bad Cal is what it boils down to. I must be more careful when I am using the board and clamps 'cause I can't remember the last time I had anything but a perfect cut with the circular saw. The only thing you can't do is repeat the cut so it may be straight but no two pieces will be the same length like they are with a fence. I find that kinda important when doing these sorta cuts.
Cal,
That is usually the result of the fence being out of parallel with the blade. Get a dial indicator & align the fence so that it's parallel to the mitre slot within 0.005". If you get that adjustment dead on the workpiece will track the fence and slide through the blade effortlessly.
I was told that the out-feed end of the fence should be several thousandths wide of parallel, to avoid any tendency to bind the work between the fence and blade. (That stalls the blade if you're lucky; kicks back the work or breaks the blade if you're not.)That is usually the result of the fence being out of parallel with the blade. Get a dial indicator & align the fence so that it's parallel to the mitre slot within 0.005". If you get that adjustment dead on the workpiece will track the fence and slide through the blade effortlessly.
Dale
- Status
- This old topic is closed. If you want to reopen this topic, contact a moderator using the "Report Post" button.
- Home
- Design & Build
- Equipment & Tools
- What tools do I need to cut perfectly straight edges with a circular saw?