Professionally:-
lasercutting is the way I produce cut out panels.
You can specify any shape you want, get great accuracy and a decent finish.
Only limitation usually is the hole diameter must be bigger than the material thickness.
Challenges with this are setting out a DXF file in CAD, and finding a lasercutter company that wont charge too much for a minimum order.
At home:-
I usually mark out with a soft pencil. Then drill copious holes (Centre punch the hole centres before drilling, so they don,t drift off centre when you drill through.)
Cut out extra material with a hacksaw. I have one where the blade can be set at 90 deg angles. Then its down to filling with a round and flat file set. You need to make sure that the files are sharp, and then removing material is easy.
Attachments

Thanks all - lots of great practical (and not so...) ideas. Envious of you who have relatively easy access to Front Panel and the likes. Here we think we are pretty damn lucky just to get a pair of pliers and a 12 inch shifter...
Distortion of the panel is the biggest problem I have, closely associated with my impatience and tight-fisted approach to capital expenditure. Guess the first thing I should buy is a can of Patience and a two-dozen pack of Realism.
Distortion of the panel is the biggest problem I have, closely associated with my impatience and tight-fisted approach to capital expenditure. Guess the first thing I should buy is a can of Patience and a two-dozen pack of Realism.
The key is to invest in good metal files. Rattail, triangle, flat, square in various sizes. If you've only ever used the rusty ones that were rattling around in the bottom of your dad's toolbox since before you were born, new files will be a revelation. Scribe the lines accurately, chew the hole out undersize with Unibit, nibbler, cutoff wheel, or saber saw, and file to fit. File in one direction only (away), holding the file with two hands. For small openings, like D-shaped holes for banana jacks, jeweller's files are helpful.
Last edited:
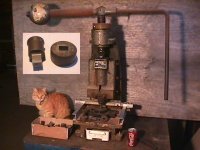
Flypress
Once upon a time, every little plumbing shop had one of these, but since they became supermarkets, the old presses got flogged off for scrap. They can still be found if you look hard enough.
Note hastily inserted piece of plywood - don't want the world to see how untidy my workshop is") .
.
M
Once upon a time, every little plumbing shop had one of these, but since they became supermarkets, the old presses got flogged off for scrap. They can still be found if you look hard enough.
Note hastily inserted piece of plywood - don't want the world to see how untidy my workshop is
.M
Attachments
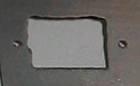
I used my Rotary Tool (Dremel) with Cutting Bit i bought from Ebay..
An externally hosted image should be here but it was not working when we last tested it.
Note hastily inserted piece of plywood - don't want the world to see how untidy my workshop is
M
Lol - in MY w/shop, you'd be lucky to FIND the press. And the cat would have been buried under something that fell over too.
I used my Rotary Tool (Dremel) with Cutting Bit i bought from Ebay..
An externally hosted image should be here but it was not working when we last tested it.
Hmm so did I and the result was terrible
I then chain drilled and filed for a much better result... my bit was slightly different though (spiral flutes) so may have been too agressive (and I was probably too impatient). Admittedly I was trying to do it quickly by using a steel template (old pc case) and just run around the existing hole. The bit just tore through the steel resulting in the mess shown Tony.
Attachments
Laser? EDM? CNC mill?
I usually mark it out, drill near the corners, and file, file, file. Nice job when I'm done, but there's GOT to be a better way. Takes forever and calls for a lot of patience. Out of all the things that are done by drilling/filing, the IEC 320 mains connector thing turns out to be the most difficult for some reason.
For larger rectangular holes, I drill near the corners and use a sabre saw with the finest blade obtainable, going very slowly, giving the edges a wide berth and taking care not to mar the finish (if BOTH sides have to be finished, this is a BAD IDEA!). In any case, this requires great care to avoid marring the surface with the saw's sole plate. Beats anything else I've tried for larger holes, (6-8" square or larger)
For smaller square holes (1/2"), I just drill the largest hole I can and file the edges square.
I'll admit to sometimes drilling a series of close-spaced holes (3/16 or 1/4), using dikes or a fire-ax or something to break the "web" between holes, then file, file, file. Good for odd-shaped holes of medium size, say 2-3" -or narrow slots. Have bandages handy.
Nibbling tools- I have to really consider if there might be a better alternative- and there usually is. They tend to mar the surface about 1/8" on either side of the slot they cut. Still need to file or otherwise finish. And for VERY large holes, my hands give out before the slot is cut. I generally agree- these instruments of torture offer only false hope, and should be banned.
A set of high-quality, perfectly clean and SHARP files is invaluable.
Practical but not pretty
Buy an IEC extension cable: the male end accepts the female end of a regular IEC cable. Cut the end and connect it to the amp via a round hole and grommet. I'm not sure what makes an IEC connection so desirable - all my pro amps have little pig tail sort of cords on them, like a toaster. I don't se what's wrong with that approach for DIY too.
Buy an IEC extension cable: the male end accepts the female end of a regular IEC cable. Cut the end and connect it to the amp via a round hole and grommet. I'm not sure what makes an IEC connection so desirable - all my pro amps have little pig tail sort of cords on them, like a toaster. I don't se what's wrong with that approach for DIY too.
Here is something that will make the filing easier. Put pieces of wood on both sides of the panel and clamp them in place with a couple of C clamps. Make sure the wood edges are lined up on your target line. Then file away.
Putting these pieces on either side of the panel makes the panel stiffer and makes the filing much faster. They also serve as guides to keep you filing flat and to tell you when to quit.
Dr. Spiff
Putting these pieces on either side of the panel makes the panel stiffer and makes the filing much faster. They also serve as guides to keep you filing flat and to tell you when to quit.
Dr. Spiff
I dont know if its been mentioned
But files fore alu are made with a very special "cut"
They really are way more effective than ordinary ones
Especially if a lot of material is to be removed, or fore massive alu
Fore the last finer work, ordinary files are ok
Fore thin alu sheet I have also used a slim(5-10mm) and very sharp carpenters chissel, and a hammer and its important to remember hardwood as backing, or it will bend
What I find the hardest is to avoid scratching the surface
But files fore alu are made with a very special "cut"
They really are way more effective than ordinary ones
Especially if a lot of material is to be removed, or fore massive alu
Fore the last finer work, ordinary files are ok
Fore thin alu sheet I have also used a slim(5-10mm) and very sharp carpenters chissel, and a hammer
and its important to remember hardwood as backing, or it will bendWhat I find the hardest is to avoid scratching the surface
- Status
- This old topic is closed. If you want to reopen this topic, contact a moderator using the "Report Post" button.
- Home
- Design & Build
- Construction Tips
- Square holes in aluminium...