Those round cells used in laptop battery packs are gold! some people speak quite highly of them in terms of durability.
I was thinking to go for polyquest packs, they're pretty affordable (for lipoly packs...) I have a compu-control charger (Graupner Ultramat), but don't know if it keeps the packs alive for a long time... Other charger-pack combinations seem to have wiring going from every cell in order to monitor each cell during the charge process (to prevent cell unbalance).
djQuan can you elaborate more on this 4-step process, didn't find any detailed info on this in my search for a good charger...I thought if the charge didn't exceed 4.2 Volt the cells would be ok?
I must say the Ni-Cad packs I built in bottles (from "Apollinaris" soda waters, very good bottle for "D cell" packs..) proved very handy for many applications...And they proved to be very durable...And you can fit them in the bottle holder on a bicycle....")
If anybody wants to build one, I can recommend Saft Vre-d5500 cells, they're unbeatable (ask Anton Bauer pack refurbishers)
Cheers
I was thinking to go for polyquest packs, they're pretty affordable (for lipoly packs...) I have a compu-control charger (Graupner Ultramat), but don't know if it keeps the packs alive for a long time... Other charger-pack combinations seem to have wiring going from every cell in order to monitor each cell during the charge process (to prevent cell unbalance).
djQuan can you elaborate more on this 4-step process, didn't find any detailed info on this in my search for a good charger...I thought if the charge didn't exceed 4.2 Volt the cells would be ok?
I must say the Ni-Cad packs I built in bottles (from "Apollinaris" soda waters, very good bottle for "D cell" packs..) proved very handy for many applications...And they proved to be very durable...And you can fit them in the bottle holder on a bicycle....
If anybody wants to build one, I can recommend Saft Vre-d5500 cells, they're unbeatable (ask Anton Bauer pack refurbishers)
Cheers
I just did a search and forgot where I got a PDF. but here's a little summary.......
the first stage is constant current charging of deeply depleted cells where each cell voltage is <3V. the cell is charged at constant current at a reat of 0.1C. (C stands for the capacity of the cell, for example, for a 2400mAh cell, C = 2.4A)
when the cell voltage exceeds 3V, it switches to normal constant current charging at 0.2 to 1C rate.
stage three is when the voltage of the cell reaches 4.2V, it is then charged at constant voltage @ 4.2V. it is recommended that the voltage regulation be better than 1%.
stage 4 is the end of charging. to monitor the full charge condition, measure the current drawn by the battery at stage 3 and when this drops below 0.02 to 0.07C then charging is terminated. trickle charging is not recommended or instant damage to the cells will occur.
if you want the PDF file, post your email, it's 1.75MB. really big. also contains some charger circuits.
the laptop battery that I dismantled also has the wires linking to each individual cells and is indeed for that purpose of monitoring the charge state of each cell to balance them properly. the pack contains complex circuitry and even temp monitoring, low voltage cut off and even serial data connection to the laptop!
wow yeah, do send me the file vb.degroot@chello.nl
Thanks!
I actually am quite satisfied with the nicads, but they're to heavy on the bike.....
Thanks!
I actually am quite satisfied with the nicads, but they're to heavy on the bike.....
mail sent.
I also have a datasheet for Ni-MH charging characteristics. interested?
Ni-MH is much simpler to use and make a charger for since it only needs constant current charging but the most reliable way to detect the full charge condition is to measure the increase in cell temp.
just take note that if you make a charger for Li-ION cells, use cells that you got cheap. they're easy to damage by improper charging and they are not cheap.
Ni-MH are more forgiving.
I guess I got lucky. I found a set of new 8 li-ion 18650 cells really cheap (compared to getting them off retail sites).
You can't beat the size, and for the price of making your own charger you can get one for $20-30US off batteryspace.com
It has a protection circuit and stops charging at max capacity so it won't damage your pack. I tried one out and I can say they work. I left my battery charging and forgot all about it. I was worried I'd come home to a smoking mess of bubbling, burning and smoking wires, but instead my battery was fine and the friendly green LED indicating charging was finished greeted me.
yeah regarding the protection features on the battery, the one I bought for my pack is supposed to be soldered at each cell. I got a pre-made pcb that I had to solder to my pack. Since the pack I made is in 4 series 2 parallel, I had to wire between the junctions of the two parallel batteries. So instead of monitoring each cell in the pack, it measures the 2 cells as one since they are in parallel. It treats that as a cell at normal voltage but at a larger capacity. It sounds more complicated than it is and looks confusing. You also have to wire between the output + and - wires so that adds 2 more things to the circuit. But hey, it works. I haven't gotten any dead cells, and I haven't caught anything on fire so I can't complain. Besides, the shrink wrap hides the wiring and it helps keep the pack protected. So if you don't want to make the charger yourself I can recommend one to you. For only 19 bucks, it would have cost me more to make one than to buy one already made.
You can't beat the size, and for the price of making your own charger you can get one for $20-30US off batteryspace.com
a 16V 1.8A SMPS wall wart cost me $1 a few years ago. the charger cost me nothing since it was built using parts scavenged from stuff at home since it used generic parts like op-amps, bjt's and some passives.
basically, all it cost me was the work.
beats the hell out of $20 and a few weeks of wating for it in the mail. 
I can't say it works as good or better than the stuff you're using but it serves the purpose. and that is good enough for me.
and to note: the charger I made was designed to follow the four steps of charging needed by the cells which includes complete stop of charging when full and the only thing missing is the cell balancing feature.
Thanks djQUAN,
I allready have a pretty good datasheet for NiMH charging, but it can't hurt to read another...
I thought the most reliable method to detect a full charge was delta V?
Though NiMH have far less detectable delta V than NiCD my Graupner charger has adjustable delta V detection....
This charger never let me down, even 1 cell charges fine on auto detect and it can charge up to 5A currents!
When I bought it I actually searched for an ICE charger, but it was very hard to get here....
The reason I would build one is to make friends happy...
If I'm going for new packs they will definately be Lipoly.. Though I wonder when Li fibre packs become available..
Are we drifting to much offtopic here by the way?
My AMP 32 cuties start to sound pretty good! Now burned in for almost 60 hours...Very full and rich detail from this amp, I'm hearing so much detail from my cd's. I never thought such a small amp could
sound so good!!
Oh and, Jan wrote a new instruction manual for this amp! Now available at http://www.41hz.com support...
well, delta V was also a good way to detect but the increase in temp is easiest.
the PDF is in another computer so I can't sent it right now. going to send it when I get the chance.
Li-fibre? haven't heard of them........
I guess a new topic discussing batteries and chargers would be in order?
the PDF is in another computer so I can't sent it right now. going to send it when I get the chance.
Li-fibre? haven't heard of them........
I guess a new topic discussing batteries and chargers would be in order?
li fibre:http://trugroup.com/Lithium-Battery.html
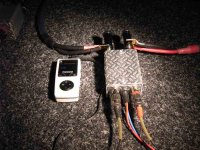
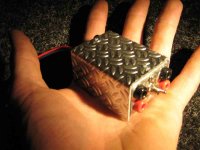
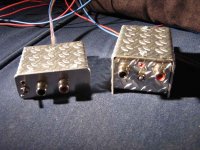
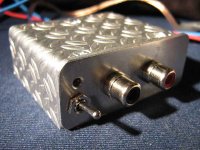
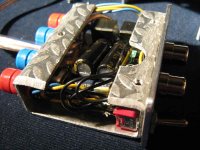
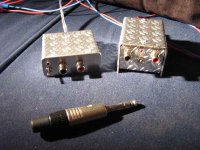
I encased another AMP32 (see pics) only the led doesn't get any power anymore. Must be something on the board, there is simply no voltage on the pcb pads...
But it produces fine sounds....
Here's a picture of it playing:
I encased another AMP32 (see pics) only the led doesn't get any power anymore. Must be something on the board, there is simply no voltage on the pcb pads...
But it produces fine sounds....
Here's a picture of it playing:
Attachments
That is what you call efficient use of space. What differences have you found with the 1000uF caps instead of the stock ones? I might have to try that mod.
Regarding your problems, I have no idea. I would hazard a guess that something shorted somewhere, possibly on your case. Take it out and go back over everything.
Check the diodes, maybe one of them went bad, that could help explain why you aren't getting any voltage. Or if you are using a switch, check the soldering on it. Mine stopped working, but it turns out one of the wires broke off my switch. I got really scared i shorted my amp somehow. My LED never worked in the stock position, I soldered it to the open hole in J3 but it never lit up. I had to wire it with a resistor to my power supply input for it to even function.
Also, you might need a heatsink, even though your chip is pushed against the case, it is diamond plate and thus not flat not giving adequate cooling contact. Thermal grease would help, but that is only for when you get the amp running again and at this point is the least of your worries.
Thanks for the response Xpunge,
The 1000uF cap version still has to break in, keep you posted on that...
I had a lot of trouble with the last one, but got it working at last, the soldering on the chip gave problems. When I tightened the screws it failed, than I had it working but it produced clicks from the speakers when I tapped on the case. After I went over the soldering again it worked flawless...
About the cooling contact, I got a piece of a sort of silicon coated cloth to put between the chip and case. Don't know what it's called, but it is
at least non-toxic.
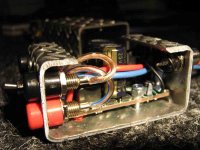
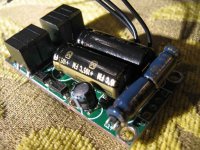
Here's a picture of one I made to fit into the smallest possible casing, I put the caps flat...
The 1000uF cap version still has to break in, keep you posted on that...
I had a lot of trouble with the last one, but got it working at last, the soldering on the chip gave problems. When I tightened the screws it failed, than I had it working but it produced clicks from the speakers when I tapped on the case. After I went over the soldering again it worked flawless...
About the cooling contact, I got a piece of a sort of silicon coated cloth to put between the chip and case. Don't know what it's called, but it is
at least non-toxic.
Here's a picture of one I made to fit into the smallest possible casing, I put the caps flat...
Attachments
You can have a listen if you like, since you live only 15 kilometers away from me..
I have never seen eyes become larger from my collegues at work...this was on my pvc-tube car speakers...
At home I have some more decent speakers and the sound of this amp is comparable with any D-amp I've tried. I use an AUDIODIGIT MC4x100 with TRIPATH TAA4100A chip (much like AMP9 from 41hz.com) and the little one sounds slightly more intense, but not fatigueing. The highs are ultra detailed but smooth, and the bass is very very tight and deep enough to my taste. Though the MC surely has a bit more reserve and grown-up sound, it tends to be a bit dull too. Compared to a SI T-amp the AMP32 really rocks and I can imagine it leaves no wishes open on high efficiency speakers.
I've ordered two AMP9 kits from 41hz.com by the way. One "low profile" which is 12V specific and smaller, the other "high profile" which uses slightly larger caps and is 27V specific. Very cool Jan offers this option, the AUDIODIGIT is 27V specific and allready sounds very good from a 12V supply..Only minute difference in gain and dynamics, so I'm very curious to compare it to the AMP9 12V specific kit.
Keep you posted on that....
I gave another demonstration at work with the little gem connected to two community subwoofers parallelled with granite tops, soon the room filled with people the one more stunned than the other! The sound pressure level went up so high people had to shout in eachothers ears!
The little gem connected to a lab power supply set to 14 volts.. the consumption meter went up to 2.5A on the beat!
Really high levels can be achieved within reasonable distortion level, absolutely amazing! Offcourse this had nothing to do with hifi...
The sound pressure levels in my room on my own speakers are lower, but paid back twice in quality offcourse....
A lot of my collegues can't live another day without one now...
- Status
- This old topic is closed. If you want to reopen this topic, contact a moderator using the "Report Post" button.
- Home
- Amplifiers
- Class D
- Amp 32 Pics + Review