Hi Luke! As WaveIO PCB was built, I can see limited options to what you want to do with actual PCB design + DB! Initially, with the DB I had in mind to offer the possibility for external clock for WaveIO. Practically, to do that I guess I'm forced to build up something that Ian already did: a FIFO!Hi Lorien, I would like to use the inbuilt clock at first, but I may upgrade the system at a later date. If I order WaveIO with daughter board, can I use on board clock and then maybe slave the clock in the future?
Anyway DB is out of the question for now as it doesn't exist!
In my opinion there are simpler ways to do it (but not so easy as a "plug and play" option DB would offer you!). The simplest path I see is to remove the local oscillators and solder coaxial cables instead providing two distinct external clock signals to it: 22.5792 MHz and 24.576 MHz. Leave the mux "thingy" to WaveIO!
The hard part could be the one in which you have to remove the oscillators from the WaveIO's PCB... it all depends on few key factors, including your experience in the DIY field. I can continue if you want to provide help on this matter but I have to know first if this approach is any good for you!
@ Eldam: I'm sorry I wasn't faster enough but is like Massimo and Walter said before me (thank you both)!
Kind regards,
L
Last edited:
Anyway DB is out of the question for now as it doesn't exist!
Hi Lucian, is DB project still alive?
A tweak that takes WaveIO up a notch
I confess, I am a Blackgate capacitor junky. That confession aside, I have long wondered if my BG addiction would play with Lorien's excellent WaveIO.
No longer a curiosity. To satisfy the itch, I soldered a 4.7u Blackgate N to pin 4 of X1 clock. (actually to the + side of the OSON feeding X1). For convenience I took ground back to the ground pin at the SPDIF test pad. This also done in parallel with vibration dampening by placing mounting putty directly on the clocks. Solder cap then squash a round ball of putty onto the clock and surrounding real estate. This alone does bring out more detail and bass but bleeding together. The BG cap just explodes the whole thing sharply into 3d.
OMG! Game changer. Massive jump in holographic presentation. Tight bass cranked up. Even high end extension.
If you have one of these somewhere, rip it out and try it here. If you can find one. buy it. This just allows WaveIO to continue to show what it is capable of.
I confess, I am a Blackgate capacitor junky.
I believe you can get help for that.
This also done in parallel with vibration dampening by placing mounting putty directly on the clocks.
I don't have any BGs to hand but I did try just covering the clock with a blob of BlueTak. You're right - it makes for a significant SQ improvement: sharper, better focussed.
Of course, the sensitivity of X-tals to vibration is not news. Another tip in like vein is to wrap a few turns of PTFE tape round the PCB's mounting pillars. (I'm reliably told that PTFE is used widely in aircraft electronics for vibration control.) If you can get the thicker, yellow-labelled tape graded for gas pipes, it's easier to work with but the thinner plumber's grade is fine too. As suggested by someone on AA's Tweakers' Asylum, try also wrapping some round the connectors on USB and similar cables. Neither tweak makes for a huge, night-and-day change but they're perceptible and not what you'd call expensive.
One thing that definitely didn't work was "de-coupling" the WaveIO PCB from its mounting pillars with 3mm rubber (Nitrile?) O-Rings sandwiched between brass washers - they made it sound decidely worse. Still, the trial at least convinced me that PCB mounting could be critical.
This just allows WaveIO to continue to show what it is capable of.
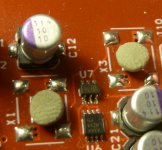
Agreed. Any chance of a pic of how you mounted the cap?
Dave
found it
Ok. I managed to take a reading: 4.5 mA (sorry, didn't think of a way for doing it before).
Hi. I'd like to upgrade the 3.3V supply that feed the optocoupler but don't find the current requirement. Informations would be appreciated, thanks.
Pierre
Ok. I managed to take a reading: 4.5 mA (sorry, didn't think of a way for doing it before).
Thanks... need BG AnonymousI believe you can get help for that.
wrap a few turns of PTFE tape round the PCB's mounting pillars...
Thanks for these tips. Also heads up re rubber washer..
I will snap a pic and post.. Basically laid flat on the pcb with one leg up against the solder that spills out from the smt on + side of Oscon. Pre tinned the cap lead and lots of flux. Then tacked with a soldering iron like a spot weld.
I did try just covering the clock with a blob of BlueTak. You're right - it makes for a significant SQ improvement: sharper, better focussed.
I've given it a try today with two little blobs of plasticine on X1 and X3.
I got a marked difference, better sound, not a subtle change, more details, better microdynamics, firmer in the low end, more things at the right place at the right time. It seems to sound louder as it always I experienced when a tweak or a change makes the sound better.
I'll give a try to the standoff tweak as well. I had interesting experience in the past with shigaclone comparing 4 to 3 to 2 to 1 standoff (2 in diagonal without rubber damper was the best).
Attachments
+1 with Blu-Tak. It's incredible but true.I've given it a try today with two little blobs of plasticine on X1 and X3.
I got a marked difference, better sound, not a subtle change, more details, better microdynamics, firmer in the low end, more things at the right place at the right time. It seems to sound louder as it always I experienced when a tweak or a change makes the sound better.
I'll give a try to the standoff tweak as well. I had interesting experience in the past with shigaclone comparing 4 to 3 to 2 to 1 standoff (2 in diagonal without rubber damper was the best).
My God those clocks are small!
Jonathan
I wondered if the insulation would tend to heat the chip and thus degrade its performance rather than improve it though I have been running all day without apparent ill effect. Tomorrow is, of course, another day. Whatever, Bluetak and the rest are known to be good for vibration control.. . . adding this on top most probably acts as a insulator, keeping the crystal at a constant temperature.
I did the same. Knead, Knead, Knead . . . Plonk! Ditto BTW round the USB socket.. . . My blob covers the entire area of you photo! Right over the Oscon caps and all.")
Dave
Hi ,
I feed the Wave I/O isolator chip from a board which is after it for an effectiv gnd isolation.
Here the PS is mixed with the one of the main board which is a I2StoPCM from Ian (much advised for great soundstage and jitter rejection). Ian's simultaneous board has two vias to hack the main voltage near the main plug which feeds the board (4.5 V for me so ok for the isolator chip as well !)
Am I ok like that or does the isolator chip need a standalone PS regulator (not shared) just for itself ! Is quiet regulator important for the isolator or does it just need its voltage without changing anything to I2S isolation ground job due to the voltage quality ? (any influence of the supply on the I2S lines ?)
Thanks
@ Wlowes, I'm agree BG N is outstanding with digital, I use it for the FGPA of my SqueezeBOX Duet (BG N 33 uF)... it becomes just an another device with it !
In my wave I/O i have the very little NDK XOS : do I need blue tack here also or just only for the biggest XO near the entry PS plug ? Not problem of cooling if the can is Blue tacked ?
thanks in advance,
regards
eldam
Last edited:
Dave
Thanks for the USB blob idea. I will give it a shot.
I leave my WaveIO powered 7/24. No apparent heat issues. I doubt the clocks draw enough power to generate many btu. If anything stable temp likely a good thing.
Eldam, for what it is worth, I also power my Ian I2S-PCM card with same supply as the WaveIO isolator. In my case I use a salas shunt after a pretty well filtered linear PS. Perhaps a small inductor before each would cut down noise from one to the other.
I put my clay on the 2 NDK clocks. (in my case FOX). I think this would be the primary benefit. I did not think about the clock that supplies the XMOS processor. Good idea.
OK. I added a blob of clay to the 3rd clock as Eldam suggests, and then around the usb connection. Definitely worth the add.
Also devised a way to clearly see the impact. Fist listen to a well recorded track with lots of micro detail. Turn the volume down to the point where the sound degrades. There is always a point when the dynamics and bass thin out and the system is sub par. Then add the clay ball. You will notice the sound floor has dropped and the sound is now full albeit at a very low volume. Then return to normal listening level and enjoy.
Also devised a way to clearly see the impact. Fist listen to a well recorded track with lots of micro detail. Turn the volume down to the point where the sound degrades. There is always a point when the dynamics and bass thin out and the system is sub par. Then add the clay ball. You will notice the sound floor has dropped and the sound is now full albeit at a very low volume. Then return to normal listening level and enjoy.
Hi Wlowes,
Did I suggest that ? Maybe more Blue Tack as you do yourself already ?! Maybe sand or quartz, but Clay ????
I have the last version of the Lorien's device with very very little NDK Xos : I putted upon it some blue tack but asking myself if it's avoid a better usefull cooling of the little can than a more usefull damping ? !
anybody has experience on ubuntu 14.04
i'm trying to use Audacious without succes on wav file...
there is a couple of option with alsa?
p { margin-bottom: 0.25cm; line-height: 120%; } sysdefault:CARD=L20
Luckit USB Audio 2.0, USB Audio
Default Audio Device
iec958:CARD=L20,DEV=0
Luckit USB Audio 2.0, USB Audio
IEC958 (S/PDIF) Digital Audio Output
dmix:CARD=L20,DEV=0
Luckit USB Audio 2.0, USB Audio
Direct sample mixing device
dsnoop:CARD=L20,DEV=0
Luckit USB Audio 2.0, USB Audio
Direct sample snooping device
hw:CARD=L20,DEV=0
Luckit USB Audio 2.0, USB Audio
Direct hardware device without any conversions
plughw:CARD=L20,DEV=0
Luckit USB Audio 2.0, USB Audio
Hardware device with all software conversion
is this pointless and i should stay with the borg collective (itune in yosemite)
my connection now is itune--luckit@192khz,i2s--LKSAudioDA--tubebalpre...
trying audacious--luckit@192khz,i2s--LKSAudioDA--tubebalpre...
the dac says its lock @ 192khz and i get the vu meter going in audacious but there is no sound coming out
any idea on my open source tribulation
thanks again for a fantastic usb sound card
Martin Gagnon
any health hazard down the road with this tweek?I've given it a try today with two little blobs of plasticine on X1 and X3.
Martin Gagnon
health hazard for the board not me...
Last edited:
- Home
- Source & Line
- Digital Line Level
- XMOS-based Asynchronous USB to I2S interface