well, after 2 attempts at the air carrier i finaly completed my mock up. If this went well i planned to remake it properly.
Lets just say it did go well
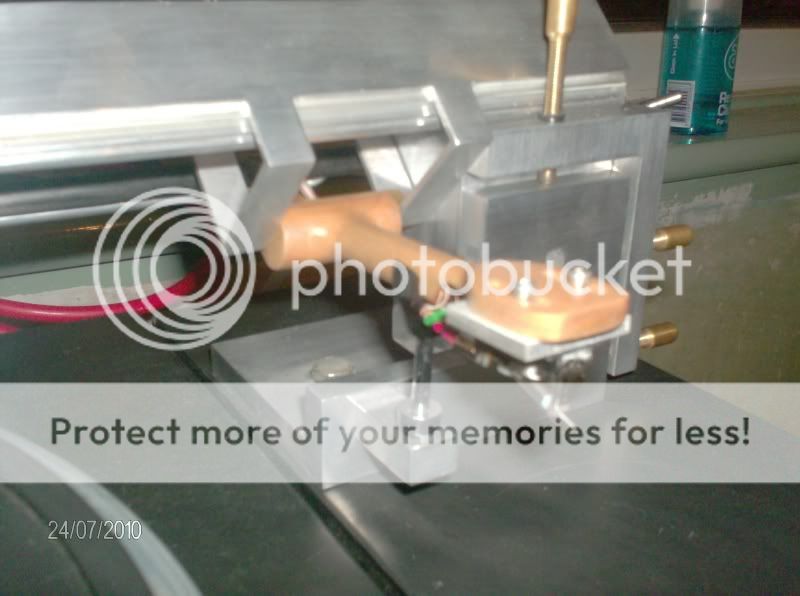
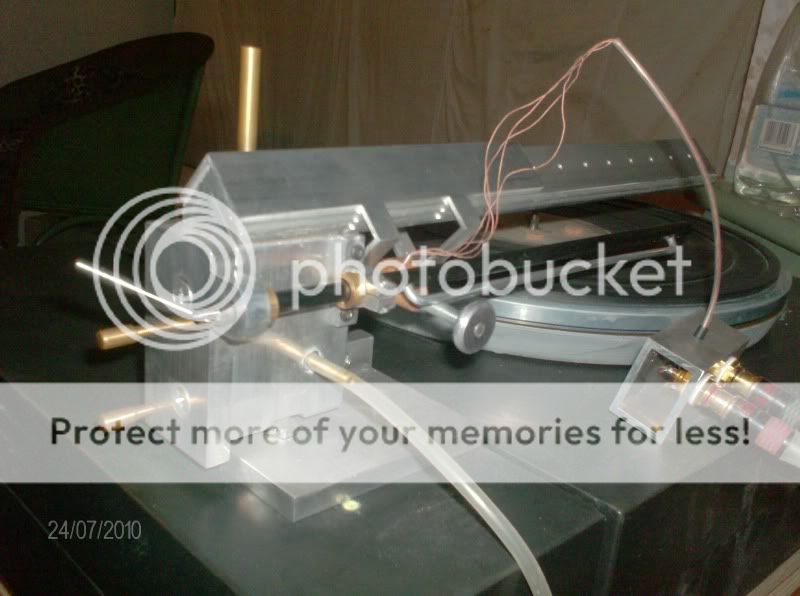
Before the pictures, i'd just like to point out this was a rough lash up. The arm wire was just an old failed phono lead attempt bodged to work, the counterweight is a drill bit and half a bolt latch .
The deck is on the floor and its all heath robinson, the air pump was humming away in the same room and there has been no attention paid to arm mass/cart matching etc.
BUT, it sounds fantastic! better than the rega rb250 which i normaly use. If it sounds this good on a shoddy lash up i cant wait to hear what it sounds like built properly!
Anyhow, heres some picks, its on a modded lenco.
Just thought i'd share my success to spur on others.
Lets just say it did go well
Before the pictures, i'd just like to point out this was a rough lash up. The arm wire was just an old failed phono lead attempt bodged to work, the counterweight is a drill bit and half a bolt latch
.The deck is on the floor and its all heath robinson, the air pump was humming away in the same room and there has been no attention paid to arm mass/cart matching etc.
BUT, it sounds fantastic! better than the rega rb250 which i normaly use. If it sounds this good on a shoddy lash up i cant wait to hear what it sounds like built properly!
Anyhow, heres some picks, its on a modded lenco.
Just thought i'd share my success to spur on others.
cool and well done!. that looks like a fun thing to try so i have some questions
does the air pump in underneath that angle piece with all the holes drilled in it?
does the arm only move because of the sideways pressure from the stylus?
what did you use for a compressor? how many PSI.
does the air pump in underneath that angle piece with all the holes drilled in it?
does the arm only move because of the sideways pressure from the stylus?
what did you use for a compressor? how many PSI.
My congrats, graeme; keep the project going!
What I'm always using for the slider is a piece of the SAME Alu profile as used for the rail. I found any invisible mismatch between profiles is critical and reduces slider's "payload". I have 20X20X180 mm slider which easily bears my hefthy 153 gramm hardwood arm, using two regular aquarium pumps connected in parallel as an air supply.
Cheers,
Michael
The speakers are a kit available in the UK form 'world audio designs'
Heres the link, there very good http://www.world-designs.co.uk/acatalog/SpkrKits.html
As for the angle, i know thats whats supposed to happen.
I made 2 air bearings, one with 1.5x20x20, the gold one, and one in 1.5x25x25
For some reason, the combination in the pic is the only one that doesnt bind with the arm in place, this combination moves freely.
I have done all i can to smoothe the pieces but these two together work best.
Im going to get some valve lapping compound and have another go at making things sit even better.
Heres the link, there very good
http://www.world-designs.co.uk/acatalog/SpkrKits.htmlAs for the angle, i know thats whats supposed to happen.
I made 2 air bearings, one with 1.5x20x20, the gold one, and one in 1.5x25x25
For some reason, the combination in the pic is the only one that doesnt bind with the arm in place, this combination moves freely.
I have done all i can to smoothe the pieces but these two together work best.
Im going to get some valve lapping compound and have another go at making things sit even better.
graeme uk-
Careful now. Valve compound is formulated for hardened steel, you want to polish soft aluminum, and it needs a much finer grit. The “fine” valve polish has a grit around 220, you want 600 min. If you have a hard time finding a good lapping compound, you might try making a slurry out of an abrasive cleaning powder (Comet Cleanser here in the states) and water, and then finish up with toothpaste for a “mirror” finish. Another approach would be to wrap 600 grit wet/dry paper around one piece, and then the other..be sure to keep it wet or it will load up.
-Casey
Im going to get some valve lapping compound and have another go at making things sit even better.
Careful now. Valve compound is formulated for hardened steel, you want to polish soft aluminum, and it needs a much finer grit. The “fine” valve polish has a grit around 220, you want 600 min. If you have a hard time finding a good lapping compound, you might try making a slurry out of an abrasive cleaning powder (Comet Cleanser here in the states) and water, and then finish up with toothpaste for a “mirror” finish. Another approach would be to wrap 600 grit wet/dry paper around one piece, and then the other..be sure to keep it wet or it will load up.
-Casey
Thanks for showing this. It caused me to read more about Ladegaard arms and start building one as well. so far i have some nice titanium, aluminum,carbon and bronze. some is even machined and joined together.
and i learned how to strip the anodizing off the L extrusion with extra strength drain-o I wish i knew that when i built the "scrounge clone" and sanded all the anodizing off by hand!
i was wondering, since bronze is sort of self lubricating and runs very smooth would it be good for the knife edge, I.E. does the "smoothness" still apply at such a microscopic scale or would a harder material be more suitable. i was also thinking about using 2 points rather than the knife edge.
and i learned how to strip the anodizing off the L extrusion with extra strength drain-o
I wish i knew that when i built the "scrounge clone" and sanded all the anodizing off by hand!i was wondering, since bronze is sort of self lubricating and runs very smooth would it be good for the knife edge, I.E. does the "smoothness" still apply at such a microscopic scale or would a harder material be more suitable. i was also thinking about using 2 points rather than the knife edge.
I dont think there will be much difference between two points or a knife edge. I also dont think that the self lubricating properties of phospher bronze is needed as there shouldnt be and movement between the knife and the v block.
I am working ovewr the arm now sorting it out. Once i have it performing at its best ill make a tidy one.
Ill probably end up making a few in total
What are you using titanium for?
I am working ovewr the arm now sorting it out. Once i have it performing at its best ill make a tidy one.
Ill probably end up making a few in total
What are you using titanium for?
the carbon tube is held on to the bridge piece with a piece of Ti and a Ti bolt. the counterweight will also sit on a Piece of ti rod. My Taig mini lathe HATES titanium
I have quite a lot of Ti bike wheel and bottom bracket axles from back in the day when they used steel and replaced it with Ti to save weight. I also have a bunch of various other Ti bolts and hardware nobody wants for bikes any more.
I have quite a lot of Ti bike wheel and bottom bracket axles from back in the day when they used steel and replaced it with Ti to save weight. I also have a bunch of various other Ti bolts and hardware nobody wants for bikes any more.
Thats handy
Wish i had access to some more tools, dont even have a bench or a vice at the moment. I also nearly lost an eye today from a shattering cutting wheel. A big lump hit me in the eye and stuck in, had to pull it out! God knows how i got away with that, goggles from now on i think
Im rebuilding it at the moment, still doesnt look pretty but ill wory about that when ive optimised its performance.
A big lump hit me in the eye and stuck in, had to pull it out!
YIKES!!

If you are saying that it actually stuck in the eyeball..don't "F" around.
A friend of mine some years ago, managed to poke himself in the eye with a leather awl. He didn't think much of it, except how lucky he was (sound familiar?). Well, the next morning he looked in the mirror and found his eye looked like a cats. The retina had been detached, and was slowly oozing to the bottom of his eye. His eye was saved..barely. Had he gone in immediately, they told him it would have been a lot easier.
Take the above for what it's worth.
-Casey
I didnt look in the mirror, i was too scared.
It was a piece of a dremel cutting disc so about .75mm thick, about 1/3 of a 1" diameter disc. It hit my in the inner corner of my eye and stuck there. Im not sure what it stuck into, i think it was just held there by my eyelid as it shut when it hit.
I pulled it out and then went to the mirror to check it out. I could still see, there was no visable damage and no water loss (i assume my eyes are full of water?)
Anyhow, it seems theres no damage, no pain either.
If i'd looked in the mirror before i pulled it out i'd know what happened but i really didnt want to see it
A lesson learned! I use grinders alot im my job and working on cars and never wear goggles. I think i will from now on!
ive managed to reduce the weight of everything that moves in the vertical plane alot. Once ive remade the air bearing i can add more weight to the slider. Hopefully todays work will yield results.
!! OW! Those dremel discs are #$%$##$%! get the carbon reinforced ones they work better , last longer and don't shatter (but wear goggles anyways for dremelling)
Here is what i did so far.
First i will try with "spikes" on the bottom of the adjuster screws.
if its not so good i will try knife edges
front bolts are Ti. hollow threaded rod inside the arm tube (about 1 inch) is Ti
adjuster bolts are aluminum and there is a spring and tiny piece of brass inside the top bridges pressing against the threads to keep them nice and tight.
the rear bolts holding on the bronze are nice heavy steel ones
Attachments
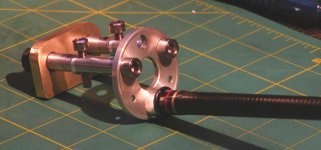
looks very nice. A few things i'll point out though. I assume this if for a ladegaard arm? From what ive read the stylus should be at the pivot point, it looks like your arm is slung down low.
The counterweight should be as low as possible and really should be below the pivot point. And the whole assembaly that moves in the vertical should pretty much be as light as possible.
Going by those points your arm tube should be higher and the steel bolts at the back are a bit of a worry.
I may be completely wrong, i really dont understand these things, im just going by what ive read (which may also be wrong )
Either way, it looks alot prettier than mine does.
I dont thing 2 points will be any worse than a knife edge, just dont think it will be any better either. I used a stanly blade but ground away the center so it sits on two small edges.
The counterweight should be as low as possible and really should be below the pivot point. And the whole assembaly that moves in the vertical should pretty much be as light as possible.
Going by those points your arm tube should be higher and the steel bolts at the back are a bit of a worry.
I may be completely wrong, i really dont understand these things, im just going by what ive read (which may also be wrong
)Either way, it looks alot prettier than mine does.
I dont thing 2 points will be any worse than a knife edge, just dont think it will be any better either. I used a stanly blade but ground away the center so it sits on two small edges.
I use one knife and one spike on my arm. The spike is working against four tiny balls pivot assembly; all taken from the old discarded arm. The knife is resting on two triangled bronze pins making V-bead. So, I have constrain against slipping along the slider, which knife bearing alone haven't, and I should not care about precise distance between two pivot points, which otherwise becomes huge problem for two spikes.First i will try with "spikes" on the bottom of the adjuster screws.
Attachments
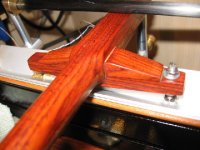
I have taken note of the issues with my design. but it is a lot lighter than it looks the aluminium bits are hollow. I will make some changes this week.
I have another one (almost entirely carbon) in the works as well. It is pretty crazy looking
The great thing about this is you can make different arm s and just swap them as long as you set up the wiring so it can be changed without too much hassle. I am thinking of using a gantry
then I can try both and see which one i prefer or remove them for modification or make new ones.
now to find a way to isolate the turntable from trains (i have a shunting yard very close and get LF vibration in my house) without letting the table get out of level.
Livemusic thats nice. is that carbon rod on eccentric pulley a cueing device? it looks like it presses down on the back of the arm.
Ive been doing a bit more messing, damping the carriage and the knife blade. It all helps. Ive also been playing with air pressure to vary the air gap but havent noticed any change in sound.
I have found a nice highly flexible wire for it though
http://www.satcure.co.uk/accs/page13.htm
I was given a small sample which i spliced in to see if it was supple enough and its completely solved my tracking and VTF problems so i ordered enough to wire the arm.
Im in the process of making another air bearing as im not happy with the current one, im trying to get the two pieces of angle to fit together as well as possible to make the bearing more stable.
After lightening the arm as much as possible (i took out quite alot) its alot more stable. But im not sure if ive lost some of the sparkle/transparancy and replaced it with treble distortion or if im just getting used to the arm. I really didnt listen much before i started modding.
Will a test record show up any problems the arm might have?
- Status
- This old topic is closed. If you want to reopen this topic, contact a moderator using the "Report Post" button.
- Home
- Source & Line
- Analogue Source
- wow! ladegaard success.