Sorry to add to the confusion, Chris and I posted at the same time. I agree with Chris, my comments are just for the type of router bits you need to accomplish what Chris said.
The only bit I failed to mention was the 1/2" straight bit. You want to size the hole for the driver so that the rabbet bit recesses the driver, example if you have a 6" driver, size the hole 5", add a 1/2" rabbet, final hole size is 6" and driver is flush to baffle.
Of course you have to calculate the first hole size according to the driver you have and the depth of the rabbet for the driver.
This can all be done with the baffle mounted or removed.
Bob
The japer jig is actually designed for a 1/4" straight bit. With a 1/2" bit your outer diameter is larger. Depending on the wayt in which i join my baffles I sometimes wait to make the driver cut out until I am done with with construction and have used a flush trim bit, that way I am sure to get the exact center.
Here at school there is a crafts center on campus, which is actually not affiliated with the school itself. It is basically a warehouse with all the tools you need. For 6 moths it was $40 to use all of their tools. Which include 2 tables saws, 2 miter saws, 2 joiners, 2 planars, 2 radial arm saws, and pannel saw, 4 drill presses, 3 band saws, ~6 lathes, ~4 routers, multiple sanders of every type, and multiple jig saws. I can use it as much as I want and is open 7 days a week. The man in charge is also going to teach me how to use the lathes, and they have many many classes. Well worth the $40 in my opinion.
Josh
edjosh23 said:The japer jig is actually designed for a 1/4" straight bit. With a 1/2" bit your outer diameter is larger. Depending on the wayt in which i join my baffles I sometimes wait to make the driver cut out until I am done with with construction and have used a flush trim bit, that way I am sure to get the exact center.
Here at school there is a crafts center on campus, which is actually not affiliated with the school itself. It is basically a warehouse with all the tools you need. For 6 moths it was $40 to use all of their tools. Which include 2 tables saws, 2 miter saws, 2 joiners, 2 planars, 2 radial arm saws, and pannel saw, 4 drill presses, 3 band saws, ~6 lathes, ~4 routers, multiple sanders of every type, and multiple jig saws. I can use it as much as I want and is open 7 days a week. The man in charge is also going to teach me how to use the lathes, and they have many many classes. Well worth the $40 in my opinion.
Josh
Sounds like you got ripped off actually.
AudioSlav said:
Sounds like you got ripped off actually.
Sounds like a good deal to me. If anyone knows of a place like that in the Twin Cities area, I'd sure like to know.
BHD said:
Sounds like a good deal to me. If anyone knows of a place like that in the Twin Cities area, I'd sure like to know.
Yep, $40/year sounds like a good deal.
Last time I was at the planing mill store, one of the customers offered to do some cuts for $30/hr or something. Just because someone has
bought a table saw doesn't mean they can charge like a professional.
Hell, the last estimate I got from Stock lumber was $1 per cut with the
purchase of the sheet goods. Sheets good was a bit high though.
And cuts that require additional setups might be more.
There's a Wickes here and also a Lowes but I haven't gone to them
for estimates.
The projects I've done are from pieces I can carry myself.
But a nice flat pack of pre-measured cuts would be nice to get.
I think it's a great deal! Having access to all the tools I need and someone else doing the cleanup, sharpening and maintainance would be worth $40/month to me! I'm planning on buying a house in the next year, and looking at houses, the ones with 2 car garages are much more than $40/month more than those with one car garages.
Tom.
Tom.
I'm hoping I can talk one of the towns around here into it.
Far as cleanup, sharpening etc that should be a group effort.
Saw blade sharpening would be overhead and expensed.
Jet has a new wet wheel system that looks great for chisels,
kitchen knives and everything.
I complete do it yourself shop would have a state of the
art dust collection system as well with a hose system as shown
in the recent Fine Woodworking mag.
A day rate should be available as well as a subscription rate.
who knows how to write business plans?
")
Far as cleanup, sharpening etc that should be a group effort.
Saw blade sharpening would be overhead and expensed.
Jet has a new wet wheel system that looks great for chisels,
kitchen knives and everything.
I complete do it yourself shop would have a state of the
art dust collection system as well with a hose system as shown
in the recent Fine Woodworking mag.
A day rate should be available as well as a subscription rate.
who knows how to write business plans?
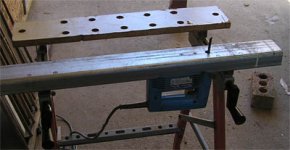
For most my cutting I use an inverted jig saw mounted on a modified vice bench. A nail is used to centre circles, a suitable placed hole on the sliding table locates the work. A poor mans band saw. And you do need to watch fingers.
The saw is mounted on a piece of channel. The mass soaks up most of the vibration.
The saw is mounted on a piece of channel. The mass soaks up most of the vibration.
Attachments
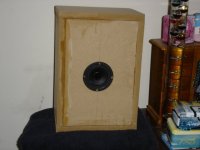
I'm still working on my first project to build some speakers and a mini sub to hook up to a computer, xbox, ps2, vcr, using a old onkyo amp I have.
Overall goal was to built a system to bash the Blose 5 series 3 system. I figured it shouldn't be too hard of a task to do that.
Anyway, my first finished cabinet turned out to be a success. The sound is great and I just have to wait to finish the rest of the project.
I used a hand held saw, using a straight edge jig to make straight edge cuts, and a plunge router and a jasper circle jig for making cuts to mount the speaker drivers.
Thanks for all the help guys. Using a hand saw saved me a ton of cash. It takes a little practice, but I was able to start a lot sooner without needing a full table saw.
The URL link is insanely long. It's the $399 system on bose.com
It's basically their cube speakers and a acostimass (sub, they can't really call it a sub).
I'm building a system based on the tb w3-8797 (at the time, they were on sale a little) and I'm trying out the tb w5-876sa mini sub.
I'll try to post some pics later on. Right now, I have one speaker done that is naked MDF. I was really happy with the way it sounded when I had finished it. The one speaker I built already sounds way better then blose.
Also, I tried posting pictures before and I sized it down to 640x480 and made it a gif and it was still too big. I'll have to host the files some place else and link them.
It's basically their cube speakers and a acostimass (sub, they can't really call it a sub).
I'm building a system based on the tb w3-8797 (at the time, they were on sale a little) and I'm trying out the tb w5-876sa mini sub.
I'll try to post some pics later on. Right now, I have one speaker done that is naked MDF.
I was really happy with the way it sounded when I had finished it. The one speaker I built already sounds way better then blose.Also, I tried posting pictures before and I sized it down to 640x480 and made it a gif and it was still too big. I'll have to host the files some place else and link them.
gvr4ever said:Also, I tried posting pictures before and I sized it down to 640x480 and made it a gif and it was still too big.
Use jpeg for pics.
- Status
- This old topic is closed. If you want to reopen this topic, contact a moderator using the "Report Post" button.
- Home
- Loudspeakers
- Full Range
- Wood working.