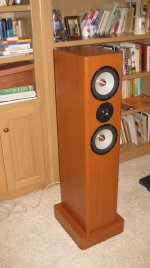
A great job, I am impressed!<snip>
I've had good luck with 10 mil paper-backed veneer, Weldwood contact cement, and a J-Roller (the thing with the green handle, which took a while to find, but worth it.) Lining up the grain to match is tricky but doable. Hope the pics below help.
Since you have to use additional glue I guess that it isn't PSA, what is the point of the paper backing?
paper backing allows for much thinner slicing of the "solid" wood veneer, as well as making it flexible enough to allow for easy fabrication, wrapping around curves, etc (in the long grain direction, of course)
and at the risk of boring repetition, the DIY method of tack dried wood glue and iron allows for much easier grain alignment than contacts or PSA
and at the risk of boring repetition, the DIY method of tack dried wood glue and iron allows for much easier grain alignment than contacts or PSA
You certainly aren't boring -or- repeating - in my case at least<snip>
and at the risk of boring repetition, the DIY method of tack dried wood glue and iron allows for much easier grain alignment than contacts or PSA
")
Can you please explain "tack dried wood glue and iron"? I want to veneer a "plain" box - i.e. no curves, etc.
Thanks . . .
You certainly aren't boring -or- repeating - in my case at least
Can you please explain "tack dried wood glue and iron"? I want to veneer a "plain" box - i.e. no curves, etc.
Thanks . . .
Just a cheap and nasty old DIYer trick - no doubt has been described elsewhere better than will follow - probably even a few You-Tube videos out there.
I've finished literally hundreds of cabinets over the past dozen or so years using this method, so while other folks may have different approaches, this works fine for me. - you know - YMMV etc.
Note that the value of domestic tranquility is far greater than the cost of buying a cheap clothes iron dedicated for this purpose - even if only used once.
("Honey, why does my cotton blouse smell like wood?"
) Make sure the iron has no knicks, scratch marks or debris adhered to the face from previous use - it'd kinda ruin your day to scratch the veneer with your iron. I periodically sand the face of mine with 220G on random orbit sander.
Layout cut pattern for veneer, mark for alignment and trim all pieces 1/4" or so over size to allow for careful trimming later. More than that, and you could lose continuity of grain patterns on highly figured materials.
Mark enclosure for alignment of grain wrapping, etc. I use the veneer's splice line between flitches as a marker- and align the center of major figuring pattern on the centre of enclosure fronts.
Use your favorite flavor of cabinet makers glue ( I like yellow modified PVA such as Titebond I), and a small (3" wide) short napped velour paint roller and disposal paint tray. Don't pour glue directly onto paper backed veneer, as it's hard to estimate exact quantity required, and things can get messy and uneven.
Roll the glue to both surfaces in a light coat - it'll be thicker than most latex house paints, but use the same crisscross technique for a thin and very lightly stippled texture.
Let dry at least 10-15min, until dry to the touch - in other words they shouldn't stick to each other without the application of the iron.
Carefully align each piece with the indicators on the enclosure, ensuring no creases or bubbles, then start applying even pressure with the iron set to highest temp - paying particular attention to the edges of cabinet and any cutouts. As long as you keep the iron moving Don't worry about over-doing it or scorching the veneer - you're gonna sand it out later, and bubbles that sometimes occur if you miss a spot are not always apparent until later, which can be a real pain in the a$$..
Use a hard sanding block with 150G paper on an angle to sand at least partially through the face veneer, then trim with wide chisel, plane iron or utility knife - a continuous stroke works fine for along the grain direction, but I find a series of gentle downward arcing strokes works better in the cross grain. I don't like using a laminate trimmer for this, as you can still get tear-out, and the bearing can leave a deep crease mark on veneer when trimming an overlapping piece.
The nose of the iron can be used to scorch an outline the areas of any cutouts for trimming, and actually with some practice (way less than 10,000hrs), you can actually use the iron to shear the veneer on larger cutouts, as well as to fold it around radiused or 45 or 90` edges along the grain, and even across the grain, with very little tearout, and without the exposed edges of backing paper.
I generally like to apply veneer sequentially on opposing faces of cabinets , with the top and bottom applied last, so that any exposed backing paper edges are continuous. In other words, back first, then sides, then fronts (or on small enough cabinets all three of those in one piece, with the tops and bottoms last.
Carefully trim any cutouts, then sand by hand - starting no coarser than 150G - usually finishing with 220G is fine. Be very, very careful if using a random orbit sander - the face veneers are very thin, and small air driven sanders are much lighter and easier to control than electrics, but the veneer is very thin, and edges and bubbles are particularly vulnerable to sand through.
Now you should be ready for application of your choice of finishing materials.
A brilliant guide, thanks VERY muchJust a cheap and nasty old DIYer trick . . . <snip>
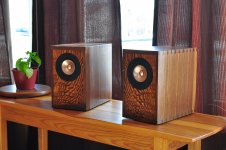
I covered these (obviously a long time ago by the CRT TV in the picture) with iron on veneer. The sort that comes with the heat activated glue already applied. The jarah is a lovely red tone.
Kimbo, where did you buy your veneer? I've had trouble finding anyone in Australia who supplies veneer at all, never mind pieces large enough to cover speakers.
Hi Stuey,
I picked it up from 'Plyco' in Fairfield, Melbourne. It was a decade ago and I recall that it was expensive, but as this is on my way to work it was easy to purchase.
I have the packet in front of me. Looks like it is made by a company called 'Consolidated Edging' and when I look them up I see that they are now named Consolidated Veneers CV Edging - Perhaps if you contact them they will sell direct or point you to a lower price outlet. The sheet was 2440mm x 305mm, was called 'iron on timber veneer sheet' and came with instructions. I seem to recall that there was a display board with quite a number of different timbers available.
I picked the jarrah because I love the colour and I eventually made a really nice CD/DVD cabinet for the wall out of jarrah that matches the speakers. I just laminated up pairs of jarrah floorboards to make up the timber for the cabinet work. I see you are from way out West, so as jarrah is your local timber perhaps it will be a bit more affordable for you. Here's hoping!
Cheers, Kimbo
Last edited:
The cabinets are built and I have bought some "Peel & Stick PSA wood veneer".
The instructions advise that in order to prepare the surfaces one should:
The largest surface on the cabinet measures 31cms x 19 cms.
I would be very grateful for any advice before I make a mess.
The instructions advise that in order to prepare the surfaces one should:
- rub down the plywood with 120 grit paper (of which I have plenty)
- remove any dust using something called "tack cloth" (which I don't have)
- wipe down with denatured alcohol (which I do have)
- seal the surface with varnish or polyurethane finish
The largest surface on the cabinet measures 31cms x 19 cms.
I would be very grateful for any advice before I make a mess.
The wood is "American Walnut PSA Peel and Stick Veneer".
I have just ordered a pair of "Liberon Plastic Scraper" from Axminster.co.uk.
I have also watched a YouTube video which suggests coating the plywood with a water based adhesive first - since one can wash it off with water,does EvoStik qualify?
I have just ordered a pair of "Liberon Plastic Scraper" from Axminster.co.uk.
I have also watched a YouTube video which suggests coating the plywood with a water based adhesive first - since one can wash it off with water,does EvoStik qualify?
Tack cloths (or tack rags) are just squares of cheesecloth that are impregnated with turpentine and varnish to make them tacky, so they pick up dust. It's surprising you aren't able to find these as they are widely available here. You can make your own, just Google "tack cloth recipe". A veneer scraper (or veneer hammer) is a tool with a handle attached to a broad rounded edge that is used to apply pressure to improve the bond and smooth out the surface. Again you could make a passable one if you just Google the term to see how they are constructed.
I tried a peel and stick (PSA) veneer last year, for my first adventure with veneering. Pre-sealing the surface is very important.
For my project, the veneer was applied to mdf. The mdf was coated with a shellac sealer first, due to the porous nature of mdf. Two coats were necessary where the mdf was cut with the router or saw blade.
The guy at the woodworking store who recommended the sealer put things in perspective when he said, "Think about how hard it is to peel off a label from a jar. A very smooth, non-porous surface is what you want for the PSA to work the best."
That being said, you only get one chance to place it where you want it. Get help with large pieces.
Attachments
- Status
- This old topic is closed. If you want to reopen this topic, contact a moderator using the "Report Post" button.
- Home
- Design & Build
- Construction Tips
- Wood veneer advice please?