I'm up to veneering my little Vifa 2 way monitors, and have been searching for information on veneering. I found http://www.fwprdc.org.au/content/pdfs/PN03.2303.pdf, which is a really good, in-depth resource.
I'm using crown-cut birch without backing for my speakers, using the PVA and iron method. So far it's been fairly successful, though I've had some trouble trimming it. I'm dreading veneering the front and sides, as I've got a 16mm radius down the sides, so the front and sides have to be veneered in one go. Additionally, I've already done the driver cutouts, so I imagine trimming the veneer in the cutouts will be lots of fun.
Cheers,
Suzy
I have been following this thread closely, as I have done quite some veneering over the years. Oldfart - and others- are presenting a very good summing up of the problems you encounter working with this stuff.
I do have some experiences of my own, though..
Contact cement- I have been using differnet type of glue, and contact cement "may" work in somecases, - I made a pair of loudspeakers som years ago.. while doing fine for several years, one of them was partly exposed to sunlight for afew hours a day, and the heat caused the veneer to creep or slip in the center seam ( two sections joined to get enough widht. Contact cement is usable , but far from the best alternative.
I fully endorse the use of normal white glue and hot iron. . Hide glue is another possibility, but you have to learn how to work with hide glue, as it has a a fairly limited open time. If possible, using a press of some kind is excellent. One of the nicer sides of hide glue, is that it is reversible with heat and steam...
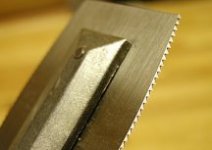
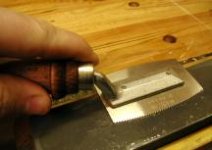
Cutting the veneer is another task - I too have been using exacto knives, etc.etc with fairly good results, but a veneer saw is the absolute better alternative - I was taught veneering in shop classes in the late 60-s, and the veneer saw was THE tool for the job.
I do have some experiences of my own, though..
Contact cement- I have been using differnet type of glue, and contact cement "may" work in somecases, - I made a pair of loudspeakers som years ago.. while doing fine for several years, one of them was partly exposed to sunlight for afew hours a day, and the heat caused the veneer to creep or slip in the center seam ( two sections joined to get enough widht. Contact cement is usable , but far from the best alternative.
I fully endorse the use of normal white glue and hot iron. . Hide glue is another possibility, but you have to learn how to work with hide glue, as it has a a fairly limited open time. If possible, using a press of some kind is excellent. One of the nicer sides of hide glue, is that it is reversible with heat and steam...
Cutting the veneer is another task - I too have been using exacto knives, etc.etc with fairly good results, but a veneer saw is the absolute better alternative - I was taught veneering in shop classes in the late 60-s, and the veneer saw was THE tool for the job.
Attachments
And another one...
For those interested in vacuum rigs for veneering, this is a good link:
http://www.joewoodworker.com/veneering/welcome.htm
For those interested in vacuum rigs for veneering, this is a good link:
http://www.joewoodworker.com/veneering/welcome.htm
Attachments
Was the cut chipping or tearing out?
Make sure the back side of the cut is well supported, take very light cuts when you are nearly through.
I usually use a sharp blade on cross-cuts. Sometimes I'll saw part way and then finish with the blade.
Make sure the back side of the cut is well supported, take very light cuts when you are nearly through.
I usually use a sharp blade on cross-cuts. Sometimes I'll saw part way and then finish with the blade.
Dryseals said:I was practicing with the veneer saw the other day on some left over peices. Ripping seemed to work OK, but cross cutting seemed to screw up every time. What is the proper method for working the veneer saw?
Re. . the veneer saw...
As said above, you need to work up against a good support,- the neighbouring edge of a panel/side, or a good straight edge. You need a solid wood backing to saw against.
If cutting loose leafs, you need to clamp the leafs under a good straight edge, to saw against a solid backing. Light strokes - from the edge towards the center of the work piece. This is a tool that need some practice to develop a feel for the process.
the pictures are from the vacuum rig link I posted, and one of the pictures actually shows how to sharpen the saw - it needs to be very sharp to work correctly.
The "Joe Woodworker" site actually has a lot of tips..
http://www.joewoodworker.com/veneering/seams.htm
Great thread everyone. There is a lot of good information here.
Bear-
Can you apply a water-based poly over a Danish Finsih? Will the Danish still yellow and the poly stay clear? I am thinking of Minwax's Polycrylic.
The Danish Oil finish is not a solid coating like a lacquer or varnish.
Bear-
Can you apply a water-based poly over a Danish Finsih? Will the Danish still yellow and the poly stay clear? I am thinking of Minwax's Polycrylic.
I made a start with my veneering last night.
Sorry Oldfart but I went with the PVA iron on method. I'm sure animal glue is the professional way to go but not having any experience of animal glue before I thought I'd give it a miss.
I started with one of the sides of the cabinet which is the biggest panel (400x1000mm). Bond seems very strong but the 0.6mm raw veneer has shrunk onder the heat of the iron and one or two cracks have appeared (about 0.5mm wide and 100mm long).
Is there any way to avoid this on the other panels?
What can I do about the cracks? I've had one suggestion of filling the crack with PVA and then sanding over it and the dust will stick to the PVA????
Cheers Kenny
If you use some steam, you can remove the veneer and start over.
I found that excessive heat caused the veneer to separate at the join between leaves. If you use less heat, then it works better. If any bits don't get stuck down, you can run the iron over these afterwards.
Also, I got the best results when I let the PVA dry until it was clear before applying the veneer.
Cheers,
Suzy
PS: Here's a pic of my little monitors:
An externally hosted image should be here but it was not working when we last tested it.
Ironing raw veneer can be a challenge.
My best results with troublesome veneer came this way...
Coat the veneer lightly, one light coat of glue. I use a short-nap trim roller.
Do Not Thin the glue! This only adds extra water that must be removed before glue-up.
Put two regular coats of glue on the substrate (mdf).
Let the veneer and substrate dry thoroughly, ~24 hours seems to work in a rather dry, warm room.
Sometimes light pre-heating of the veneer with the iron will help. Just hover the iron a few mm over the surface of the veneer a few seconds before you apply pressure.
Work from one edge to the other in small overlapping passes, about 1/4 the width or less of the iron.
Use the lowest heat setting that will adequately bond. Testing on scrap is the way here.
I've never had good results with filling cracks with PVA glue and sawdust. It's difficult to sand and always is darker than the wood. And it can leave the surrounding area impermeable to other finishes that are later applied.
I've used that method with thin CA glue, very carefully applied, to fill tiny hairline cracks. Results were mixed.
You can widen cracks with a veneer saw or the back edge of a sharp hobby knife to fit an edgewise piece of matching veneer glued in. In most cases the repair is nearly invisible.
Highly figured woods (burls, quilted's, etc.) are more difficult to repair. A normal wood filler close to the finished color and some artists brushes and oil or acrylic colors or pigments will probably be required for the best results.
Hope this helps.
KennyBradley said:I made a start with my veneering last night.
...
I started with one of the sides of the cabinet which is the biggest panel (400x1000mm). Bond seems very strong but the 0.6mm raw veneer has shrunk onder the heat of the iron and one or two cracks have appeared (about 0.5mm wide and 100mm long).
Is there any way to avoid this on the other panels?
What can I do about the cracks? I've had one suggestion of filling the crack with PVA and then sanding over it and the dust will stick to the PVA????
Cheers Kenny
Thanks Bob and suzy,
I had a go at the other side last night. This time I applied an extra coat of PVA to the substrate and only coated the outside edge of the veneer (about a 1" strip). Before applying the glue to the veneer I Ironed it and I also Ironed the centre of the veneer imediatley before applying it to the substrate.
Results where much better this time.
I had another look at my first attempt. The crack is't as bad as I thought and I'd rather not remove it if I can avoid it. The veneer is Black American Walnut and the coulor varies quite a lot in vertical strips which should make it easier to fill since colour match is less critical. I'll experiment with a thin strip of veneer. .
Thanks again. Kenny
Hi Kenny,
Did you humidify (slightly dampen with plant spray) and press the veneer between two sheets of MDF for 24 hours prior to glueing?
I found that by doing so the veneer becomes very flexible, hence reducing risk of cracks considerably.
Best is to put a 10-20kg weight on top of the MDF-veneer sandwich while pressing (e.g. a bucket of water) to increase pressure a bit. Not too much weight, otherwise the veneer might crack.
Regards, Fokke.
69stingray said:Great thread everyone. There is a lot of good information here.
Bear-
Can you apply a water-based poly over a Danish Finsih? Will the Danish still yellow and the poly stay clear? I am thinking of Minwax's Polycrylic.
Make some samples and try it. I've never tried water based over oil.
-Ken
Speakers are finally finished. Thanks to every one for your help and advice. They're not perfect but I'm fairly happy with them.
Although the iron on PVA method was simple I found it did have it's problems. I had to ensure the raw veneer was as dry as possible before starting because shrinkage was causing cracks to open up. Thankfully this was only on the first panel and It is now filled with filler wax and is almost indistinguishable.
I also found a lot of pressure had to be applied to the iron to ensure a bond. I worked a small area at a time and went over it with a veneer hammer while still hot. I have just noticed one small area (about the size of a thumb nail) which has not bonded. Not sure what I'm going to do with it now. I fear the iron will damage the oil finish?
Here Is a photo, unfortunately it doesn't really do the beauty of the grain justice but you get an idea.
Thanks again for your help, Kenny
Attachments
Hi Kenny
Your speakers look great. It is spurring me on to finish mine which are working but not finished off as yet.
If it helps you my father was a cabinet maker and I used to help him a lot with furniture making. The usual method for removing bubbles was to cut the bubble along the grain, then squeeze glue under each half and then leave wuth a weight on untill the glue had dried. Any cracks were filled with wax - which I think you are doing - as you can adjust the colour of the wax easily to suit the grain of the wood.
Hope you enjoy the speakers and that they sound as good as they look.
Don
- Status
- This old topic is closed. If you want to reopen this topic, contact a moderator using the "Report Post" button.
- Home
- Loudspeakers
- Multi-Way
- Veneering methods