Quote from this thread ....
_______________________________________________
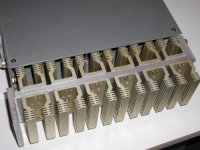
There was a question how to cut square holes for AC jack and switch. I found the switch that has
the same width as AC jack and I put it directly above the jack so I have to open just one square
hole. Since most of my panels are usually 1/4" doing it by hand would be pretty hard. I used many
different methods before, but found out that those 2 tools are most handy for the job. To start
the hole I drill 1/4" holes in ea. corner of the square. Final trim is done by hand and a file.
________________________________________________
Over the weekend, I have successfully cut a rectangular hole for installing a power switch on a 3/16" Al Sheet Metal per Peter's suggestion of drilling 1/4" hole in the corners. I just want to mention that it can be done by using a jig-saw (for cutting circular holes) with metal blades and it would be helpful if the holes are a little bit bigger than the blades.
Another very helpful suggestion from Peter! Thanks.
_______________________________________________
There was a question how to cut square holes for AC jack and switch. I found the switch that has
the same width as AC jack and I put it directly above the jack so I have to open just one square
hole. Since most of my panels are usually 1/4" doing it by hand would be pretty hard. I used many
different methods before, but found out that those 2 tools are most handy for the job. To start
the hole I drill 1/4" holes in ea. corner of the square. Final trim is done by hand and a file.
________________________________________________
Over the weekend, I have successfully cut a rectangular hole for installing a power switch on a 3/16" Al Sheet Metal per Peter's suggestion of drilling 1/4" hole in the corners. I just want to mention that it can be done by using a jig-saw (for cutting circular holes) with metal blades and it would be helpful if the holes are a little bit bigger than the blades.
Another very helpful suggestion from Peter! Thanks.
Banned
Joined 2002
Hpotter:
Kewl set of tools, dude!
What about engraving aluminium pannels?
I'm thinking of engraving some letters (SON OF ZEN, of course)with 1mm depth in a 3mm aluminium front panel.
do you think a router would do the job? will it work in aluminium and with only 1mm depth?
the tricky part is all that curves...
With a ruller and lots of time it could be made, and I could say that I have a HMC (human manual controlled) milling station in my home")
Kewl set of tools, dude!
What about engraving aluminium pannels?
I'm thinking of engraving some letters (SON OF ZEN, of course)with 1mm depth in a 3mm aluminium front panel.
do you think a router would do the job? will it work in aluminium and with only 1mm depth?
the tricky part is all that curves...
With a ruller and lots of time it could be made, and I could say that I have a HMC (human manual controlled) milling station in my home
transfer technique
I found out a techique (just today) to make PCB markings with a laser printer and transparencies. I ran out of transparencies and tried with transparent stickers.
it was awsome! all the lines are firmly attached to the copper, in fact it's very difficult to come off.
Here is the hole thing:
1- make the drawing of the PCB and reverse it (mirror)
2- print it wit laser printer or copier to transparent plastic for laser printer (heat resistent)
3 - position it in the blank PCB
4 - put the iron on it in the oo or ooo
mark and press it against the plate
5 - detach the plastic carefully
6 - sink the pcb in ferric cloride or whatever U use .
I guess it could also work with front pannel lettering.
If my engraving adventure fails I'll try this
Finishing Aluminum
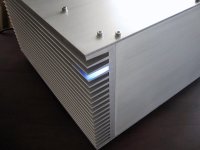
There are several methods you can use, I like to lightly sand blast my heasinks after machining. For flat panels the best method is soap, water and a brillo pad, always push in striaght lines and in one direction only. I have attached a photo showing a project where I used both methods of finishing.
Regards
Anthony
An externally hosted image should be here but it was not working when we last tested it.
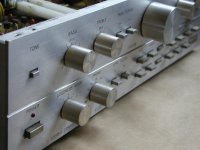
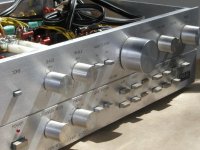
This is a closeup of a preamp panel I made in early '80s. There was no protection done to aluminum surface of any kind and after extensive use you don't see any wear after all those years. I finished it simply by using fine grade waterproof sandpaper (between 200 to 400, depending on your likening). If you do it wet the surface will become matte, when do it dry it will have a shine. Just use a piece of wood to move your panel along it's edge, so the brushed lines are perfectly straight. After that clean it with hot water. Dry immediately because water might leave spots. That's my memries of making the panel then.
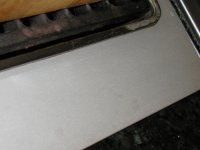
Today I'm using 6" belt sander. I simply sand the panels on it, using WD40 as a lubricant and 150 grid paper. One might use different lubricant but since it's working for me I didn't bother to look for anything else. After that I clean the panel with Varsol and give it a final look with Scotch Brite.
To see more pics of the preamp see: http://www.diyaudio.com/forums/showthread.php?s=&postid=43046#post43046
Today I'm using 6" belt sander. I simply sand the panels on it, using WD40 as a lubricant and 150 grid paper. One might use different lubricant but since it's working for me I didn't bother to look for anything else.
After that I clean the panel with Varsol and give it a final look with Scotch Brite.To see more pics of the preamp see: http://www.diyaudio.com/forums/showthread.php?s=&postid=43046#post43046
Attachments
Re: Brillo
Hello HPotter, cp642 is correct.. though I tend to keep a few different types at my disposal to work with. First the Soap acts as a lubricant to control the abrasive action and smooth the stroking process. I use a copper pot scrubber for rough finish then follow up with the presoaped little steel wool pads for polishing. The plastic types are useless of course. I tried sand paper but never got the sheen I wanted and it seemed messier. I do all the polishing under luke warm running water and have not had the experience of a dull finish from wet working.
Regards
Anthony
- Status
- This old topic is closed. If you want to reopen this topic, contact a moderator using the "Report Post" button.
- Home
- Design & Build
- Equipment & Tools
- Useful tools and techniques