Hello everyone,
a few years ago I bought my Elekit TU-8200 which I built myself.
Now I would like to check all the voltages as suggested in the manual but it seems to be quite difficult as the components are mounted upside down on the board ....
Is there someone on the forum who has already marked all the control points on the welding side who wants to share his experience, in order to help even inexperienced people like me ... ????
Photos would be appreciated
Thank you in advance")
a few years ago I bought my Elekit TU-8200 which I built myself.
Now I would like to check all the voltages as suggested in the manual but it seems to be quite difficult as the components are mounted upside down on the board ....
Is there someone on the forum who has already marked all the control points on the welding side who wants to share his experience, in order to help even inexperienced people like me ... ????
Photos would be appreciated
Thank you in advance
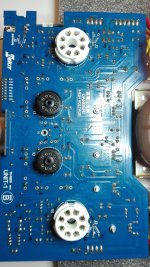
You can see the reference point on the PCB.
I have the TU-8200 not the TU-8200R.......so as you should know there are no landmarks printed on the board ....
Do you have any suggestions to locate them without disconnecting everything ??
I thought someone had already had the same problem as me ...
In fact I could follow the circuit diagram, but all the components are soldered backwards ... it is no coincidence that in the latest PCBs made by Elekit there are also in good evidence the various test points.
Please if someone else has already solved the matter, perhaps by marking with permanent marker pen the various points on the board, could you kindly share the photo ???
Thank you in advance
Hello folks,
in the end I managed to solve the problem by myself ...
With a lot of patience I followed the circuit diagram on page. 19 of the manual and I marked all the reference points on the PCB.
These are the measured voltages (DC ground):.if anyone is interested...
Point 1,2 ----> 3.4 , 3.5 V
Point 3,4 ----> 3.4 , 3.4 V
Point 5,6 ----> 107 , 104 V
Point 7,8 ----> 106 , 105 V
Point 9,10 ----> 199 , 199 V
Point 11 ----> 1.1 V
Point 12 ----> 0.57 V
Point 13,14 ----> -16.3 , -16.2 V
Point 15,16 ----> 0.02 , 0.02 V
Point 17,18 ----> 0.43 , 045 V
Point 19,20 ----> 260 , 259 V
Point 21,22 ----> 255 , 255 V
Point 23,24 ----> 265 , 264 V
Point 25 ----> 278 V
Point 26 ----> -31 V
Point 27 ----> -33 V
Point 28 ----> 6.2 V
Point 29 ----> 6.2 V
my set up for all the values is:
1)TU-8200 with all the PCB's mods suggested by Pacseltf;
2) driver tubes: 12AU7 X 2 ;
3) power tubes: 6L6GC X 2
I hope I was helpful
Hello Chiaro, I did the same 3 years back during the build. Your values are similar to what I got. The line voltage here is ~ 240v so the 200+ voltages (Point 19 - 25) on mine are a little higher.
Could someone please explain which are the key voltages in those numbers to watch for ?
Could someone please explain which are the key voltages in those numbers to watch for ?
Hello folks,
in the end I managed to solve the problem by myself ...
With a lot of patience I followed the circuit diagram on page. 19 of the manual and I marked all the reference points on the PCB.
Hi there, I'm having issues with my 8200, same as yours, old blue PCB version, it's completely dead and doesn't turn. Do you have a picture of your board with the test points?. Thanks in advance
Last edited by a moderator:
Hi Chiaro!Hello folks,
in the end I managed to solve the problem by myself ...
With a lot of patience I followed the circuit diagram on page. 19 of the manual and I marked all the reference points on the PCB.
These are the measured voltages (DC ground):.if anyone is interested...
Point 1,2 ----> 3.4 , 3.5 V
Point 3,4 ----> 3.4 , 3.4 V
Point 5,6 ----> 107 , 104 V
Point 7,8 ----> 106 , 105 V
Point 9,10 ----> 199 , 199 V
Point 11 ----> 1.1 V
Point 12 ----> 0.57 V
Point 13,14 ----> -16.3 , -16.2 V
Point 15,16 ----> 0.02 , 0.02 V
Point 17,18 ----> 0.43 , 045 V
Point 19,20 ----> 260 , 259 V
Point 21,22 ----> 255 , 255 V
Point 23,24 ----> 265 , 264 V
Point 25 ----> 278 V
Point 26 ----> -31 V
Point 27 ----> -33 V
Point 28 ----> 6.2 V
Point 29 ----> 6.2 V
my set up for all the values is:
1)TU-8200 with all the PCB's mods suggested by Pacseltf;
2) driver tubes: 12AU7 X 2 ;
3) power tubes: 6L6GC X 2
I hope I was helpful
I have some problems with the 8200 - the left channel sometimes just disappears and turn into noise.
Need to find the problem - you do not by any chance have a picture of your makings to share? Many of the voltage checkpoints are the same as on the 8200R but still a little different. Would save me a lot of time🙏😉