What is some good software for a DIYer to use in designing layered constructions?
Well I'm not sure to be the right person to ask... as I am "only" using open source 2D vector design software (aka Illustrator clones).... but I had a look at some other project here on DIYaudio where 3D software was used.
Can't help, sorry!
Whilst waiting for the glue to dry out (24 hours.. just give it some time), bitumen mats and stuffing again, and of course taking care of the cover plate
Cover plate:
Bracing the cover plate with some 30 x 30 mm MDF, damping with 2 layers of bitumen mats (actually left-overs) taking care to have enough to dampen the cover plate of the other cabinet identically.
I don't expect this one to vibrate in any way...
An externally hosted image should be here but it was not working when we last tested it.
An externally hosted image should be here but it was not working when we last tested it.
An externally hosted image should be here but it was not working when we last tested it.
An externally hosted image should be here but it was not working when we last tested it.
An externally hosted image should be here but it was not working when we last tested it.
Cover plate:
Bracing the cover plate with some 30 x 30 mm MDF, damping with 2 layers of bitumen mats (actually left-overs) taking care to have enough to dampen the cover plate of the other cabinet identically.
I don't expect this one to vibrate in any way...
An externally hosted image should be here but it was not working when we last tested it.
Thanks all for your comments!
Bitumen mats for the rear of the cabinet and acoustic foam behind the woofer
Bitumen mats for the rear of the cabinet and acoustic foam behind the woofer
An externally hosted image should be here but it was not working when we last tested it.
An externally hosted image should be here but it was not working when we last tested it.
An externally hosted image should be here but it was not working when we last tested it.
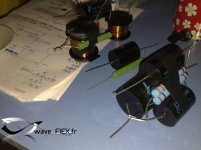
Installing the woofer x-over: 4 neopren pads between the coil and the bracing to minimize vibration and some tape for securely holding the wiring
First test of the x-over before closing the bottom of the cabinet
An externally hosted image should be here but it was not working when we last tested it.
An externally hosted image should be here but it was not working when we last tested it.
First test of the x-over before closing the bottom of the cabinet
An externally hosted image should be here but it was not working when we last tested it.
An externally hosted image should be here but it was not working when we last tested it.
No pics of closing the woofer area actually (we went too fast)..
It was all about applying some glue to the bottom plate, tighten it with the nuts, aligning was done using the bare strap without plywood.
As the cabinet is now standing on his own, we needed to fill that gap in the cabinets back wall.
DIY funnels for filling... with liquid bitumen...
Actually it fills up quite easily.. but takes it's time
I poured 1/2 liter at a time, letting it rest at least 12 between each filling.
Very little absorbtion of the liquid in the MDF...was looking forward to see how it would work out
Once this time-consuming task finished we just need fix the cover
It was all about applying some glue to the bottom plate, tighten it with the nuts, aligning was done using the bare strap without plywood.
As the cabinet is now standing on his own, we needed to fill that gap in the cabinets back wall.
DIY funnels for filling... with liquid bitumen...
An externally hosted image should be here but it was not working when we last tested it.
An externally hosted image should be here but it was not working when we last tested it.
An externally hosted image should be here but it was not working when we last tested it.
An externally hosted image should be here but it was not working when we last tested it.
Actually it fills up quite easily.. but takes it's time
I poured 1/2 liter at a time, letting it rest at least 12 between each filling.
Very little absorbtion of the liquid in the MDF...was looking forward to see how it would work out
Once this time-consuming task finished we just need fix the cover
An externally hosted image should be here but it was not working when we last tested it.
Well, here's the first one finished ! Ill will be used to run in all the drivers during the build-up of the second cabinet.
Almost forgot about having to do the second...
Some more pics of the assembly of the 2nd cabinet, in total disorder:
Top cover with bracing and bitumen mats
Woofer area with front baffle and bitumen mats
With the acoustic foam
An externally hosted image should be here but it was not working when we last tested it.
Almost forgot about having to do the second...
Some more pics of the assembly of the 2nd cabinet, in total disorder:
Top cover with bracing and bitumen mats
An externally hosted image should be here but it was not working when we last tested it.
Woofer area with front baffle and bitumen mats
An externally hosted image should be here but it was not working when we last tested it.
An externally hosted image should be here but it was not working when we last tested it.
With the acoustic foam
An externally hosted image should be here but it was not working when we last tested it.
Banned
Joined 2002
DIY funnels for filling... with liquid bitumen...
I don't know if I would have filled these with tar.
MDF is very porous.
I don't know if I would have filled these with tar.
MDF is very porous.
It's actually some kind of car underbody seal, often used in car-audio for sealing assemblies, not really liquid.
I used a total of 2.8 liters for a calculated volume of 2.6 liters per cabinet, you can deduct an absorbtion of 7,7 % of the mass, far less than could be obtained with any paint without heavily bonding the MDF before...
Initial absorption is low, what about future absorption? What about off-gassing?
I thought you would have filled that cavity with a highly rigid material like epoxy.
Initial absorption is low, what about future absorption? What about off-gassing?
I thought you would have filled that cavity with a highly rigid material like epoxy.
Filling the cavity with sand would have been excellent.
I imagine most of us wish we could build these speakers...
I imagine most of us wish we could build these speakers...
With all modesty in place, I don't think I'd have a problem, though I wouldn't do it translam.
When you consider that the majority of the "building" was done with a computer controlled router that pretty much eliminates the need for woodworking talent; the same way as a printer can easily print out a sheet full of neat letters that most would be incapable of doing by hand.
I'm not crazy about putting sand in speakers. I think about how hard it is for it to get fully compacted and that it may take quite a while but a space will eventually appear at the top of the sand - loose grains rattling around (not that I'm likely to hear that).
Molten lead would have been the best
- Status
- This old topic is closed. If you want to reopen this topic, contact a moderator using the "Report Post" button.
- Home
- Loudspeakers
- Multi-Way
- Troels' PMS (multilayer assembly) build thread