Potential Interest In Customer Curved Speaker Enclosures
I'd be interested in any thoughts or expressions of interest were we to produce a DIY or finished speaker cabinet with a curved enclosure (box) plus flat front baffle.
Curved enclosures are generally considered superior to rectangular enclosures since the pressure waves coming off the back of the drivers are far less likely to reflect off the back of the cabinet and interact with the driver. However, fabricating curved cabinets is quite challenging without specialized equipment.
We have a large format CNC machine that could be put to use cutting out curved (180 degree) enclosure segments that could then be stacked/glued forming the body/back of the enclosure. Materials could vary from very cheap strand board, to MDF to high grade plywoods. Enclosure volume would depend on the height of the stack. For very large volume speaker enclosures we might use a larger (wider and/or deeper) segment size.
Options might include providing a box full of assemble-yourself segments including top/bottom and baffle, a fully assembled and unfinished cabinet, or a totally finished cabinet with veneer etc. Baffle driver/port openings would be cut to spec.
Thanks for your time and consideration.
Regards,
Morten
Newsletter Subsciption
We just found out we've had an ongoing glitch with our newsletter subscription registration where it would give an error message if you tried to register. That started when we switched over to a different web hosting service. It's now been fixed.
You can subscribe to our newsletter via this link: Newsletter Subscription Signup | Tortuga Audio
Cheers,
Morten
The release of the V2.1 version of our LDR3x Passive Preamp Controller Board includes firmware that allows the user to adjust the input impedance. There are 5 different input impedance settings that can each be defined by the user between 1k and 99k. Setting #1 comes set at 20k by default.
For example, you could set up 5 input impedance settings at say 5k, 10k 20k, 50k and 90k and switch between them "live" while playing music to determine which sounds optimal for your system.
Hi Morten,
That's a great feature !
I will place an order
Regards,
Danny
New 2.1.x firmware release for Tortuga LDR passive preamps
After a ton (perhaps a few tons) of work, we are pleased to finally release the latest version of our LDR preamp controller firware that was developed as part of the V2.1 version of the LDR3x Preamp Controller Board.
This Rev 2.1.x firmware now includes both adjustable impedance as well as a greatly improved auto-cal algorithm. You can read more about it via this article: LDR Passive Preamps With Adjustable Impedance | Tortuga Audio
For convenience I've quoted the essential top lines below.
We've been shipping versions of this new firmware with our products starting back in January but we didn't want to formally release it and make it available to existing V2/preamp customers until such time as we felt it had a chance to mature.
Best,
Morten
March 1, 2015 - Tortuga Audio has released a major firmware update for its LDR Passive Preamp product line allowing the user to change the input impedance of their LDR passive preamp. This firmware update also includes an upgraded auto-calibration algorithm resulting in improved sound stage and stereo imaging.
The Adjustable Impedance feature allows the user to set up 5 different impedance settings, each between 1k and 99k, with setting #1 currently set up at 20k by default.
All Tortuga Audio preamp products shipped starting January 1, 2015 include some version of the updated 2.1.x firmware. This firmware update is also available to all existing owners of the V2 and V2.1 versions of the LDR3x passive preamp controller board as well as all passive preamp products equipped with a USB socket. Version 2.1.7 is considered the most complete, stable and reliable version as of this edit. Owners are encourage to upgrade to this version.
The latest firmware file plus the required PC compatible bootloader program (not available yet for MACs) can be downloaded from here. Detailed instructions can be found there as well. The specific remote command sequences needed to adjust impedance can be found here in our online documentation.
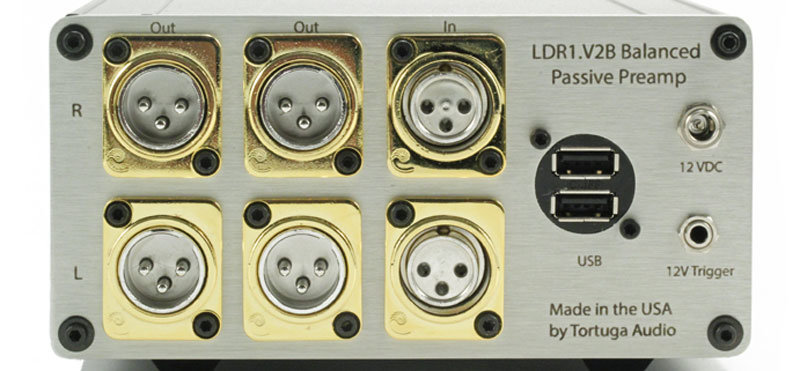
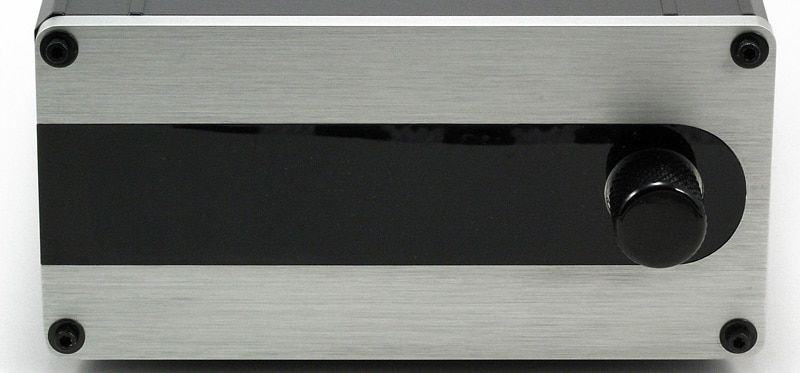
LDR1.V2B Balanced Passive Preamp - Single XLR Input / Dual Output
Here are pics of our latest offering, the LDR1.V2B. A single input, dual output balanced passive preamp. This unit sounds fantastic and since it's a single input design there is no input switching circuitry or signal pathways. Pure in and out.
The unit in this pic has the optional Cardas XLRs. Standard XLRs are the black Neutriks. Comes in silver front/rear panel as shown and also the all-black Darth Vader.
More info on the LDR1.V2B here: LDR1.V2B Balanced Passive Preamp | Tortuga Audio
10% discount for all newsletter subscribers
Subscribe to our newsletter and get 10% off on all purchases made going forward in 2015. Simply use the same email address you used to subscribe when purchasing anything through our website. Use the coupon code: newsletter10% during checkout. If you're subscribed and it doesn't accept this coupon code, just contact us at info@tortugaaudio.com and we'll fix you right up.
Existing customers are automatically included so you shouldn't have to do anything. If you're not sure if you're subscribed, just try to subscribe again and it will inform you if your're already on the list. You can opt out at any time.
You can sign up here: Newsletter Subscription Signup | Tortuga Audio
It's our way of saying thanks for your interest in Tortuga Audio.
Cheers,
Morten
New Website!
Annnnddddd....we are back online with our new website!!
Probably still some rough edges here are there. If you check it out and run across something odd or just plain wrong please let me know.
Some of the content including the documentation needs to be updated to get rid of little bits of shortcodes that are no longer used/working. That will take some more time but it's all there and accessible.
Now we can get back to work on actually producing!
Cheers,
Morten
Customer Feedback
Latest feedback from one of our preamp owners posted here with permission.
Interesting on a couple accounts. Another instance of our LDR preamps: 1) providing better volume control than digital/DAC; and, 2) outperforming tube preamps - in this case an $8k Klimo Merlino
Latest feedback from one of our preamp owners posted here with permission.
Interesting on a couple accounts. Another instance of our LDR preamps: 1) providing better volume control than digital/DAC; and, 2) outperforming tube preamps - in this case an $8k Klimo Merlino
"About the sound, compared to the excellent digital attenuation of the R-2R board (DAM1021 from Soekris), the addition of the LDR3 made a surprising big difference in term of transparency and bass definition while leaving untouched the tonal balance. Compared to my costly valve preamplifier (Klimo Merlino)... OK, let's forget once and for all about valves. Honestly, I wasn't expecting for such a good result, so many thanks for your work and dedication..." - Federico (Brussels)
Customer Brings Tortuga Preamp to AXPONA
Thanks to one of our customers, a Tortuga LDR preamp made it to the AXPONA audo show in Chicago this past weekend even though we were not able to attend this year ourselves
And it got heard!
Our customer was kind enough to tell us about it and let us post the story on our website.
You can read about it here: Customer Brings Tortuga Preamp To Axpona | Tortuga Audio
Make Your Own Audiophile Preamp
As you may know, Tortuga Audio not only manufacturers plug-n-play preamps but we also sell core parts for the DIY (do-it-yourself) audio enthusiast.
We get a large volume of inquiries from the DIY community and the No. 1 question by far is some variation on: "What do I need to build a Tortuga preamp?"
As a life long DIY'er I can certainly relate. And while every DIY project is an exploration into the unknown, successful outcomes favor the well informed. We recently took some time to summarize our thoughts and recommendations on the DIY approach to a Tortuga preamp and posted an article on our website titled Make Your Own Audiophile Preamp.
If you're considering a DIY audio project and upgrading your preamp, a Tortuga preamp project is one of the best values in high performance audio today.
Whether you've already tackled a DIY Tortuga preamp project or are thinking about doing so, I welcome your feedback and questions on this article and will try to update the article accordingly.
You can find the article here: Make Your Own Audiophile Preamp | Tortuga Audio
Cheers,
Morten
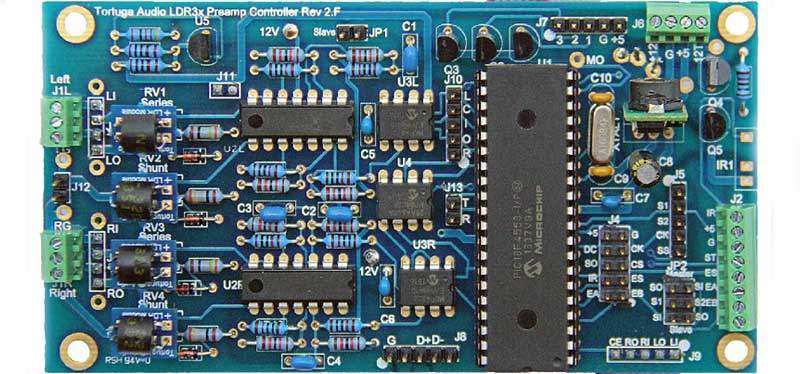
Have a DIY itch you need to scratch? Why not build your own world class audiophile preamp around our $199 preamp controller board?
Awesome LDR (light dependent resistor) sound, auto-calibration, remote control and more.
Find our more here: LDR3x.V2.1 Passive Preamp Controller | Tortuga Audio
Awesome LDR (light dependent resistor) sound, auto-calibration, remote control and more.
Find our more here: LDR3x.V2.1 Passive Preamp Controller | Tortuga Audio
Top 5 reasons to choose LDR Passive Preamps
If you're considering an upgrade to your audio system and think an active preamp is the only way to get high end performance, we invite you to think outside the preamp box and consider an LDR passive preamp.
So here, stripped down, are the top 5 reasons to choose LDR Passive Preamps to improve the performance of your stereo audio system.
Top 5 Reasons: Top 5 Reasons To Choose LDR Passive Preamps | Tortuga Audio
Enjoy!
Morten
Adjustable Impedance
Several customers have run afoul of the Adjustable Impedance feature - at least as it's currently designed/controlled - wherein they accidentally switch from the default impedance setting (#1 - 20k) to say setting number 2. No harm in that per se but if you switch the preamp to a setting number that hasn't been configured yet...you get...well....nothing. As in no sound at all. Zero. Zip. Nada.
This has a magical way of making our phone ring.
Cust: "Hi, my name is _______ and I recently bought your _______ preamp and it suddenly stopped working."
Me: "What do you mean it stopped working?"
Cust: "Well, there's no sound coming out."
Me: "Is it on?"
Cust: "Yes, it's on."
Me: "Are the displays working?"
Cust: "Oh yeah, everything looks and acts normally but there's no sound. And it was working great a moment ago. Sounds great by the way."
Me: "Are you at the unit now. Do you have the remote handy?"
Cust: "Yep"
Me: "Press the left button on the remote and tell me what number show up."
Cust: "Ok. Ah...2!"
Me: "Have you configured any of the impedance settings 2-5 since you first received the unit?"
Cust: "No. I was planning on messing with that next but I was enjoying listening to it and hadn't gotten around to it yet. And then it stopped working."
Me: "Ok. Press the down button on the remote to change the impedance setting back to 1."
Cust: "Heh! That fixed it!! It's back on! What happened? "
Me: "You'd accidentally switched from impedance setting #1 which is the default setting number and switched the unit to #2. Since #2 hadn't been configured yet, there's no attenuation table established so no sound comes out. Basically the unit is muted. If you switch it back to #2, then adjust the impedance level (1-99k), press enter, turn it off, and then run auto-cal, that will set up setting number 2. Same from settings 3-5. At that point you can switch back and forth between impedance settings on the fly with live music and home in on the optimal setting for your system. "
Cust: "Ok, great. Thanks."
Me: "You're welcome. Enjoy. Bye."
Cheers,
Morten
Tortuga Audio | Handcrafted high performance audio gear
Video review of LDR3.V2 Passive Preamp by NewRecordDay.com
A very nicely done video review of the LDR3.V2 Passive Preamp by Ron Brenay at NewRecordDay.com
I think Ron is on to something with his creative video format approach to audio reviews.
Enjoy!
Morten
https://www.newrecordday.com/tortuga-audio-ldr3-v-2-review/
A very nicely done video review of the LDR3.V2 Passive Preamp by Ron Brenay at NewRecordDay.com
I think Ron is on to something with his creative video format approach to audio reviews.
Enjoy!
Morten
https://www.newrecordday.com/tortuga-audio-ldr3-v-2-review/
If you're into DIY and looking for a truly high end audiophile preamp, you should consider our LDR3x Passive Preamp Controller for $199. Add a $25 Apple Remote and a pair of our display modules ($98) and you have the essential parts to build your own LDR preamp. Arguably the most audio bang for your buck if you're into high performance audio.
Check it out: LDR3x Passive Preamp Controller with Remote | Tortuga Audio
Check it out: LDR3x Passive Preamp Controller with Remote | Tortuga Audio
Hi Morten
I bought one if the earlier version of the passive LDR... Also the display module and the encoder module when both are just release.. Was wondering if my display module and the encoder are still compatible with the current LDR3V2 ?
Thanks
Alfred
Yes, both the encoder design and the display module design are basically the same as when they were first released in terms of function and interface and so will work fine with the LDR3x.V2.1 board. The display module has undergone one design modification since it's initial release which added a LC filter to suppress any noise generated by the display module multiplexer chip, however no changes were made to the pin interface headers.
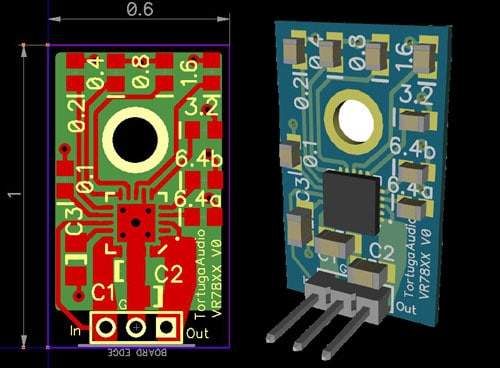
VR78XX Voltage Regulator with TPS7A4700
We have started offering a pin compatible alternative to the LM78XX series of linear voltage regulators. The VR78XX is a low dropout, ultra low-noise (4 uV RMS) linear voltage regulator designed around the TPS7A4700 regulator chip which is capable of sourcing up to a 1 amp load.
We chose the TPS7A4700 for some upcoming new products as well as a replacement regulator for our existing passive preamp product line. Since we'll be using these we came up with a small VR78XX module that we're also making available to the DIY community.
Aside from being a highly accurate and low noise regulator it can be programmed (via soldered jumpers) to output from 1.4 VDC plus any combination of 0.1V, 0.2V, 0.4V, 0.8V, 1.6V, 3.2V, 6.4V, & 6.4V for a max total output of 20.6 VDC.
This pic below is from CAD drawings. Will post pics of actual module soon but the cad pics are quite accurate except the one shows all the pads populated with surface mount components whereas only 3 capacitors plus the main regulator chip are installed. The other pads are for the voltage programming.
Pricing is $25 for single units, less for quantity which includes free 1st class shipping within US. More info here: VR78XX Voltage Regulator | Tortuga Audio
We've set this up as a pre-order on the website. On pre-orders we don't charge through your payment until the unit is ready to ship.
Based on some testing we decided to increase the thermal vias to the ground plane on the back side and make most of the back into a large pad to facilitate heat transfer to a heat sink.
The revised board/design won't be available until around mid-Sept.
As a practical matter this module is not as thermally robust as the LM78XX series chips. If you intend to run at higher currents with larger voltage drops you'll definitely need a good heat sink but perhaps the better choice is using an upstream heavy duty resistor to handle the deltaV*I power dissipation.
You only need around a +0.3 volt drop out with this module.
Custom "Boathull" speakers - progress photos
A few pics of the custom set of "boathull" speakers we're making for a customer. These are 0.32 cubic foot cabinets for a 2-way design. These will look very cool when finished. The baffle and top/bottom will be veneered in zebra wood to compliment that striped laminate look of the baltic birch. Took a bit of trial and error on laying out the boathull toolpaths but after the first few we adjusted the layout/spacing and it went smoothly. Always nice working with wood.
[Edit: These photos appear compressed vertically - at least on my end. Clicking on them renders them properly. ]
After building the initial stack but without ends and before sanding. The peppering you see is part of the plywood color variations and are not voids. Very few voids in the baltic birch plywood and what few their are will fill in nicely and disappear.
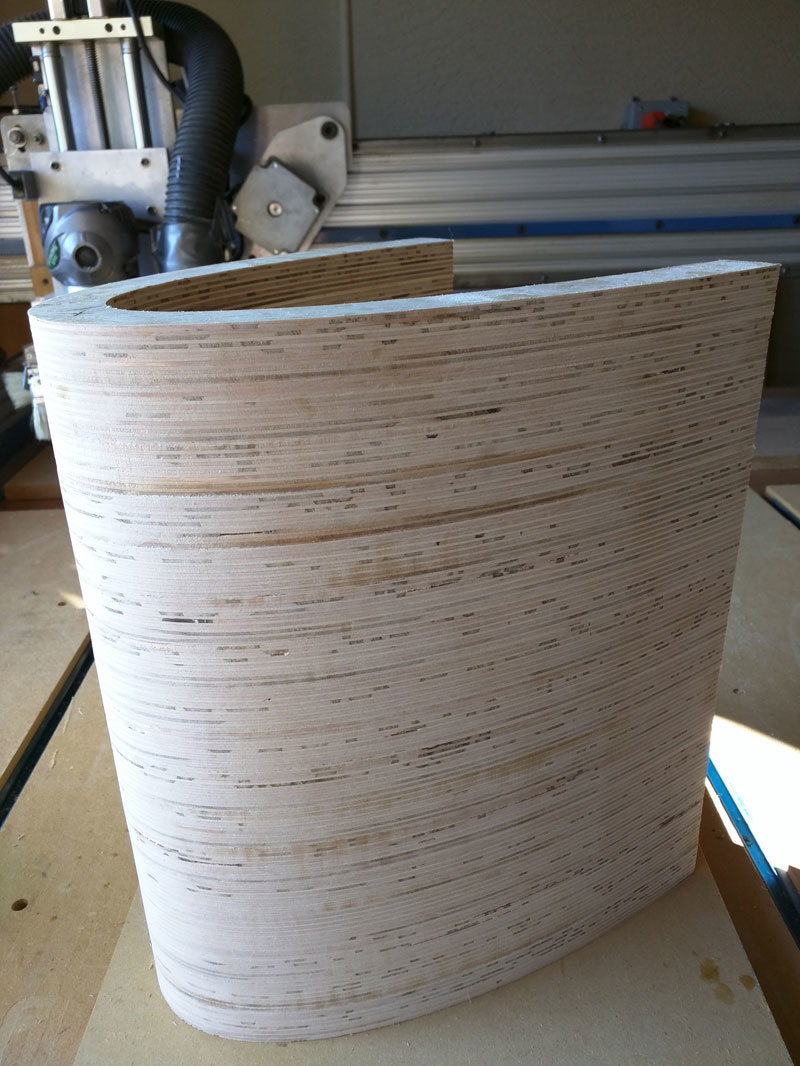
The first boathull stack - 17 layers. Each glued and power nailed. Extremely strong/rigid even without baffle, ends or internal brace.
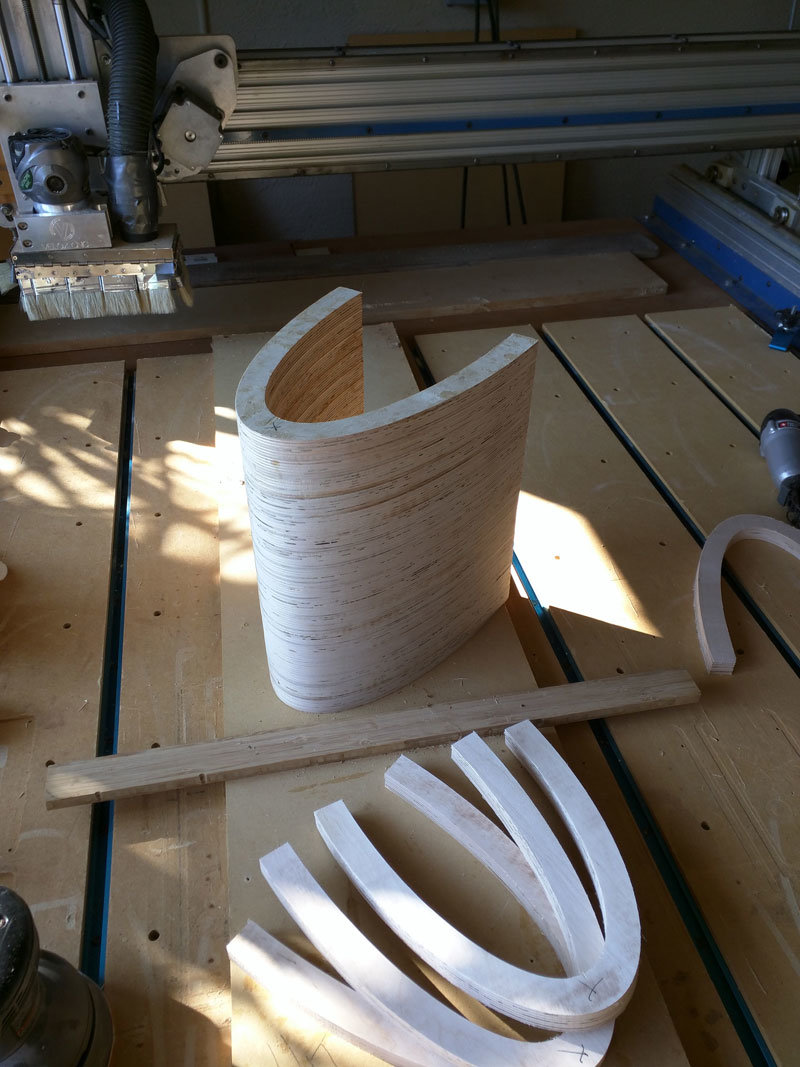
Tried to maximize utilization of the wood while maintaining the integrity of the sheet to keep it clamped down in place while milling. The lower right corner area shows initial attempts at getting even more utilization but this proved unworkable as adjoining pieces would not hold together during milling.

A few pics of the custom set of "boathull" speakers we're making for a customer. These are 0.32 cubic foot cabinets for a 2-way design. These will look very cool when finished. The baffle and top/bottom will be veneered in zebra wood to compliment that striped laminate look of the baltic birch. Took a bit of trial and error on laying out the boathull toolpaths but after the first few we adjusted the layout/spacing and it went smoothly. Always nice working with wood.
[Edit: These photos appear compressed vertically - at least on my end. Clicking on them renders them properly. ]
After building the initial stack but without ends and before sanding. The peppering you see is part of the plywood color variations and are not voids. Very few voids in the baltic birch plywood and what few their are will fill in nicely and disappear.
The first boathull stack - 17 layers. Each glued and power nailed. Extremely strong/rigid even without baffle, ends or internal brace.
Tried to maximize utilization of the wood while maintaining the integrity of the sheet to keep it clamped down in place while milling. The lower right corner area shows initial attempts at getting even more utilization but this proved unworkable as adjoining pieces would not hold together during milling.
- Status
- This old topic is closed. If you want to reopen this topic, contact a moderator using the "Report Post" button.
- Home
- Vendor's Bazaar
- Tortuga Audio LDR3x DIY Preamp Controller w/ Remote