OK, I totally see your point about the wrong approach to damping in my last graphic. That didn't make sense at all...Chortle. You seem determined that every modification to your original design makes things worse. The baffle wants to be stiff so that it bends as little as possible when the driver hammers away at it. If you put a soft damping material between two stiff materials then it is only the inner layer that will resist being bent by the driver. The soft damping layer will be squashed by the inner layer but in squashing it will only push weakly on the outer layer. If the outer layer is only there as a constraint to help deform the damping layer that is fine but if you want it add stiffness/strength which you probably do for a front baffle then it won't to any significant extent.
As mentioned earlier and shown in the section of the commercial AE speaker I would probably use something like a box of 12mm ply, 3mm stiffish damping material, 6mm constraining layer. I would stiffen the front baffle by perhaps sticking another 12mm layer to the inside. I would add a few braces in all 3 directions and glue them together where they crossed guided by FE simulations of what I was doing. Without the FE simulations I would guess at something like a slightly irregular 3d lattice with around 1 to 3 rows of struts in each direction. I would only consider a pair of "damping struts" of the type described in the previous post if there was a known problem to address but I wouldn't expect one if CLD is used for the main box.
Note this is only a rough outline because it takes time to work through a design and see what works as intended, what doesn't, fix/improve what doesn't and repeat... This needs to be quantitative either via measurement or more efficiently via simulations because you need to know how much is required to get the job done. For example, your original design using thin layers of extensional damping would introduce some damping. How do you know if it enough, if is nearly enough and doubling the thickness would do it or that faffing around with CLD is going to be necessary?
Well, I have to admit that I was hoping to get the enclosure "in the ballpark" on first try. I realize I won't be able to build the perfect enclosure this way, but I don't really want to spend too much time and money on several test enclosures.
But I think I could accomplish some goals as suggested without even changing the design too much. What I may have failed to mention is, that I was planning to "veneer" the enclosure on sides and top/bottom with 1/4" hardwood panels. Instead of simply gluing these panels on, I could use a damping material as a first layer, and then the hardwood veneer. That would essentially be CLD panels, at least on four sides. I suppose I could easily to this for the back as well. Does that sound more reasonable? In addition to an improved bracing system?
What I am a little unclear about is what to do with the front baffle then. It is supposed to be one layer of 3/4" plywood, and another of 3/4" hardwood. Would it be advisable to sandwich a viscous material in between these as well?
Oh, and I am not sure what a "irregular 3d lattice" looks like... I would appreciate a link to an example.
I was looking at Butyl for similar reasons. I believe it is also easier to glue to wood with e.g. "3M Scotch Weld".That's what I did on my double aluminium baffle. Butyl is available in rope shape and tape-like shape as well. My baffle is quite narrow so I used the butyl rope.

It has a couple advantages compared to bitumen products, no odour being one of them. Easily available as it's used for several purposes in the automobile industry.
Butyl is available online in a few different shapes and sizes at McMaster-Carr
Drtebi, to correctly understanding enclosure wall vibrations, damping, and isolation requires extensive reading and comprehension. Listed below are previous related threads on this forum, with the exception of the last thread which addresses loudspeaker Qtc.
Andy19191 and several others who have posted in this current thread have numerous posts in the threads listed below. You will be going down a lot of rabbit holes. Some of the links have changed, and not all of the posts are 100% technically sound, so you have to read with awareness. But the threads provide information and guidance that I, Andy, and the others had to scratch and scrounge to obtain.
Cabinet structure MDF vs HDF
http://www.diyaudio.com/forums/multi-way/230419-cabinet-structure-mdf-vs-hdf.html
http://www.hsi-luidsprekers.nl/index.php/projecten/12-kast-materialen-onderzoek
http://audioqualia.prophpbb.com/topic29.html
http://audioqualia.prophpbb.com/topic44.html
Woofer choice : maple or mdf ?
http://www.diyaudio.com/forums/multi-way/265240-woofer-choice-maple-mdf.html
How to brace a speaker cabinet?
http://www.diyaudio.com/forums/multi-way/235908-how-brace-speaker-cabinet.html
Speaker Construction Materials
http://www.diyaudio.com/forums/multi-way/272169-speaker-construction-materials.html
Constrained layer damping adhesive
http://www.diyaudio.com/forums/multi-way/255954-constrained-layer-damping-adhesive.html
Constrained layer damping with MDF and Ply
http://www.diyaudio.com/forums/multi-way/153419-constrained-layer-damping-mdf-ply.html
The best cabinet material !!!!
http://www.diyaudio.com/forums/multi-way/276721-best-cabinet-material.html
High damped vs. Low damped (Qtc)
http://www.diyaudio.com/forums/multi-way/260253-high-damped-vs-low-damped.html
Last edited:
Thank you for that advise, that's good to know.I'm not familiar with your driver, but the other Tannoy DCs I've owned, you would not want something against the rear of the driver. It could cause issues with the high frequency diagram.
I was trying to more or less center the vertical brace, and thought that connecting it to the other braces would make it itself more rigid as well.I would not cut the spectacle mid brace, to fit the vertical through it..
Fit the vertical brace through the holes.
Then you can glue and/or screw the vertical to the spectacle if you consider it necessary.
Why would you think that it would be better to put the vertical brace through the holes?
The 2:1 thickness for CLD is a rule of thumb for using the same material for the structural and constraining layer. Hardwood is not used for speakers because humidity causes it to move and the strong joints between the panels required for speakers leads to the wood breaking. In this case there is no need for the hardwood panels to be glued to each other for the damping to work and a small gap could be left to accommodate the movement. I don't know enough about the issues involved to be confident it would work and that, for example, the panel movement wouldn't tear the damping layer in time but my guess would be a fair chance it would work. Anyone?What I may have failed to mention is, that I was planning to "veneer" the enclosure on sides and top/bottom with 1/4" hardwood panels. Instead of simply gluing these panels on, I could use a damping material as a first layer, and then the hardwood veneer. That would essentially be CLD panels, at least on four sides. I suppose I could easily to this for the back as well. Does that sound more reasonable?
If you opt for CLD then not doing the back would probably be unwise given it is the panel with the largest area and likely to be the one that dissipates most of the energy put into cabinet by the driver.
What I am a little unclear about is what to do with the front baffle then. It is supposed to be one layer of 3/4" plywood, and another of 3/4" hardwood. Would it be advisable to sandwich a viscous material in between these as well?
If you do then the hardwood front will float and not contribute to stiffening the baffle. This may be what is wanted if you are set on using 3/4" hardwood which may break with movement if it is glued strongly to the rest of the speaker. I would consider using a thicker inner layer for the baffle because the hole for the driver substantially reduces the baffle stiffness and can be expected to be the loudest of the six sides since it faces the listener, is directly driven by the driver and has all that radiating area below the driver.
I would use a set of struts like your vertical strut running between opposite panels and, if FE was available, possibly running diagonally between adjacent panels and all glued to each other where they cross. It is not that the panels with holes cut out won't stiffen the cabinet but that they use a lot of material to do it with much of the material not doing much. If you don't consider the extra material to be much of an issue then panels with holes are likely to be easier to manufacture.Oh, and I am not sure what a "irregular 3d lattice" looks like... I would appreciate a link to an example.
Not cutting into the spectacles is a good idea. I can still attach the vertical by cutting slots only into the vertical only, which will make construction easier and will provide a strong bond. I think I will stick with one vertical (it's 1.5" x 1.5"), the top and bottom panel are only about 11" x 11", and "trapezoid", so the back side is even shorter. I think one 1.5" brace should suffice.The spectacles will be more rigid if left uncut.
The vertical can still be attached to the side of the spectacle mid member.
You could even put in two verticals passing either side of the mid members.
The 2:1 thickness for CLD is a rule of thumb for using the same material for the structural and constraining layer. Hardwood is not used for speakers because humidity causes it to move and the strong joints between the panels required for speakers leads to the wood breaking. In this case there is no need for the hardwood panels to be glued to each other for the damping to work and a small gap could be left to accommodate the movement. I don't know enough about the issues involved to be confident it would work and that, for example, the panel movement wouldn't tear the damping layer in time but my guess would be a fair chance it would work. Anyone?
If you opt for CLD then not doing the back would probably be unwise given it is the panel with the largest area and likely to be the one that dissipates most of the energy put into cabinet by the driver.
If you do then the hardwood front will float and not contribute to stiffening the baffle. This may be what is wanted if you are set on using 3/4" hardwood which may break with movement if it is glued strongly to the rest of the speaker. I would consider using a thicker inner layer for the baffle because the hole for the driver substantially reduces the baffle stiffness and can be expected to be the loudest of the six sides since it faces the listener, is directly driven by the driver and has all that radiating area below the driver.
I would use a set of struts like your vertical strut running between opposite panels and, if FE was available, possibly running diagonally between adjacent panels and all glued to each other where they cross. It is not that the panels with holes cut out won't stiffen the cabinet but that they use a lot of material to do it with much of the material not doing much. If you don't consider the extra material to be much of an issue then panels with holes are likely to be easier to manufacture.
I have been woodworking for quite some time, and I have hardly ever experienced problems with wood movement. This depends a lot on the climate that you live in, and where I live, I don't have much changes in humidity at all, which certainly helps. It also depends a lot on the wood itself, some wood is a lot more prone to move, and other species don't move much at all. Even the cut of wood makes a difference, quarter sawn oak for example is a lot more stable than just flat sawn oak. On places like The Wood Database you can look up the radial and tangential shrinkage of wood, which can help when searching for a particularly stable wood.
I don't think that glue joints for speakers are any "stronger" than those for any other furniture; when a joint breaks or otherwise doesn't hold up well, it's the jointing technique that's to blame, or even the glue itself (not all glue works on every wood).
The reason why I decided to make the front baffle 3/4" thick is, because I wanted to round off the edges as much as possible, to reduce diffraction. It figured it would look nicer when the entire panel that is rounded off is hardwood as opposed to plywood. There are other ways to accomplish this, like gluing thick rounded hardwood corners to the edges of the front panel, but I like the idea of a thick front panel and also prefer the simpler construction.
I agree it is probably not a good idea to use a damping layer in between the front baffles. I actually wanted to mount the driver to the hardwood baffle, and mount that baffle with a good amount of "cabinet connection" screws and t-nuts to the inner baffle. I actually forgot why
I guess I thought of a removable baffle.Regarding struts vs. spectacles, I keep asking myself how people glue these struts to the cabinet... I cannot think of a "clean" way to do this, especially if it is a large number of struts. That is one reason why I prefer the spectacles. These can simply be glued into shallow rabbets in the sides. The glue joints would be very strong, and easy to clamp too.
The other issue is, that the cabinet is receding in the back (trapezoid shape), and the spectacles would make the construction a lot easier, as they would actually help align things when putting it all together...
By the way, the drivers and crossovers arrived today. I played them a bit on an open test baffle, and already like them a lot (I cannot say much of their bass performance yet, on an open baffle I cannot expect much without EQ etc.). Very nice midrange, just what I was hoping for. The horn players are back on stage ☺.
Furniture made with solid wood allows for movement in the design. A speaker cabinet cannot normally do this because the joints have to be rigid and airtight. In your case by attaching independent solid wood panels to a damping material there looks to be a fair chance solid wood might be OK but I don't know enough to be sure. You seem to be aware of the issues and interesting DIY has to be experimental to some extent so why not go for it? Even if it fails it is likely to be fairly easy to repair by removing the outer panels and damping material and replacing with veneered plywood and fresh damping material.I don't think that glue joints for speakers are any "stronger" than those for any other furniture; when a joint breaks or otherwise doesn't hold up well, it's the jointing technique that's to blame, or even the glue itself (not all glue works on every wood).
I thought the damping layer with a solid wood baffle was a good idea not a bad one. This was not only because of problems of differential movement due to moisture but also because little of the vibration of the inner panel making it across the damping layer to the outer layer. As a separate point, I was suggesting that the inner structural layer of plywood for the baffle would probably benefit from being thicker if you had an isolated floating solid wood outer layer that was not contributing to the stiffness seen by the driver.I agree it is probably not a good idea to use a damping layer in between the front baffles. I actually wanted to mount the driver to the hardwood baffle, and mount that baffle with a good amount of "cabinet connection" screws and t-nuts to the inner baffle. I actually forgot why
Personally I wouldn't strongly bond a 3/4" solid wood panel to a different material because of the risk of different movements causing failure over time but the risk is for you to judge. I am by no means an expert in the area.
Yes, one has to incorporate wood movement into the design, especially where one piece connects to another but the grain runs in the opposite direction. And that's why I don't think it would be a problem with the hardwood panel glued to the damping layer—there is essentially no wood-to-wood connection, so if the wood moves, the worst thing that could happen is that it would "stretch" the damping layer... it won't move any other wood panel and cause breakage or so, since it's not connected directly to any other panel. I will stick to this plan.Furniture made with solid wood allows for movement in the design. A speaker cabinet cannot normally do this because the joints have to be rigid and airtight. In your case by attaching independent solid wood panels to a damping material there looks to be a fair chance solid wood might be OK but I don't know enough to be sure. You seem to be aware of the issues and interesting DIY has to be experimental to some extent so why not go for it? Even if it fails it is likely to be fairly easy to repair by removing the outer panels and damping material and replacing with veneered plywood and fresh damping material.
By bonding you mean gluing? I think it might be good to use these furniture connection screws:I thought the damping layer with a solid wood baffle was a good idea not a bad one. This was not only because of problems of differential movement due to moisture but also because little of the vibration of the inner panel making it across the damping layer to the outer layer. As a separate point, I was suggesting that the inner structural layer of plywood for the baffle would probably benefit from being thicker if you had an isolated floating solid wood outer layer that was not contributing to the stiffness seen by the driver.
Personally I wouldn't strongly bond a 3/4" solid wood panel to a different material because of the risk of different movements causing failure over time but the risk is for you to judge. I am by no means an expert in the area.
An externally hosted image should be here but it was not working when we last tested it.
It would take a few to make a solid connection. And by leaving the holes in the hardwood slightly oversized, one can allow for wood movement. I have heard some people say that they used a gasket material in between the baffles, to make it air tight. Not sure if that would help or introduce problems?
I thought the damping layer with a solid wood baffle was a good idea not a bad one.
I do think the same, and a good way to do it (they may be other good way too but this one is well documented):
http://www.diyaudio.com/forums/mult...trained-layer-construction-2.html#post3140184
It would take a few to make a solid connection. And by leaving the holes in the hardwood slightly oversized, one can allow for wood movement. I have heard some people say that they used a gasket material in between the baffles, to make it air tight. Not sure if that would help or introduce problems?
If you make a two shell enclosure (or kind of) you should not have connection between layers or it will ruin the intended effect.
If the solid wood and plywood is not strongly bonded/glued the driver will mainly see the stiffness of which ever one it is bolted to and not the combination of both. The loose connection may allow for sufficient differential movement but it will not introduce damping and the outer panel will be less well isolated from the vibration of the inner.By bonding you mean gluing? I think it might be good to use these furniture connection screws:
It would take a few to make a solid connection. And by leaving the holes in the hardwood slightly oversized, one can allow for wood movement. I have heard some people say that they used a gasket material in between the baffles, to make it air tight. Not sure if that would help or introduce problems?
Is the objective of the bolts to have a removable baffle? Small air leaks are not a problem so long as they do not whistle and are often required for a sealed speaker so that the state of the air within the cabinet can slowly equalize with the air outside and not pull or push the driver cone away from the designed resting position. The driver itself may be leaky in which case it will not matter if the cabinet is air tight.
I have a tall narrow speaker with a 50mm thick ash front/baffle.
The other five sides are 38mm kitchen work top with the artifical veneer still on the outside.
I have not had any problem with the ash changing width/size/shape due to humidity over the 15years or so since I built them.
The other five sides are 38mm kitchen work top with the artifical veneer still on the outside.
I have not had any problem with the ash changing width/size/shape due to humidity over the 15years or so since I built them.
I read that post a couple of days ago, it is very informative. Notable is, how the drivers are attached to the inner baffle only, something I would have to do as well I suppose.I do think the same, and a good way to do it (they may be other good way too but this one is well documented):
http://www.diyaudio.com/forums/mult...trained-layer-construction-2.html#post3140184
If you make a two shell enclosure (or kind of) you should not have connection between layers or it will ruin the intended effect.
As mentioned, I don't remember why I wanted to make it removable. It doesn't really make much sense, since it would only make the outer baffle removable. I think I can safely drop the idea of bolting the hardwood baffle to the inner baffle.If the solid wood and plywood is not strongly bonded/glued the driver will mainly see the stiffness of which ever one it is bolted to and not the combination of both. The loose connection may allow for sufficient differential movement but it will not introduce damping and the outer panel will be less well isolated from the vibration of the inner.
Is the objective of the bolts to have a removable baffle? Small air leaks are not a problem so long as they do not whistle and are often required for a sealed speaker so that the state of the air within the cabinet can slowly equalize with the air outside and not pull or push the driver cone away from the designed resting position. The driver itself may be leaky in which case it will not matter if the cabinet is air tight.
I must have misunderstood you earlier, I thought you had doubts about using CLD for the front baffle. It seems that the "general consensus" is to use CLD for the front baffle as well.
If I do that, I would still have to figure out how to mount the driver. In the thread that krivium linked to, the driver is mounted to the inner baffle only, not touching the outer baffle. This is a bit tricky but I suppose the right approach.
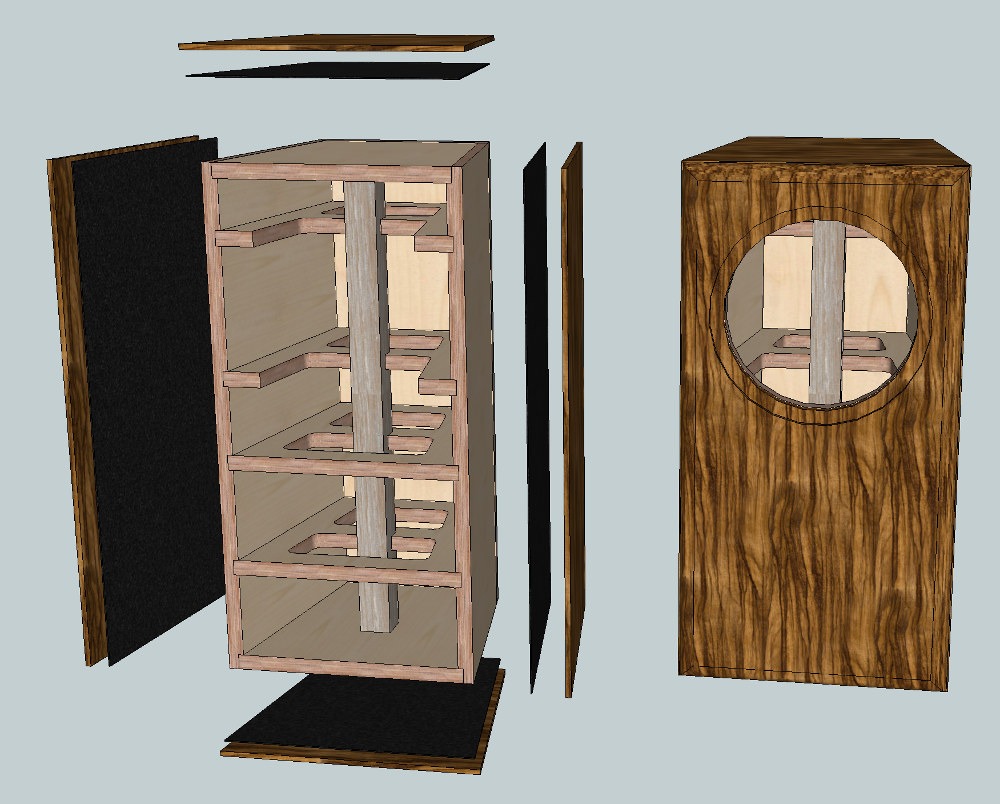
I think I am pretty set on this final design now (see attachment).
Here I used 1/2" hardwood panels on the exterior as opposed to 1/4", which is probably better than 1/4". I found some "Primavera" 1/2" panels online on sale... that's why. The front baffle is still 3/4".
What's not very visible in the image is a ring of about 3/8" thickness which is supposed to be glued to the inner baffle, and to which then the driver is supposed to be fastened. Thus it would not be in direct contact with the outer baffle. I believe that is the idea when using CLD on the front baffle, correct me if I am wrong.
Crossover
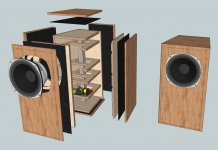
You may notice that I also placed the crossover into the drawing. It's placement doesn't make sense... well, it is actually a bit tricky to fit the original crossover into the box, since it is quite long.
The only way to make it accessible once everything is glued up, would be to place it vertically behind the driver, removing part of one brace to make it fit.
I thought about making it external... the nice thing about it would be, that I could then optionally run the speakers actively without much fuss. I am not too crazy about having two external boxes on my desktop though...
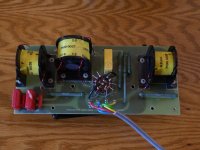
Another option would be to just build a new one, and choose a layout that fits better inside the box. I could also get rid of the tweeter presence switch, which I doubt I would use (it sounds just fine in the "level" position). Since this crossover is from the late 70s, it may not be a bad idea to replace the caps. The crossover schematics are available online.
A pic of the original crossover is attached as well.
Here I used 1/2" hardwood panels on the exterior as opposed to 1/4", which is probably better than 1/4". I found some "Primavera" 1/2" panels online on sale... that's why. The front baffle is still 3/4".
What's not very visible in the image is a ring of about 3/8" thickness which is supposed to be glued to the inner baffle, and to which then the driver is supposed to be fastened. Thus it would not be in direct contact with the outer baffle. I believe that is the idea when using CLD on the front baffle, correct me if I am wrong.
Crossover
You may notice that I also placed the crossover into the drawing. It's placement doesn't make sense... well, it is actually a bit tricky to fit the original crossover into the box, since it is quite long.
The only way to make it accessible once everything is glued up, would be to place it vertically behind the driver, removing part of one brace to make it fit.
I thought about making it external... the nice thing about it would be, that I could then optionally run the speakers actively without much fuss. I am not too crazy about having two external boxes on my desktop though...
Another option would be to just build a new one, and choose a layout that fits better inside the box. I could also get rid of the tweeter presence switch, which I doubt I would use (it sounds just fine in the "level" position). Since this crossover is from the late 70s, it may not be a bad idea to replace the caps. The crossover schematics are available online.
A pic of the original crossover is attached as well.
Attachments
Last edited:
- Status
- This old topic is closed. If you want to reopen this topic, contact a moderator using the "Report Post" button.
- Home
- Loudspeakers
- Multi-Way
- To damp or not to damp sealed enclosure, still confused!