Mark, Fcel,
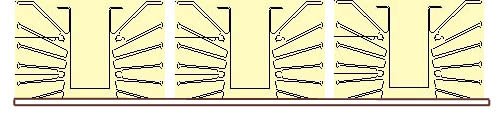
You could mount the milled heatsinks to a flat aluminium plate (See attached) and mount the devices to the plate. This would solve the left-right, 2 devices per heatsink issue. Although, the al plates will add to the cost.
Just a thought,
Rodd Yamas***a
You could mount the milled heatsinks to a flat aluminium plate (See attached) and mount the devices to the plate. This would solve the left-right, 2 devices per heatsink issue. Although, the al plates will add to the cost.
Just a thought,
Rodd Yamas***a
Attachments
And then 3 sinks per side wouldn't be enough. You'd rather have to use 4.roddyama said:Mark, Fcel,
You could mount the milled heatsinks to a flat aluminium plate (See attached) and mount the devices to the plate. This would solve the left-right, 2 devices per heatsink issue. Although, the al plates will add to the cost.
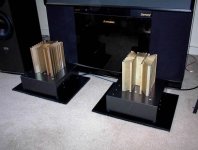
Here is a pair of single ended amps that I built last fall. These are the largest version of that particuluar style heatsink, and about 9" tall.
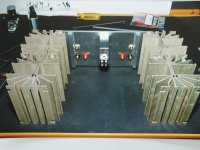
I wish I know CAD well enough to wing up a drawing for you all as to how I would mount the heatsinks with the fins cut off. Basically there would be a top and bottom angle attached to the front panel and back panel. The heatsinks would be attached to these rails by at least two countersunk allen screws top and bottom. The complete heatsink can be attached to the chassis at the large L part of the fin. Krell did it that way and it was very strong indeed.
I wish I know CAD well enough to wing up a drawing for you all as to how I would mount the heatsinks with the fins cut off. Basically there would be a top and bottom angle attached to the front panel and back panel. The heatsinks would be attached to these rails by at least two countersunk allen screws top and bottom. The complete heatsink can be attached to the chassis at the large L part of the fin. Krell did it that way and it was very strong indeed.
Attachments
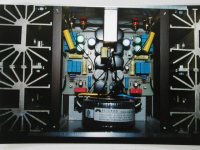
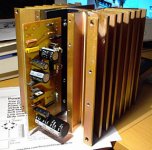
Here is how I attached the semis and PCB to the heatsink.
They work well, run VERY hot but not excessively. No problems so far. I also very much like Rod's idea of attaching the heatsinks to an alumnium plate. It would have to be at least tooling plate as it needs to be perfectly flat, and not to thick, say 1/4" at most. INstalling the heatsinks on the top plate is certanly possible and I do like the look but I think that withough making swiss cheese out of the chassis top for air circulation it is not the best way to go. The side mounting affords unrestricted air movement to move upwards through the sinks.
Mark
Attachments
Peter,

I do like that Mark Finnis retro look as well.
Rodd Yamas***a
True, there is less surface area for heat dissipation, but only by about 10% because of the added surface area of the plate. Although, it's clear your implementation of this style heatsink looks great.And then 3 sinks per side wouldn't be enough. You'd rather have to use 4.
I do like that Mark Finnis retro look as well.
Rodd Yamas***a
Mark .... I just saw your last pix post of the gold heatsink. I assume that's for your other amp. I saw holes on the gold heatsink and I assumed your new heatsink has holes on it too. Can't you just use those holes and mount it to the chassis L plate without doing any cutting of the fins?
Peter,
I have seen that pix of your Zen heatsink but never really notice how it's installed. Now, I see that you have bolted the 2 heatsink together and then bolt them to the front and back plate. That's a quick and easy way!
Is there anyway someone can move this later portion of this thread to "useful tools and technique"?
I found that simplest solutions always work the best. That's why I don't recommend milling and L brackets for mounting transistors. Although it might look good visually with PCB and all but it's no good for heat transfer and devices longevity.
Fcel, if you feel like doing it, you can copy the interesting parts to useful tools and techniques.
Fcel, if you feel like doing it, you can copy the interesting parts to useful tools and techniques.

the approach that you just posted seems to be the "previous style" of doing things.
fcel:
I was not trying to say that you should put all components outside the chasis, but that the heatsinks can be mounted vertical to plane of mounting either on the top (as done in that picture) - similar to the single ended amps shown by Mark above -or on the sides . The only problem with that is that air circulation is not as effective. But, now having seen Peter Daniel approach above, I like it a lot better - no milling and good air circulation.
ideal heatsink
My ideal heatsink has circuitry on one side of it and forced air on the other. It seems that impinging air flow (blowing air down into the fins and letting it out the ends) is better than flowing air from end to end. So while there are some heatsinks that accept the fan at one end, I have yet to find one that accepts a fan to impinge (like the microprocessor setup).
BTW, a little air flow helps out quite a bit. I did a bit of calculation last night and the air flow required to equal convection cooling is quite low. Since I assume fan noise is an issue, one might try a low speed motor and large blades.
Eric
Heatsinks
I have had a brief look at this thread...........I am building a compact Aleph-X.........at around 100w............
The device will be pushing out arround 300w of heat from sinks +
40-50watts from ps etc.........
I am using copper busbars and mounting the fets direcetly to this...running the bar 'live'..........this give excellent thermal transfer..........the bar is then isolated from main heatsink using silpad along the whole length of bus bar..............giving a very large thermal junction area. This my help the guy in the original posting..............I bought 250mm x 50mm x 12mm bars for £8 each....or $14.....not bad really....
My design will also use mild air cooling....
- Status
- This old topic is closed. If you want to reopen this topic, contact a moderator using the "Report Post" button.
- Home
- Amplifiers
- Pass Labs
- The perfect heatsink