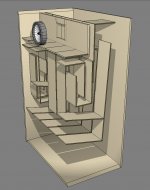
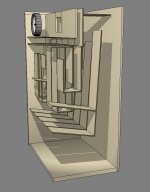
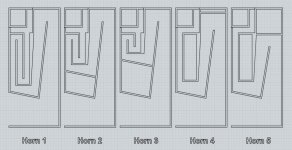
3D views of all 5 horns
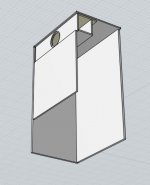
With obscuring panels hidden so the inside can be seen.
Thoughts?
I can make as many of these kinds of views as needed pretty quickly.
I might even attempt an animation of the speaker building itself...
Colin
With obscuring panels hidden so the inside can be seen.
Thoughts?
I can make as many of these kinds of views as needed pretty quickly.
I might even attempt an animation of the speaker building itself...
Colin
Attachments
closed PanPipe
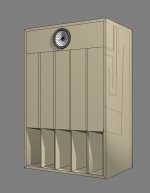
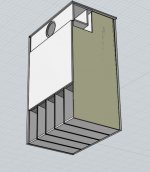
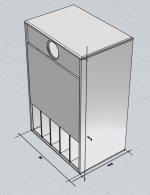
Here is a 3d view with everything visible.
How it will really look.
I can think of lots of ways to make this look cooler (one thing I like about these kind of folder horns is the aesthetics...)
But this is X's design as drawn, or as close as I can get.
Lots and lots of parts.
Colin
Here is a 3d view with everything visible.
How it will really look.
I can think of lots of ways to make this look cooler (one thing I like about these kind of folder horns is the aesthetics...)
But this is X's design as drawn, or as close as I can get.
Lots and lots of parts.
Colin
Attachments
aesthetic improvement
Sound quality is obviously why we all want full range speakers instead of multi- driver speakers with time smearing crossovers in them, but it has to be said that BLH speakers can look really cool. I like the Nagaoka ones with the exposed edge plywood boxes and the stepped plywood horn shaped mouths.
Like the image attached - this is not the coolest example ever, but one I could find quickly.
I love how this looks, as each plywood step explains in a simple visual way the power of the overall exponential form.
The PanPipe, as designed now, is not unattractive. Are there ways to incorporate some of the aesthetic in the Nakaoka designs without ruining the design's sonic properties, or making it too hard to build?
I would love it if the row of identical square mouth openings to be replaced by a series of different size openings (just a little, not very different..) and interior treatments which express on the outside some of what is going on on the inside...
Any input from the experts?
Colin
Attachments
Colin,
I would make the longest one bigger and get smaller. Look at plots on post 1 and you can see which horns have what output. Musically, it males more sense to get lower bass more gain to compensate for baffle step losses. I don't think stepped mouths have much of an effect at bass wavelengths which are much longer. They look nice and may serve to smooth out higher frequencies. You as the builder are allowed artistic latitude.")
Looking forward to the build if you really indeed plan to build it. It will be one of the most ambitious BLH projects ever!
Regards,
X
I would make the longest one bigger and get smaller. Look at plots on post 1 and you can see which horns have what output. Musically, it males more sense to get lower bass more gain to compensate for baffle step losses. I don't think stepped mouths have much of an effect at bass wavelengths which are much longer. They look nice and may serve to smooth out higher frequencies. You as the builder are allowed artistic latitude.
Looking forward to the build if you really indeed plan to build it. It will be one of the most ambitious BLH projects ever!
Regards,
X
build approach
Now starting to really think about how to practically build this.
I am thinking of a modular approach - construct each horn section as a module with two 1/4" plywood or Luan side panels as a sandwich for 1/4" plywood or foam core flow guides forming the horns.
The outer dimensions would all be the same - 5 separate sandwiches. 5 1/2" wide (5" horn section plus 2 1/4" side panels.)
Then, build the Driver chamber and plenum as a separate assembly, maybe out of 1/2" ply.
Then build the outer box out of 3/4" plywood.
Slide the horn sections in one by one, then screw the driver assembly in front.
With this approach, the horns would be pressure fit somehow, and not be glued at all. It might make sense to wait to cut the main box's width panels until I could measure just how wide all 5 horn modules are when finished.
Maybe some silicone caulk around the openings between the Plenum and the horns to there are no leaks.
Would this be a good approach?
My reasons for the approach is to eliminate lots of very tricky glueing which would not allow for mistakes - there would be no going back if something went wrong.
Thoughts?
Colin
Sounds like a great plan Colin. I think the hybrid thin luaan plywood and foam core is excellent as well as sliding each section in as a pressure fit. If you use foam runner gasket the whole thing could be modular and swappable from the top slide in slide out and rearrange.
Lets take a swing at this...
All righty then...I am new to the quality audio thing. I can build stuff.
Wife has suggested we need new end tables around the entertainment center. This thing grows a little from the notebook drawings once we start adding real materials into it. Lets review my plan.
Driver box will be integral to the enclosure. Rabbiting the LH and RH sides to support the box. The bottom of the enclosure will be the removable part in the event horn arrangement and/or replacement is desired. Probably never happen in my house, but seemed like a neat concept.
Horns are individual cartridges.
Horns load from the bottom.
Horns made from two pieces of 1/4-in baltic birch with 5-inches of MDF sandwiched in between. I don't see building it completely solid, just glue in the pieces where material is to remain. Save a lot on MDF that way. Cavities will be milled out of the MDF. After milling is completed the second piece of birch will be bonded on the MDF. A final pass on the CNC router for sizing and one horn done. Rinse wash repeat.
Enclosure will be 3/4-something, haven't decided yet. Front piece is 1/2-in. Need the front piece to help keep the rest in formation with the bottom off.
I used a bit of everything in this thread, so some for some technical audio questions:
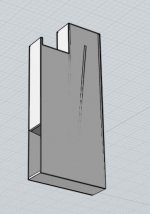
REF: "Horn Port.jpg"
All the horn throats in my design are 2x5. That also appears to be Colingreen's interpretation based on the models shared on this thread. This differs from what I believe I see on the notebook drawing.
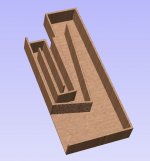
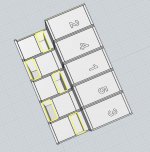
REF: "Horn Cavity Vectors.jpg"
I would appreciate a professional check of the horn vectors. I would like to not deviate from the original concept. That is a 1-in grid.
All righty then...I am new to the quality audio thing. I can build stuff.
Wife has suggested we need new end tables around the entertainment center. This thing grows a little from the notebook drawings once we start adding real materials into it. Lets review my plan.
Driver box will be integral to the enclosure. Rabbiting the LH and RH sides to support the box. The bottom of the enclosure will be the removable part in the event horn arrangement and/or replacement is desired. Probably never happen in my house, but seemed like a neat concept.
Horns are individual cartridges.
Horns load from the bottom.
Horns made from two pieces of 1/4-in baltic birch with 5-inches of MDF sandwiched in between. I don't see building it completely solid, just glue in the pieces where material is to remain. Save a lot on MDF that way. Cavities will be milled out of the MDF. After milling is completed the second piece of birch will be bonded on the MDF. A final pass on the CNC router for sizing and one horn done. Rinse wash repeat.
Enclosure will be 3/4-something, haven't decided yet. Front piece is 1/2-in. Need the front piece to help keep the rest in formation with the bottom off.
I used a bit of everything in this thread, so some for some technical audio questions:
REF: "Horn Port.jpg"
All the horn throats in my design are 2x5. That also appears to be Colingreen's interpretation based on the models shared on this thread. This differs from what I believe I see on the notebook drawing.
REF: "Horn Cavity Vectors.jpg"
I would appreciate a professional check of the horn vectors. I would like to not deviate from the original concept. That is a 1-in grid.
Attachments

- Status
- This old topic is closed. If you want to reopen this topic, contact a moderator using the "Report Post" button.
- Home
- Loudspeakers
- Full Range
- The PANPIPE (Pentahorn) BLH Speaker