hayenc said:
The emails I sent to the site for heatsink quotes get returned as undeliverable. Has anyone else had any success?
Try phoning them. I spoke with them when I was buying mine. Who could wait for email?

Really I was so excited when I found them, that I couldn't wait for morning to came to give them a call. I just couldn't believe what I was reading off the web.
No, that will be too much for me. Anodizing is nasty with chemicals much stronger than what I am use to bath in (metol, hydrohynon and borax found in photography developers are drugs of my choice, but last 16 years I am completely green being digital, so not even those I use any more) I would say good Gin or Single Barrel Jack Daniel's is the strongest chemical I use.
I think I wrote this somewhere. I did powder coating. It is absolutely great process and very inexpensive. For the beginners Sears sells powder coating gun and powders:
http://www.sears.com/shc/s/p_10153_12605_00917288000P
After that all you need is an old oven, small or big, whatever the biggest size is that you want to do. It is as simple as it could be:
You clean the metal well, attach the electrode to that and spray the powder that is safer and cleaner than any paint. With this gun you do not need compressor, it has blower included in it. It needs just a little pressure that small fan inside the gun provides. Electric charge does the rest, so that powder you spray gets attached to the metal. That ensures minimal spill over. After that, bake that in the oven at 400 degrees F for about 15 min. and voila you are done. Like I said it is healthier, easier and faster even than any painting. After you are done just vacuum the leftover powder spill.
Black wrinkled finish hides all your mistakes in finished surface, so typically that is may choice. There is also clear powder and that is what I used for the front panel. Honestly, anodizing looks better, but this comes close to it.
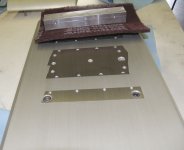
I did brushing as well. I made a lots of research on brushing. Finally I went to the source - 3M. There I found some engineer that was trilled to talk to me about all kinds of abrasives and who gave me the advice of what to use, as the very same thing is used in the machines that are doing brushing. The simple 3M abrasive pad. Here look in the picture. You only drag that abrasive in even motion and in the whole width of your panel.
Do not let the picture confuse you. The panel is already done, brushed and powder coated. The clear area is what I have protected so it doesn't have the powder coat on it. There you could see the difference between the clear powder coat and clear metal without the finish. Just look at the picture as an illustration of how to use the abrasive pad.
I think I wrote this somewhere. I did powder coating. It is absolutely great process and very inexpensive. For the beginners Sears sells powder coating gun and powders:
http://www.sears.com/shc/s/p_10153_12605_00917288000P
After that all you need is an old oven, small or big, whatever the biggest size is that you want to do. It is as simple as it could be:
You clean the metal well, attach the electrode to that and spray the powder that is safer and cleaner than any paint. With this gun you do not need compressor, it has blower included in it. It needs just a little pressure that small fan inside the gun provides. Electric charge does the rest, so that powder you spray gets attached to the metal. That ensures minimal spill over. After that, bake that in the oven at 400 degrees F for about 15 min. and voila you are done. Like I said it is healthier, easier and faster even than any painting. After you are done just vacuum the leftover powder spill.
Black wrinkled finish hides all your mistakes in finished surface, so typically that is may choice.
There is also clear powder and that is what I used for the front panel. Honestly, anodizing looks better, but this comes close to it.I did brushing as well. I made a lots of research on brushing. Finally I went to the source - 3M. There I found some engineer that was trilled to talk to me about all kinds of abrasives and who gave me the advice of what to use, as the very same thing is used in the machines that are doing brushing. The simple 3M abrasive pad. Here look in the picture. You only drag that abrasive in even motion and in the whole width of your panel.
Do not let the picture confuse you. The panel is already done, brushed and powder coated. The clear area is what I have protected so it doesn't have the powder coat on it. There you could see the difference between the clear powder coat and clear metal without the finish. Just look at the picture as an illustration of how to use the abrasive pad.
Attachments
FastEddy said:Very Cool !!
I'll go get that Sears blow gun today !!
Hold on, do not jump the gun yet. In a few hours I will post some more info, that could give you more choices. Got to go now, but stay tuned.
Hi Vladimir,
Thank you for posting more information about your amps. Having seen them and heard them in person I have to say that I have never come across a finer DIY project! I really think that they deserve their own thread over in the PL forum. I fear that all this wonderful info will get buried here and be forgotten.
I have one question for you.
I count 10 output transistors on the one main heatsink you show out on the bench. That means that your amp has 20 output transistors total. But the X600 manual on the Passlabs site states that that amp has 48 output transistors. Can you help me understand the difference?
Cheers,
Graeme
Ok so answers in the order it has been received. Your estimated wait time - 2 min.
Like I described in my post, Sears gun is good, and simple to start with. But if you already own a small compressor than for almost same amount of money you could have much higher quality unit such as this one:
http://www.caswellplating.com/powder/
The compressor needs to give only 15 PSI so any small one will do, but with a good filter in line. So why this unit is better? Because it gives very high voltage ( 50 KV) and it has variable voltage. Typical problem with the powder coating is to evenly cover sharp edges. There you have a Faraday effect where the powder escapes from the edges. Solution to that is to preheat the metal and than to apply the powder with (if I remember well, but could be the opposite - didn't do that for a while) lower voltage. That is where this gun will shine. This site that I posted has very good info and manuals, as well as very extensive supplies. So pick what suits you but I taught it is good to give you full info on options before you buy. Sears is something like $190 and this is $ 230, for much higher quality unit. The pleasure when it is done is full. Especially for someone like me who cannot wait to see it done. When I work on my projects I am almost killing myself to speed up process to see it done. For the like ones this is great - not too much wait time.
Got It !!! Thanks a bunch !!!
This still needs a separate compressor ... and either system needs an old oven with thermostat ... and I should cook the parts @ preheated oven of 400 F. for ~ 15 minutes to "set" the paint powder.
(I understand about cooking parts in my wife's good kitchen oven ... last time was the last time for me )
This still needs a separate compressor ... and either system needs an old oven with thermostat ... and I should cook the parts @ preheated oven of 400 F. for ~ 15 minutes to "set" the paint powder.
(I understand about cooking parts in my wife's good kitchen oven ... last time was the last time for me
)FastEddy said:Got It !!! Thanks a bunch !!!
This still needs a separate compressor ... and either needs an old oven with thermostat. Both systems should cook the parts @ preheated oven of 400 F. for ~ 15 minutes
(I understand about cooking parts in my wife's good kitchen oven ... last time was the last time for me
You are correct. And no, do not mix oven for food with oven for metal work. I purchased used oven for this purpose for very little just around the corner from the studio. Still works with no problem. I have a laser thermometer from before so that works great. Next you will need a nice sifter for the powder so that powder crumbles stay away from the gun. With Sears they will give you a few steel wires to hang your objects, and with Caswell you will need to buy them. And that is about all.
gl said:Hi Vladimir,
Thank you for posting more information about your amps. Having seen them and heard them in person I have to say that I have never come across a finer DIY project! I really think that they deserve their own thread over in the PL forum. I fear that all this wonderful info will get buried here and be forgotten.
I have one question for you.
I count 10 output transistors on the one main heatsink you show out on the bench. That means that your amp has 20 output transistors total. But the X600 manual on the Passlabs site states that that amp has 48 output transistors. Can you help me understand the difference?
Cheers,
Graeme
Regarding the output transistors,
You are correct, but essentially this is an AB class amp. With that in mind MOSFETs are not cooking like in the class A amp. The design for X600 and X1000 is the same, with only difference in the power supply voltage and amount of output transistors. X350 is almost the same. As we know in regards to the Mosfet capacitance it is always better to have less MOSFETs in the output. Since I have plenty of heatsinks that gave me a luxury to bump up the current through the smaller amount of MOSFETs. Even with that my sinks are handling cooling really well. My power rails are just a few Volts less than what is in original, so that helps as well. The boards that I use are meant for X600/X1000. This amp is a real monster, and it has endless power. I am using them for my base speakers in three way active system and the bass is - you remember it I hope from BAF2007.
Regarding the thread on this I didn't start it with the reason. Nelson never intended to have this as DIY amps. I happened to stumble upon offering from our reputable member who was selling a few boards here in the market place. He made just a few for his own pleasure and wanted to recover the cost of making them for himself.
I was lucky, but did not want to talk about the circuitry in respect toward the Nelson. That is why I never started the thread. What we are talking here is more about the machining and that is OK. Graeme, thank you very much for the compliments. Coming from you they have the special meaning for me.
Now note to readers:
I will use this chance to answer any possible inquiries sent to my email: No schematic is available from me until and if Nelson makes it public. Please, please, please do not write to me with questions like that - nothing will change my mind. Sorry.
" ... Since I have plenty of heatsinks that gave me a luxury to bump up the current through the smaller amount of MOSFETs. Even with that my sinks are handling cooling really well. ..."
I believe that you may find that, unless you really pump up the volume (MOSFETs generally are power passers, rather than just current or voltage gas passers), ... and will run quite within thermal specs at lower listening levels and still provide the headroom you expect. ...
I believe that you may find that, unless you really pump up the volume (MOSFETs generally are power passers, rather than just current or voltage gas passers), ... and will run quite within thermal specs at lower listening levels and still provide the headroom you expect. ...
" .... The powder coat finish is probably more durable in the long run as well. ..."
And it is more environmentally correct (cough, cough) ... and harder to scratch ... and easier to clean up after spray on ... and less flammable and better temperature resistant (to ~ 350 F.) ... and IMOP better looking than a spray can paint job.
And it is more environmentally correct (cough, cough) ... and harder to scratch ... and easier to clean up after spray on ... and less flammable and better temperature resistant (to ~ 350 F.) ... and IMOP better looking than a spray can paint job.
Heat Sink Prices
I cut and pasted the email address and got a response the next day ( see below ).
The cheaper one is 5.25" long, while the $42 one is 11.75".
Regards,
Tom
1-19-09
Good afternoon
For your request on the following……
6 pcs G12264
Your cost $ 23.50 each.
We have 34 pcs in our stock, subject to any prior sales
6 pcs G12265, Rev D
Your cost $ 42.00 each
We have 121 pcs in our stock, subject to any prior sales.
When and if order is placed, we will then quote shipping cost.
If you should need anything further, please let me know.
Thank you
Joann List
Customer Service
Darrah Electric Company
5914 Merrill Avenue
Cleveland, Ohio 44102-5699
216.631.9944 Direct Line
216.631.0440 Fax
www.darrahelectric.com
Your Source For: Aavid, ABB, Crydom, Dynex, Enerpro, Iconopower, IXYS, LEM, Powerex, R-Theta Thermal Solutions, and Power Assemblies
hayenc said:
The emails I sent to the site for heatsink quotes get returned as undeliverable. Has anyone else had any success?
I cut and pasted the email address and got a response the next day ( see below ).
The cheaper one is 5.25" long, while the $42 one is 11.75".
Regards,
Tom
1-19-09
Good afternoon
For your request on the following……
6 pcs G12264
Your cost $ 23.50 each.
We have 34 pcs in our stock, subject to any prior sales
6 pcs G12265, Rev D
Your cost $ 42.00 each
We have 121 pcs in our stock, subject to any prior sales.
When and if order is placed, we will then quote shipping cost.
If you should need anything further, please let me know.
Thank you
Joann List
Customer Service
Darrah Electric Company
5914 Merrill Avenue
Cleveland, Ohio 44102-5699
216.631.9944 Direct Line
216.631.0440 Fax
www.darrahelectric.com
Your Source For: Aavid, ABB, Crydom, Dynex, Enerpro, Iconopower, IXYS, LEM, Powerex, R-Theta Thermal Solutions, and Power Assemblies
Re: Heat Sink Prices
I hope you agree with me. These prices are steal! Also I remember now, these prices are the same I paid two years ago. You know that they will cut on a appropriate size for you?
tommak said:
I cut and pasted the email address and got a response the next day ( see below ).
The cheaper one is 5.25" long, while the $42 one is 11.75".
I hope you agree with me. These prices are steal! Also I remember now, these prices are the same I paid two years ago. You know that they will cut on a appropriate size for you?
With all the doom and gloom around us , the next BAF should be a bright spot and hopefully more people will have time to drop by.
Maybe 2 days next time ? Hopefully more people will bring in their DIY equipment for demo.
Should make up a demo CD list so that people can get familiar with the music that will be used for demos. Hearing a familiar recording helps to form one's opinion of the demo equipment.
Maybe 2 days next time ? Hopefully more people will bring in their DIY equipment for demo.
Should make up a demo CD list so that people can get familiar with the music that will be used for demos. Hearing a familiar recording helps to form one's opinion of the demo equipment.
wrenchone said:AR2 - Thanks for the heads up on DIY powder coating. I may try getting a rig, as spray can wrinkle coating is a bit hit or miss - mostly miss. The powder coat finish is probably more durable in the long run as well.
FastEddy said:" .... The powder coat finish is probably more durable in the long run as well. ..."
And it is more environmentally correct (cough, cough) ... and harder to scratch ... and easier to clean up after spray on ... and less flammable and better temperature resistant (to ~ 350 F.) ... and IMOP better looking than a spray can paint job.
It is all true. I find it even much easier to apply than any regular paint. Keep this in mind as well: If you screw up anything before you start baking you could always just blow powder off and start from scratch. What do you think how I know that?
The hardest part is putting the part to the oven while is hanging from the baking rack without touching anything or falling from the hanging hooks. Keep your owen close to where you are spraying. I sifter powder coat any time I fill the bottle. Buy enough powder because it goes fast.
There are some fascinating and lurid possibilities for powder coat colors, especially if you check out the folks who cater to the custom automotive crowd. There are also several rigs available on E-pay for under $100, including some blower types and some needing a small boost of compressed air.
- Status
- This old topic is closed. If you want to reopen this topic, contact a moderator using the "Report Post" button.
- Home
- Member Areas
- Clubs & Events
- The Burning Amp Festival- an Audio Happening