From Keele: 1,000,000 = coverage angle in degrees x frequency x width or height in inchesStill have problems how to calculate this
No, it would require EQ.Do you think the 4" will go down to ~80Hz at -3db?
Figuring no horn gain, output at 3.8mm Xmax would be around 103dB at 80 Hz, 114.6dB at 125 Hz.
The B&CNDF34 don't sound bad at Xvar of 5.7mm.
Four 5NDL38 5" at 3.5mm Xmax would have about +3dB more output and require less power.Any alternative, if the 4" is not enough?
The Xvar is 4mm.
I think at >125Hz the little drivers would work OK, at 80-90 Hz you may still want to use your midbass depending on your listening curve preference and SPL requirements.The Bass i am using is directly in front of me, and i want to make sure, that crossover is low enough to make sure, that i don't here the position.
At the moment i am crossing the Top at 600Hz to the MidBass and 90Hz to the Bass. All with 24dB/octave
Having listened to the B&CNDF34 on a tiny MRH horn reaching around 86dBA at 75 feet outdoors above three EV MTL4 4x18" cabinets crossed at 125Hz, I know they would be more than enough for me on the EV HP6040, but I'm old, deaf and lazy ;^)
Art
Hi Art
Thx a lot... will think about it. But i think before i start i need another HP6040 (or at least HP9040) in spare for testing ist")
I don't want to destroy my hp6040 without a proof of concept, because they are not easy to get in Europe.
HP9040 is not such a big problem.
Christian
Thx a lot... will think about it. But i think before i start i need another HP6040 (or at least HP9040) in spare for testing ist
I don't want to destroy my hp6040 without a proof of concept, because they are not easy to get in Europe.
HP9040 is not such a big problem.
Christian
Hi art
i maybe found another driver?! I know, it's not your favorite brand but i am using this brand in my midbas
What Do you think about 5"P200ND 8 OH
https://www.beyma.com/en/products/c/low-mid-frequency/105P2ND8/altavoz-5p200nd-8-oh/
FS: 78Hz, xMax: 5,7mm, sens: 92dB, 150W AES/300W max.
Christian
i maybe found another driver?! I know, it's not your favorite brand but i am using this brand in my midbas
What Do you think about 5"P200ND 8 OH
https://www.beyma.com/en/products/c/low-mid-frequency/105P2ND8/altavoz-5p200nd-8-oh/
FS: 78Hz, xMax: 5,7mm, sens: 92dB, 150W AES/300W max.
Christian
If i don't get a Backup for my HP6040.... maybe the B&C ME464 is a good horn for a multi entry horn?!
https://www.bcspeakers.com/en/products/horn/1-4/0/ME464
Sad, that there is only a 1.4". My TAD 4002 is with adapter 2" and without 1,5"... but if i start to drill holes... this can be adopted as well
Christian
https://www.bcspeakers.com/en/products/horn/1-4/0/ME464
Sad, that there is only a 1.4". My TAD 4002 is with adapter 2" and without 1,5"... but if i start to drill holes... this can be adopted as well
Christian
Christian,
Mark100 used a single 15/16" hole per driver, 3.5" center from throat.
My "boat horn" used a 3/4" hole approximately 3/4" deep, 1/4" standoff.

Like mark100s project using the B&CNDF34, upper range extended to around 1000Hz, but the port location on the re-entrant (folded) horn resulted in a null around 490 Hz and generally peaky response, which looked a lot worse than it sounded.
That said, it was just a leftover parts project that ended up as the loudest one cubic foot "full range" multiple entry horn box possible.
Have fun with your project, whatever it ends up as!
Art
Mark100 used a single 15/16" hole per driver, 3.5" center from throat.
My "boat horn" used a 3/4" hole approximately 3/4" deep, 1/4" standoff.
Like mark100s project using the B&CNDF34, upper range extended to around 1000Hz, but the port location on the re-entrant (folded) horn resulted in a null around 490 Hz and generally peaky response, which looked a lot worse than it sounded.
That said, it was just a leftover parts project that ended up as the loudest one cubic foot "full range" multiple entry horn box possible.
Have fun with your project, whatever it ends up as!
Art
ChristianHi Art
I hope its OK to hijack your thread.... if not, let me know
Port diameter: i found, that the compression ratio shouldn't be higher than 10:1... good to know, but how can i calculate that?
The port size in the case of multiple entry horns does not determine compression ratio, the location of the entry port does.
The TC9FD18-08 does not have enough Bl or Xmax to compare to the B&CNDF34.
This is all so far off topic from the SynTripP that it would be better to start a new thread.
Art
Gosh sorry I missed your questions! I assume you resolved it by now... We just wired the 10" in parallel and did a separate wire for the compression driver. We're amplifying wiht 500+500W Hypex amps per channel, incredibly low distortion compared to usual PA amp dross...Hey! Just got the drivers and tweeters assembled with Mr. Speakers' 3d-printed chassis. Curious about wiring and power for 2x 10CL51-8 and Eminence N314X-8. Not sure whether to run the tweeter and midrange separately or if we wire them together. Do we use a passive crossover built into the cabinet or do we run a rack pa crossover such as the Behringer Super-X Pro CX3400 V2.
We printed in Black ASA (we think, asked for white and our printer service messed up) and assembled using the best guesstimate of hardware from home depot. Very happy with how they came out so far!
Was hoping to catch Mr. Speakers at CanJam NYC to answer some questions about his SyntripP build, but heard he couldn't make it. (Hope you're well.)
Questions for Mr. Speakers NYC CanJam2023 1. Did you use an aftermarket crossover? What was the most optimal crossover frequency for your system? 2. Did you apply any paint to the 3D-printed horn for environmental protection? How is it holding up? 3. What subs pair best with the Syntripps from your experience? (Besides Keystones) 4. What did you use to fasten each horn half together, other than the 4 screws? 5. What did you do for sound treatment within the box? 7. If you had to rebuild the system from scratch, what would you have done differently? 8. If you could pair the Syntripp with any DIY sub, which would you build? (Keystone included) 9. Using the Syntripps as main mid-tops, what would you recommend for DJ monitors? Anything in the DIY space that resembles a smaller Syntripp?
View attachment 1153267
View attachment 1153268
We painted it to look nicer, and the tan color doesn't get trashed by playa dust at Burning Man.
For the subs we're using a 21" bandpass that's tuned to 20Hz. gsgad.com
We did glue the halves together as well. Lotsa screws and a little glue on the box seams.
Just lined with some fiberglass fill. Could use wool or poly too... I don't think it's too critical.
DJ monitors mostly suck, not sure what to recommend. We use a set of Mackies which are pretty lame.
We have upgraded the system for Burning Man, we now have 1800W bass bin amps, 600W for the new paraflex kickers we built, and Hypex 500+500 on the tops.
It is a massive upgrade to the system to use the kickers, the pattern control on the horn tops breaks down around 300Hz and the EQ required to achieve linearity was so high the tops really limited system output. Not now! The kickers run 80-300Hz and we're now limited by the bass bins, system output is on the order of 127-130dB, but we'll know better when we test outdoors at the burn. Hard to say measuring this system in the shop!
The coherence and clarity on the tops is unreal with a good amp, while the Hypex is $$$ more than Crowne you hear every $ in quality, incredibly low distortion and superb dynamics.

Nontheles even indoors we are getting incredibly smooth performance using a Dirac-based 32-bit DSP for our crossovers.

It is a massive upgrade to the system to use the kickers, the pattern control on the horn tops breaks down around 300Hz and the EQ required to achieve linearity was so high the tops really limited system output. Not now! The kickers run 80-300Hz and we're now limited by the bass bins, system output is on the order of 127-130dB, but we'll know better when we test outdoors at the burn. Hard to say measuring this system in the shop!
The coherence and clarity on the tops is unreal with a good amp, while the Hypex is $$$ more than Crowne you hear every $ in quality, incredibly low distortion and superb dynamics.
Nontheles even indoors we are getting incredibly smooth performance using a Dirac-based 32-bit DSP for our crossovers.
Hello everyone !
I have recently complete the 3D design (thanks a lot @leosandstrom for the onshape CAD I have learnt a lot !) and I would like to put a cabinet flange. The one I am looking at is the SM707 but it takes kind of a lot of space and I wonder if it would impact the performance mainly for the bass as it won't have the same volume behind. What do you think ?
Here is a picture to show you so you can better understand.
Again thank you Art for all the work it might have been and everyone for the discussion there is plenty of good comments and understanding in this thread !
Big up
Alex
Attachments
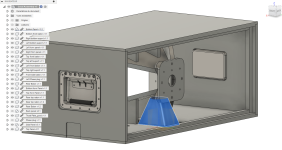
I would not be concerned about the marginal volume increase occupied by the plastic Adam Hall SM707 Speaker Flange.
I would be concerned about mounting it well behind the cabinet's center of gravity as you have depicted it.
If it is drawn to scale, it is not possible to use that mount in it's proper position at the center of gravity.
I would be concerned about mounting it well behind the cabinet's center of gravity as you have depicted it.
If it is drawn to scale, it is not possible to use that mount in it's proper position at the center of gravity.
Hello !
Thank you for the prompt reply ! That is true it is behind the center of gravity, I am still thinking on how to deal with that, the only way I see it is to do like @leosandstrom did but then I need to place small stands at the corners because the flange fixation will come out of the cabinet !
I'll think about that
best
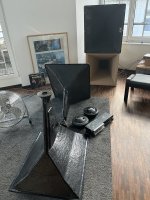
 still iterating on design/mechanics of the extensions, but getting close! they are sounding real nice. you're a legend, Art!
Yikes I grossly overestimated my abilities and time management skills in my first post. The drive is still up and I'll keep adding to it, stealing everyone's data and what not!
Glad to see everyone killing it, this isn't an "easy" speaker to build!
I've sort of come to understand that the definitive plans are the first ones Art posted, then as soon as you build them you've created a unique version. Even if you follow the plans to a T.
I'm still aspiring to build four for my class, first one is going well, with some issues:
I followed the pdfs I mentioned (like 6 months ago I guess?), and routed out the rings for the 10" speakers,. Turned out the ring was too small! For some reason I just remade the entire panels. I remade them when I received the speakers and took the measurements straight from them.
I saw a box and built a box, forgot to make the back panel detachable, now I've got to run a tracksaw all the way round the back and bolt it back haha.
The horn side and top panels are flush in the front with the cabinet but about 5mm out (sides to top and bottom) at the back where the horn plate adaptor goes, I'm going to sand that down like nobody's watching. (hopefully no one will be watching)
The flushness in the front is also and issue mind you because the grill will have to go somewhere. But that'll be for v2.
I haven't even considered the pole mounting attachment, yet another problem for future me!
I have no idea how to attach the 10" speakers to the panels, at least they fit! Screws wouldn't work, and nuts and bolts would show on the inside of the horn. I should really read up on the build process art wrote.
I'm humbled by this project! Very happy to have bitten off more than I can chew.
I can't wait to hear them
Build pics are on their way!
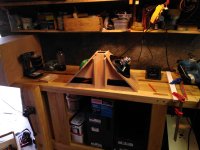
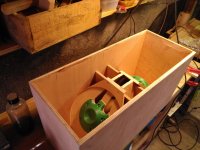
Back in the garage for summer break! The horn assembly isn't glued up yet. in the 2nd photo you can see that I had to cut the back out of the enclosure haha. Got the wood to make the brackets to bolt it back on. Bolted the speakers on, only two nuts showing in the horn in the end. Two of the bolts came too close to where the top and bottom panels of the horn were set, so I left them out. I screwed the cone fillers in but I feel like glueing them?
I've got to mark out and drill the attachment holes for the HF driver on the throat adapter then countersink the bolts as the threaded inserts that came with it aren't long enough.
Once I'm happy with the dry assembly I'll glue it all up, prbably still have to work on the transition on the throat adapter since I built it before having the driver to reference. My teacher recommends acrylic "silicon", the stuff we use to seal door frames and windows that can be painted over. Then it's another round of wood filler and sanding before painting.
Rave on!
Attachments

- Home
- Loudspeakers
- Multi-Way
- SynTripP: 2-way 2-part Virtual Single Point Source Horn